Senin, 23 Desember 2024

Absolute Essentials You Need to Know to Survive Vi Editor

Absolute Essentials You Need to Know to Survive Vi Editor

Vi is on almost every Unix and Linux distribution, so why not take advantage of it?

VI, pronounced as distinct letters /ˌviːˈaɪ/ it's a terminal-based text editor. One of the most common tools in Unix, VI is extremely powerful for text manipulation. Although it could be a little bit challenging. And that's why I am listing the absolute basics of the Vi editor commands in this article.

📋
Vim is a popular fork/clone of VI. It includes additional features like syntax highlighting, mouse support (yes, you read that right) and more. Basic commands and keyboard shortcuts remain the same in both VI and Vim. So if you learn Vi, you are automatically learning the basics of Vim and other descendants of Vi.

Why you should learn Vi?

Here are five reasons why I recommend learning Vi and Vim:

  1. Vi/Vim is free and open source. And remember this is it's foss!!
  2. Vi is always available since it's required by POSIX.
  3. Vi/Vim is well documented. And it also has its own user manual; you only need to type :h in command mode. I'll discuss command mode later in this guide.
  4. Vi/Vim has a lot of plugins. Vim Awesome is one of the most popular websites to download extensions.
  5. It does not consume a lot of system resources, and you could do a lot of tasks, even write novels in Vim.
It is not uncommon for some distributions to replace Vi with Vim. Even if you are using Vi commands, it runs Vim.

Launch Vi

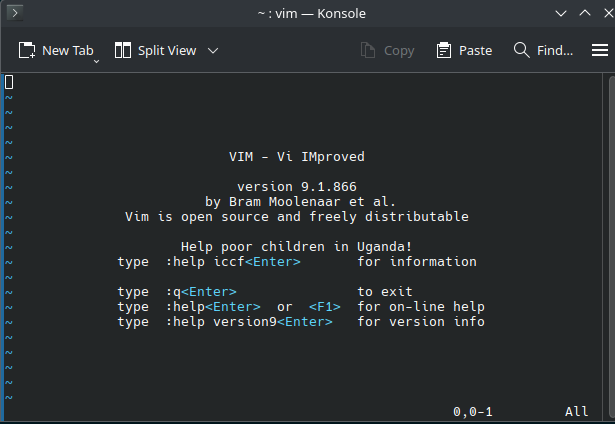
To execute the program, you must type vi:

vi
Absolute Essentials You Need to Know to Survive Vi Editor

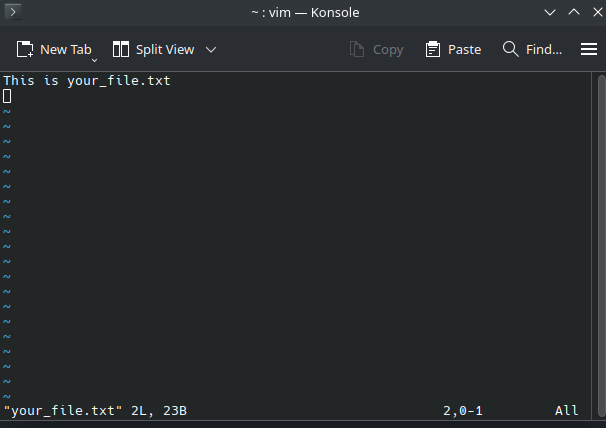
Also, you could open a file by providing its name. It will open the file for editing if it exists, or create a new one if it does not exist.

vi your_file.txt
Absolute Essentials You Need to Know to Survive Vi Editor

Vi modes

You must understand that Vi has 2 different modes:

  • Normal or command mode: This is the mode you use for navigating and copy-pasting
  • Insert mode: This is the editing mode where you actually type text

Using Normal mode in Vi

💡
This is the default mode when VI/Vim opens.

The Normal mode is used for actions like navigation, copy, paste, delete, text substitution (not editing), etc. You always could go back to this mode by pressing <Esc>.

1. Movement commands

These are the movement keys:

  • h: Left.
  • j: Down.
  • k: Up.
  • l: Right.

2. Deletion commands

  • x: It's like the delete key. Delete the character under the cursor.
  • dd: Deletes the current line.

3. Copy and paste

  • y: Yarn (Copy) command. Copies the selected text.
  • yy: Yarn (Copy) command. Copies the current line.
  • p: Paste. After using a copy command, it pastes the content after the cursor.

(Command Mode)

💡
In fact, this is not a different mode (that's why parentheses are used), but it's important to separate it because it's where you could type orders and commands

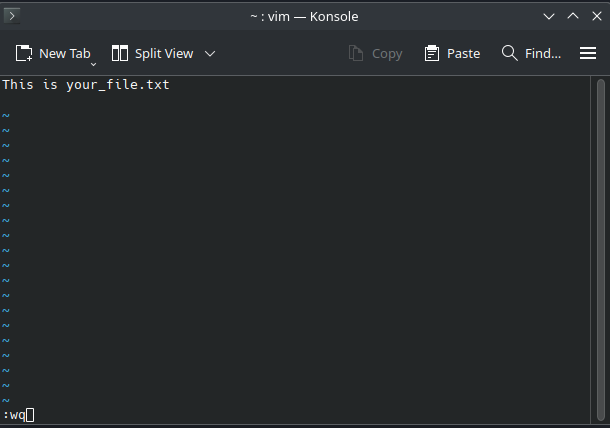
In normal mode, you could use commands by typing :.

For example, if you want to save your text and exit Vi, you can type:

:wq
Absolute Essentials You Need to Know to Survive Vi Editor

Other common Vi commands you can use in normal/command mode:

  • :h: Help
  • :%: Means all the lines
  • :s: Used for search (and substitutions)
  • :/foo/ : Regex to find items to replace
  • :/bar/: Regex to replace items with
  • :u: Undo last action
  • :w: Save
  • :q: Quit
  • !: Forces order

I have added : in front of each command so that it is easier to note that you have to use : to use the commands.

Insert mode

💡
In this mode, you could edit and manipulate the text.

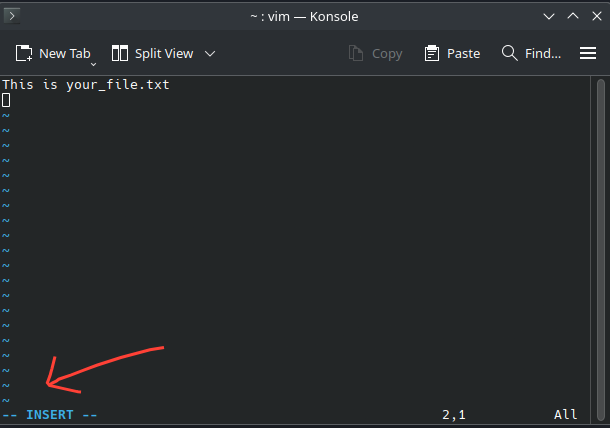
You could enter this mode by pressing the letter i in Normal Mode and start typing whatever you want.
Absolute Essentials You Need to Know to Survive Vi Editor
Look at the bottom left to check insert mode
  • i: Enter in Insert mode. Lets you insert, before the current cursor position.
  • I: Lets you insert at the beginning of the line.
  • a: Lets you append after the cursor.
  • A: Lets you append at the end of the line.

Visual Mode (only in Vim)

💡
In this mode, you could select text visually, which is very useful when working with large paragraphs.

You could enter this mode by pressing the letter:

  • v: Character mode
  • V: Line Mode
  • Ctrl+V: Block mode

Learn more about the visual mode in Vim here.

Visual Mode in Vim [Beginner’s Guide]
There are three modes in Vim and the least popular and yet quite interesting is the Visual mode. Learn more about it.
Absolute Essentials You Need to Know to Survive Vi Editor

A "vi" bit of history and trivia

💡
Did you know Vi is tiny, with just 160 kB in size?

It was developed in 1976 by Bill Joy as a visual mode of the ex line editor, also cowritten by Bill Joy.

A 2009 survey of Linux Journal readers found that vi was the most widely used text editor, beating the second Gedit, by nearly a factor of two (36% to 19%).

It was not until 2002 that VI was released as an open-source program under the BSD-style license.

Vim (VI Improved) it's a free and open-source clone of Stevie (ST Editor for VI Enthusiasts), developed in 1991 by Bram Moolenaar. It has a huge number of extensions.

Conclusion

Among all the terminal based text editors, I prefer the Vi ecosystem.

VI/Vim is omnipresent in Unix-like operating systems due to its POSIX syntax, and when you invest a little time to unwrap its real power, you could master one of the best text-editor.

Also, you could keep growing; you could use NeoVim and its myriad of extensions and add-ons to arrive at a full IDE. The sky (and your Lua programming knowledge) is the limit.

📜
BTW, this article has been fully written in (Neo)Vim. :)

Author Info

Absolute Essentials You Need to Know to Survive Vi Editor

Jose Antonio Tenés
A Communication engineer by education, and Linux user by passion. In my spare time, I play chess, do you dare?


from It's FOSS https://ift.tt/le947Vv
via IFTTT

Going Retro With AGC: Smart Computer That Powered Apollo Missions in the 60s

Going Retro With AGC: Smart Computer That Powered Apollo Missions in the 60s

When we look at things retro, the Apollo Guidance Computer is about as retro as it gets!

This computer was cutting-edge in the 1960s, but what made the AGC so special? How did it manage to send astronauts to the moon and back with computing power less than today’s pocket calculators? It turns out that this gem of retro-computing was one of many firsts - and still influences computing today.

Going Retro With AGC: Smart Computer That Powered Apollo Missions in the 60s

The AGC laid the groundwork for concepts that still ring true today: modular codingcode reusability, and optimization for resource-constrained systems. The AGC was definite proof that a lean, well-designed system could handle major challenges, providing the way for both space exploration and other future technological achievements.

In a way, it’s like the ultimate minimal system - way ahead of its time in terms of principles that influenced later computing.

What made the Apollo Spacecraft computer revolutionary?

The AGC was the principal onboard computer for NASA's Apollo missions, including all of the lunar landings. Both the Command Module (CM) and the Lunar Module (LM) had AGCs, so two AGCs were used on most of the Apollo missions, but with differing software, depending on the purpose of the AGC.

Developed by the MIT Instrumentation Laboratory (known as Draper Labs today), the AGC was one of the first to use integrated circuits, making it one of the most successful examples of miniaturization. It took up just about 1 cubic foot of space. It was also lightweight, weighing around 70 pounds (31.75 kilogram). This made the AGC was portable enough to fit aboard a small spacecraft.

This innovation wasn’t just about size. The AGC’s software, written in assembler language, known as AGC4, allowed complex operations to be carried out within abnormally strict constraints of limited memory and processing power. The AGC had only 2K of RAM and 36K of ROM. That’s a fraction of what even the simplest of today's gadgets use, yet it was enough to guide humans to the moon. It is an excellent example of 'lean' programming - doing a lot with little - but the principles of modularity and code reuse, that we use today, come from the AGC.

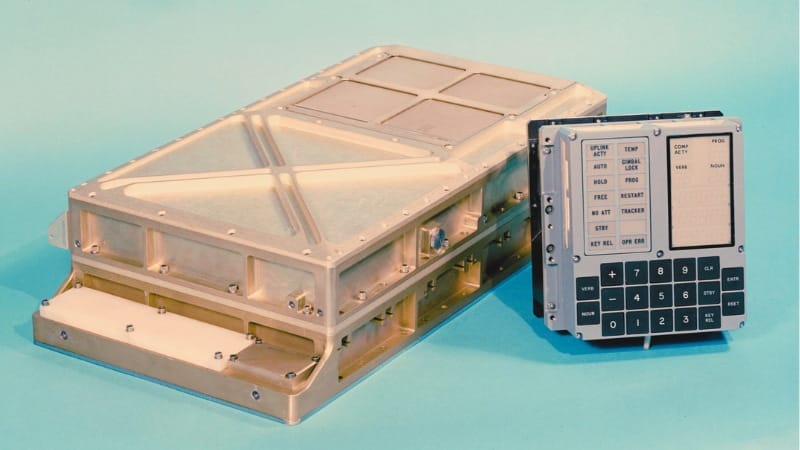
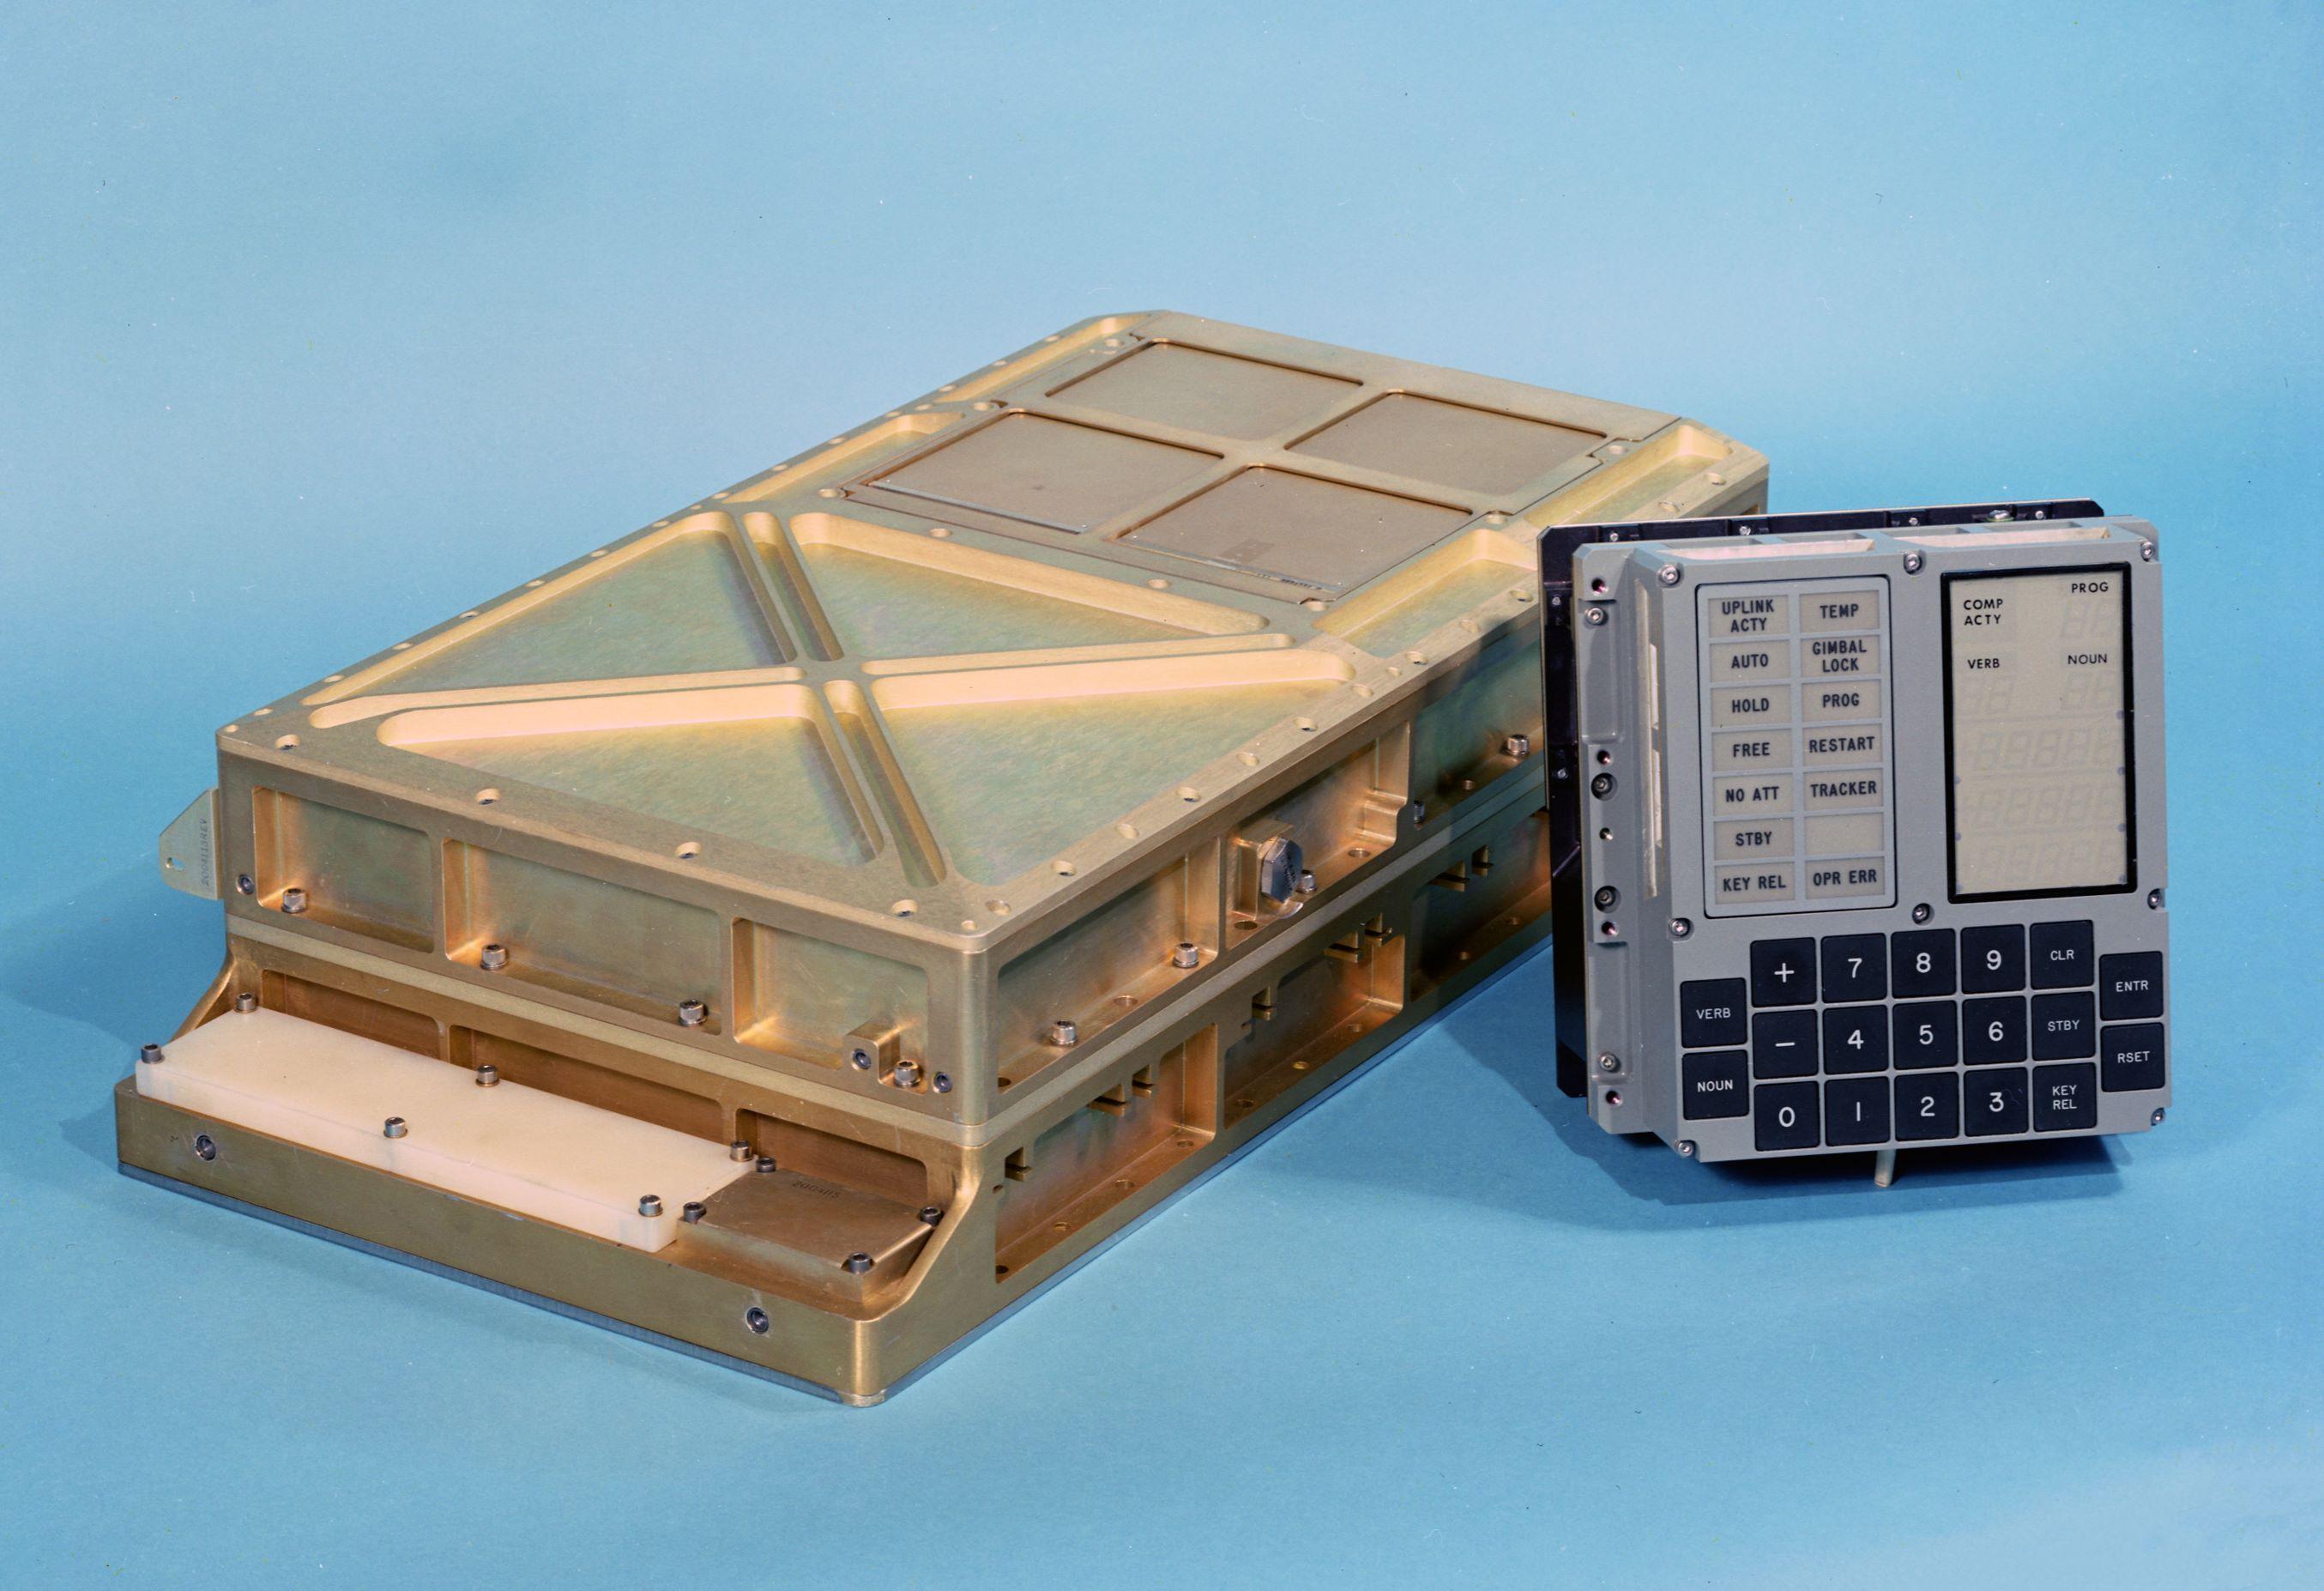
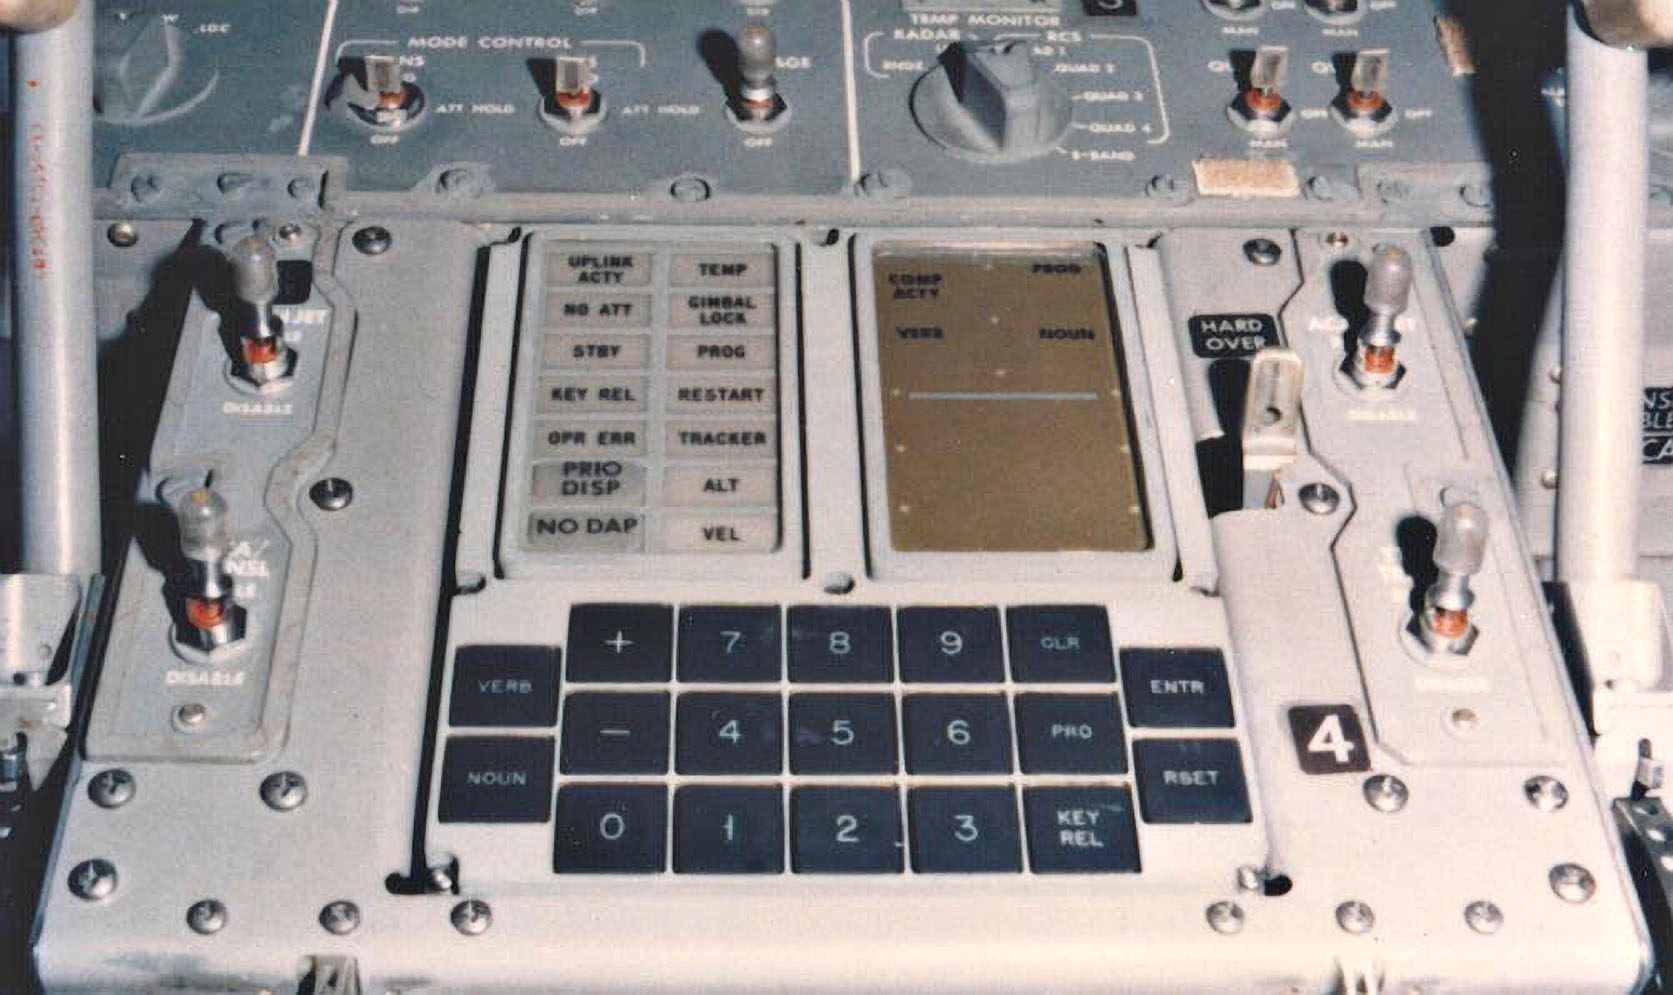
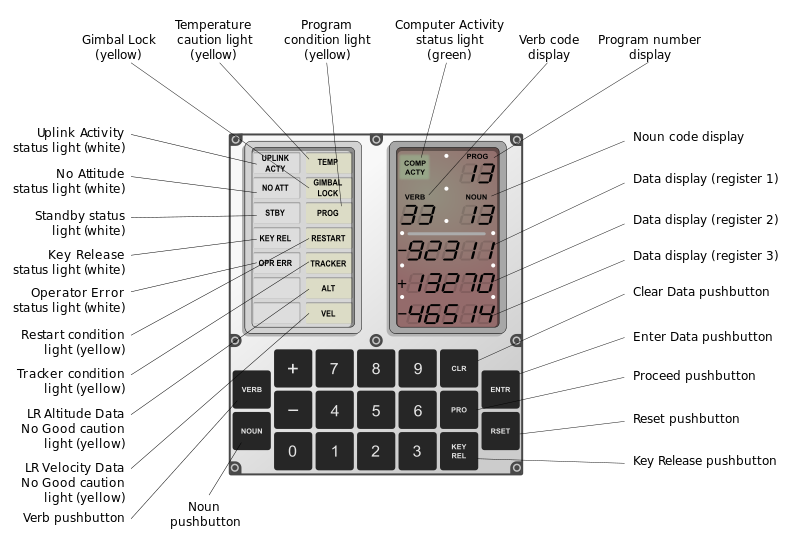
The AGC also came equipped with a user interface - the Display and Keyboard (DSKY) interface. The term, “user-friendly” may not come to mind when you see one, but the DSKY did allow astronauts to effectively enter commands in real-time. In an era before touchscreens or even computer mice, the DSKY was certainly cutting-edge. In fact, it can even be considered one of the earliest forms of the Command Line Interface (CLI).

Going Retro With AGC: Smart Computer That Powered Apollo Missions in the 60s

A smart computer

The AGC was also a smart computer, earning the nickname, "the fourth astronaut," from the vital role it played in the Apollo missions. The AGC performed calculations and managed tasks in real-time that were impossible for human astronauts to handle manually, especially under the constraints of time and stress.

The AGC calculated precise maneuvers, such as course corrections and lunar landings, where even slight errors could have been catastrophic. It also prioritized tasks autonomously. During the famous "1202 program alarm" incident, when the computer was overloaded, it managed to ignore non-essential tasks and continue critical operations, ensuring the mission's success.

The AGC was trusted as much as the astronauts themselves, forming a partnership where the machine’s reliability supported human judgment. The AGC, then, didn’t just assist - it actively contributed to the mission’s success. I think that the nickname is a poetic and fitting tribute to the machine’s significance.

Lessons from the AGC for modern computing

Efficiency is key

The AGC’s developers didn’t have the luxury of abundant resources. They had to write hyper-efficient, reusable code and design hardware that maximized performance with little power. This mindset of doing more with less is still relevant today, especially in areas like IoT and embedded systems.

The AGC's software was developed by a team at MIT, led by Margaret Hamilton, and is a true master-class in software development. They implemented rigorous testing protocols and pioneered the concept of "software engineering."

Sophisticated real-time capabilities

The AGC was designed for real-time processing, essential for navigation and control tasks in space. This was a significant achievement at a time when most computers were used for batch processing.

Collaboration pushes innovation

The AGC wasn’t the magic of a lone genius. It was the result of collaboration between NASA, MIT, and contractors. The best ideas often come from collective effort.

Interested in more?

Recently, there has been a surge of interest in the AGC. Enthusiasts restore vintage machines, program replicas, and even build AGC emulators. But why? For many, it’s a way to appreciate the ingenuity of early engineers and reconnect with the roots of modern tech.

Online Apollo Guidance Computer Simulator
Going Retro With AGC: Smart Computer That Powered Apollo Missions in the 60s

For instance, open-source projects like VirtualAGC allow anyone to explore the original Apollo software. Meanwhile, museums and exhibitions display AGC hardware, inspiring a new generation of engineers.

Can I build an AGC replica?

Yes! Projects like VirtualAGC provide schematics and code for building your own functional replica - a fantastic way to dive into retro-computing.

GitHub - virtualagc/agc_hardware: Schematics and board layouts for an Apollo Guidance Computer replica
Schematics and board layouts for an Apollo Guidance Computer replica - virtualagc/agc_hardware
Going Retro With AGC: Smart Computer That Powered Apollo Missions in the 60s

Where can I see an original AGC?

Several museums, including the Smithsonian’s National Air and Space Museum, display original AGC units. These exhibits often include interactive demos.

Conclusion: a timeless tribute

The Apollo Spacecraft Computer isn’t just a relic of the past; it’s evidence to what human ingenuity and perseverance can accomplish. Constraints can propel creativity, and small, incremental innovations can bring about huge achievements. A look at tech history reminds us of how far we’ve come and how much we owe to the pioneers who got us here. The AGC is a perfect example of that.


from It's FOSS https://ift.tt/D5PFg7o
via IFTTT
5 Local AI Tools to Interact With PDF and Documents

5 Local AI Tools to Interact With PDF and Documents

We’ve covered a lot of local LLMs on It's FOSS. You can use them as coding assistants or run them on your tiny Raspberry Pi setups.

But recently, I’ve noticed many comments asking about local AI tools to interact with PDFs and documents.

Now, during my research, I stumbled upon countless AI-powered websites that promise to summarize, query, or analyze PDFs.

Some were sleek and polished but unsurprisingly, most were paid or had limited “free tier” options. And let’s be honest, when you’re uploading documents to a cloud service, there’s no real guarantee of privacy.

That’s why I’ve put together this list of open-source AI projects that let you interact with PDFs locally. These tools enable you to have your data stay on your machine, offline, and under your control.

Whether you’re summarizing long research papers, extracting key insights, or just searching for specific details, these tools will have your back.

Let’s dive in!

1. Chatd

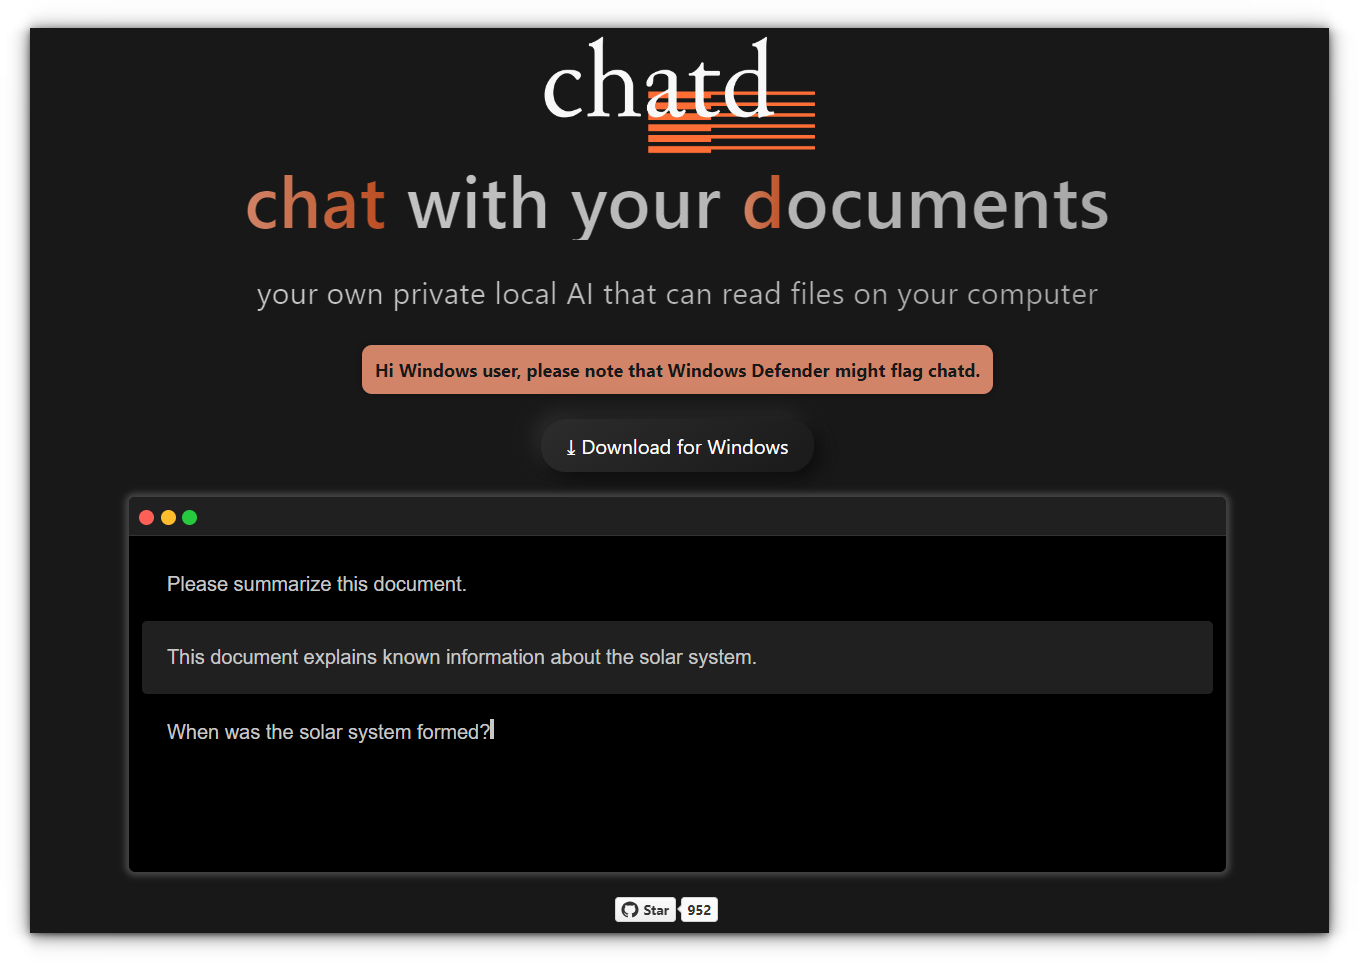
chatd is a desktop application that allows you to chat with your documents locally using a large language model.

Unlike other tools, chatd comes with a built-in LLM runner, so you don’t need to install anything extra, just download, unzip, and run the executable.

5 Local AI Tools to Interact With PDF and Documents

Key features:

  • All your data stays on your computer and is never sent to the cloud.
  • Comes pre-packaged with Ollama, a local LLM server that manages the language model for you. If you already have Ollama running, chatd will automatically use it.
  • Works seamlessly on Windows, macOS, and Linux.
  • Advanced users can enable GPU support or select a custom LLM.

2. localGPT

LocalGPT is an open-source solution that enables you to securely interact with your documents locally.

Built for ultimate privacy, LocalGPT ensures that no data ever leaves your computer, making it a perfect fit for privacy-conscious users.

5 Local AI Tools to Interact With PDF and Documents

Key features:

  • All processing happens on your machine, ensuring no external data leaks.
  • Integrates seamlessly with popular open-source models like HF (HuggingFace), GPTQ, GGML, and GGUF.
  • Uses LangChain and ChromaDB to run a fully local Retrieval-Augmented Generation (RAG) pipeline.
  • Comes with two GUIs, one API-based and the other standalone using Streamlit.
  • Optional session-based history to remember your previous questions.
  • Supported File Formats: PDFs, TXT, CSV, DOCX, Markdown, and more. You can add custom loaders via LangChain.

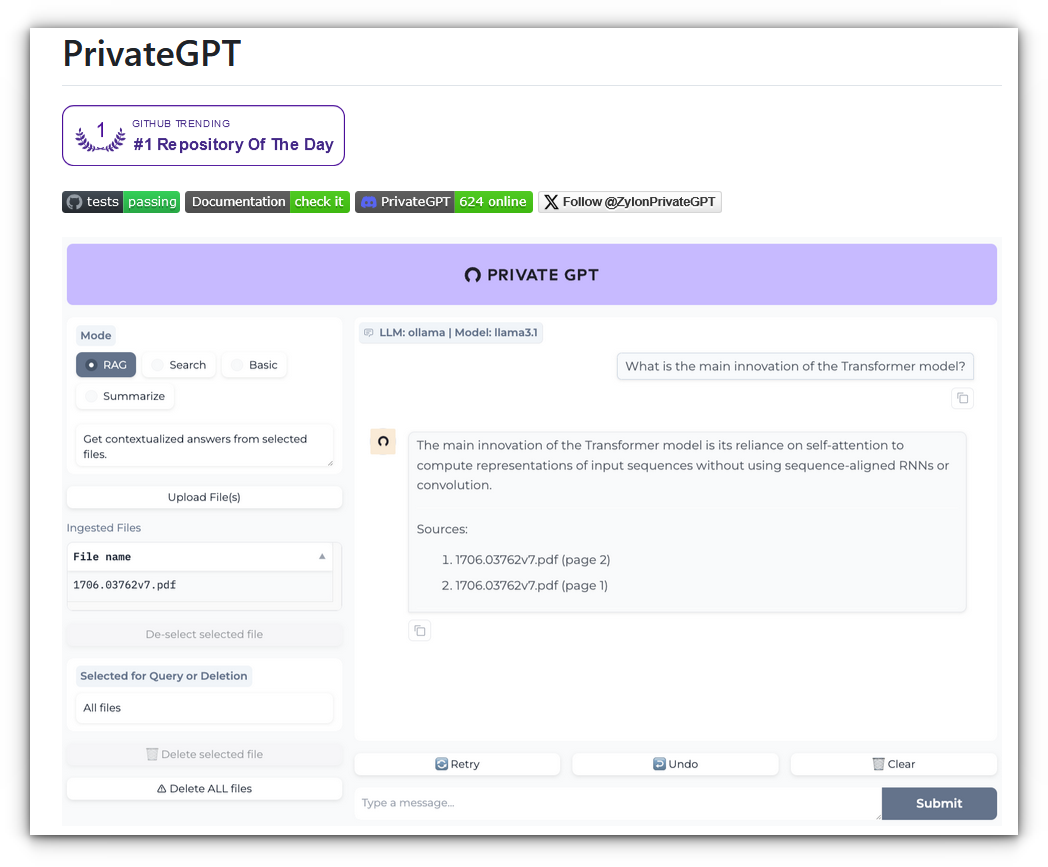
3. PrivateGPT

PrivateGPT is a production-ready, privacy-focused AI project that enables you to interact with your documents using Large Language Models (LLMs), completely offline.

No data ever leaves your local environment, making it ideal for privacy-sensitive industries like healthcare, legal, or finance.

Having personally used this project, I highly recommend it for its privacy and performance once set up.

5 Local AI Tools to Interact With PDF and Documents

Key features:

  • 100% offline, no internet connection required.
  • Built on a robust Retrieval-Augmented Generation pipeline.
  • Offers OpenAI-compatible APIs for building private, context-aware AI applications.
  • Includes a user-friendly interface (Gradio UI) to interact with your documents.
  • Uses LlamaIndex for document ingestion and RAG pipelines and FastAPI, making it extensible and easy to integrate.
  • Provides tools for advanced users to customize embedding generation and document chunk retrieval.
Setting Up PrivateGPT to Use AI Chat With Your Documents
Set up the PrivateGPT AI tool and interact or summarize your documents with full control on your data.
5 Local AI Tools to Interact With PDF and Documents

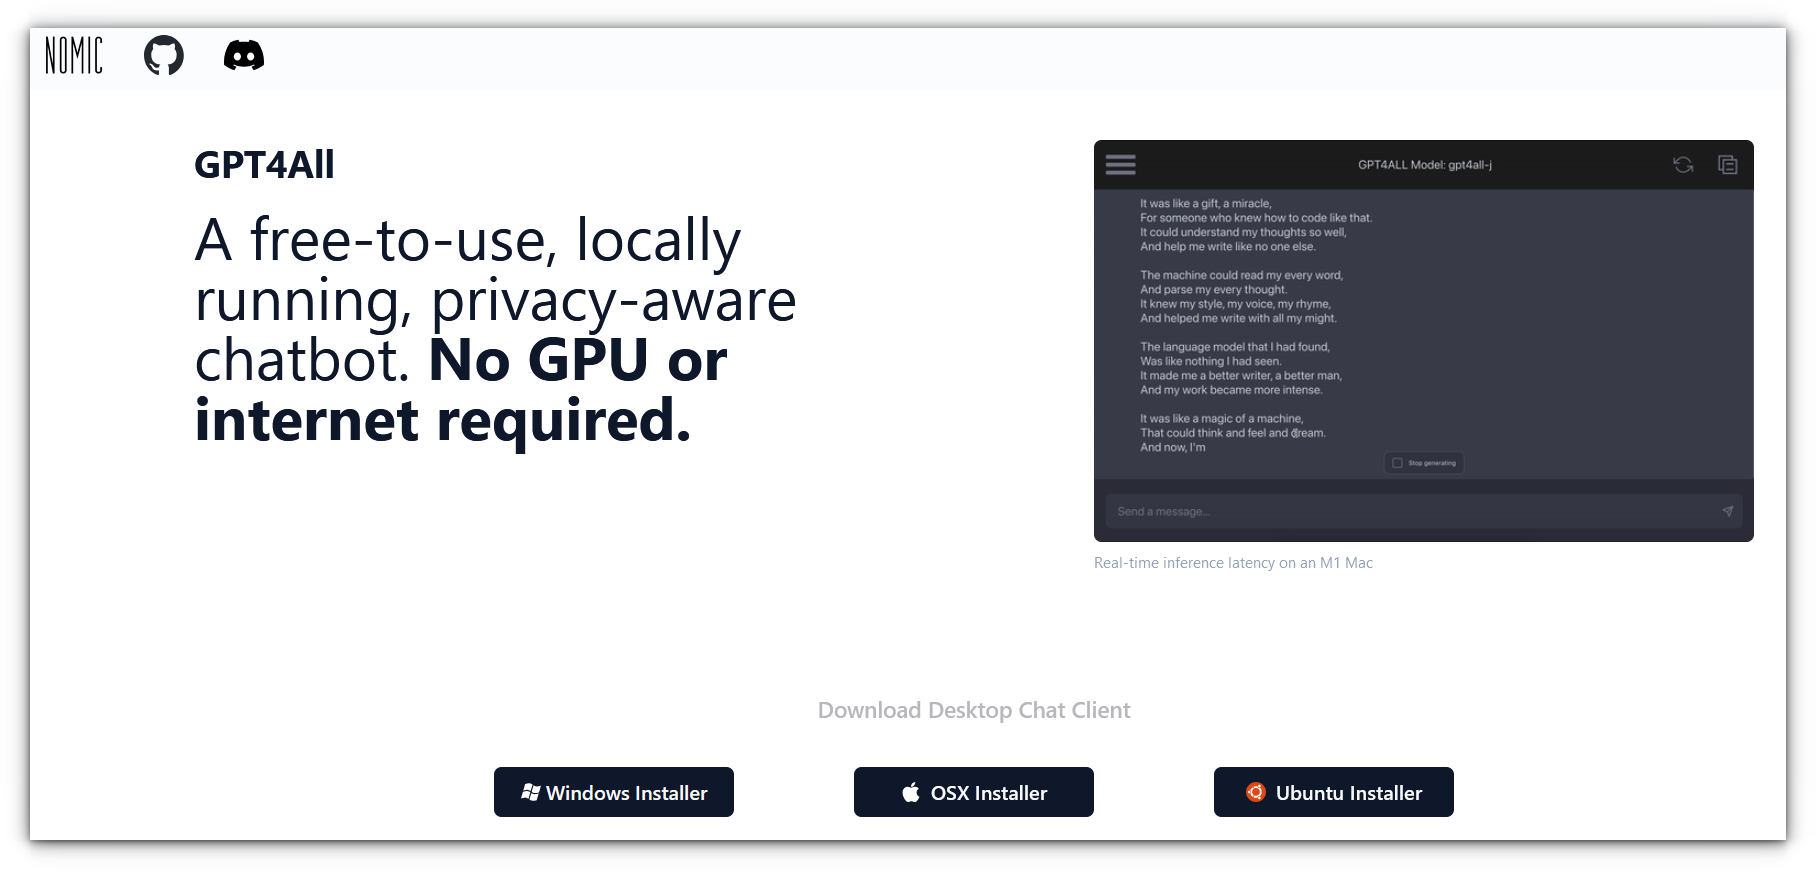
4. GPT4All

GPT4All is another open-source project that enables you to run large language models (LLMs) offline on everyday desktops or laptops, no internet, API calls, or GPUs required.

The application is designed to run smoothly on a variety of systems. It's perfect for privacy-conscious users who want local AI capabilities to interact with documents or chat seamlessly.

5 Local AI Tools to Interact With PDF and Documents

Key features:

  • Run LLMs locally without the need for cloud-based API calls.
  • Works entirely offline, ensuring privacy and control over your data.
  • Download and install the application on Windows, macOS, or Linux to get started immediately.
  • GPT4All offers a Python client for integrating LLMs into your own applications.
  • The LocalDocs feature allows you to privately chat with your documents, offering a secure way to interact with local data.
  • Can be integrate with Langchain for enhanced functionality and access to external databases such as Weaviate.

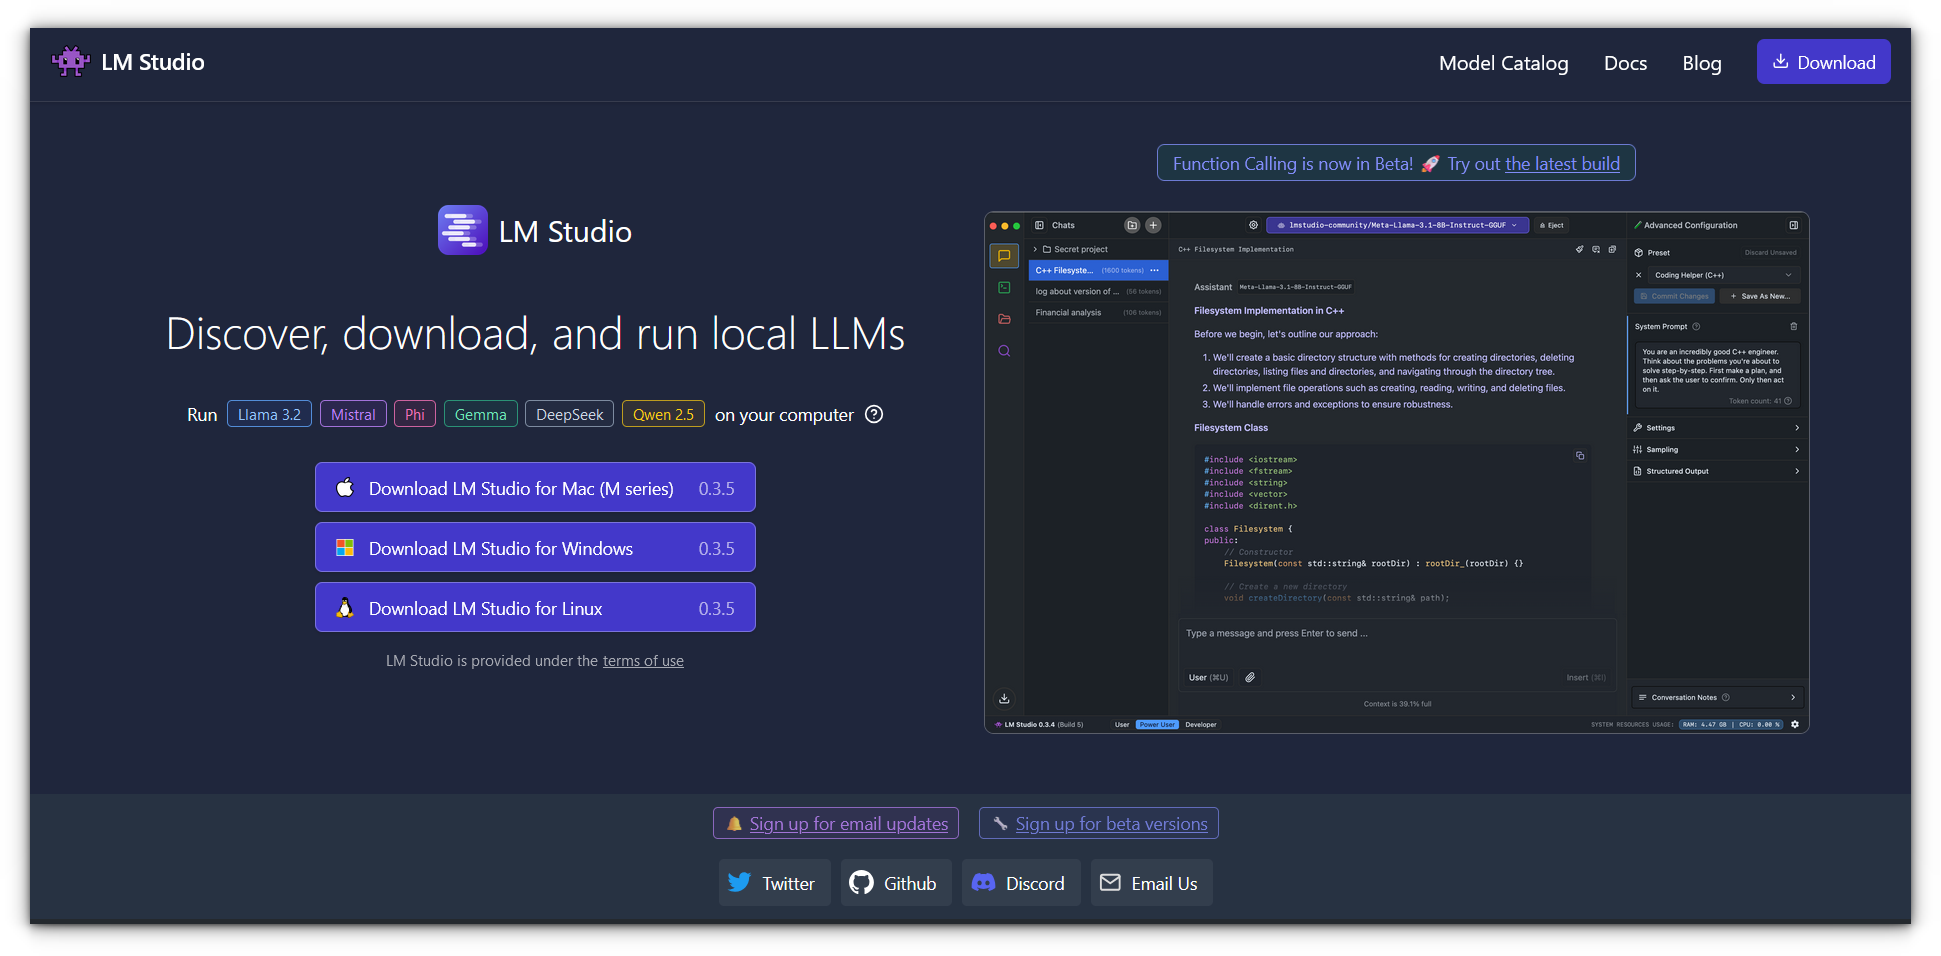
5. LM Studio (Editor's Choice ⭐)

LM Studio has become my go-to tool for daily use, and it’s easily my favorite project in this space.

With the latest release (version 0.3), it introduced the ability to chat with your documents, a beta feature that has worked exceptionally well for me so far.

5 Local AI Tools to Interact With PDF and Documents

Key features:

  • LM Studio lets you download LLMs directly from Hugging Face using its in-app browser.
  • Use a simple, user-friendly interface to chat with AI models for tasks like answering questions, generating text, or analyzing content.
  • Introduced in version 0.3, you can now upload documents and interact with them locally (still in beta).
  • It works as a local server, allowing seamless integration of AI models into your projects without relying on third-party services.
  • On-demand model loading helps optimize system resources by loading models only when needed.
  • Explore trending and noteworthy LLMs in the app’s Discover page.
  • It also supports vision-enabled AI capabilities with MistralAI’s Pixtral models for advanced applications.
  • Available for macOS, Windows, and Linux and Apple Silicon Macs.
Using LM Studio to Run LLMs Easily, Locally and Privately
LM Studio makes it easier to find and install LLMs locally. You can also interact with them in the same neat graphical user interface.
5 Local AI Tools to Interact With PDF and Documents

Wrapping up

Personally, I use LM Studio daily. As a university student, reading through PDFs day in and day out can be quite tiresome. That's why I like to fiddle around with such projects and look for what best suits my workflow.

I started with PrivateGPT, but once I tried LM Studio, I instantly fell in love with its clean UI and the ease of downloading models.

While I’ve also experimented with Ollama paired with Open WebUI, which worked well, LM Studio has truly become my go-to tool for handling documents efficiently.

These are some of the projects I recommend for interacting with or chatting with PDF documents. However, if you know of more tools that offer similar functionality, feel free to comment below and share them with the community!


from It's FOSS https://ift.tt/V8Kbkqg
via IFTTT

Rabu, 18 Desember 2024

FOSS Weekly #24.51: OBS Tip, New Linux Tools, Fun With Terminal, New Releases and More

FOSS Weekly #24.51: OBS Tip, New Linux Tools, Fun With Terminal, New Releases and More

'Tis the season for ❤️

And I would appreciate your love and support in helping us achieve our goal of 60,000 subscribers on YouTube before 2024 ends. We need 3,600 more people.

So, if you haven't already, please do subscribe to our YouTube channel and if possible, encourage others in your Linux communities.

With your help, we can achieve this. And if we did, there will be a new video tutorial series on NixOS 😎

💬 Let's see what else you get in this edition

  • A new Xfce release after years
  • Using a Raspberry Pi as a Wi-Fi extender
  • Terminal tools to pretend hacking
  • An open source app for managing AppImages
  • And other Linux news, videos and, of course, memes!
  • This week's newsletter is supported by PikaPods

❇️ PikaPods: Self-hosting Without Hassle

PikaPods allows you to quickly deploy your favorite open source software. All future updates are handled automatically by PikaPods while you enjoy using the software. Did I tell you that they also share revenue with the original developers of the software?

Oh! You also get a $5 free credit to try it out and see if you can rely on PikaPods.

PikaPods - Instant Open Source App Hosting
Run the finest Open Source web apps from $1/month, fully managed, no tracking, no ads, full privacy. Self-hosting was never this convenient.

📰 Linux and Open Source News

The Kali Linux 2024.4 release marks the final major version for Kali in 2024.

Kali Linux 2024.4 Release Disables Pip for Pipx, Adds GNOME 47 and 14 New Tools
Kali Linux 2024.4 is a packed release. Let’s take a look at what’s new.
FOSS Weekly #24.51: OBS Tip, New Linux Tools, Fun With Terminal, New Releases and More

🧠 What We’re Thinking About

Here is a thought: There's no compelling reason to remain on Windows in 2025. 🙂

I Don’t See a Reason to Switch to Windows from Linux Anymore in 2025
Do you think there’s any reason to switch to Windows? Well, we don’t think so, and here’s why!
FOSS Weekly #24.51: OBS Tip, New Linux Tools, Fun With Terminal, New Releases and More

🧮 Linux Tips, Tutorials and More

Use Zoom In and Out While Recording in OBS Studio
You can use some third party scripts to enable mouse-based zoom in, zoom out while screen recording with OBS Studio. Here’s how!
FOSS Weekly #24.51: OBS Tip, New Linux Tools, Fun With Terminal, New Releases and More

👷 Maker's and AI Corner

Who knew a Raspberry Pi could be turned into a Wi-Fi extender? 😳

And I stumbled across this open source software that can be used for creating online quizzes and test by educators.

Want to access the services running on your local network from anywhere? The free Cloudflare Tunnels feature can help you with that.

Use Cloudflare Tunnels to Access Homelab Outside Local Network
Self hosting various open source software on your local system and now want to use it from anywhere? Cloudflare Tunnel comes to your help.
FOSS Weekly #24.51: OBS Tip, New Linux Tools, Fun With Terminal, New Releases and More

📹 Videos We are Creating for You

Impress your kids and nephews with these fun CLI tools this Christmas 🎄


✨ Apps of the Week

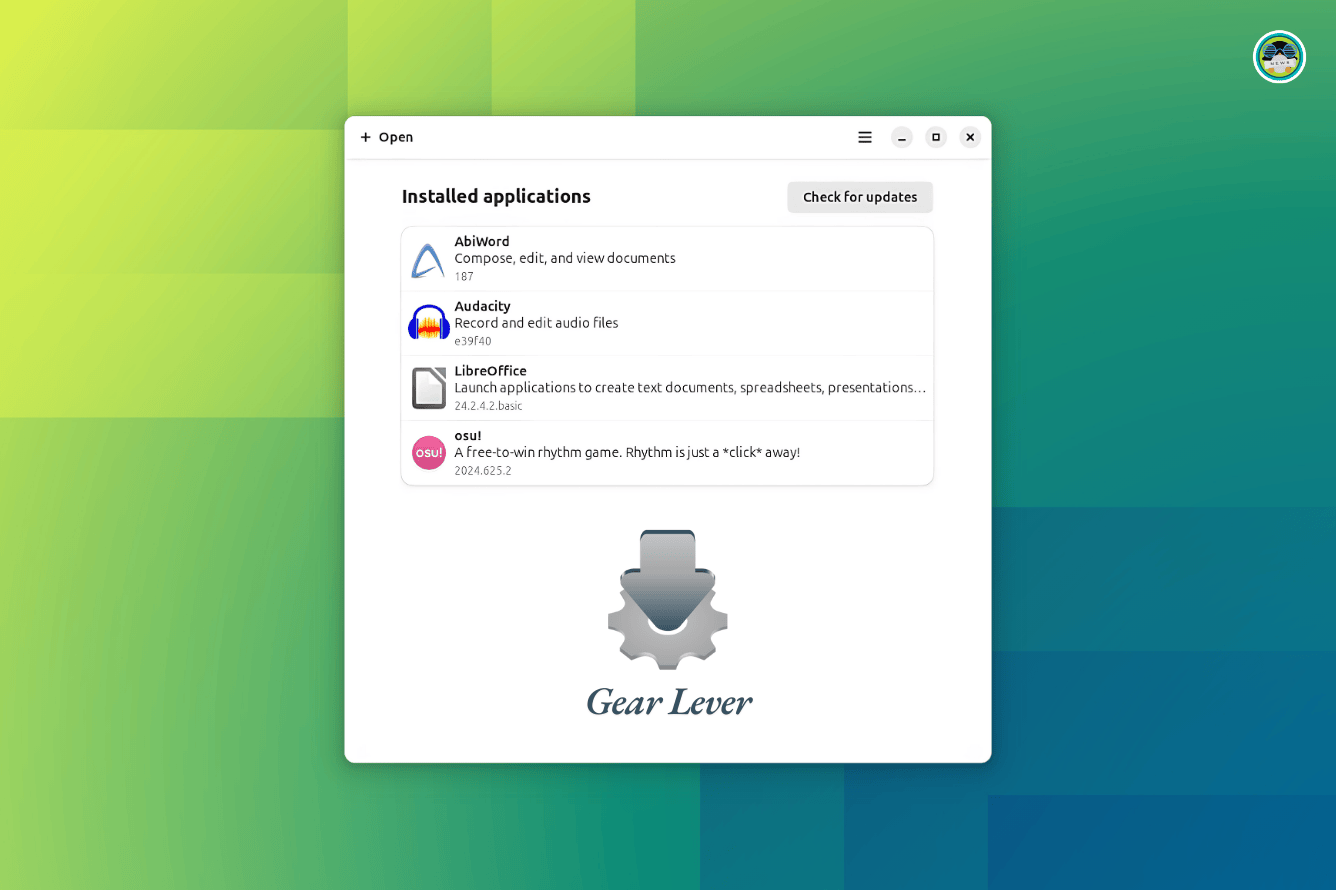
If you are fed up tracking down AppImages on your system, then you can use a utility like Gear Lever to organize and manage those better.

Gear Lever: An Open Source Tool To Manage AppImage Apps on Linux
A nifty tool to help manage AppImage files.
FOSS Weekly #24.51: OBS Tip, New Linux Tools, Fun With Terminal, New Releases and More

We tried SimpleX Chat, a private, decentralized communications app.

And a list of interesting Linux apps discovered by us in 2024.

These Are The Most Useful Linux Apps I Discovered in 2024
Here are the best Linux apps we encountered in 2024. Try them out if you haven’t yet!
FOSS Weekly #24.51: OBS Tip, New Linux Tools, Fun With Terminal, New Releases and More

🧩 Quiz Time

Can spot all the Tuxes in this fun game?

Spot The Tux: It’s Almost Christmas!
Christmas is almost here. Let’s have a fun puzzle!
FOSS Weekly #24.51: OBS Tip, New Linux Tools, Fun With Terminal, New Releases and More

💡 Quick Handy Tip

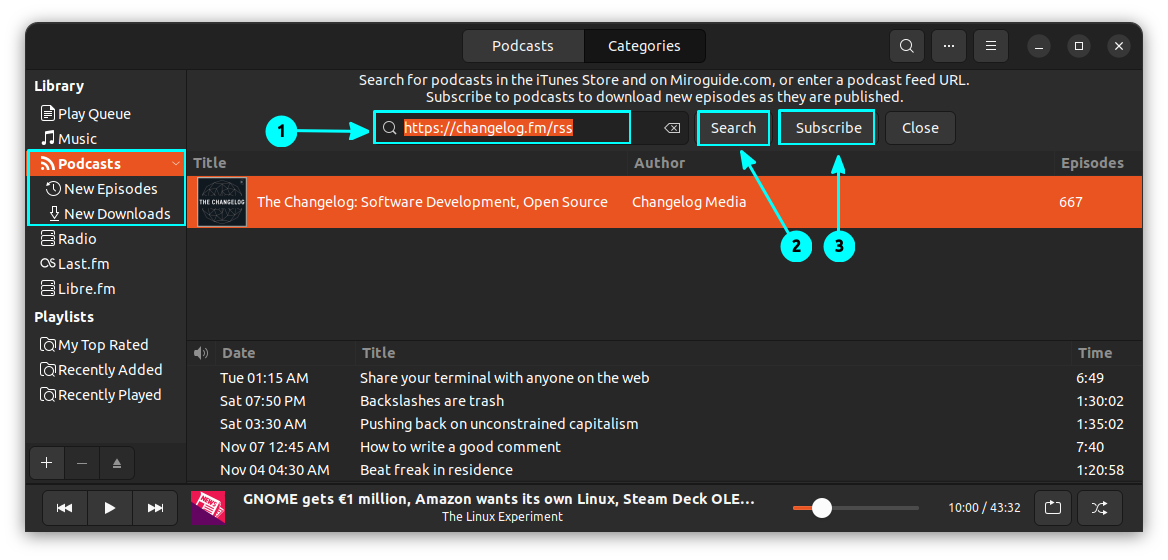
You can subscribe and listen to podcasts using Rhythmbox. Just enter a Podcast RSS URL in the text box inside the “Podcasts” category and click on “Search”, then “Subscribe”.

FOSS Weekly #24.51: OBS Tip, New Linux Tools, Fun With Terminal, New Releases and More

🤣 Meme of the Week

My favorite Linux humor in this season

FOSS Weekly #24.51: OBS Tip, New Linux Tools, Fun With Terminal, New Releases and More

🗓️ Tech Trivia

In December 1991, IBM and Siemens AG unveiled a prototype 64-megabyte DRAM chip, a significant step in semiconductor development. This innovation followed Moore's Law, which predicts that the number of transistors on a chip doubles roughly every 18 months.


🧑‍🤝‍🧑 FOSSverse Corner

FOSSers are debating the topic of power off vs. suspend in Linux systems. Which side do you stand on?

Arguments for/against power off and suspend?
As suggested
FOSS Weekly #24.51: OBS Tip, New Linux Tools, Fun With Terminal, New Releases and More

❤️ With love

Share it with your Linux-using friends and encourage them to subscribe (hint: it's here).

Share the articles in Linux Subreddits and community forums.

Follow us on Google News and stay updated in your News feed.

Opt for It's FOSS Plus membership and support us 🙏

Enjoy using Linux 😄


from It's FOSS https://ift.tt/IoJ0W9K
via IFTTT

Use Zoom In and Out While Recording in OBS Studio

Use Zoom In and Out While Recording in OBS Studio

Have you ever wanted to zoom the screen recording area to where your cursor currently is? OBS can do it for you with the help of third-party scripts. You don't need a dedicated video editor in Linux just for zooming into an area.

Before starting this guide, let's make sure you have OBS Studio installed on your system.

Step 1: Download Zoom to Mouse Lua script

Now that you have installed and set OBS Studio, let's see how to set the Zoom to mouse feature. First, you need to download the “Zoom to Mouse” Lua script.

Use the link below to go to the GitHub repository of the project.

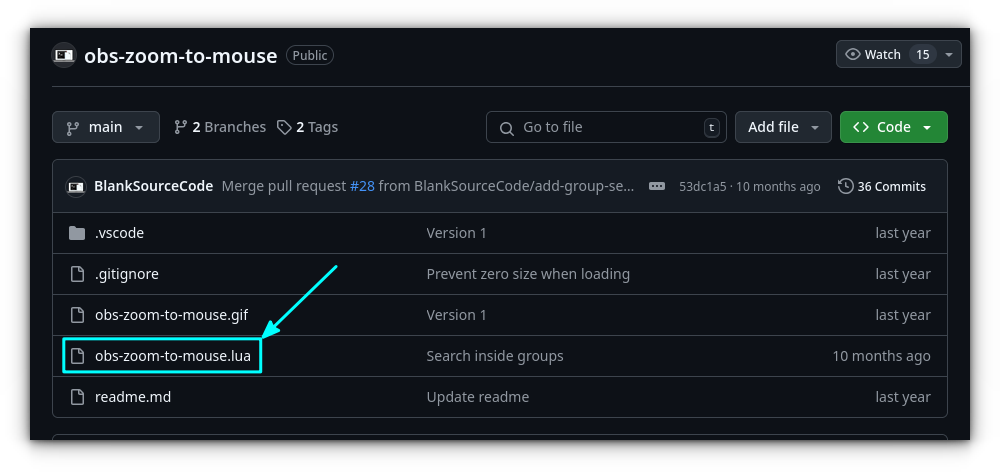
In this repository, click on the obs-zoom-to-mouse.lua Lua script file link.

Use Zoom In and Out While Recording in OBS Studio
Click on Lua Script file

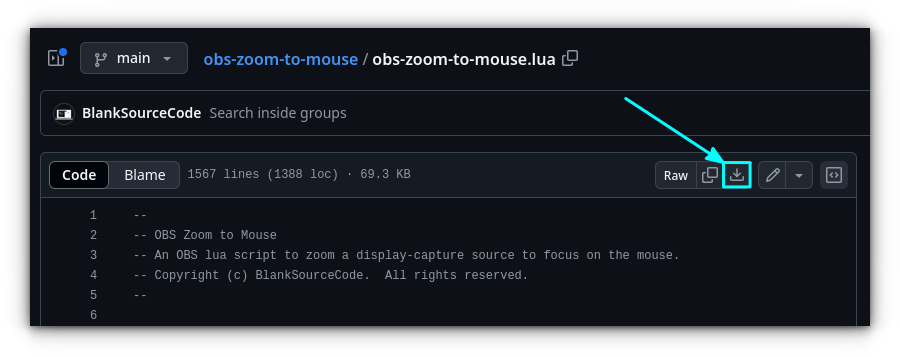
On the code page, click on the download button available on the top-right.

Use Zoom In and Out While Recording in OBS Studio
Click on the Download Button
📋
You can also use the releases section to get the file.

Step 2: Install the lua script in OBS

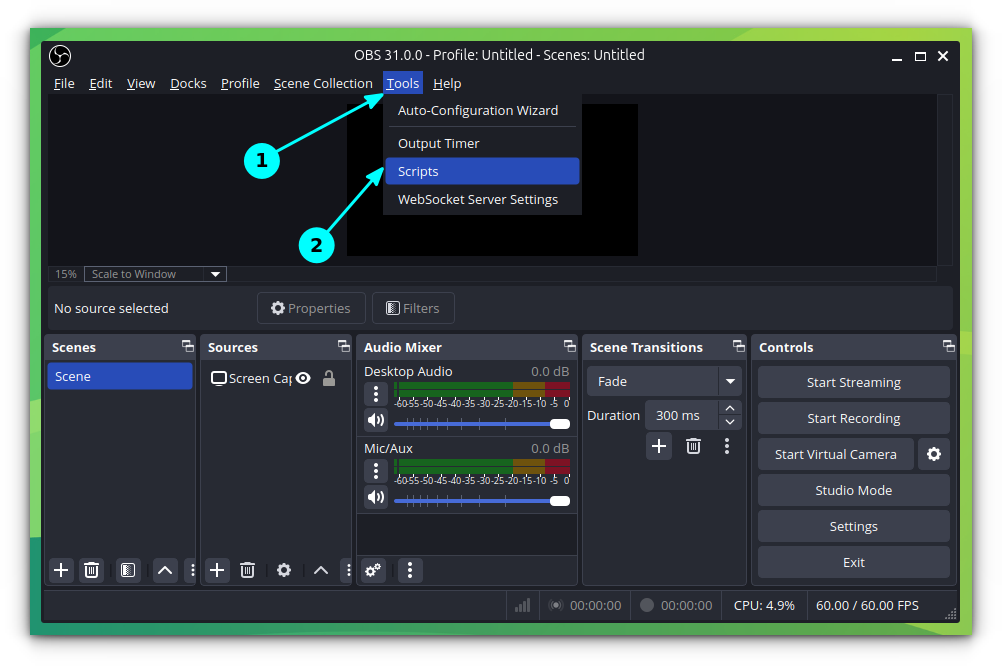
Open OBS Studio and select Tools → Scripts.

Use Zoom In and Out While Recording in OBS Studio
Click on Tools → Scripts

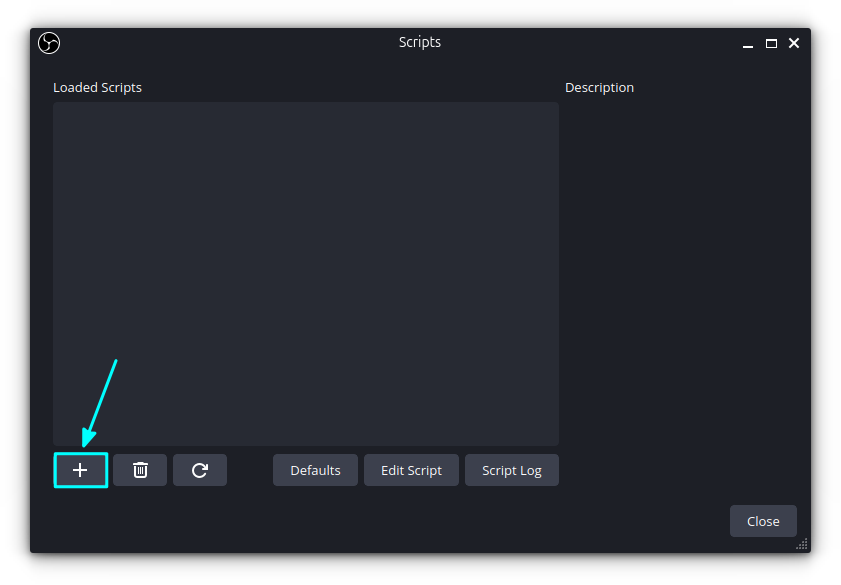
In the scripts window, click on the “+” button in the bottom-left, as shown below.

Use Zoom In and Out While Recording in OBS Studio
Click “+” to add Script

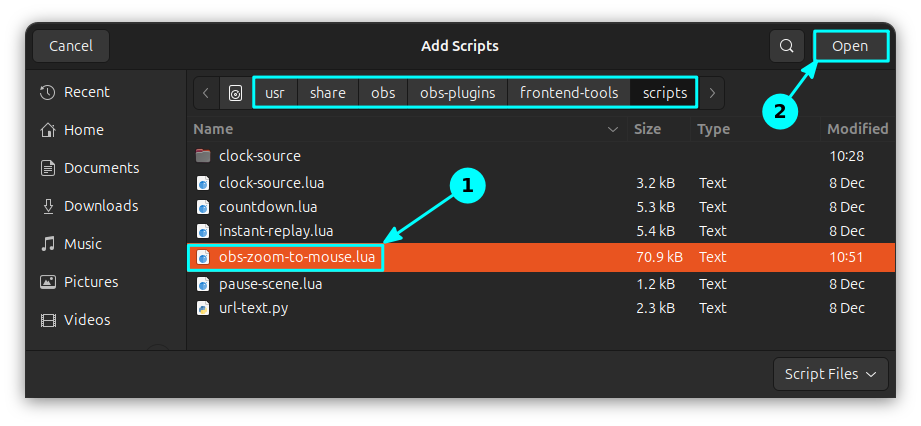
This will open a file chooser, where you can see the location of the scripts. For me, it is /usr/share/obs/obs-plugins/frontend-tools/scripts.

🚧
This location may vary according to the OBS Studio installation method (deb, snap, flatpak etc_. Replace the location according to your method of installation.

You need to copy the downloaded Lua script file to this location.

For this, open a terminal. Now, assuming you have downloaded the Lua script to the ~/Downloads directory, use the command:

sudo cp ~/Downloads/obs-zoom-to-mouse.lua /usr/share/obs/obs-plugins/frontend-tools/scripts

Now, you can see this script appear in the Scripts dialog we have opened earlier. Click on it and select Open.

Use Zoom In and Out While Recording in OBS Studio
Select and Open the Lua Script File in OBS Studio

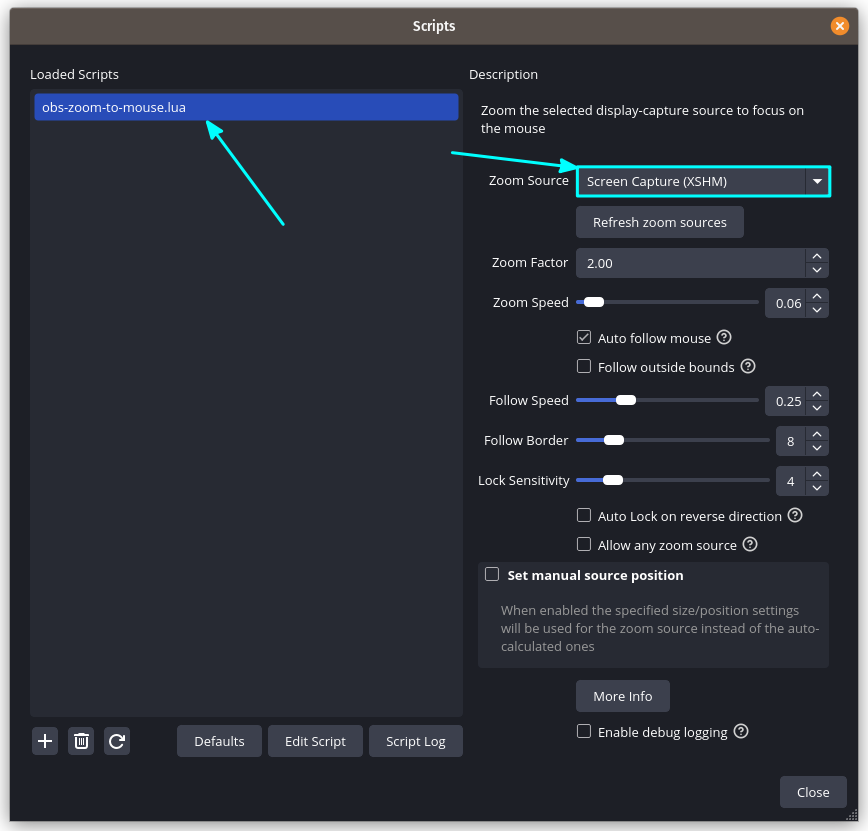
This will open the script settings. Here, you need to select a Zoom Source. This should be the same as the screen capture source.

Use Zoom In and Out While Recording in OBS Studio
Zoom to mouse settings

You can go through the rest of the settings for further tweaks.

Step 3: Set a hotkey for Zoom

Now that you have installed the Zoom to Mouse script, you should set a hotkey for this action. Otherwise, it will be difficult to access this feature.

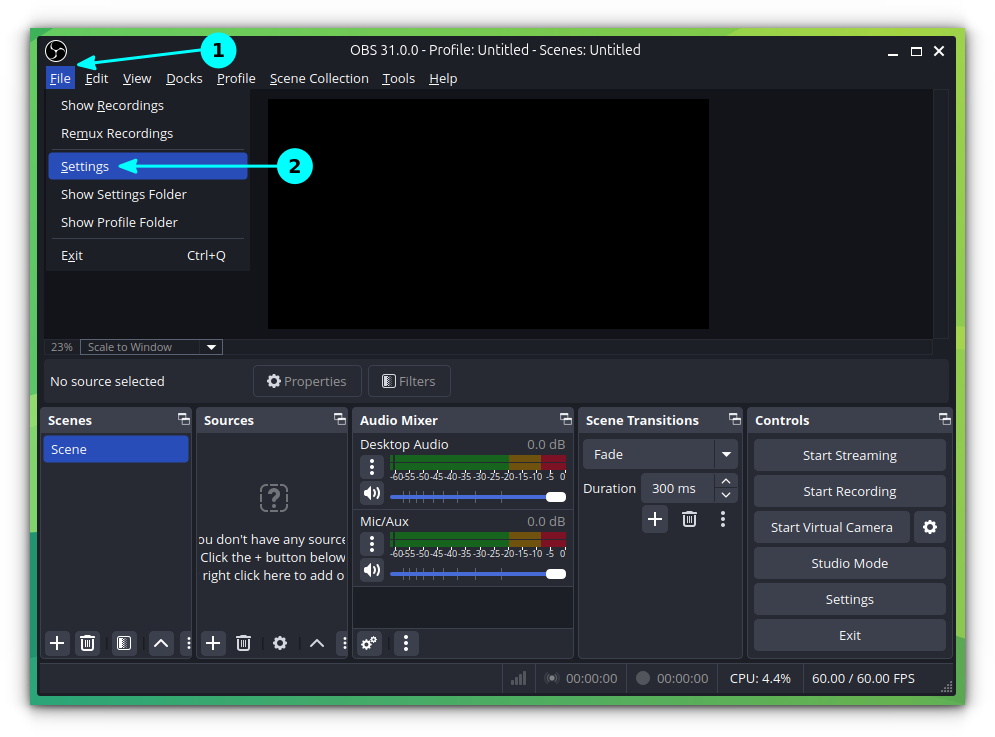
On the main menu of OBS Studio, click on File → Settings.

Use Zoom In and Out While Recording in OBS Studio
Click on File → Settings

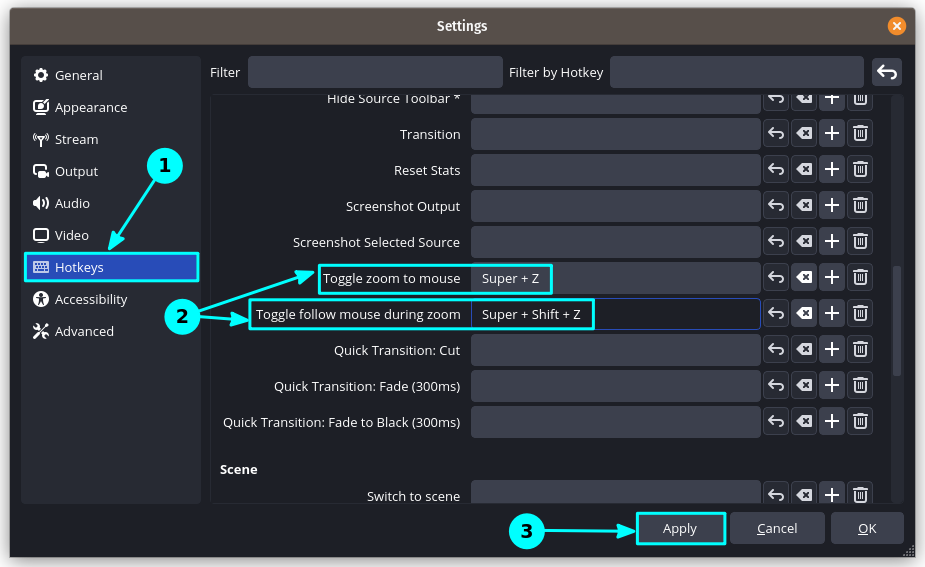
In the settings window, go to Hotkeys. Here, scroll down a bit to get the Toggle zoom to mouse and Toggle follow mouse during zoom shortcuts.

  • Toggle zoom to mouse: Toggle between zoom and normal views.
  • Toggle follow mouse during zoom: Decides whether the zoom follows the cursor, or lock in the current position. If locked, the other part of the video won't be visible if the cursor is out of the zoomed location.

In the field corresponding to these options, press your required shortcuts.

Use Zoom In and Out While Recording in OBS Studio
Set a Hotkey
🚧
You should not be adding hotkeys that have other preset values in the system. For example, setting a key like CTRL A will cause issue since this is the shortcut to select all items in the supported windows. Use some obscure shortcut which is not common.

Once set, click on Apply and close the settings windows. Now restart the OBS Studio and enjoy zooming in and out.

Enjoy OBS Studio for screen recording in Linux.


from It's FOSS https://ift.tt/w35HNtq
via IFTTT