Tampilkan postingan dengan label IFTTT. Tampilkan semua postingan

Kamis, 11 September 2025

Pironman 5 Max Review: Best Raspberry Pi Case Money can Buy

Pironman 5 Max Review: Best Raspberry Pi Case Money can Buy

The last time I reviewed the Pironman 5, I thought that it was the most amazing Raspberry Pi case that can be purchased. That's because people have 3D printed Pi cases and they match the wavelength of awesomeness.

Almost a year later, SunFounder came up with a new version, Pironman 5 Max. And they increased the awesomeness of an already outstanding product.

Pironman 5 Max Review: Best Raspberry Pi Case Money can Buy

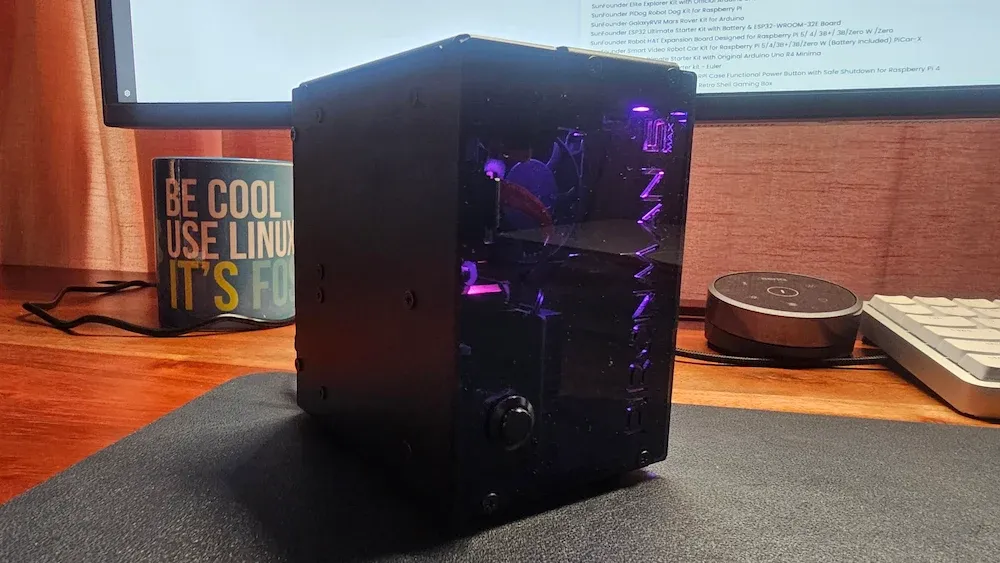
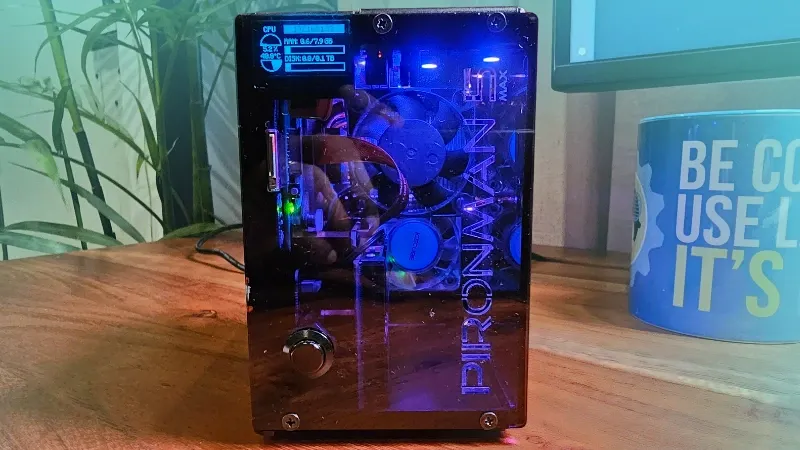
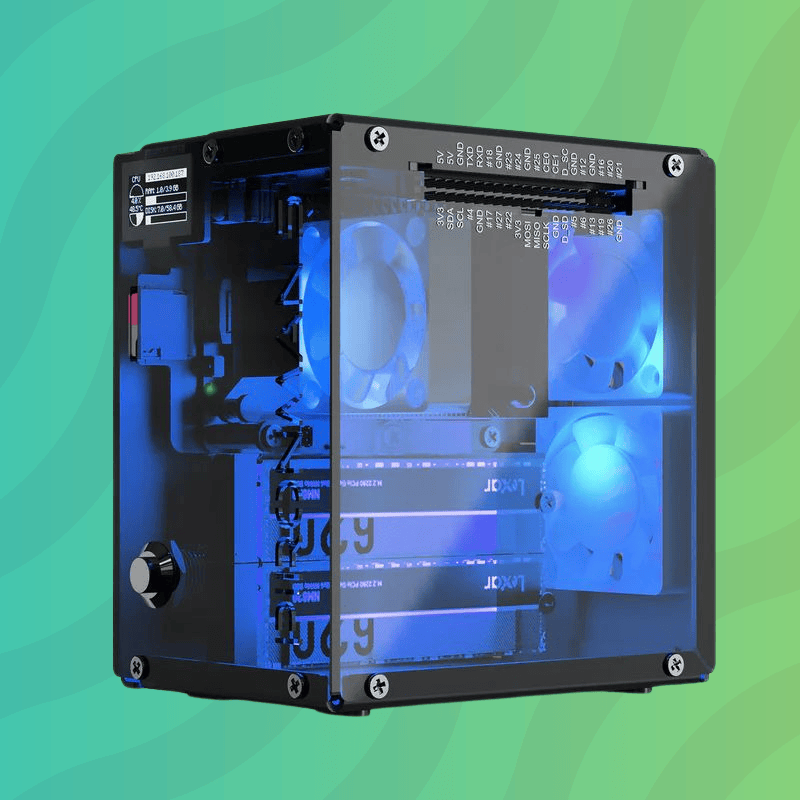
Due to light reflection, the picture above doesn't show its beauty properly. Look at the image below and admire the beauty.

Pironman 5 Max Review: Best Raspberry Pi Case Money can Buy

This gorgeous looking Raspberry Pi case is the best $90 investment for your Raspberry Pi 5 setup. If money is not an issue, I think anyone who wants to use Raspberry Pi 5 on their desktop should consider it because it offers more than just its stunning looks.

Let me dwell on its features as well as share my experience and opinion on them.

Pironman 5 Max specification

But before that, let me share what you get with this case.

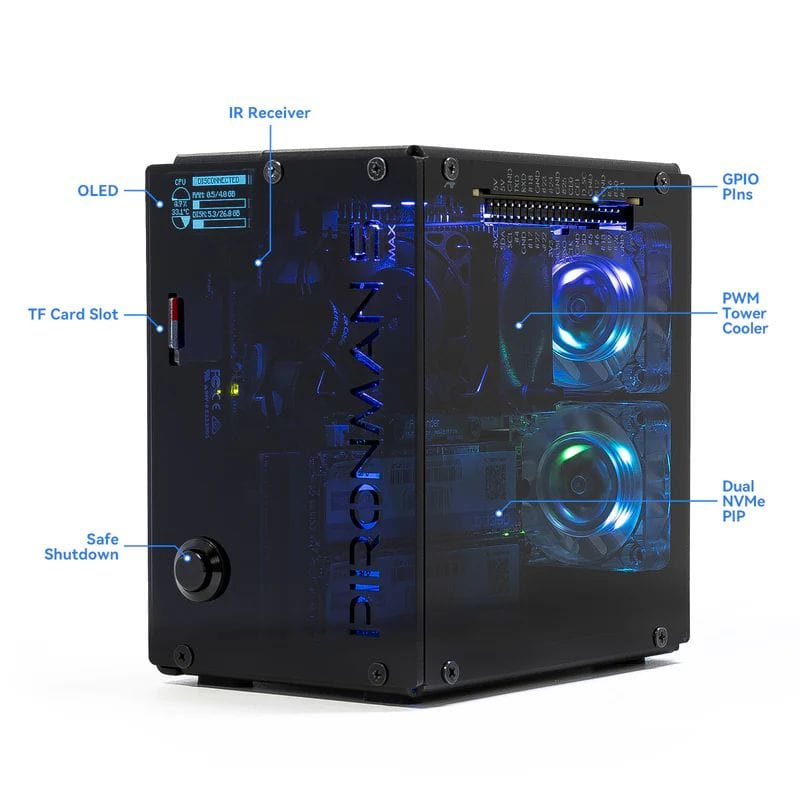
  • Dual NVMe M.2 slots: Can be used for RAID 0/1 setup or single SSD plus AI accelerator. They are powered by PCIe Gen2 switch.
  • Tower cooler (for passive cooling) with PWM fan (adjusts as per CPU temperature).
  • Two additional RGB fans that can be configured.
  • Tiny OLED display with tap to wake function
  • Two full-sized HDMI ports.
  • RTC battery support
  • All GPIO pins remain accessible through the in-built extender.
  • Sleek black looks with part metal and part acrylic body.
Pironman 5 Max Review: Best Raspberry Pi Case Money can Buy

Build your case

Like many other SunFounder products, this too has a DIY touch. The case needs to be assembled. Which is not complicated but still take a look at the official assembly video to get a gist of what kind of effort it will take.

I used the paper manual, as there were no assembly videos when I received it, and it took me nearly an hour to get it up and running.

Pironman 5 Max Review: Best Raspberry Pi Case Money can Buy
Preparing to assemble the case

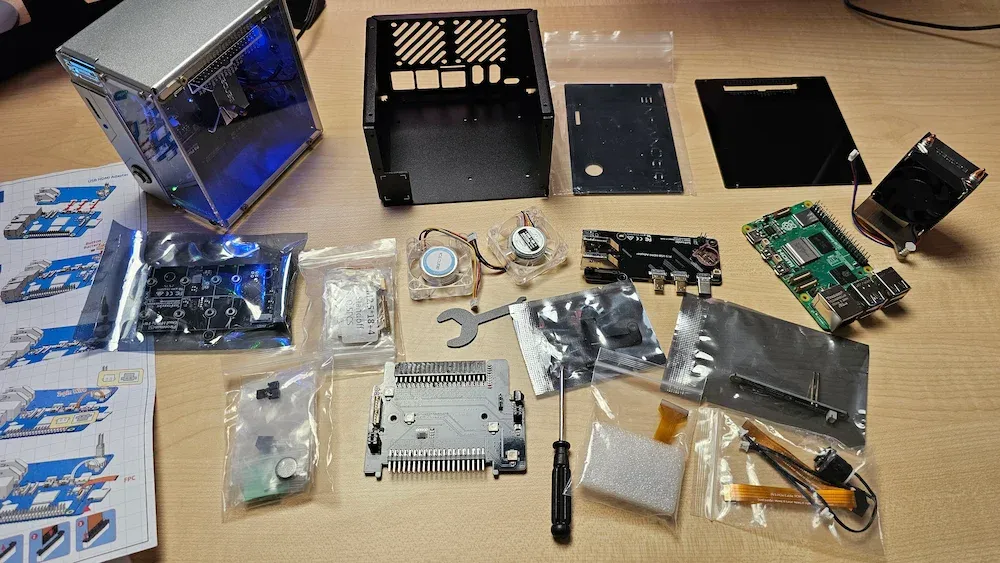
Assembly needs to be done carefully. If you put the wrong end of the FPC cable in or if the attachments do not fit in properly, you’ll have to struggle with opening the case again to fix it.

In my case, I had the fan connection wire in front of the fan and it started making awful noise. I quickly fixed it by tucking in the wire, but these things may happen.

Cooling your Pi

Your Raspberry Pi 5 needs a cooling system and the official inexpensive active cooler does a decent job at that.But if you want to use Raspberry Pi as a desktop or for intensive tasks, it starts getting hotter before choking up completely.

SunFounder has been making accessories for Raspberry Pi ecosystem for a long time and their Pironman 5 Max handles it with a mix of passive and active cooling.

Pironman 5 Max has a tower cooler to passively cool your device. And then there are RGB dual fans to add active cooling.

Surprisingly, the RGB fans were set to run by default. But you can easily configure them to start when the temperature gets hotter.

Pironman 5 Max Review: Best Raspberry Pi Case Money can Buy

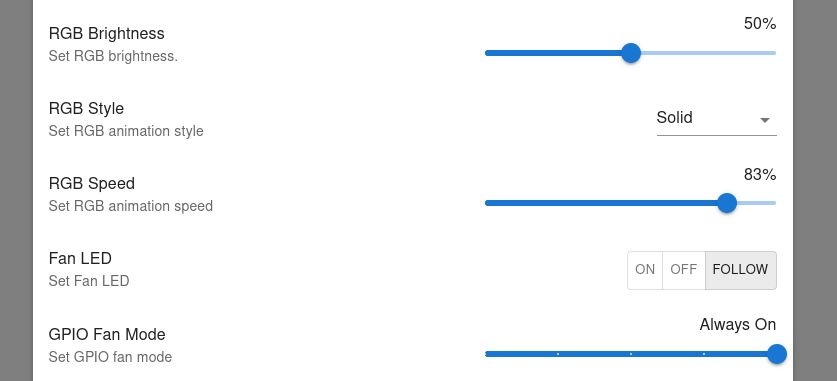
I put them at cool mode, as it hardly reaches beyond that for casual computing thanks to the effective passive cooling. You can control the RGB lighting on the fan to have them always on, always off or turn on only when the fans are running.

There is a tiny lag between the lights of the two fans. Unless you have intense OCD, you won’t be bothered with that.

Leveling up the ports

Cooling is just one aspect of this magnificent Raspberry Pi case. It converts your barebone Pi 5 into a mini PC by adding extra ports.

The Pi 5 still uses mini HDMI ports. But the Pironman 5 case converts them into full HDMI ports. Now you can use your regular HDMI cables. That’s a relief. All 4 USB ports are neatly accessible in the back.

Pironman 5 Max Review: Best Raspberry Pi Case Money can Buy

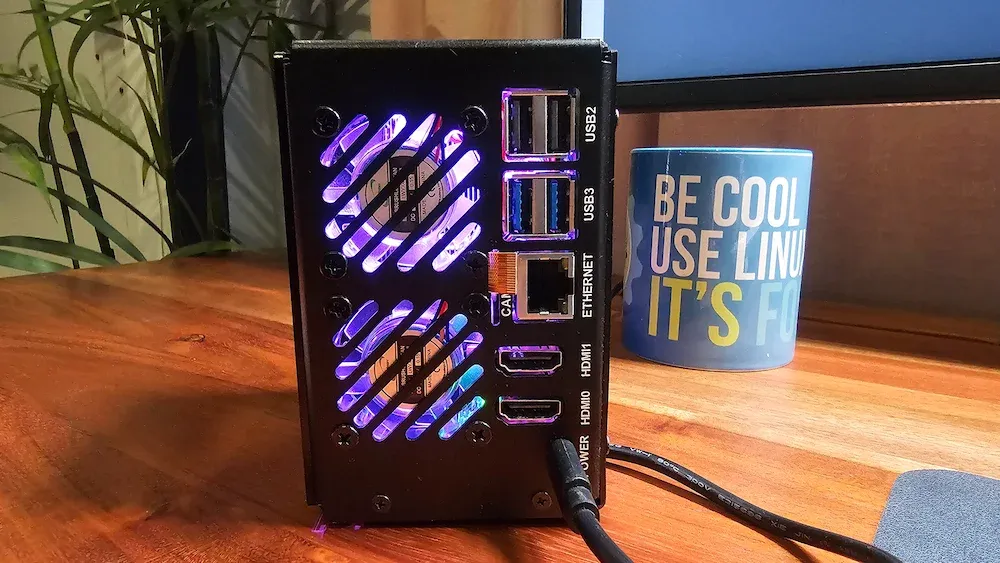
The micro SD card slot is conveniently located at the front along with a dedicated power button. You can press the power button to turn it on. While running, press it once to bring up the shutdown menu or double-press it quickly to turn it off immediately.

Pironman 5 Max Review: Best Raspberry Pi Case Money can Buy

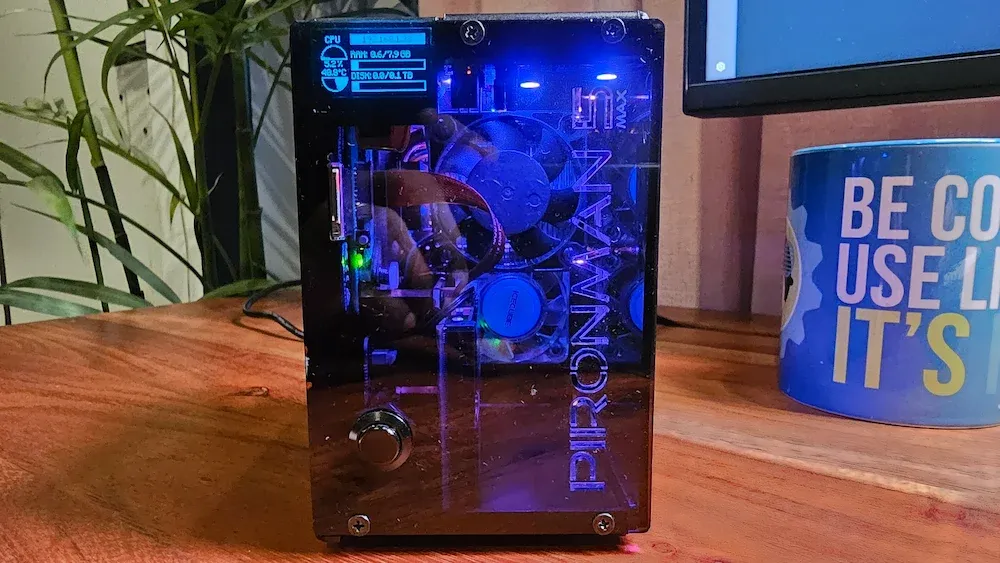
There is this tiny OLED display that gives a quick overview of your system resources. You can see the IP address, disk storage, CPU temperature, and RAM consumption. This is also configurable from the handy dashboard.

The OLED screen needs tap to wake or shake to wake. It displays for a few seconds and goes to sleep again. Saves a tiny amount of power. I find it convenient that it displays the IP address of the PI. Helps a great deal when I want to SSH into it.

It also has an IR receiver at the front for your experiments. You are not losing the versatility of your Pi as all 40 GPIO pins are easily accessible from the side. And they are neatly labeled too.

Pironman 5 Max Review: Best Raspberry Pi Case Money can Buy

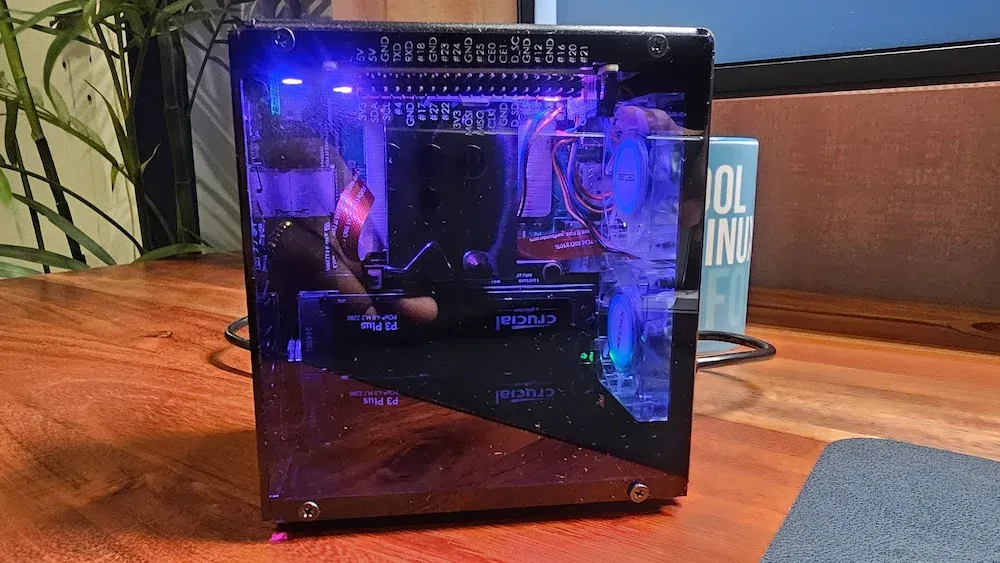
This Pironman 5 Max features a dual NVMe PIP board, which is an upgrade on its previous edition, which had only one NVMe slot. So, here, you can put in two SSDs and have a RAID setup, or you can have one SSD and one AI accelerator.

Keep in mind that this is a PCIe Gen2 switch and thus you are not getting PCIe Gen3 speed like the previous Pironman version. However, that should not be an issue, as it’s good enough for random I/O operations.

I have used two SSDs to experiment with a RAID setup. I will share that in a separate tutorial.

Beautiful RGB lighting and more

The RGB lighting adds to the charm of the case. There are 4 LEDs located at the top that throw the lights down. By default, it is blue mood lighting. You can configure their color and lighting pattern to match up with your desk and room setup.

You can also control its intensity, which is a good thing, as the semi-transparent dark glass may not always show the lights in their full glory.

A tiny but useful feature is the inclusion of RTC battery and thus giving the real time clock to your Raspberry Pi. Your Pi doesn’t need to be connected to internet to give you the correct time.

Remember...

Pironman does not support all kinds of SSDs. Go through their list of supported SSDs first.

Pironman also has a list of compatible operating systems. The script and dashboard that let you control the RGB lights and other behavior work only with these operating systems, and you have to install the scripts explicitly.

Conclusion

Ever since I started using these Pironman cases, my Raspberry Pi not only stays cool, it also looks super cool.

Now a price tag of $95 could seem like a lot but Pironman Max is not just a case, it transforms your Pi into a mini PC with a miniature gaming rig look. You get full HDMI ports, power buttons, an OLED display, and two SSD slots. It enhances the capabilities of your Pi.

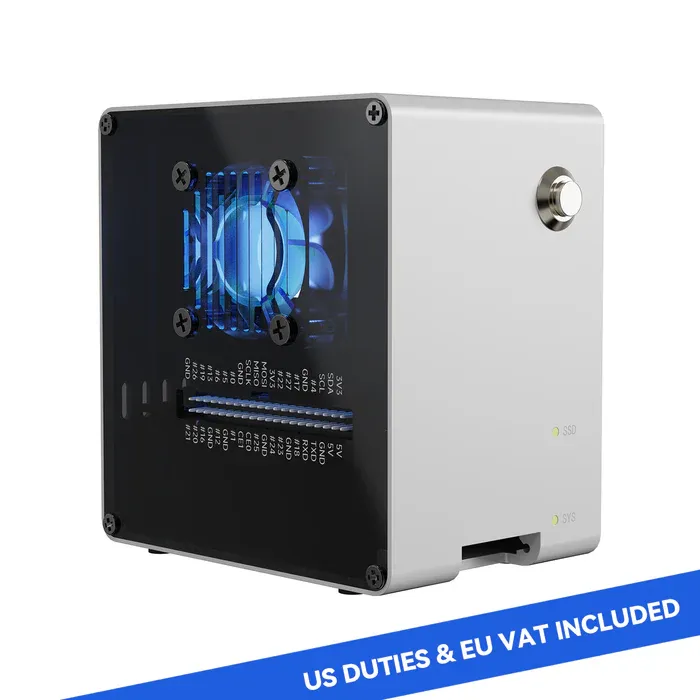
Another good thing is that they also take care of taxes and import duty. You can order it from their official website. The new version is not available on Amazon yet.

If your budget allows it, this is surely worth investing in your Raspberry Pi setup.

Alternatively, if you are on a budget, explore some other tower cases for Raspberry Pi.

In fact, there is a new mini version of the Pironman in making that costs half the price and offers half the features.

Pironman 5 Max Review: Best Raspberry Pi Case Money can Buy

Pironman 5 Mini

The mini version has only one NVMe slot and one RGB fan. There is no OLED display or passive tower cooling. But it still adds value at half the cost.

Pironman 5 Mini

And that’s my opinion. What about you? The comment section is all yours.


from It's FOSS https://ift.tt/PNW0f8n
via IFTTT

Rabu, 10 September 2025

FOSS Weekly #25.37: Mint 22.2 Released, Official KDE Distro, Kazeta Linux for 90s Gaming, Ubuntu 25.10's New Terminal and More Linux Stuff

FOSS Weekly #25.37: Mint 22.2 Released, Official KDE Distro, Kazeta Linux for 90s Gaming, Ubuntu 25.10's New Terminal and More Linux Stuff

Linux Mint 22.2 Zara is available now. Existing Mint 22.1 users can choose to upgrade or stay with their current version.

Ubuntu 25.10 is a month away. I tried it and shared the new features in the latest video. Among those features, I find the switch to Rust-based sudo the most intriguing. I am working on an article that takes a deeper look at it.

KDE's very own Arch-based distro makes the first alpha release and Sourav already took it for testing.

These were some of the highlights from this week.

💬 Let's see what else you get in this edition

  • Microsoft open sources BASIC.
  • SSD factors to consider before buying.
  • Switzerland's new open source AI model.
  • And other Linux news, tips, and, of course, memes!
  • This edition of FOSS Weekly is supported by PrepperDisk.
FOSS Weekly #25.37: Mint 22.2 Released, Official KDE Distro, Kazeta Linux for 90s Gaming, Ubuntu 25.10's New Terminal and More Linux Stuff

PrepperDisk gives you a fully offline, private copy of the world’s most useful open-source knowledge—so your access doesn’t depend on big platforms, networks, or gatekeepers.

Built on a Raspberry Pi, it bundles projects like Wikipedia, maps, and survival manuals with tools we’ve built and open-sourced ourselves. It’s a way to safeguard information freedom: your own secure, personal archive of open knowledge, ready anywhere—even without the internet.

Explore PrepperDisk

📰 Linux and Open Source News

Linux Mint 22.2 "Zara" has been released.

The Wait is Over! Linux Mint 22.2 “Zara” is Here
A fresh Linux Mint release with many refinements.
FOSS Weekly #25.37: Mint 22.2 Released, Official KDE Distro, Kazeta Linux for 90s Gaming, Ubuntu 25.10's New Terminal and More Linux Stuff

🧠 What We’re Thinking About

GNOME has had to take a step back in its campaign to remove X11 support.

U Turn! X11 is Back in GNOME 49, For Now
A temporary move that gives people some breathing room.
FOSS Weekly #25.37: Mint 22.2 Released, Official KDE Distro, Kazeta Linux for 90s Gaming, Ubuntu 25.10's New Terminal and More Linux Stuff

KDE Linux is finally here, albeit in an unfinished alpha form.

KDE’s Very Own Linux Distro Just Hit Alpha
I am still livid that they didn’t name it KLinux or Kinux.
FOSS Weekly #25.37: Mint 22.2 Released, Official KDE Distro, Kazeta Linux for 90s Gaming, Ubuntu 25.10's New Terminal and More Linux Stuff

🧮 Linux Tips, Tutorials, and Learnings

👷 AI, Homelab and Hardware Corner

Considering buying an SSD? Speed isn't everything.

Speed Isn’t Everything When Buying SSDs - Here’s What Really Matters!
Remember this for the next time you’re shopping for an SSD.
FOSS Weekly #25.37: Mint 22.2 Released, Official KDE Distro, Kazeta Linux for 90s Gaming, Ubuntu 25.10's New Terminal and More Linux Stuff

✨ Project Highlight

Or, how about a Linux distribution that turns any machine into a retro gaming console?

This Linux Gaming Distro Uses SD Cards as Game Cartridges (Just Like the 90s)
Insert cartridge, power on, play. No launchers or accounts required.
FOSS Weekly #25.37: Mint 22.2 Released, Official KDE Distro, Kazeta Linux for 90s Gaming, Ubuntu 25.10's New Terminal and More Linux Stuff

📽️ Videos I Am Creating for You

Ubuntu 25.10 Questing Quokka is less than a month away. New terminal with container integration, new sudo are among the main highlights. Watch them in action in this new video.

🧩 Quiz Time

Can you spot all the errors with these Linux Commands?

Guess the Errors With These Linux Commands
Put your Linux command line knowledge to some test.
FOSS Weekly #25.37: Mint 22.2 Released, Official KDE Distro, Kazeta Linux for 90s Gaming, Ubuntu 25.10's New Terminal and More Linux Stuff

Why should you opt for It's FOSS Plus membership:

✅ Ad-free reading experience
✅ Badges in the comment section and forum
✅ Supporting creation of educational Linux materials
✅ Free Linux eBook

Join It's FOSS Plus

💡 Quick Handy Tip

In GNOME, you can resize the window without placing the cursor at the edge or corner and dragging. Open GNOME Tweaks and go to the Windows section. Here, enable the "Resize with Secondary-Click" option. Also, remember to set a modifier key (it is the Super key by default).

Now, in an active window, hold the modifier key and then right-click and drag anywhere in the window. Another thing to note is that this behavior is enabled by default in KDE Plasma, where the Super key is a modifier key.

🤣 Meme of the Week

Linux is very versatile! 😎

FOSS Weekly #25.37: Mint 22.2 Released, Official KDE Distro, Kazeta Linux for 90s Gaming, Ubuntu 25.10's New Terminal and More Linux Stuff

🗓️ Tech Trivia

FOSS Weekly #25.37: Mint 22.2 Released, Official KDE Distro, Kazeta Linux for 90s Gaming, Ubuntu 25.10's New Terminal and More Linux Stuff
Source: CHM

On September 9, 1947, engineers working on the Harvard Mark II computer found a moth stuck in a relay, causing the system to malfunction. They taped it into the logbook with the note "First actual case of bug being found." Grace Hopper later shared the story, making it the most famous "computer bug" in history.

🧑‍🤝‍🧑 FOSSverse Corner

FOSSers are discussing what the most underrated Linux distro is. Got any in mind?

What is the most underrated Linux distribution?
There are some distros like Debian, Ubuntu and Mint that are commonly used and everyone knows how good they are. but There are others that are used only by a few people and perform equally as well. Would you like to nominate your choice for the most underrated Linux distro? I will nominate Void Linux… it is No 93 on distrowatch and performs for me as well as MX Linux or Debian.
FOSS Weekly #25.37: Mint 22.2 Released, Official KDE Distro, Kazeta Linux for 90s Gaming, Ubuntu 25.10's New Terminal and More Linux Stuff

❤️ With love

Please share it with your Linux-using friends and encourage them to subscribe (hint: it's here).

Share the articles in Linux Subreddits and community forums.

Follow us on Google News and stay updated in your News feed.

Opt for It's FOSS Plus membership and support us 🙏

Enjoy FOSS 😄


from It's FOSS https://ift.tt/ZPavCid
via IFTTT

Selasa, 09 September 2025

I Discovered the Wonderful Compose Key After 15 Years of Using Linux

I Discovered the Wonderful Compose Key After 15 Years of Using Linux

Sometimes you discover things by accident, even if they were probably there for years.

I had the same case when I discovered that GNOME allowed the use of a compose key and it was available right from the keyboard settings. Eureka moment? Sort of.

Allow me to share my 'discovery,' but before that, let me briefly tell you what a compose key is.

What is a Compose Key?

A compose key followed by two or more keystrokes lets you type special characters and symbols like ® (registered), © (copyright), and à. You do it directly with your keyboard without having to hunt them down online or dig through character maps.

This is particularly helpful for people who type in European languages like French, Swedish, etc on a QWERTY keyboard.

You'll have to enable the compose key first. I am using GNOME desktop environment in this article, but a similar feature should also be available in other desktop environments.

Enable the Compose Key on GNOME

Search and open settings from the GNOME Activities overview.

I Discovered the Wonderful Compose Key After 15 Years of Using Linux
Open Settings

Inside the settings, go to the Keyboard section. Here, you can see an option for Compose Key.

It is set to Layout default in my Ubuntu 24.04 installation using GNOME 46 and was turned off by default in my Arch installation using GNOME 48.

I Discovered the Wonderful Compose Key After 15 Years of Using Linux
Select Compose Key

In any case, go inside the compose key and either enable it (in case it is turned off) or disable the default layout.

I Discovered the Wonderful Compose Key After 15 Years of Using Linux
Set another Compose key

As soon as you do this, you can see that you can now set another key as the compose key.

I set the Right CTRL key as the compose key, as shown in the screenshot above.

🚧
If you are using VirtualBox, do not assign the Right-CTRL key. Because in VirtualBox, it is the host key with some special usage.

That's it. Whenever you need to type some special symbol, first press the Compose key. This changes the cursor to a special look. Enter the code for the character you want to enter.

0:00
/0:17

A small clip showing the working of the compose key in GNOME.

Essential compose key codes

Yes, you need to know the character code. This may seem like an additional burden, but for frequent users, it will soon become muscle memory.

Press the compose key you had set earlier followed by the sequence of characters shown in the left column and it will output the characters in the second column in the table below:

Compose Key Plus Types Character
' a á
" a ä
` a à
a e æ
o o ° Degree symbol
o c ©
o r ®
s o §
t m ™ (Trade Mark)
> > »
< < «
# E ♫ (Beamed Eighth notes)

You can check the official documentation for the X11 library's compose key sequences for a comprehensive list of keys and related character.

Can't Remember? No Worries

The compose key is particularly useful for people who don't want to divert attention from typing and at the same time need to add symbols.

But this alone is not the option. Most modern desktop environments have emoji apps like the GNOME Characters app for GNOME.

Using Emojis on Ubuntu Linux
Ubuntu has a built-in emoji picker and you can use it to insert emoticons in native GTK apps quickly. Here’s how to use it.
I Discovered the Wonderful Compose Key After 15 Years of Using Linux

If you don't use special characters frequently, you can simply search for them in the GNOME Activity overview.

For example, just search for "copyright" and if the Characters app is enabled, you can see the symbol pop up in the result. Click on it and it is copied to the clipboard and now you can paste it wherever required.

I highly recommend referring to the X11 library's compose key sequences where you can find all the key sequences, even for typing the obscure infinity symbol.

Enjoy the compose key.


from It's FOSS https://ift.tt/DVYF8em
via IFTTT

Minggu, 07 September 2025

14 Themes for Beautifying Your Ghostty Terminal

14 Themes for Beautifying Your Ghostty Terminal

Ghostty has recently emerged as a highly popular terminal emulator, gaining a strong following among developers and power users alike. This rapid rise can be attributed to its impressive performance and a rich feature set, like leveraging GPU acceleration for incredibly fast rendering and a smooth user experience, even with demanding tasks.

Performance is one thing. Ghostty also comes with a comprehensive theming system, offering a vast collection of built-in themes, which can also be previewed even before you apply them. That's cool. That's a really cool feature.

After fiddling with Kitty terminal, I am exploring Ghostty terminal these days and decided to share some of my exploits on It's FOSS.

And hence this article, where I'll show how you can change themes in the Ghostty terminal, even the external ones. Later, I'll share some of my favorite Ghostty themes that will make your terminal both aesthetically pleasing and extremely readable.

But first, learn to preview a theme in Ghostty

Ghostty has a neat theme preview system built-in. Open the terminal and run:

ghostty +list-themes

This opens the theme preview, from which you can note the name of a theme you like. You cannot set a theme from here but if you have the name, you can use it in the config as I show in the next section.

0:00
/0:13

Use the / key to start a search. Press Ctrl+C to close the theme preview.

💡
you can also use another terminal emulator to preview Ghostty themes.

Next, learn to change themes in Ghostty

Ghostty has relatively straight-forward text-based configuration. All you need is a configuration file called config at ~/.config/ghostty.

Create this file if it does not exist.

mkdir -p ~/.config/ghostty
nano ~/.config/ghostty/config

Add the name of the theme of your choice in the following manner:

theme = "<name-of-the-theme>"

Save the file. Restart the Ghostty terminal to see the theme effect.

Quotes are needed for themes that have spaces in their names. An example:

theme = "Apple Classic"

Let's see it in action where I change the Ghostty theme to Apple Classic.

0:00
/0:21
💡
You can also set light and dark theme choices so that it changes with your system theme:

theme = dark:ayu,light:ayu_light

What about external themes?

Didn't spot the theme of your choice in Ghostty built-in? You can download a color scheme of your choice or create one from scratch!

The condition is that the theme files should be present in the ~/.config/ghostty/themes directory.

Once the theme file is placed in its location, open the Ghostty config file and add the line in the same manner:

theme = "<theme-file-name>"
🚧
Avoid using external theme configs file blindly. Because, themes can modify any Ghostty options.

Restoring the default theme

Don't like the theme you changed to and want to go back to the original default theme instead of trying random themes until you find a suitable one? All you have to do is to revert the changes you made earlier.

How do you do that? Just remove the theme = theme-name from the ~/.config/ghostty/config file. Or, just comment it out by adding # in front of that line.

Cool Ghostty Themes

Now that you are familiar with the basics, let's see some cool Ghostty themes I like and perhaps you can give them a try.

1. Monokai Classic

Monokai Classic is a visually pleasing color scheme that is pretty popular among developers. If you like colored terminals with syntax highlighting and fun Linux tools such as eza, Monokai Classic is a must-checkout theme.

14 Themes for Beautifying Your Ghostty Terminal
Monokai Classic

Theme code:

theme = "Monokai Classic"

2. Monokai Pro

Yes, when it comes to standout colors, Monokai variants just excel. No wonder developers often use these themes frequently. Monokai Pro is an enhanced version of the classic Monokai theme with refined colors and improved contrast for professional development work.

14 Themes for Beautifying Your Ghostty Terminal
Monokai Pro

Theme code:

theme = "Monokai Pro"

3. ayu

A minimalist dark theme with subtle red and blue accents, designed for extended coding sessions with reduced eye strain. If you use prompts like Starship or tools like Ohmyzsh, this theme does a pretty good job with the colors.

14 Themes for Beautifying Your Ghostty Terminal
ayu

Theme code:

theme = ayu

4. GitHub Dark Default

For those who use GitHub so often and love the default color schemes used in GitHub, this is a nice choice to consider. The scheme focuses on better contrast, and the dark mode blends pretty neatly with the rest of the colors.

14 Themes for Beautifying Your Ghostty Terminal
GitHub Dark Default

Theme code:

theme = GitHub-Dark-Default

5. Catppuccin Mocha

Who doesn't love the Catppuccin themes? What makes Catppuccin special is its consistency across development tools; you can theme your entire workflow with matching colors, creating a cohesive and calming development environment.

In Ghostty, you can install this theme with just one line in your config.

If you are using Starship, go for the Catppuccin Mocha preset.

14 Themes for Beautifying Your Ghostty Terminal
Catppuccin Mocha

Theme code:

theme = catppuccin-mocha

6. Desert

Desert is not a super dark theme; it is more like a warm dark theme with a matching color palette. You still get pretty neat contrast colors for better syntax highlighting and readability. The Starship Gruvbox prompt theme is a perfect prompt match for this theme.

14 Themes for Beautifying Your Ghostty Terminal
Desert

Theme code:

theme = Desert

7. Nordfox

Nord theme has a special fan following! Like Catppuccin, the Nord color scheme also has a wide presence across many tools. So, if you are one looking to build a unique work environment, Nordfox is an interesting choice.

14 Themes for Beautifying Your Ghostty Terminal
Nordfox

Theme code:

theme = nordfox

8. Adwaita Dark

If you are a GNOME user, this can be the best theme to choose for a cohesive desktop experience. Given you like Vanilla GNOME, this theme will match your system perfectly and look consistent across all your applications.

14 Themes for Beautifying Your Ghostty Terminal
Adwaita Dark

Theme code:

theme = "Adwaita Dark"

9. Synthwave

A fun, dark theme with some bright neon color palettes. It's perfect if you want your terminal to look cool while coding games or creative projects.

14 Themes for Beautifying Your Ghostty Terminal
Synthwave

Theme code:

theme = synthwave

10. Ayu Light

The light version of the ayu theme. It has clean whites and soft colors that work well in bright rooms or during daytime coding.

14 Themes for Beautifying Your Ghostty Terminal
ayu_light

Theme code:

theme = ayu_light

11. Primary

A simple, clean light theme focused on clarity. It's great for reading documentation or any work where you need crystal-clear text. It is challenging to create a perfectly read-friendly light theme, and Primary has done a fantastic job with the color choices.

14 Themes for Beautifying Your Ghostty Terminal
primary

Theme code:

theme = primary

12. Tinacious Design Light

This is some creative color choice to select. Especially the blue ones, which, if not chosen correctly, can easily make text unreadable in a white background. But this theme has all done well with the colors. It should be one of the choices for bright theme lovers!

14 Themes for Beautifying Your Ghostty Terminal
Tinacious Design (Light)

Theme code:

theme = "Tinacious Design (Light)"

13. Catppuccin Latte

Light or dark, Catppuccin is unavoidable. Latte is the only light theme variant from Catppuccin, and to me, this appears to have more identifiable colors than the dark one. Each color is perfectly visible in all cases. I suggest you use the Catppuccin starship preset theme along with this for a proper terminal experience.

14 Themes for Beautifying Your Ghostty Terminal
Catppuccin Latte

Theme code:

theme = catppuccin-latte

14. One Half Light

A balanced light theme that's bright but not harsh. The colors are chosen carefully so you can read for long periods without eye strain.

14 Themes for Beautifying Your Ghostty Terminal
OneHalfLight

Theme code:

theme = OneHalfLight

Wrapping Up

Ghostty provides plenty of built-in themes, as you can see from the first section. You can set any theme, even a custom-designed one.

Most of the themes provided by Ghostty are beautiful-looking, and if you scroll through them one at a time, you can find some eccentric color choices as well!

If you are a Kitty user, you may recall the kitten themes command to get a similar interactive theme selector. But, in Kitty, you can easily press enter on a theme to modify the config and apply the theme. That handy feature is absent here, unfortunately.

I let you experiment with Ghostty themes and if you are interested, you can also explore some beautiful themes for VS Code 😸


from It's FOSS https://ift.tt/hVBEolu
via IFTTT