Rabu, 27 September 2023

4 Incredibly Simple Ways to Customize Budgie Desktop in Linux

4 Incredibly Simple Ways to Customize Budgie Desktop in Linux

If you ask me to make the MATE desktop modernized with added features and GTK support, I may come up with something like Budgie!

Budgie is an impressive desktop environment (DE) that provides you with a familiar layout along with a unique user experience.

So, how can you customize the Budgie desktop to elevate your experience? Fret not; I got your back here with some essential tips to tweak your Budgie experience.

I will help you do the following:

  • Change wallpaper
  • Change themes, icons, and cursor (the easy way)
  • Customize panel
  • Customize dock

Let us get started! 🤩

1. Change the wallpaper of Budgie DE

The Budgie desktop comes with some beautiful wallpapers pre-installed.

To change the wallpaper on Budgie's desktop, all you have to do is follow two simple steps:

  1. Right-click on the home screen and choose Change Desktop Backgroun option
  2. Select the image, and it will be applied to your home screen
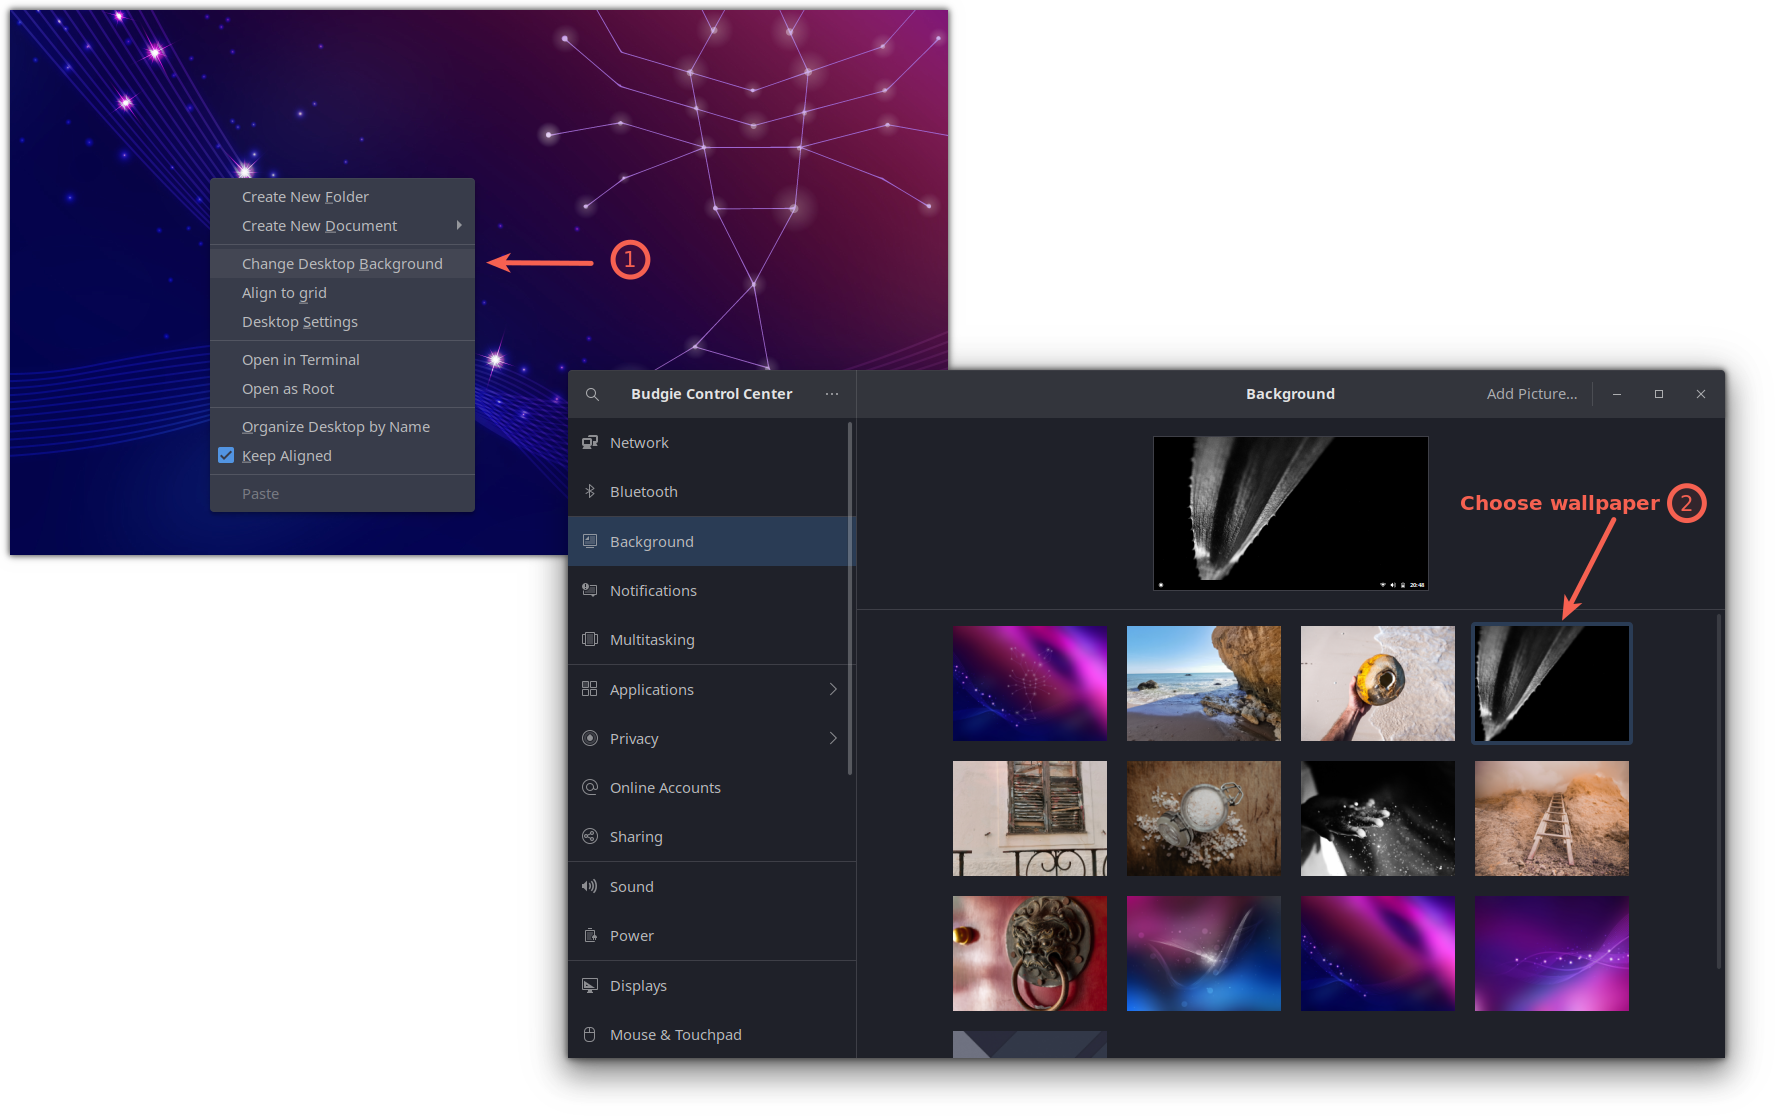
4 Incredibly Simple Ways to Customize Budgie Desktop in Linux
Click to enlarge the image

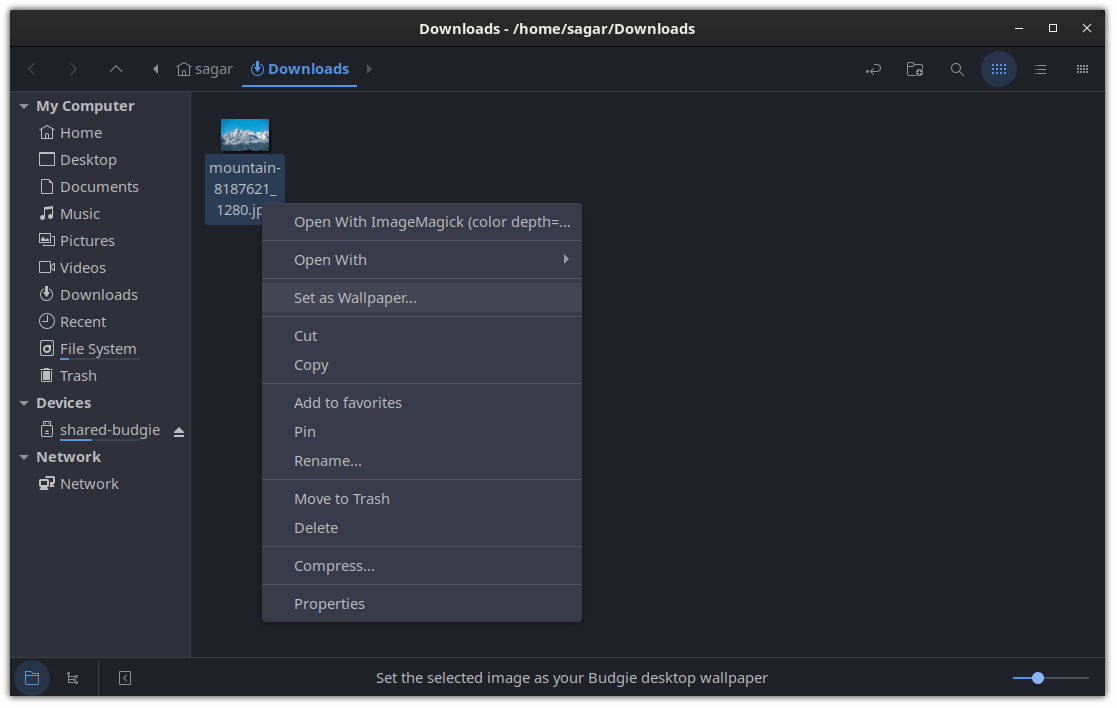
But if you don't like the available options, you can always download wallpapers from the web.

Once done, open the file manager, navigate to where the image is located, right-click on the image, and choose the Set as Wallpaper... option.
4 Incredibly Simple Ways to Customize Budgie Desktop in Linux

2. Change the desktop theme, icons, and cursor theme

Traditionally, we download themes from the web, extract the downloaded file, and move files to the respective directory to apply the theme on Linux.

How to Install Themes in Ubuntu Linux
This beginner’s guide shows you how to install themes in Ubuntu. The tutorial covers the installation of icon themes, cursor themes, GTK themes and GNOME Shell themes.
4 Incredibly Simple Ways to Customize Budgie Desktop in Linux

But that takes a while and may not be the quickest way to do it. You are free to explore it above if you are curious.

And that's where the ocs-url tool comes into play.

A tool that will install any theme (from portals like gnome-look.org) with a single click.

💡
Gnome-look.org and pling.com are a network of sites by Opendesktop.org to help you find themes, wallpapers, icons, and other goodies in a single place.

It is in no way officially affiliated with any desktop environment.

But the sad part is that it is not available in the package manager of any Linux distribution, which means you have to install it on your system manually.

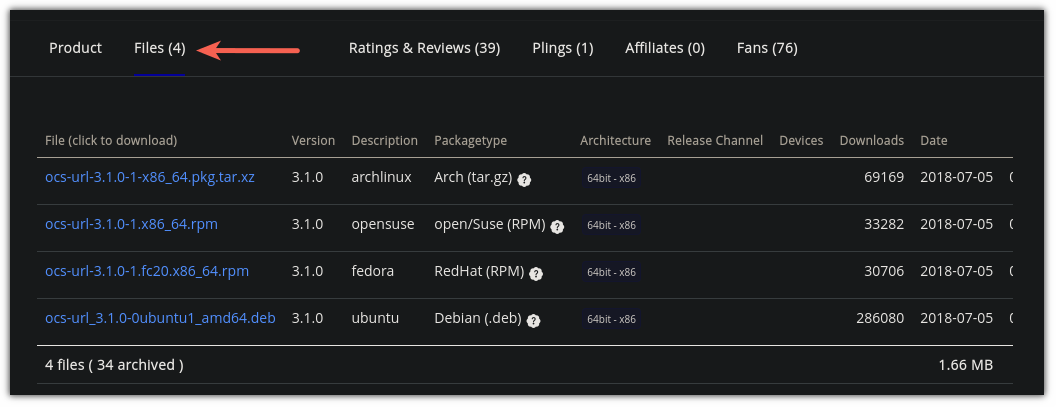
So first, go to the official download page of the ocs-url, go to the Files tab, and download packages for your system:
4 Incredibly Simple Ways to Customize Budgie Desktop in Linux

Once done, open your terminal and change the directory where the file was downloaded. For the most users, it will be the Downloads directory:

cd Downloads 

Now, use the following command for your Linux distro:

For Ubuntu:

sudo dpkg -i ocs-url*.deb

For Fedora:

sudo dnf install qt5-qtbase qt5-qtbase-gui qt5-qtsvg qt5-qtdeclarative qt5-qtquickcontrols && sudo rpm -i ocs-url*.rpm

For Arch:

sudo pacman -S qt5-base qt5-svg qt5-declarative qt5-quickcontrols && sudo pacman -U ocs-url*.pkg.tar.xz

For openSUSE:

sudo zypper install libQt5Svg5 libqt5-qtquickcontrols && sudo rpm -i ocs-url*.rpm

Now, let's take a look at how you install system themes, icons, and cursor themes.

Change system theme

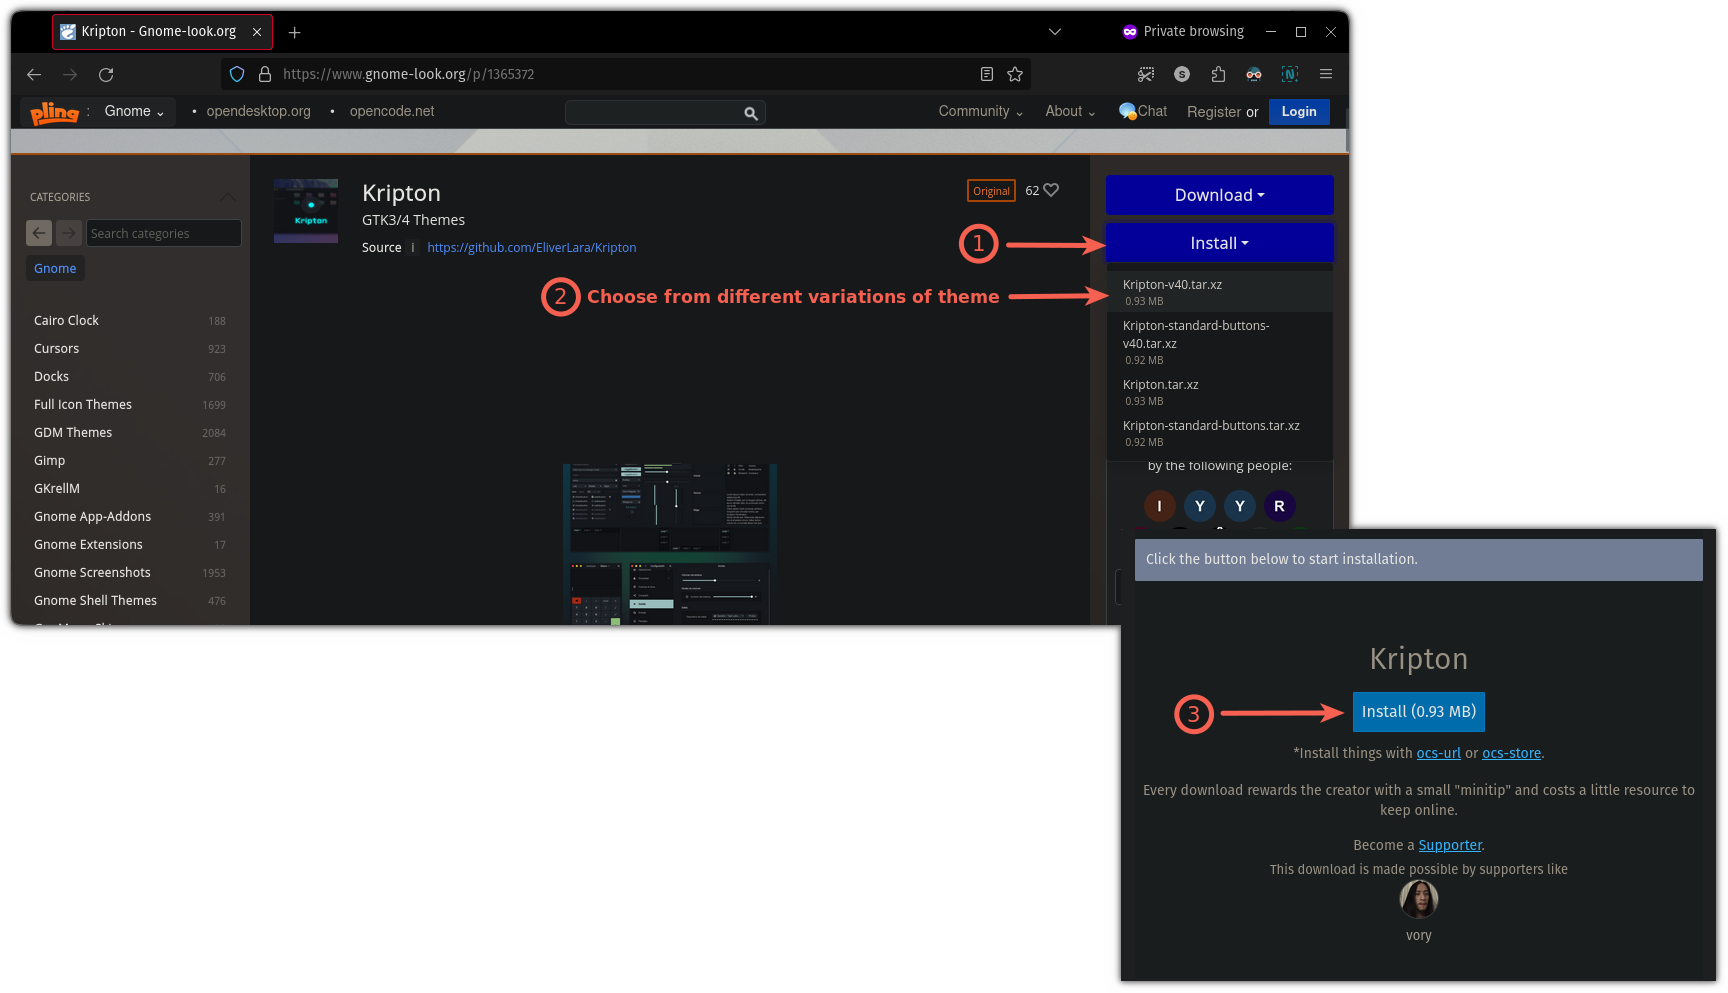
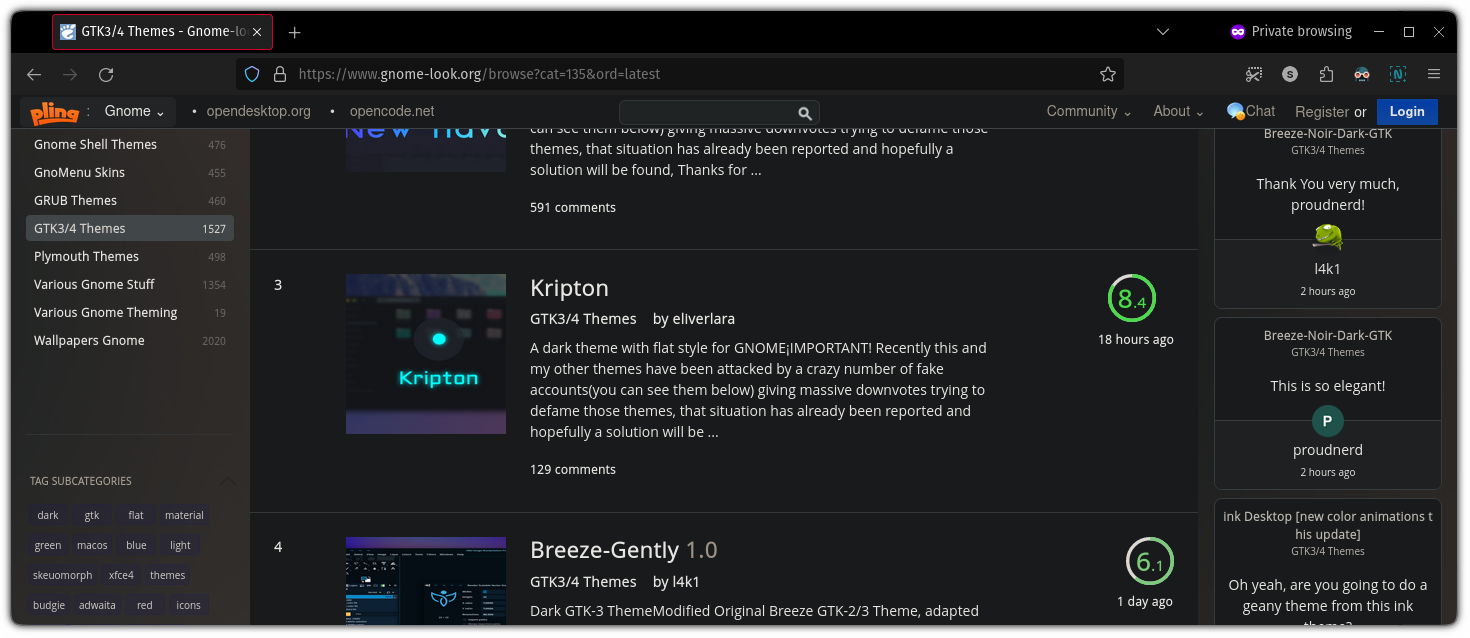
To change the system theme, first, visit the Gnome Look portal and select your preferred theme (you can choose between GTK 3 and 4 themes):
4 Incredibly Simple Ways to Customize Budgie Desktop in Linux

Decide any of your favorite themes; here, I'm going with the Kripton theme. From there, you will see the option to Install themes.

From here, you will have to follow two simple steps:

  • After clicking on the Install button, it will show different variations of the theme. Choose one of them.
  • Next, it will open a prompt, there you have to hit the Install button:
4 Incredibly Simple Ways to Customize Budgie Desktop in Linux

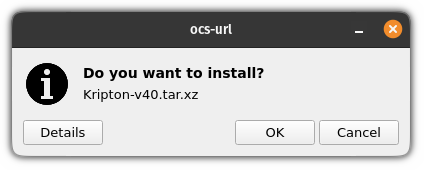
It will open ocs-url asking you whether you want to install the selected theme.

Simply press the OK button to install the theme:
4 Incredibly Simple Ways to Customize Budgie Desktop in Linux

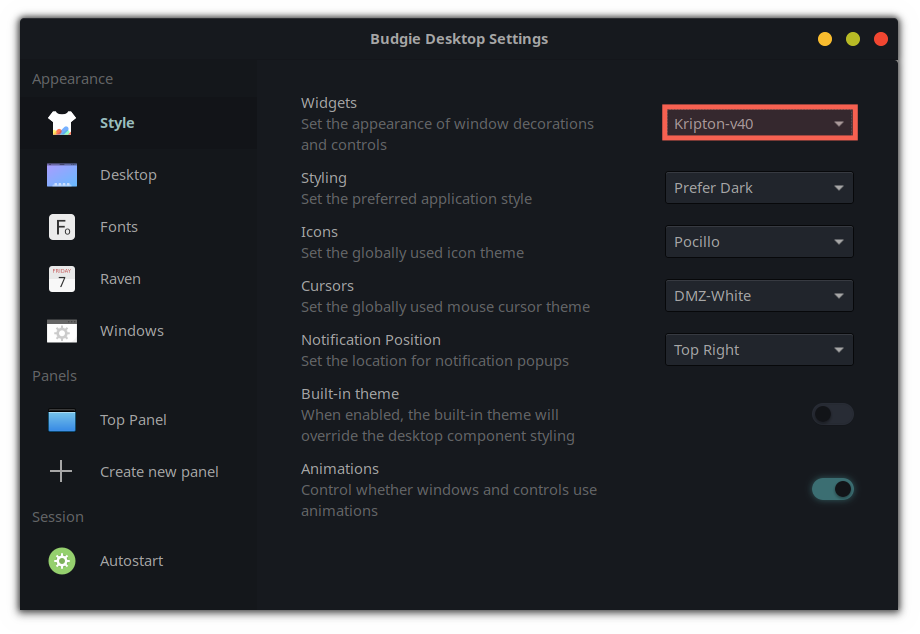
Now, access the Budgie Desktop Settings and pick the installed theme from the Widget option under Style section.
4 Incredibly Simple Ways to Customize Budgie Desktop in Linux

Change icons

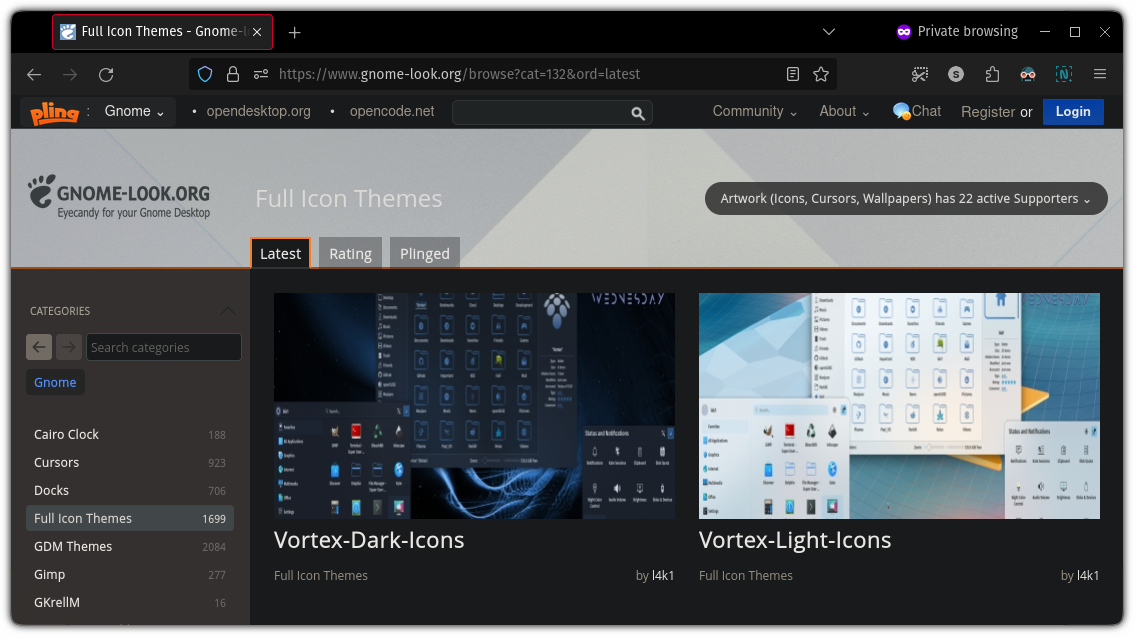
To change icons, visit the Icon section of the Gnome-look portal, and find/search for the icon that suits you the best:
4 Incredibly Simple Ways to Customize Budgie Desktop in Linux

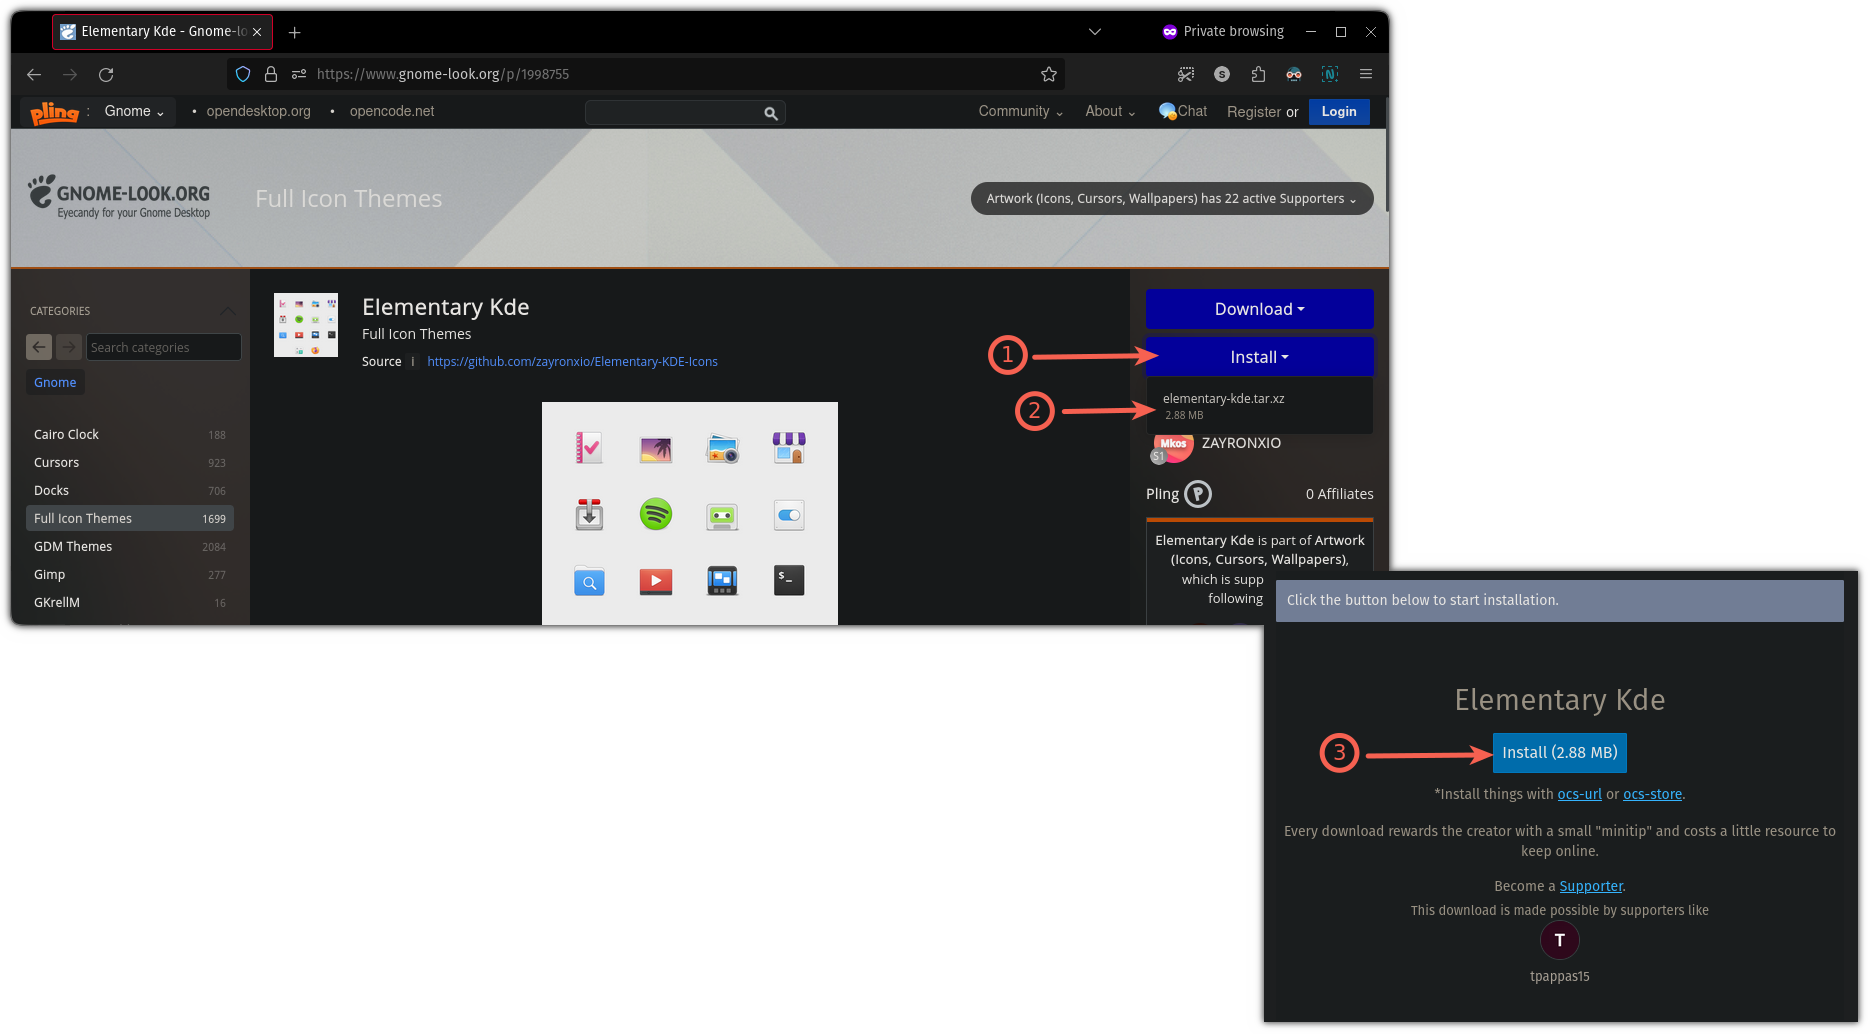
Once you find that perfect icon, you will find two options there: Download and Install. Click on the Install button.

You may find multiple icons, but in most cases there will only be one. Click on that option, it will open a prompt. Again, hit the Install button:
4 Incredibly Simple Ways to Customize Budgie Desktop in Linux

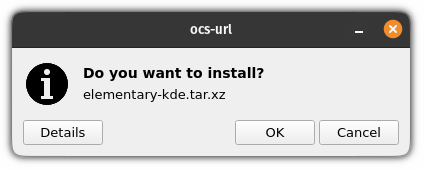
Soon, you'll see a prompt from ocs-url asking whether you want to install the selected icon pack or not. Hit the OK button to install the icon pack:
4 Incredibly Simple Ways to Customize Budgie Desktop in Linux

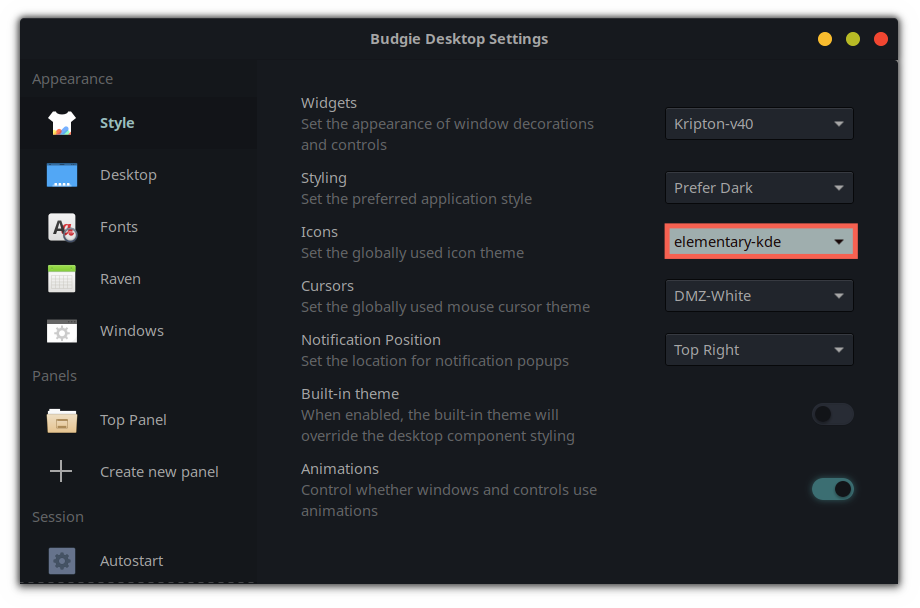
Next, open the Budgie Desktop Settings and from the icons, you can select the recently installed icons (I went with the elementary-kde option):
4 Incredibly Simple Ways to Customize Budgie Desktop in Linux

Change cursor theme

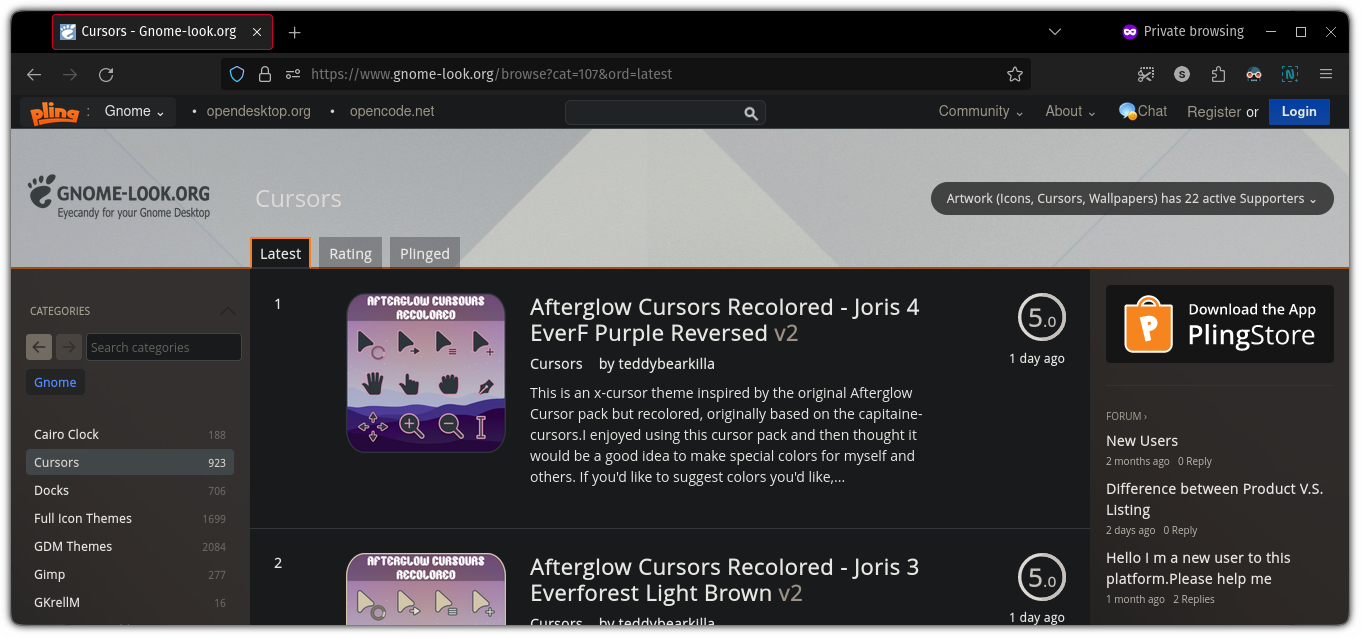
Similar to the above, visit the Gnome Look's cursor icon section to find the most suitable cursor theme for you:
4 Incredibly Simple Ways to Customize Budgie Desktop in Linux

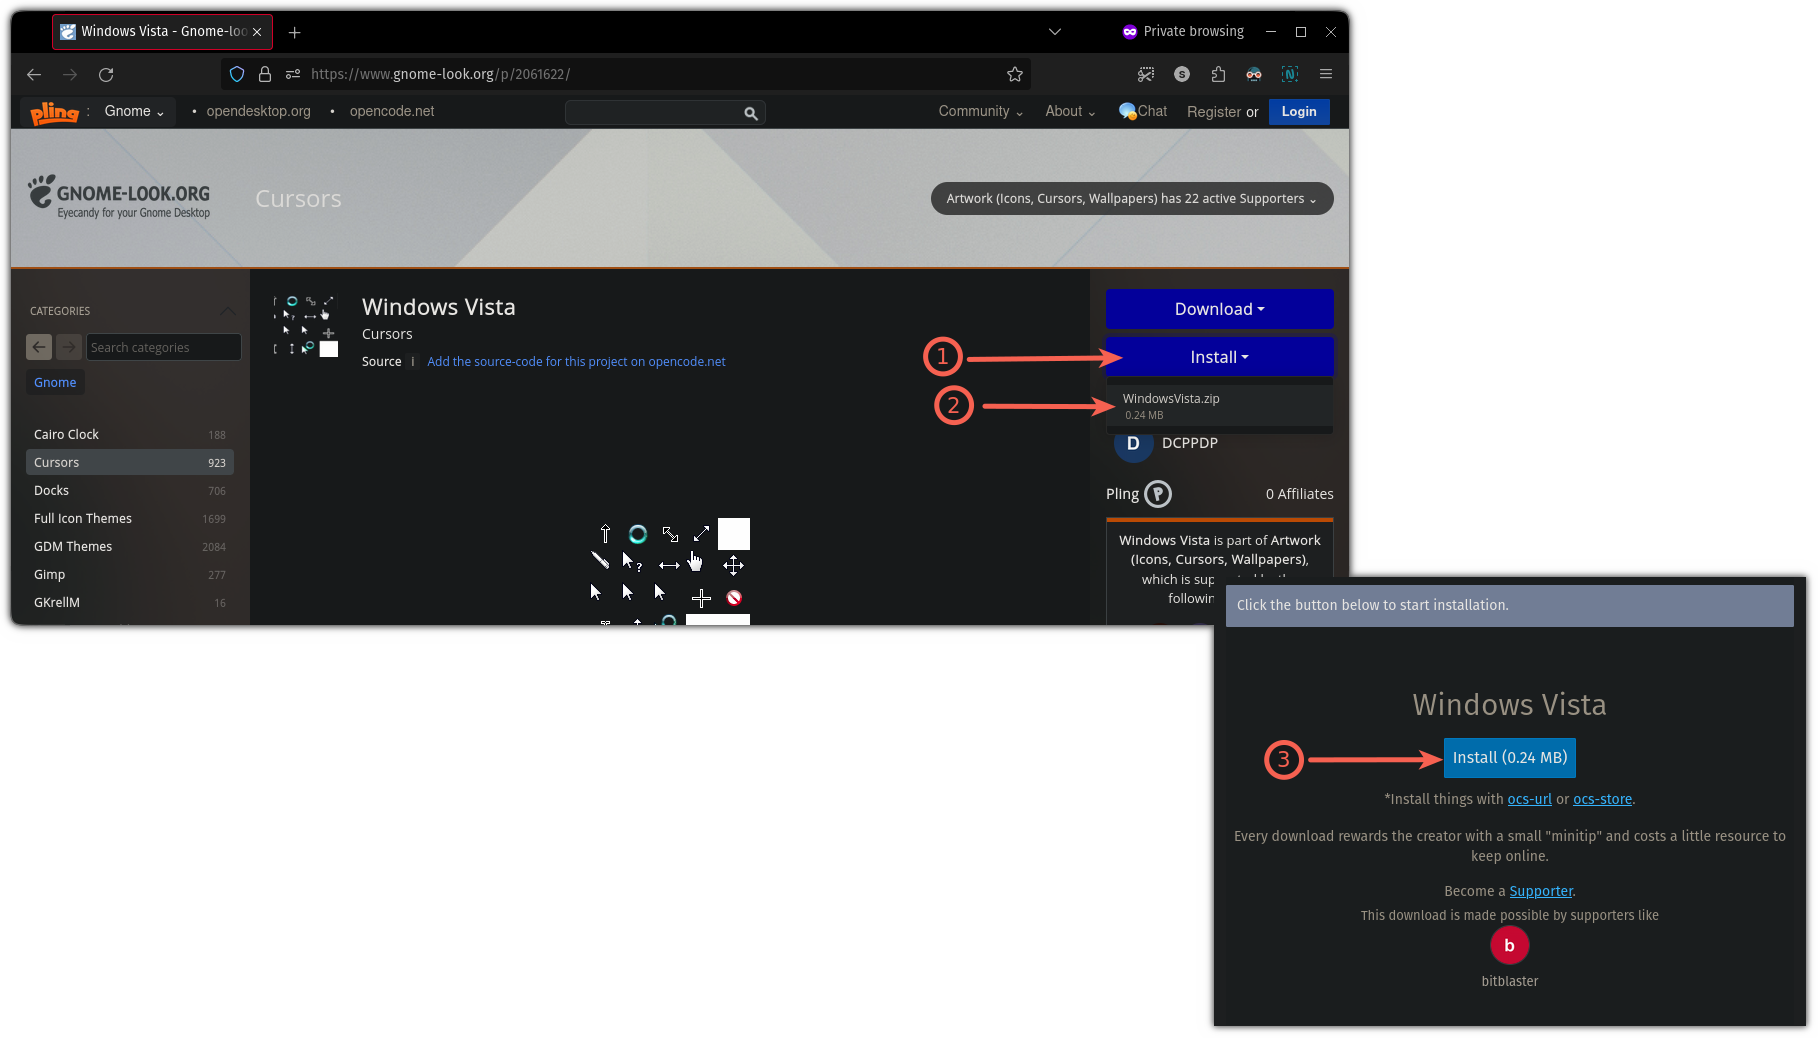
Once you find the perfect cursor theme, click on the option, and you will see the option to install the selected cursor theme.

It will open a prompt and there, click again on the installation button:
4 Incredibly Simple Ways to Customize Budgie Desktop in Linux

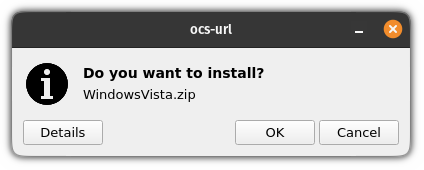
You will see a prompt from the ocs-url to install the cursor theme. All you have to do is press the OK button to start the installation:
4 Incredibly Simple Ways to Customize Budgie Desktop in Linux

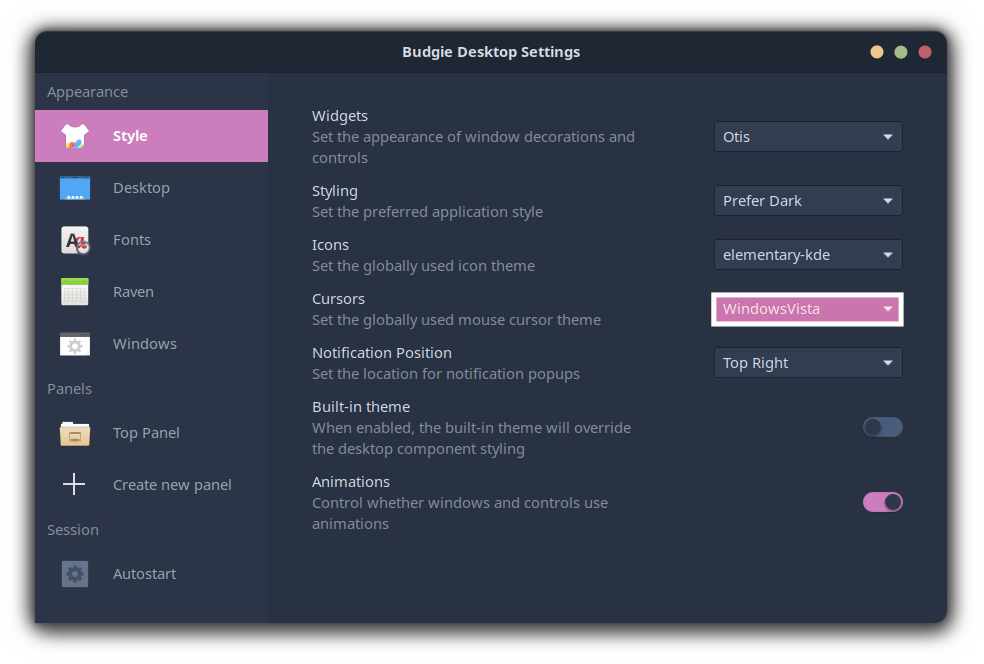
Once done, open the Budgie Desktop Settings and choose the cursor theme from the Cursors:
4 Incredibly Simple Ways to Customize Budgie Desktop in Linux

3. Customize the panel in Budgie Desktop

Depending on the Linux distro, the position for the panel may differ. For instance, you could be using Solus Budgie or Ubuntu Budgie.

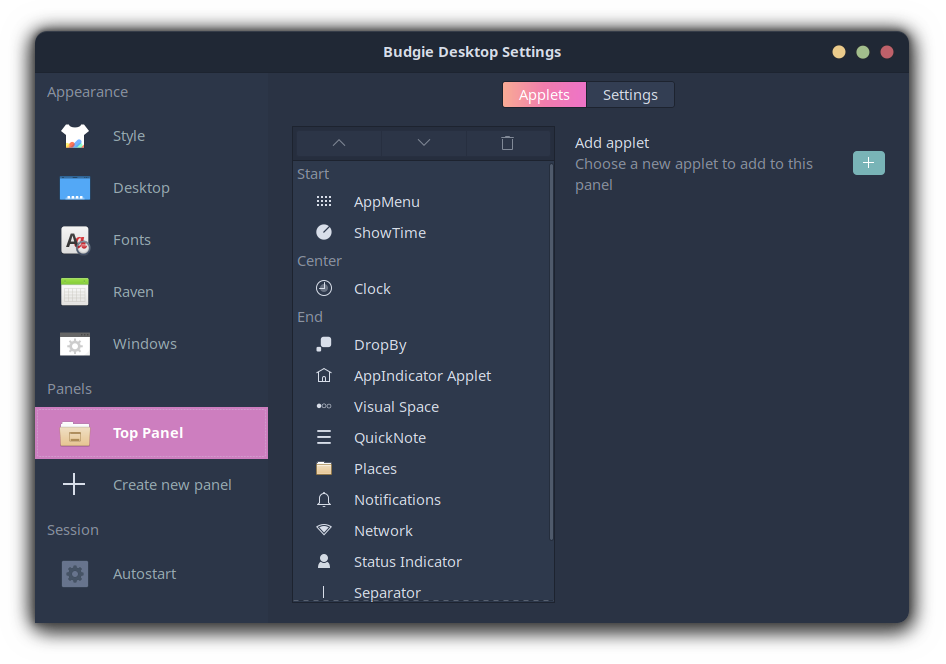
To access the settings for the panel, open the Budgie Desktop Settings, and from there you will find the settings for the panel:
4 Incredibly Simple Ways to Customize Budgie Desktop in Linux

As you can see, it shows the enabled applets on the panel in three sections:

Start (extreme left), Center, and End (extreme right).

📋
Remember, each applet has multiple options so you can also configure them individually.

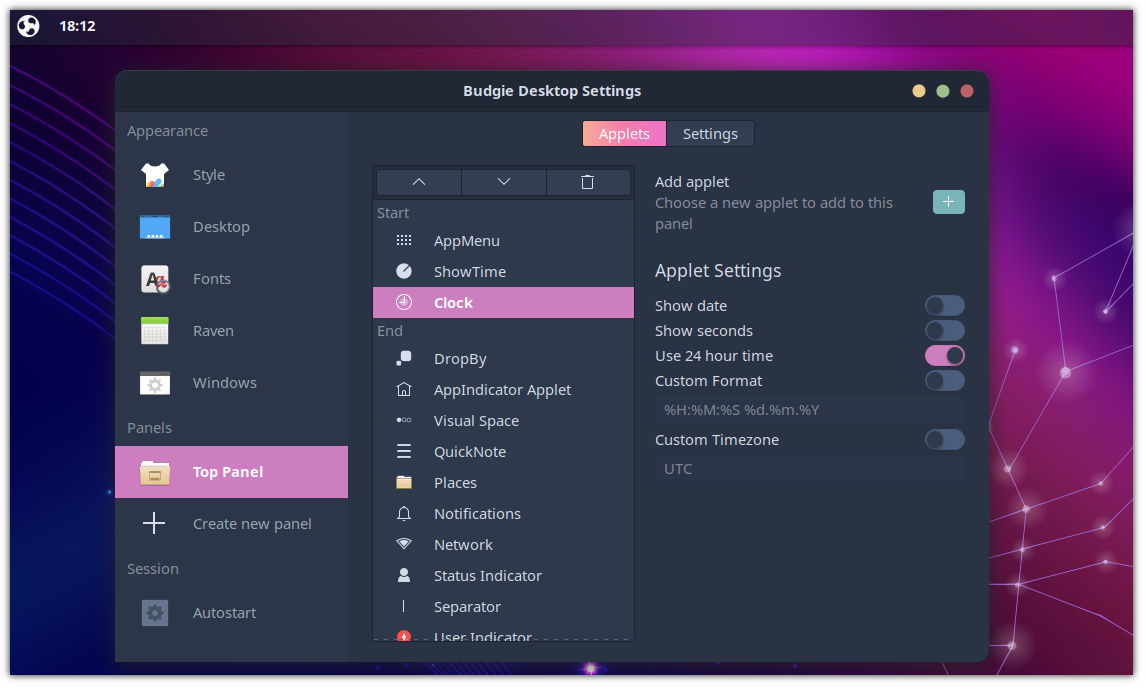
You can adjust between them. For example, here, I moved the clock to the left side as it suits my workflow much better:
4 Incredibly Simple Ways to Customize Budgie Desktop in Linux

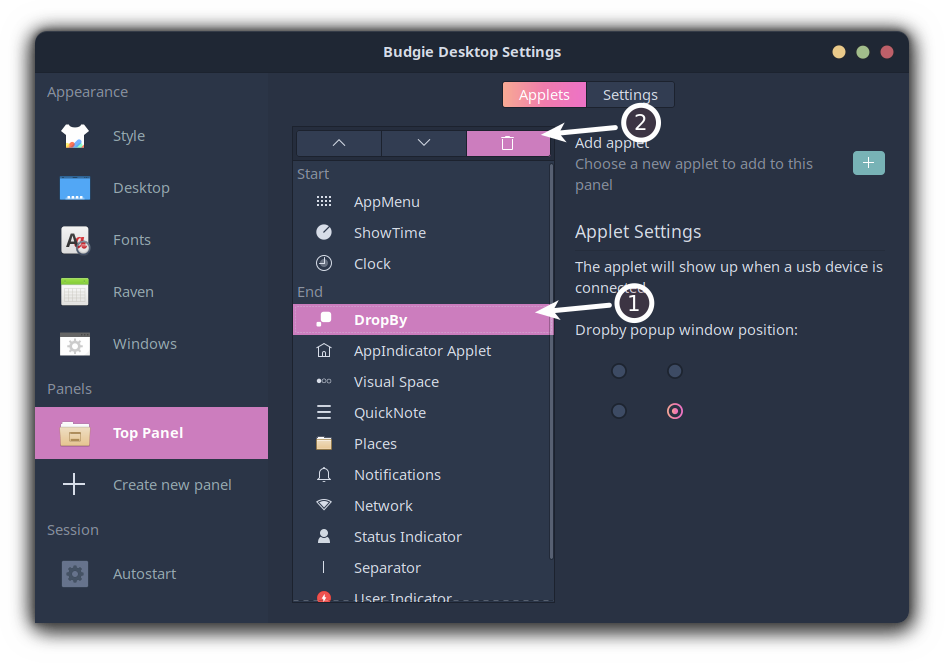
To move applets, all you have to do is select the applet and use the up and down arrow buttons located above the list of the applet.

If you want to remove the applet, just select the applet and use the delete button:
4 Incredibly Simple Ways to Customize Budgie Desktop in Linux

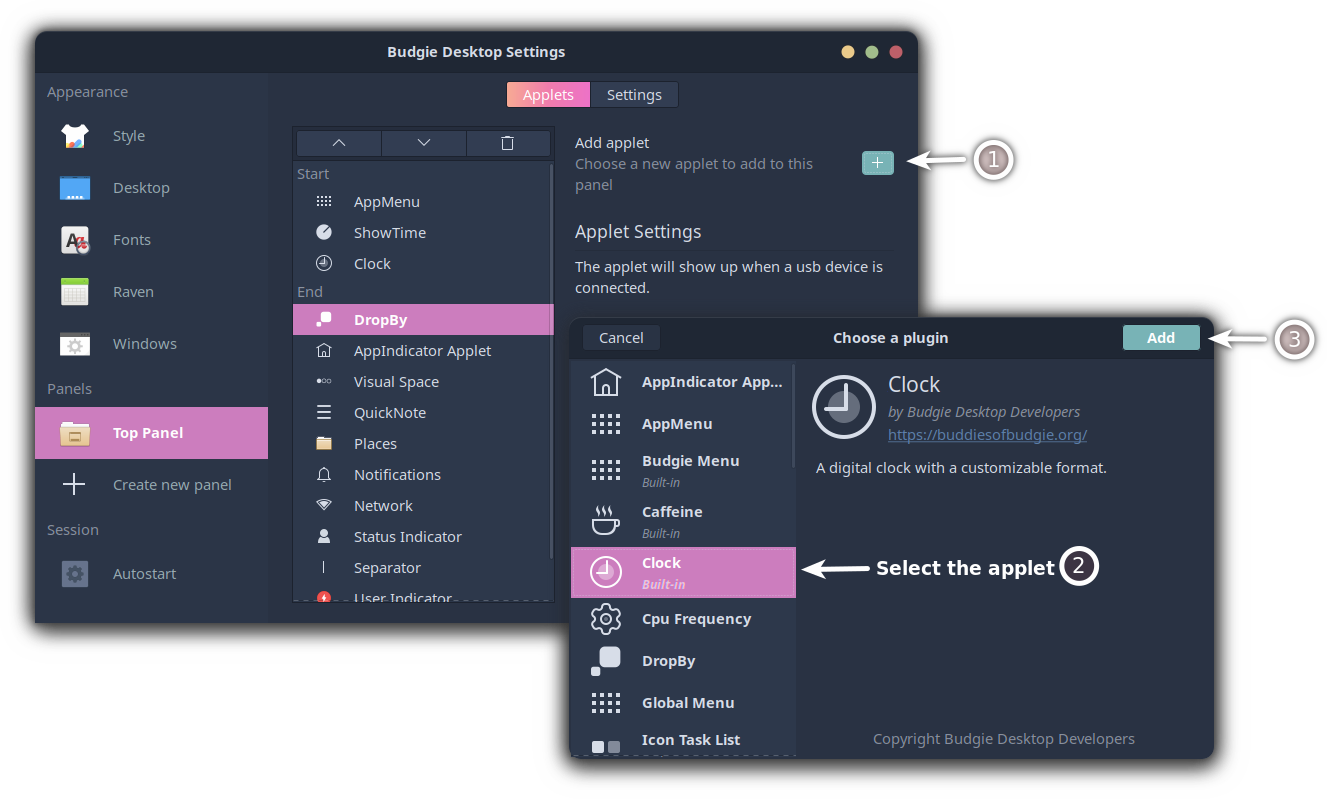
To add more applets, there is an option to add applet with the + icon. Simply press the button, and it will list all the available applets to you.

Once you find a useful applet, select the applet and click on the Add button:
4 Incredibly Simple Ways to Customize Budgie Desktop in Linux

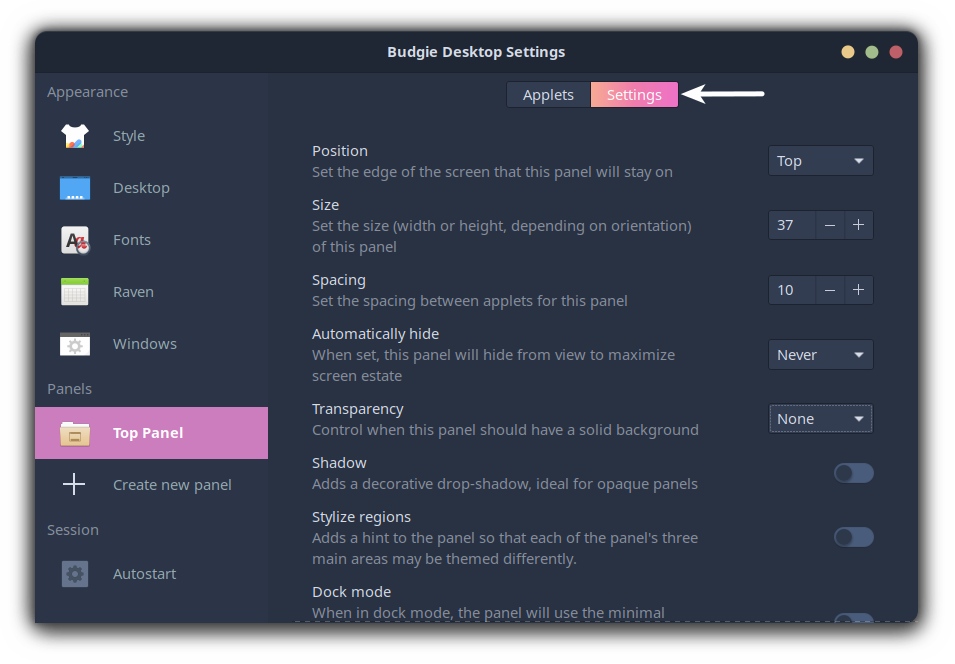
If you want to make the panel transparent, add shadows, increase/decrease space between applets, then go to the settings menu as shown below:
4 Incredibly Simple Ways to Customize Budgie Desktop in Linux

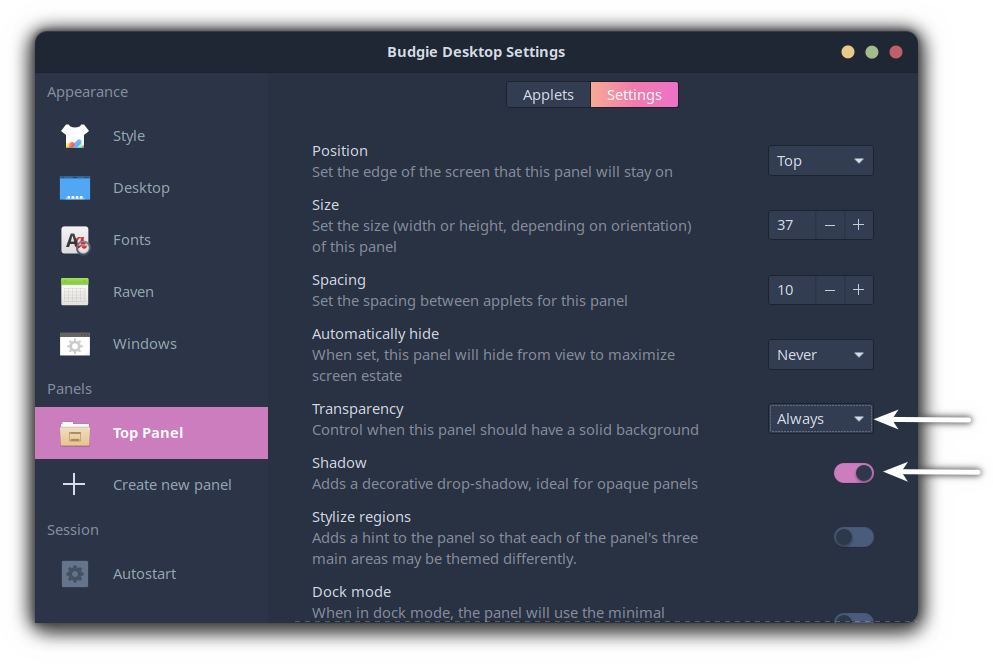
For example, here, I made my panel transparent and added shadows to make it look pleasant:
4 Incredibly Simple Ways to Customize Budgie Desktop in Linux

4. Customize the dock in the Budgie Desktop

In this section, I will walk you through the following ways to make your dock look appealing and functional:

  • Changing the theme of the dock
  • Adding docklets to add more features to the dock

Change the theme of the dock

Sorry, but the ocs-url tool won't help you change the theme of the dock, so the only way you are left with it is the manual way!

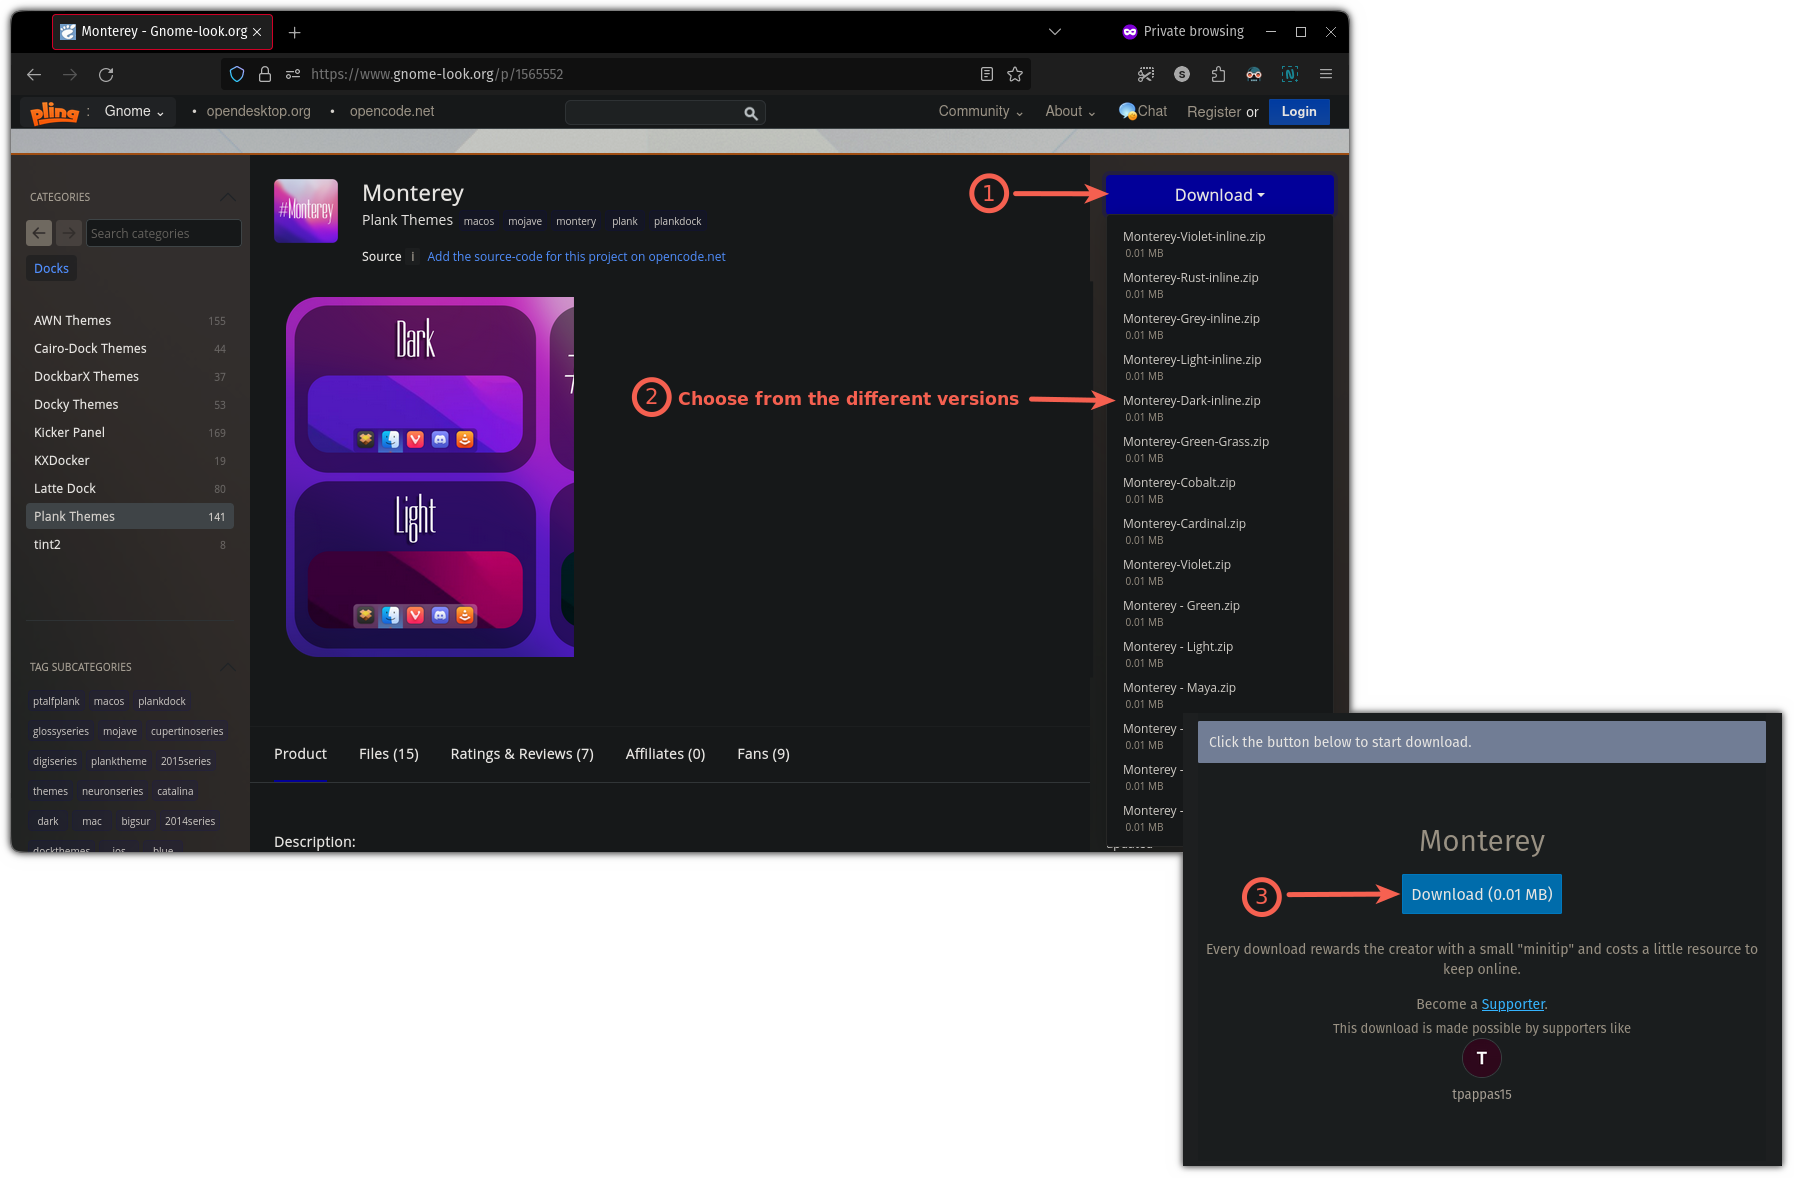
First, visit the Gnome Look's Plank theme section and download any of your favorite plank dock themes.

Here, I went for the Monterey theme to mimic macOS (dark-inline version):
4 Incredibly Simple Ways to Customize Budgie Desktop in Linux

Now, open the terminal and navigate to where the theme was downloaded.

For most users, it will be the Downloads directory:

cd ~/Downloads

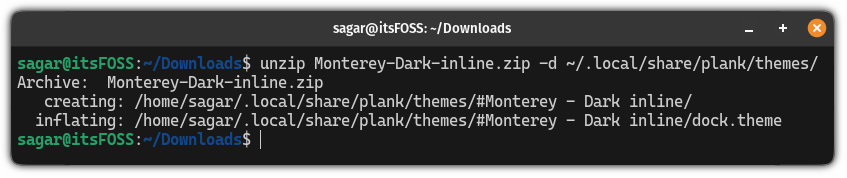
Now, use the unzip command to extract files to the .local/share/plank/themes/:

unzip <theme_name.zip> -d .local/share/plank/themes/

In my case, it looked like this:

unzip Monterey-Dark-inline.zip -d ~/.local/share/plank/themes/
4 Incredibly Simple Ways to Customize Budgie Desktop in Linux

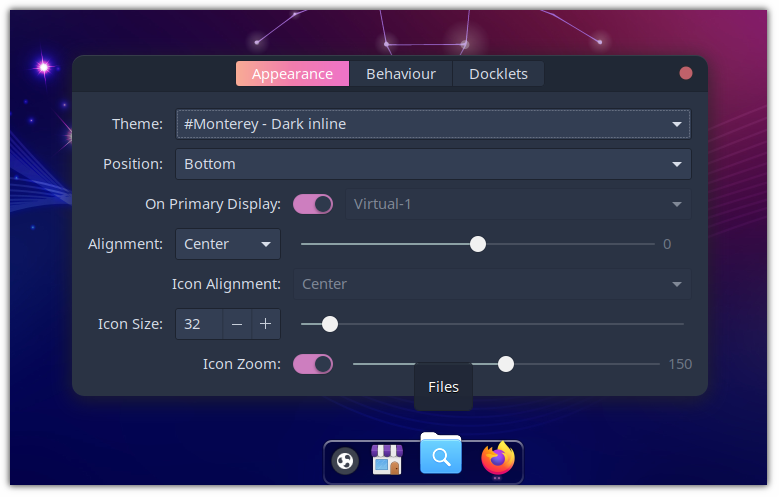
Next, open the Plank preferences and change to the recently installed theme.

I changed mine to Monterey -Dark inline:
4 Incredibly Simple Ways to Customize Budgie Desktop in Linux

Add docklets to have more features

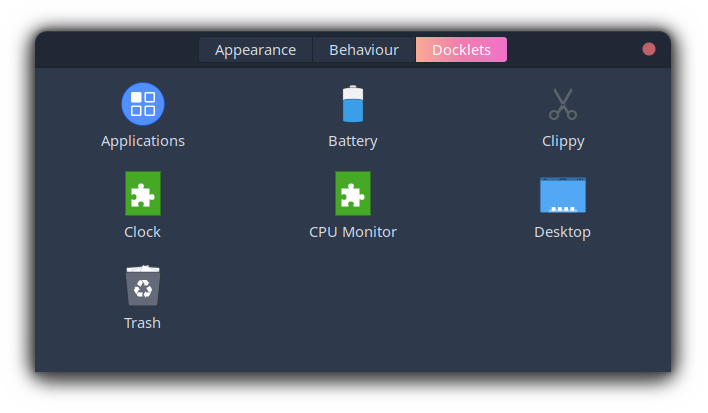
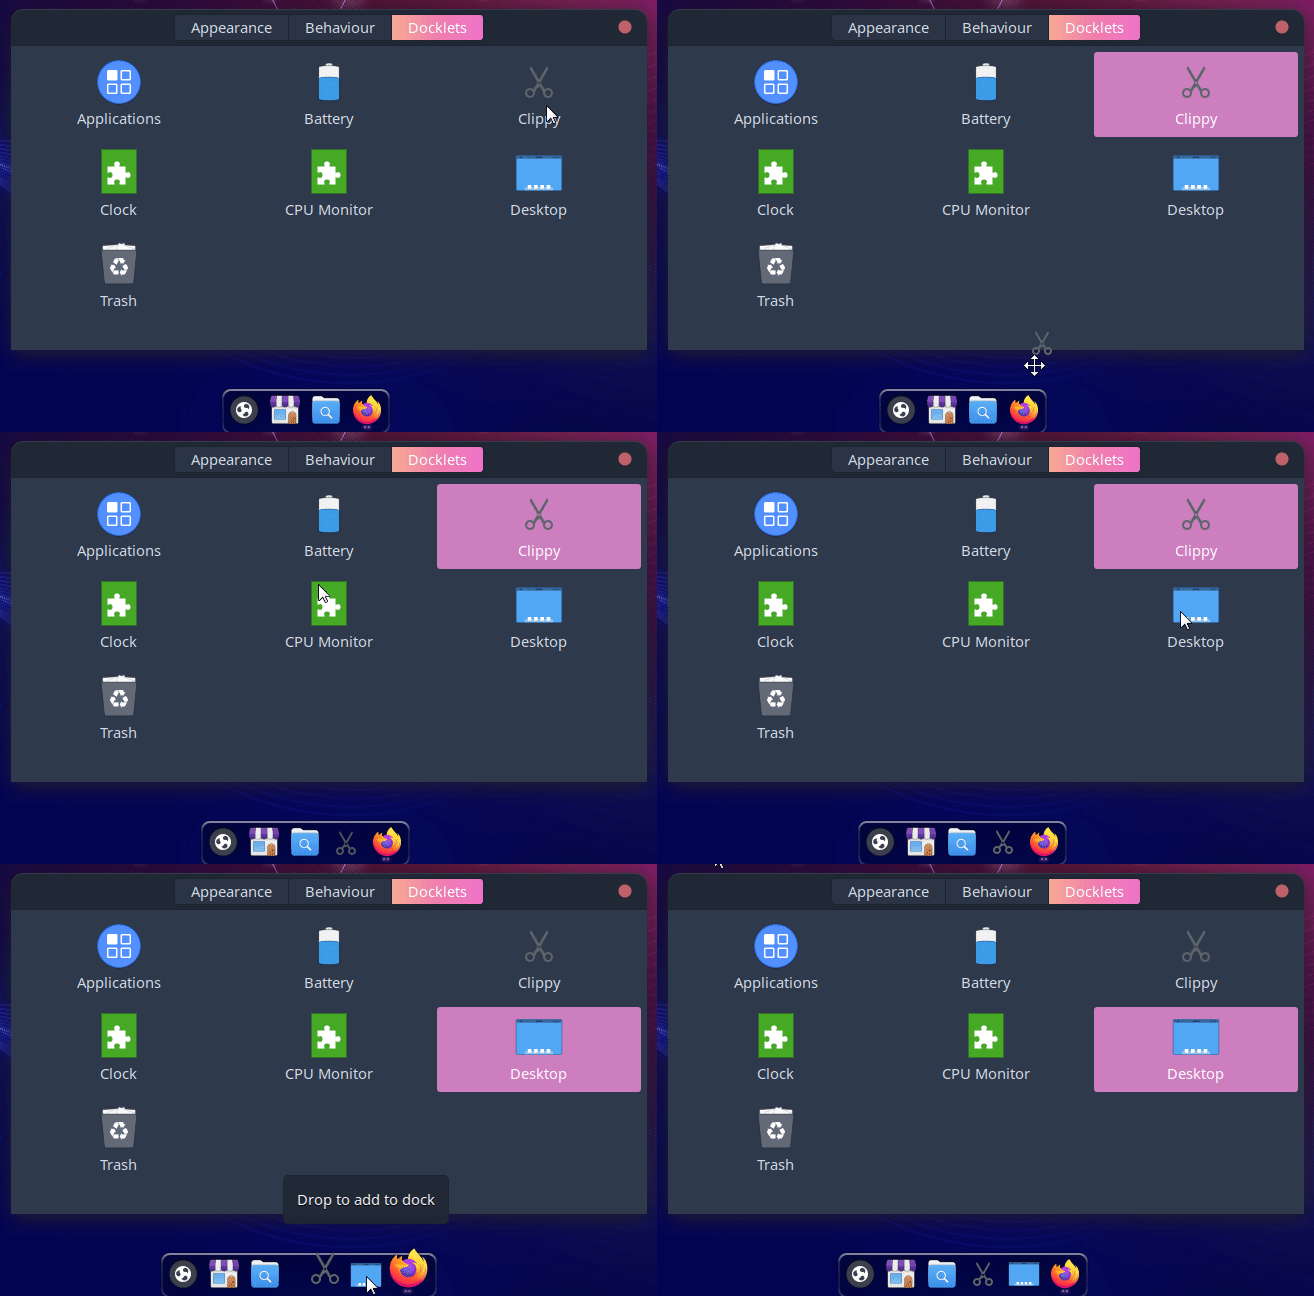
Think of docklets as applets but for the dock but unlike applets, you are not given many options.

To add/remove docklets, first, open the Plank preferences and go to the Docklets menu to list the available options:
4 Incredibly Simple Ways to Customize Budgie Desktop in Linux

Now, if you want to add docklets, simply drag them to the dock:
4 Incredibly Simple Ways to Customize Budgie Desktop in Linux

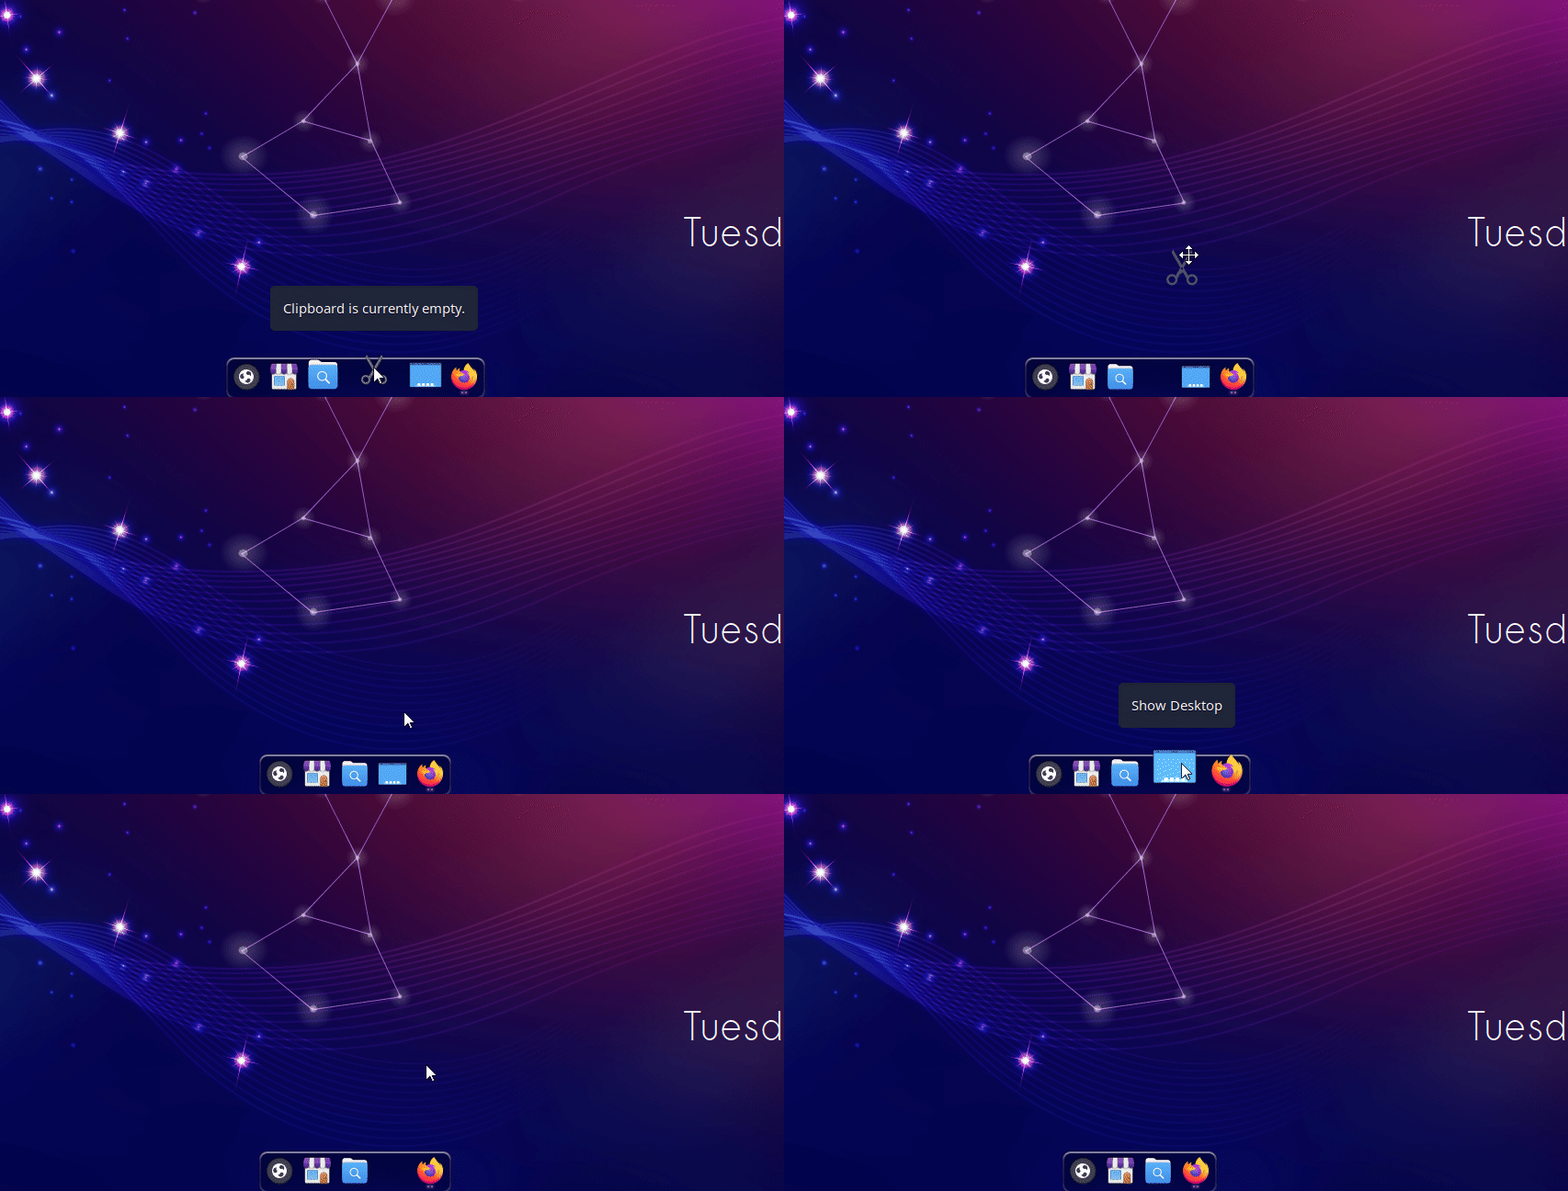
But what if you would like to remove the added docklets?

Well, that's pretty simple! Just drag them out of the dock and they will be removed:
4 Incredibly Simple Ways to Customize Budgie Desktop in Linux

Ready to Get Started With Budgie?

Sure, you can always install a Linux distribution with Budgie desktop environment baked in—for convenience.

However, you can also choose to install Budgie on your existing distro, such as Ubuntu:

How to Install Budgie Desktop on Ubuntu
Budgie is a modern, alternative take on GNOME. Learn to install the Budgie desktop environment on Ubuntu.
4 Incredibly Simple Ways to Customize Budgie Desktop in Linux

For this tutorial, I utilized Ubuntu Budgie. The steps work for Budgie desktop no matter the distribution you use.

💬 How do you customize your Budgie desktop experience? Do you want to add any tips to this article? Share your experiences in the comments down below.


from It's FOSS https://ift.tt/uPpR7NE
via IFTTT

Senin, 25 September 2023

21 Useful Terminal Shortcuts Pro Linux Users Love to Use

21 Useful Terminal Shortcuts Pro Linux Users Love to Use

Sure, learning the Linux commands should always be your priority but once you get a grip on the command line, there's one other thing you should focus on.

Terminal shortcuts!

You have no idea how helpful they are until you know how to use them to make your terminal sessions super productive.

So in this tutorial, I will walk you through the top terminal shortcuts with examples of how to use them.

Before I explain all the shortcuts individually, here's a cheat sheet of what I'll be discussing in this tutorial:

Shortcut Description
Ctrl + A Move to the start of the line.
Ctrl + E Move to the end of the line.
Ctrl + U Delete from the cursor to the start of the line.
Ctrl + K Delete from the cursor to the end of the line.
Ctrl + W Delete the word before the cursor.
Ctrl + L Clear the terminal screen.
Ctrl + C Stop the current process/command.
Ctrl + D Log out or exit the terminal.
Ctrl + Z Pause the current process (can be resumed).
Ctrl + R Search command history (backward search).
Up Arrow Show the previous command (from the command history).
Down Arrow Show the next command (from the command history).
!! Repeat the last command.
!n Repeat the nth command from history.
Tab Auto-complete commands, files, or directories.
Tab twice List all possible completions.
Ctrl + Shift + C Copy the selected text or command.
Ctrl + Shift + V Paste copied text or command.
Ctrl + Shift + N Open a new terminal window.
Ctrl + Shift + T Open a new tab in the terminal.
Ctrl + TaborCtrl + PageDown Switch between terminal tabs.
📋
Though I have used the capital letters, you don't have to type them in caps. I mean Ctrl+A means pressing Ctrl and the A key together. You don't have to press Shift+a key to get the uppercase A.

Now, let's have a look at them individually.

1. Ctrl + A: Move to the start of the line

When you press the Ctrl + A, it will shift the cursor to the beginning of the file which can be really helpful when you write a long command and want to make changes at the beginning of the line.

For example. here, I've demonstrated how you can press the Ctrl + A anywhere and it will shift you to the beginning of the line:

21 Useful Terminal Shortcuts Pro Linux Users Love to Use
Go to the beginning of the line in Linux terminal using Ctrl + A shortcut

2. Ctrl + E: Move to the end of the line

While using the terminal if you want to jump to the end of the line, you can simply press the Ctrl + E and it will do the job.

In the following example, I used a sample text and pressed Ctrl + E to get to the end of the line:

21 Useful Terminal Shortcuts Pro Linux Users Love to Use
Go to the end of the line in linux terminal using Ctrl + E

3. Ctrl + U: Delete from the cursor to start

There are times when you want to remove everything from the cursor position to the beginning of the line.

In that case, all you have to do is use the left arrow keys to place the cursor from where you would like to delete to the start of the line and then press Ctrl + U :

21 Useful Terminal Shortcuts Pro Linux Users Love to Use
Use Ctrl+U to delete from the cursor to the beginning of the line
💡
Entering the account password with sudo command and unsure whether you typed it correctly? Instead of pressing backspace all the way, just use Ctrl+U keyboard shortcut and start typing the password again.

4. Ctrl + K: Delete from the cursor to the end

As you can guess from the title, when you press the Ctrl + K, it will remove everything from the cursor to the end of the line (everything from the cursor position to the right-hand side).

To use this shortcut, first, you have to place your cursor from where you want to remove text to the end and then press the Ctrl + K as shown here:

21 Useful Terminal Shortcuts Pro Linux Users Love to Use
Delete text from the cursor to the end in Linux terminal using Ctrl + K

5. Ctrl + W: Delete a single word before the cursor

This is what I use daily as I often mistype commands and want to remove one part of the command for that, you can simply press the Ctrl + W .

When you press the Ctrl + W key, it will only remove a single word before the cursor:

21 Useful Terminal Shortcuts Pro Linux Users Love to Use
Delete single word before the cursor in Linux terminal by pressing Ctrl + W
Learn Linux Quickly - Linux Commands Book for Beginners
Learn Linux Quickly doesn’t assume any prior Linux knowledge, which makes it a perfect fit for beginners. Nevertheless, intermediate and advanced Linux users will still find this book very useful as it goes through a wide range of topics. Learn Linux Quickly will teach you the following topics:Insta…
21 Useful Terminal Shortcuts Pro Linux Users Love to Use

6. Ctrl + L: Clear terminal screen (kind of)

It does not clear the terminal screen in a true manner but declutters the screen and if you scroll up, you will still find the previous command and execution history.

Yes, it is different than the clear command as it removes the history and you will find the execution of the clear command in the command history.

But when you press Ctrl + L, it just declutters your current screen and you won't find it inside of the history (as it is not a command itself).

For example, here, I executed the history command and then pressed the Ctrl + L key to clear the screen:

21 Useful Terminal Shortcuts Pro Linux Users Love to Use
clear terminal screen in Linux using Ctrl+L

7. Ctrl +C: Stop the current process/execution

How many times did it happen when you wanted to stop the command execution and you had no idea how to do it and ended up closing the terminal itself?

Well, in any case, all you have to do is press Ctrl + C.

When you press the keys, it sends the SIGINT signal that will eventually kill the process.

For example, here, I killed the ongoing point command execution:

21 Useful Terminal Shortcuts Pro Linux Users Love to Use
Use Ctrl+C terminal shortcut to stop a running command

In the end, you'll see the ^C symbol indicating you pressed the Ctrl + C to kill the ongoing execution.

But there are several processes that may not be killed using the Ctrl + C signal and in that case, you can use the other termination signals in Linux:

How to use SIGINT and other Termination Signals in Linux
Terminating executing process is more than just kill -9. Here are some of the prominent termination signals and their usage.
21 Useful Terminal Shortcuts Pro Linux Users Love to Use

8. Ctrl + D: Logout or exit from the terminal

You can always use the exit command to close a shell session and terminal. You can also use the Ctrl+D shortcut keys as well.

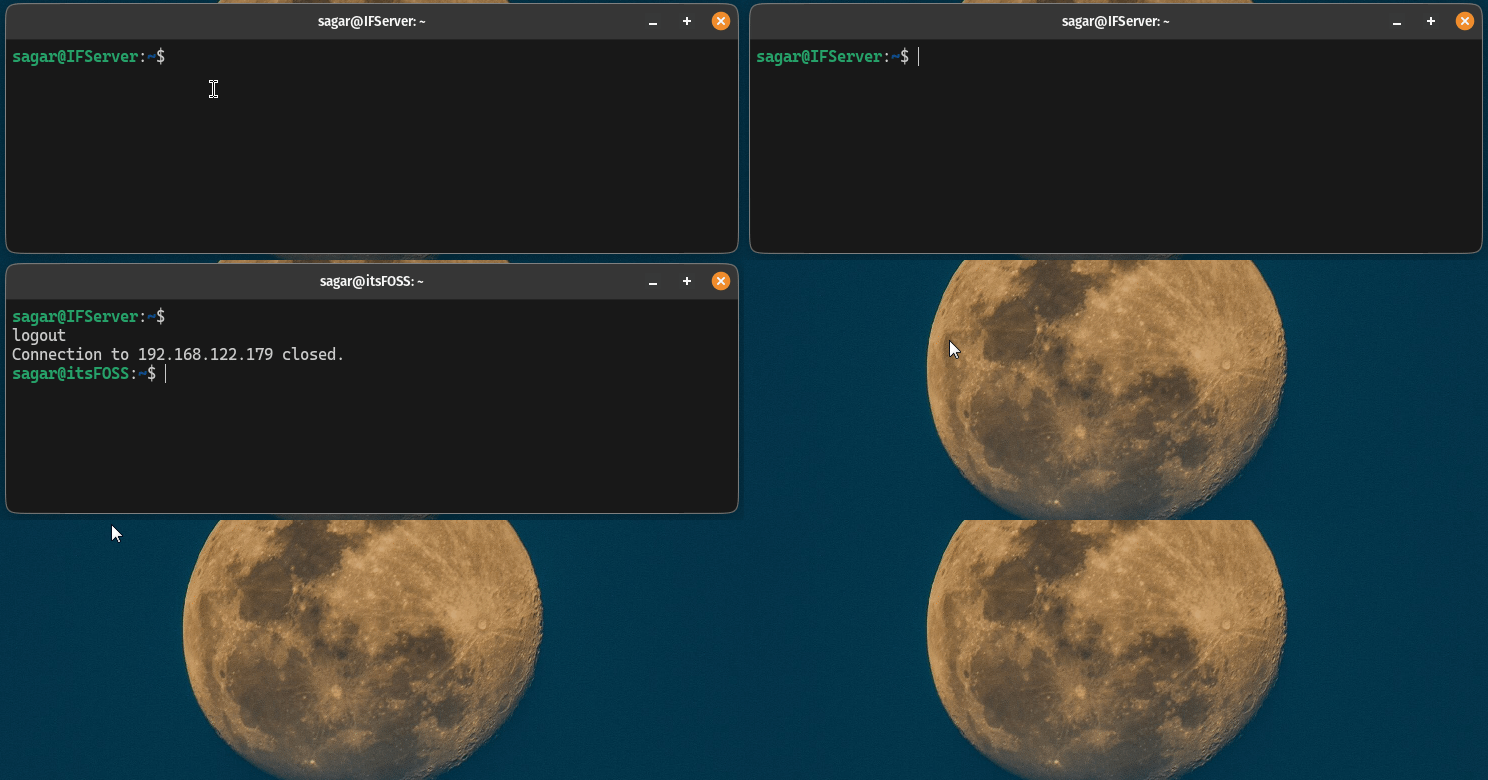
When you press the Ctrl + D, it will log you out from the ongoing session if you use it in SSH, it will close the session and if pressed again, it will close the terminal itself:

21 Useful Terminal Shortcuts Pro Linux Users Love to Use
Use Ctrl+D to close a session

9. Ctrl + Z: Pause the current process

Killing an ongoing process is not a good idea always as you have to start over again.

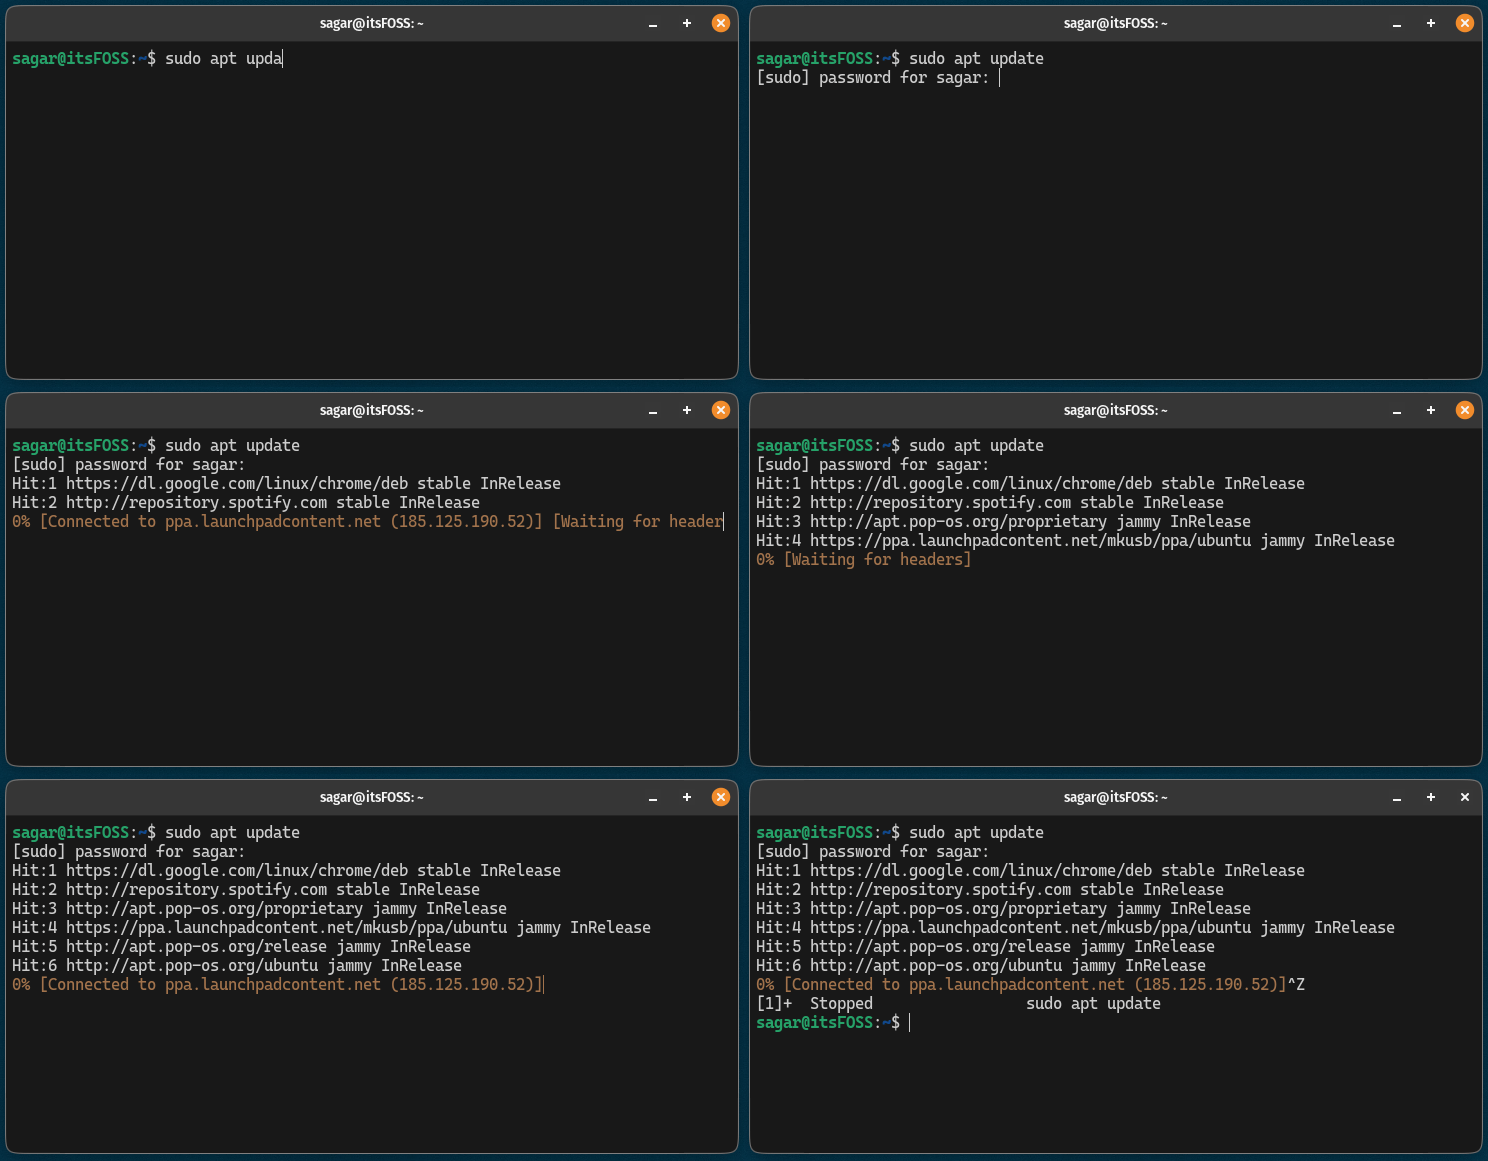
So in that case, what you can do is press Ctrl + Z to stop the ongoing process and later on can be continued from where it was left.

For example, here, I stopped the update process:

21 Useful Terminal Shortcuts Pro Linux Users Love to Use
Use Ctrl+Z to suspend a process

Want to know more ways to stop ongoing processes and how to resume them? Here's a detailed guide for that purpose:

How to Suspend a Process in Linux [And Resume it Later]
Learn how to suspend a running process in the Linux command line. Also learn how to resume a stopped process.
21 Useful Terminal Shortcuts Pro Linux Users Love to Use

10. Ctrl + R: Search command history

When you press Ctrl + R, it opens a search mode prompt from where you can type any part of the command and it will find you the command with matching string you've entered.

Once you find that command, you simply press the Enter key and it will execute that command.

For example, here, I searched for the update and it gave me the command to update the repository in Ubuntu (sudo apt update):

21 Useful Terminal Shortcuts Pro Linux Users Love to Use
Search commands from history using the shortcut Ctrl + R
📋
If you don't like any of the suggestions from the history, use Ctrl+C to come out of the search mode.

11. Up Arrow: Show the previous command from history

When you press the Up Arrow key, it will show you previously executed commands one by one from the command history:

21 Useful Terminal Shortcuts Pro Linux Users Love to Use
Navigating down the history using arrow key

12. Down Arrow: Show the next command from history

When you press the Up Arrow key, it shows you previous commands but there are times when you accidentally press it many times and now you want to show the previously shown command.

In that case, you can use the Down Arrow key.

In the following illustration, first I pressed the up arrow key multiple times, and then to come back to previously shown commands, I pressed the down arrow key:

21 Useful Terminal Shortcuts Pro Linux Users Love to Use
Navigating down the history using arrow key
📋
Page Up and Page Down keys are also use for the same purpose.

13. !!: Repeat the last command

There are times when you want to execute the most recent command one or more times and in that case, you can simply type !! (exclamation twice):

!!

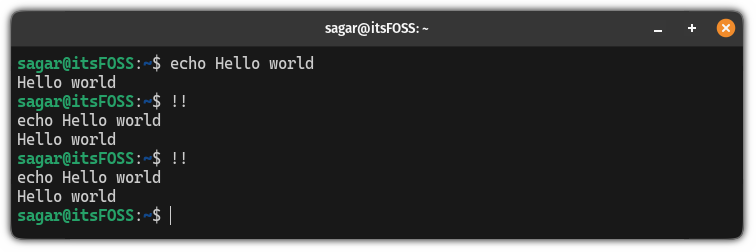
For example, here, I executed an echo command and then used the !! twice to use the same command again and again:

21 Useful Terminal Shortcuts Pro Linux Users Love to Use
The !! repeats what you entered in the terminal previously

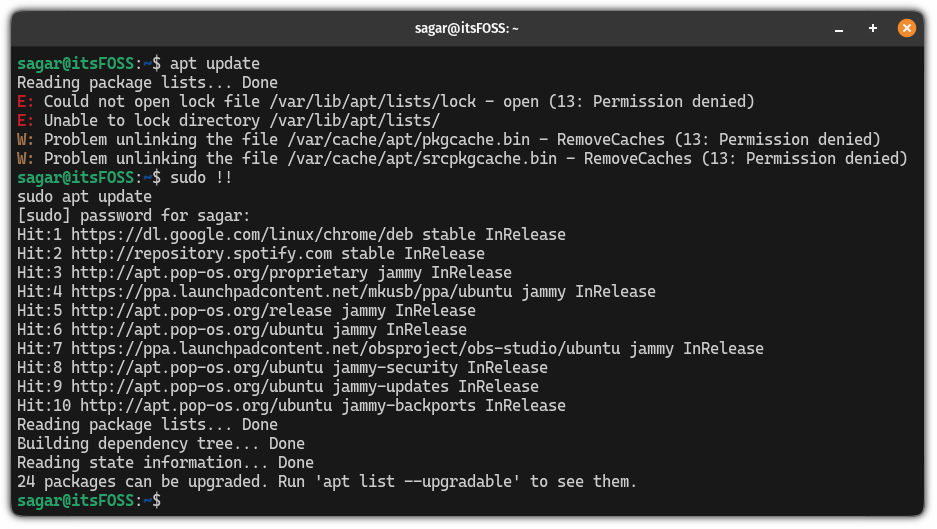
But the most common and useful execution of this shortcut is when you forget to use sudo with a command. Instead of writing the entire command again, you just use sudo !!

21 Useful Terminal Shortcuts Pro Linux Users Love to Use
Practical use of the !! keyboard shortcuts in Linux terminal
💡
A similar keyboard shortcut is Alt+.. This one gives you the last argument/part of the last command. Say, you used ls /etc/apt/sources.list.d previously and now you want to enter this directory. Just type cd and use Alt+.. It will be like typing cd /etc/apt/sources.list.d

14. !n: Repeat the nth command from history

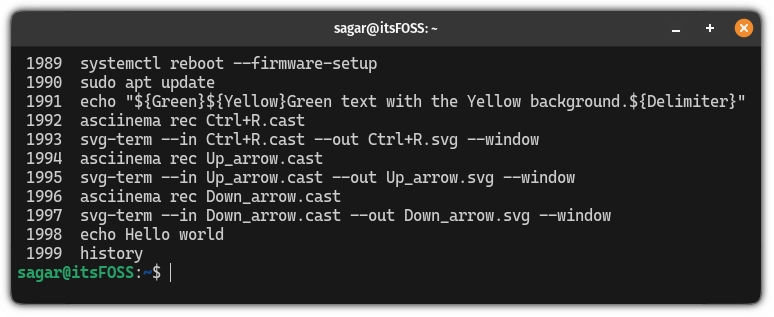
You can access the history of executed commands by simply executing the bash history command in the terminal and each will have an index number associated with it:

history
21 Useful Terminal Shortcuts Pro Linux Users Love to Use
Select commands from the history

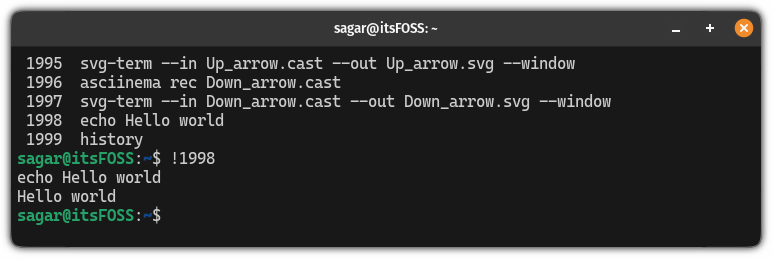
Now, let's suppose I want to execute the 2nd last echo command, then I will be using the following:

!1998
21 Useful Terminal Shortcuts Pro Linux Users Love to Use

15. Tab: Auto-complete the command

I think I should have started the terminal shortcuts list with this one.

While typing a long command, you can type half of it and then press the Tab key and it will auto-complete for you.

For example, here, I pressed the Tab key to auto-complete my script execution:

21 Useful Terminal Shortcuts Pro Linux Users Love to Use
Press tab to see command, options and argument suggestions

16. Tab (twice): List all the possible auto-completes

If pressing the Tab key does not work, it means there are multiple possibilities of the currently typed command.

In that case, what you can do is press the Tab key twice to list all the possibilities:

21 Useful Terminal Shortcuts Pro Linux Users Love to Use
Press tab twice to list all possible auto complete suggestions
The next few shortcuts are terminal emulator dependent. They should work with most terminal applications but that's not a surety.

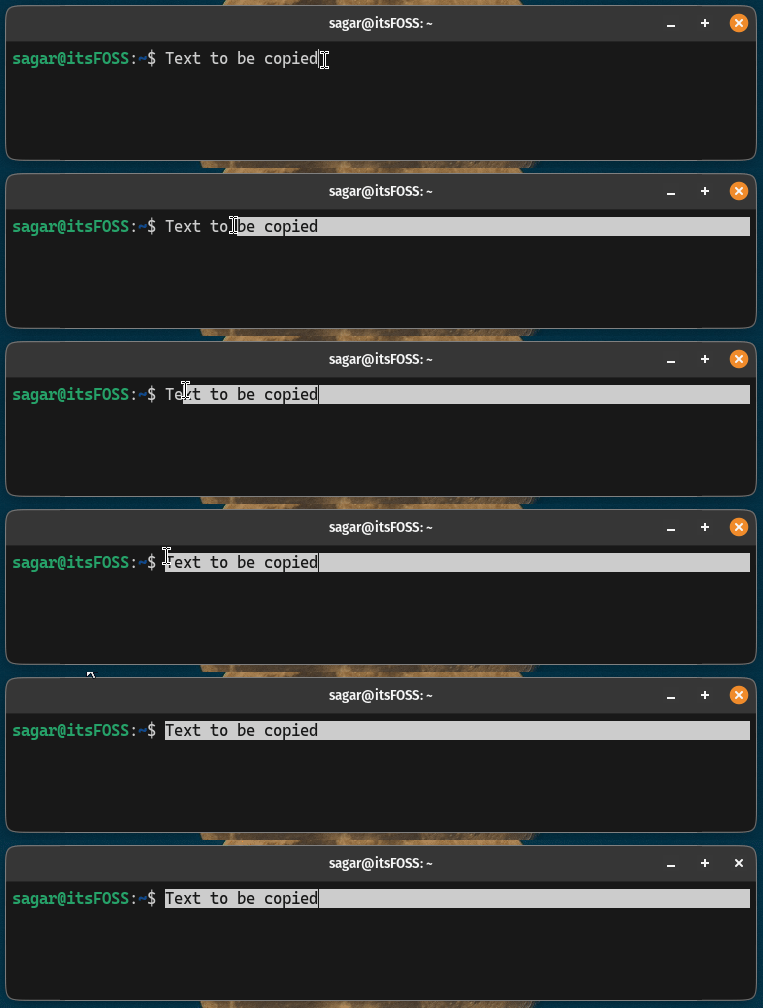
17. Ctrl + Shift + C: Copy the selected text

To copy the text in the terminal, you have to select the text using the mouse and then press the Ctrl + Shift + C to copy the selected text:

21 Useful Terminal Shortcuts Pro Linux Users Love to Use
Press Ctrl+Shift+C to copy text

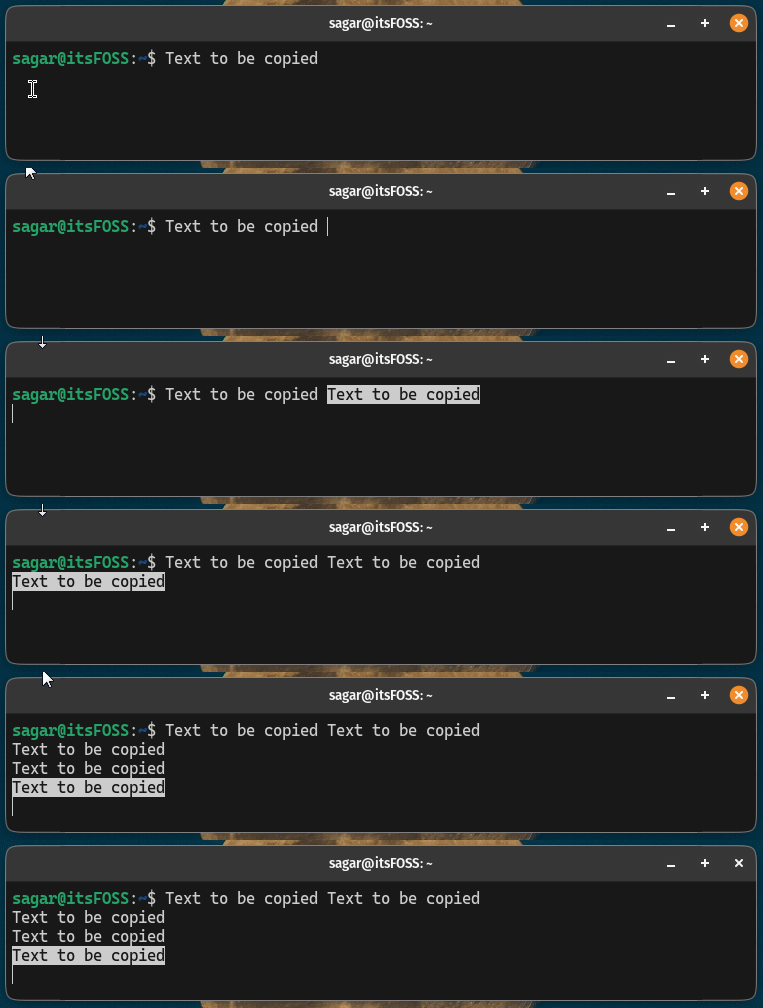
18. Ctrl + Shift + V: Paste the copied text

Once you copy the text by selecting the text and pressing Ctrl + Shift + C, now you can paste it anywhere by pressing Ctrl + Shift + V :

21 Useful Terminal Shortcuts Pro Linux Users Love to Use
Press Ctrl+Shift+V to paste text in terminal

19. Ctrl + Shift + N: Open a new terminal window

When you press the Ctrl + Shift + N, it will open a new terminal window with the same working directory you were working in the previous window:

0:00
/0:03

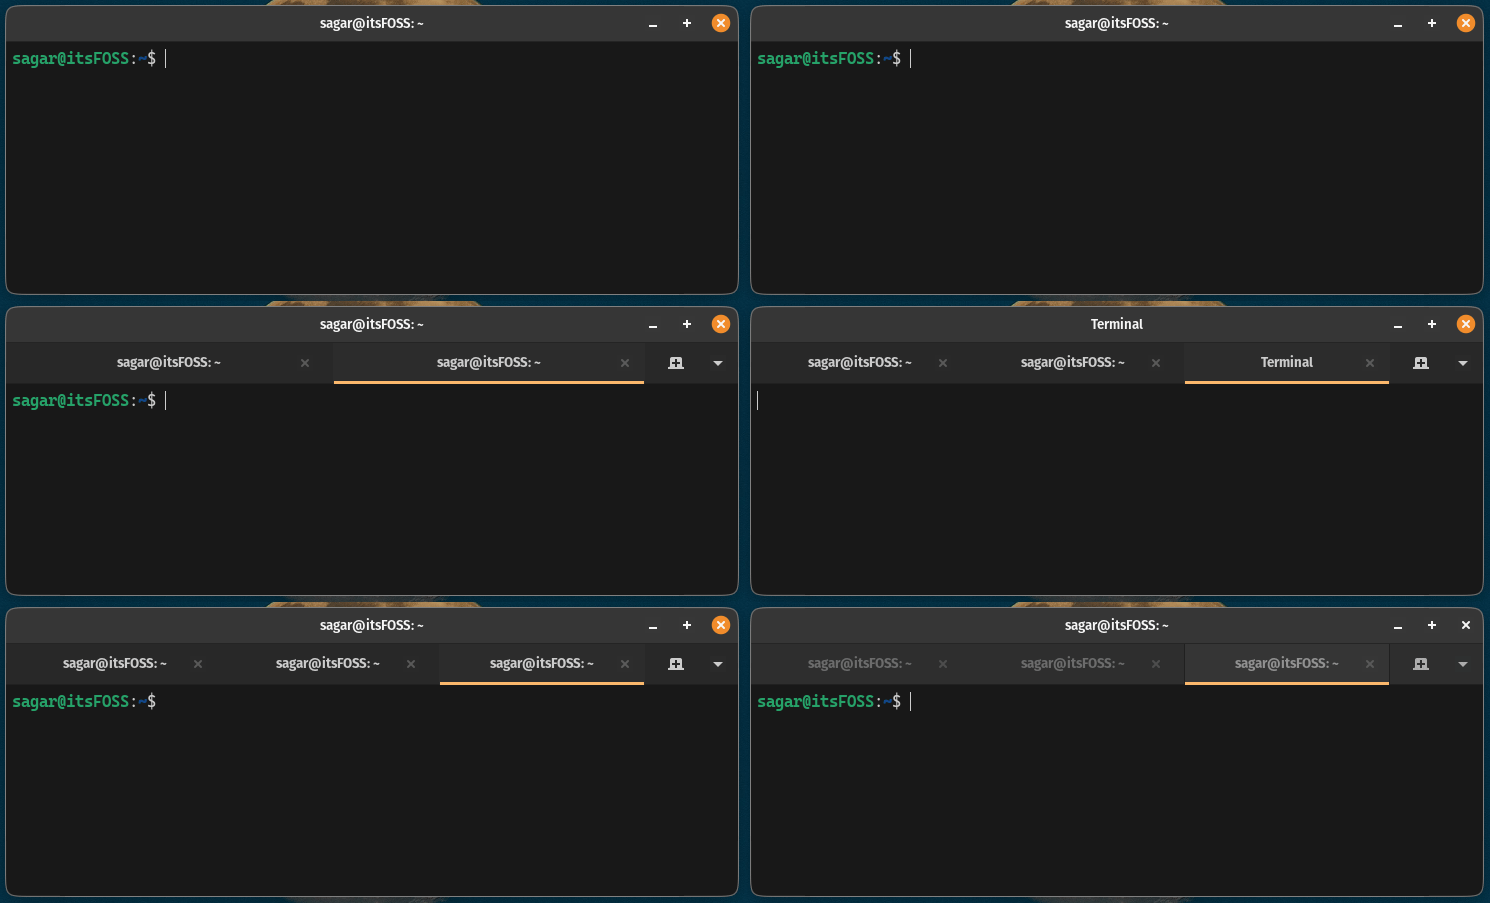
20. Ctrl + Shift + T: Open new tab

Like web browsers, in the terminal, you can open tabs to separate different tasks. To open a new tab, all you have to do is press Ctrl + Shift + T :

21 Useful Terminal Shortcuts Pro Linux Users Love to Use

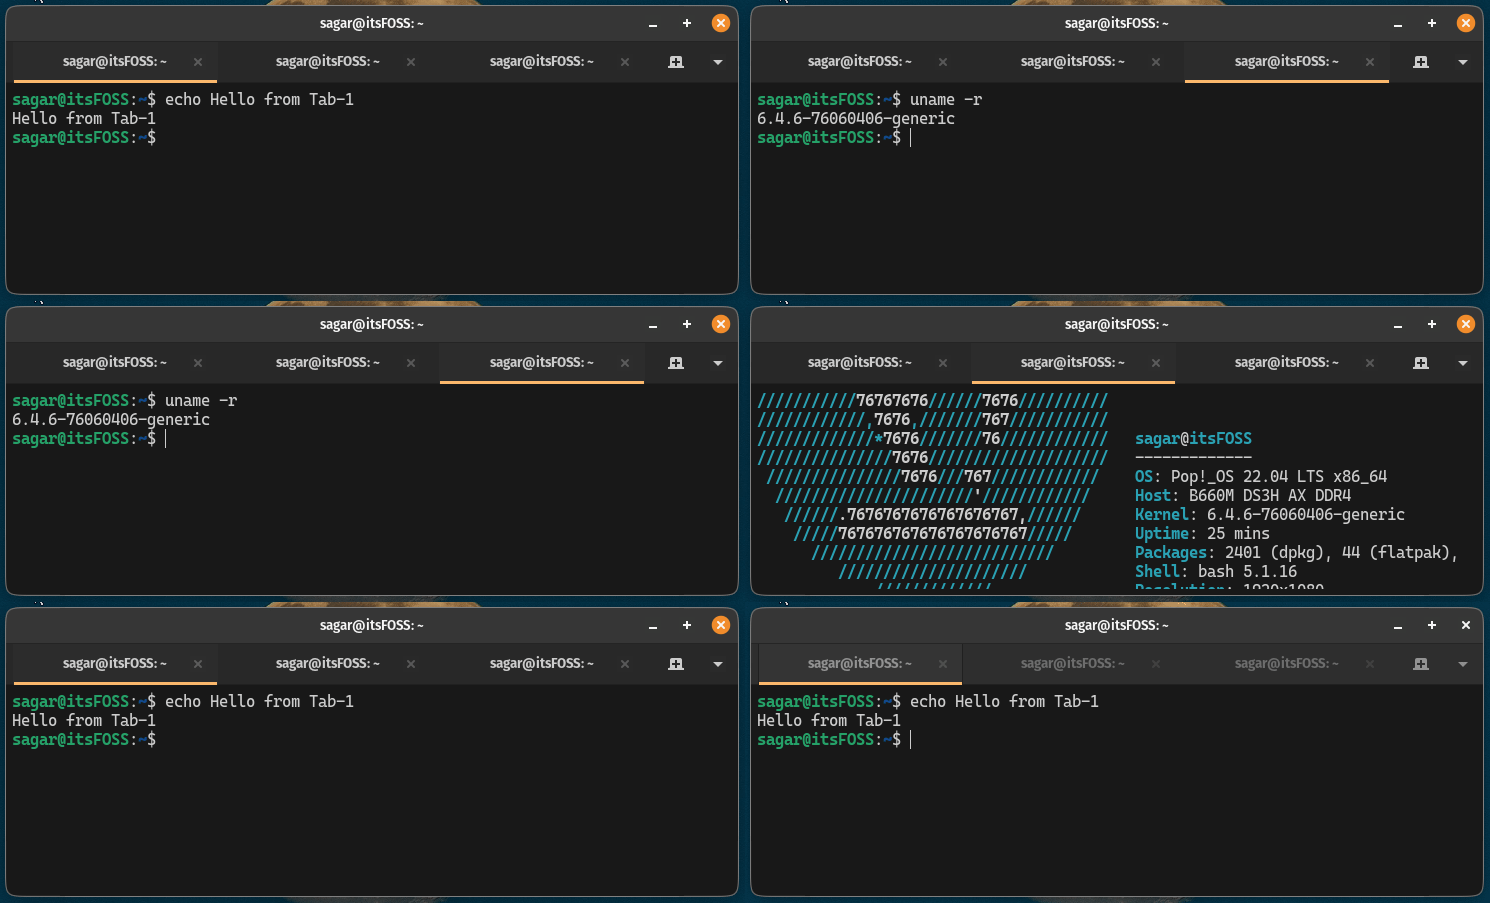
21. Ctrl + Tab or Ctrl + PageDown: Switch tabs

If you created multiple tabs using the above method, you may want to switch between them.

And for that purpose, you can use Ctrl + Tab or Ctrl + PageDown:

21 Useful Terminal Shortcuts Pro Linux Users Love to Use
💡
This is more likely an Ubuntu thing. Press Ctrl+Alt+T keys to open a new terminal.
21 Useful Terminal Shortcuts Pro Linux Users Love to Use

New Book: Efficient Linux at the Command Line

Pretty amazing Linux book with lots of practical tips. It fills in the gap, even for experienced Linux users. Must have in your collection.

Get it from Amazon

Next: Must-know Linux commands

Liked this list of 'essential' keyboard shortcuts? Perhaps you would like this list of the most basic yet essential Linux commands:

31 Basic Yet Essential Ubuntu Commands
An extensive list of essential Linux commands that every Ubuntu user will find helpful in their Linux journey.
21 Useful Terminal Shortcuts Pro Linux Users Love to Use

I understand that you may not remember all of these terminals shortcuts, at least not initially. But practice them and gradually they will be in your muscle memory.

By the way, do you have some of your favourite shortcuts that have not been included here? Share it in the comments?


from It's FOSS https://ift.tt/L5MV71E
via IFTTT