Jumat, 20 Januari 2023

8 Best Window Managers for Linux

8 Best Window Managers for Linux

A window manager should be helpful if you dabble with multiple active windows on your system and want to make the most out of the available screen space.

Sure, you can re-size and reposition your windows to organize them to some extent. However, with a window manager, you can step up your multitasking potential by organizing the windows using keyboard shortcuts, mouse and even automating some of it.

With a window manager, you can improve not only the productivity but the look and feel of your desktop if you decide to put in the effort.

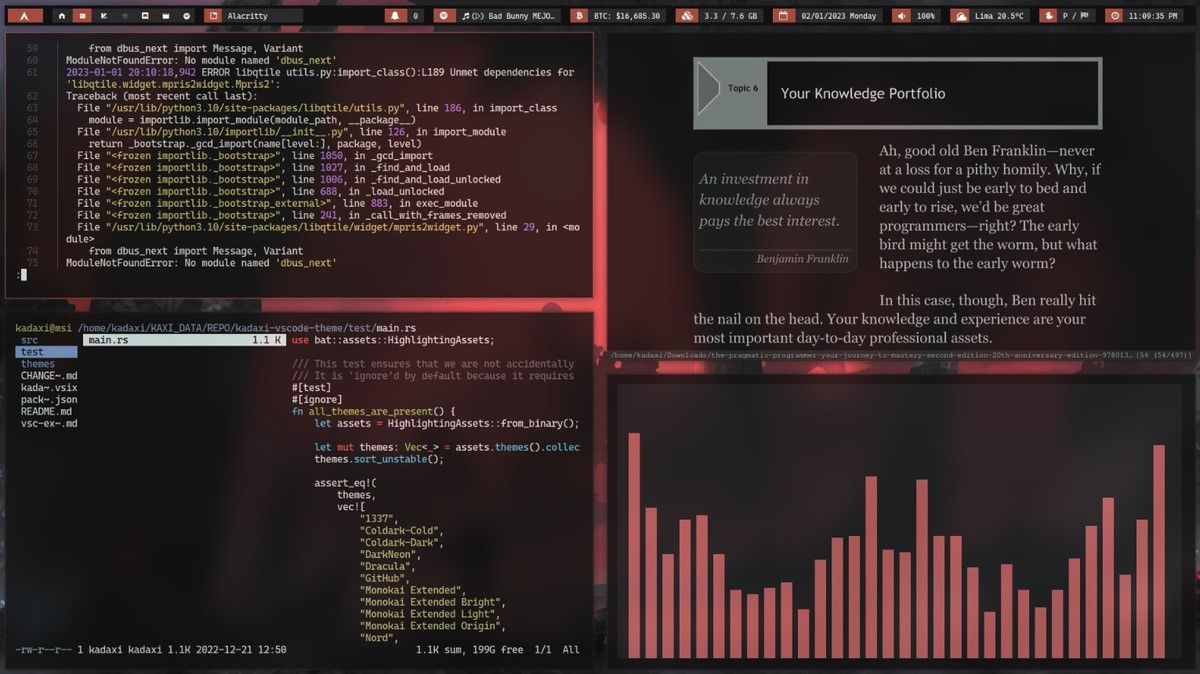
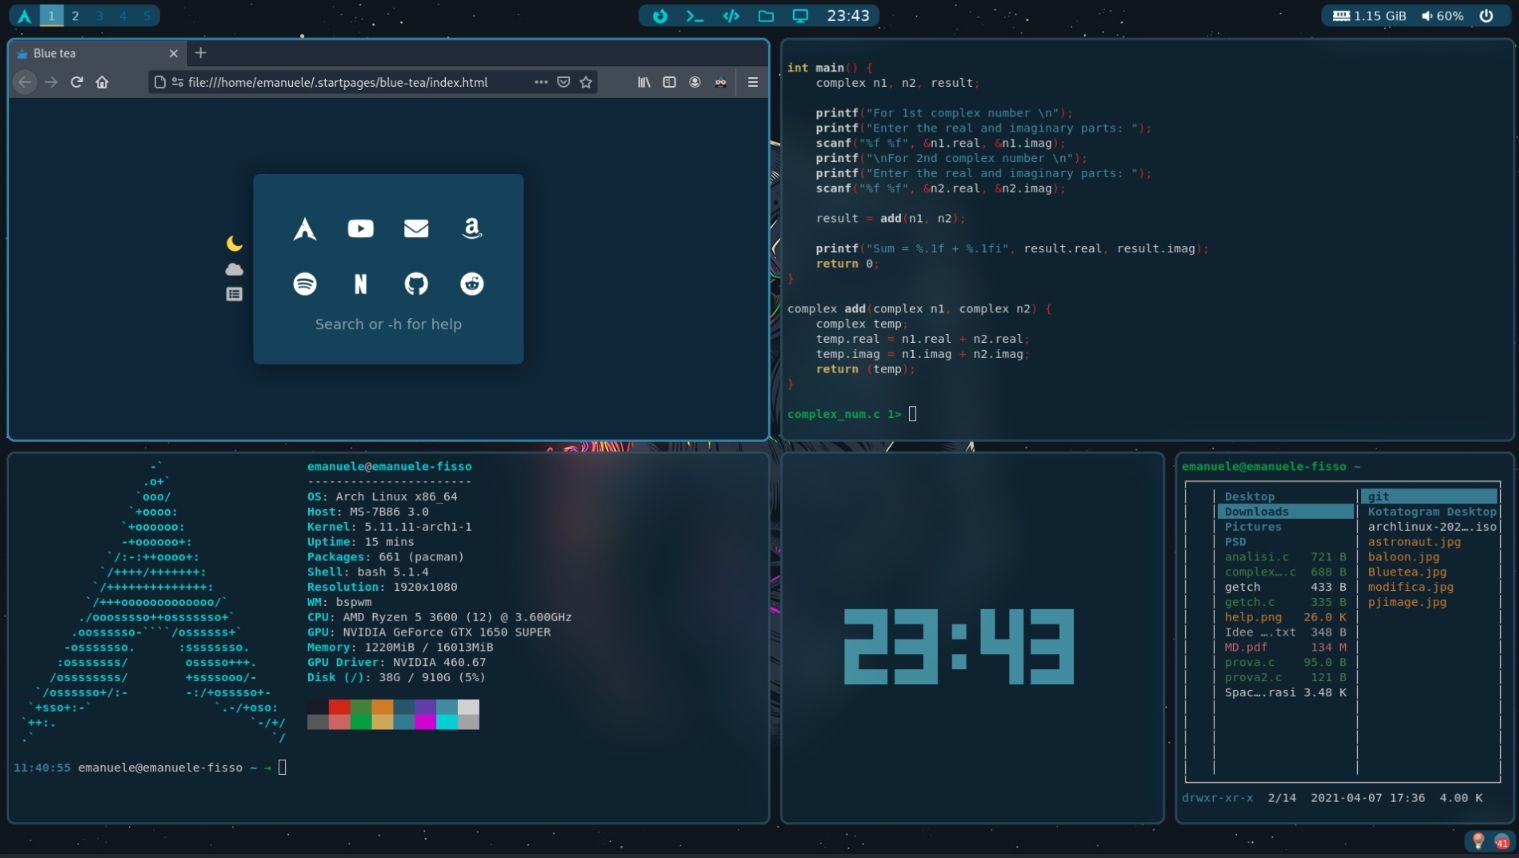
Here's an example of a user's customized desktop using a window manager to organize the active windows:
8 Best Window Managers for Linux
Image Credits: Customized Desktop with bspwm by u/emanuelep57
📋
Most of the options mentioned work for the Xorg display server, considering window managers on Wayland are called compositors. You can explore Arch's documentation to learn more.

For multi-monitor setups, you might want to check for RandR and Xinerama protocol support with the window managers.

Is it Easy to Use a Window Manager?

Yes and no.

If you decide to use a window manager, you must be willing to research/read documentation to get things right. It may not be feasible to cover everything in this article.

There are some points to note that include:

  • Some window managers provide you with room for endless customizability. If you do not know how to configure it to your liking, you may not be able to use it.
  • Some window managers might need configuration even before using it. Unless you do not set it up, you cannot utilize the window manager.
  • Most users prefer Arch Linux to use window managers. So, you can expect better community support for configurations/setup if you pick Arch Linux as your distro of choice. But, it is not mandatory, you can try other distributions.

Here, I provide the links to its documentation, and the installation commands to give you a head start.

To make things easy, you can also utilize other users' dotfiles (configuration) to quickly modify the look and behavior of your desktop. However, you still need to know what you're doing before you use them.

🚧
Some window managers/compositors for Wayland may not support proprietary graphics drivers, including NVIDIA. So, before installing and configuring any of the window managers, you might want to check what it supports.

1. bspwm

8 Best Window Managers for Linux
Image Credits: Customized Desktop with bspwm by u/emanuelep57

bspwm is a lightweight tiling window manager. The first screenshot you see in this article was made possible using bspwm.

You must install the window manager and a separate package to use the keyboard/pointer bindings. bspwm lets you manually choose how new windows get inserted or positioned or set it to automatic mode, where it follows a particular scheme to arrange the windows.

You need to configure it properly before you get to use it. Unfortunately, the documentation for it may not be easy to follow for new users trying a window manager. Arch Linux's documentation page on bspwm should help you get started.

Install bspwm

You can easily find the package for it on the official repositories of Fedora, Ubuntu, and Arch.

For Ubuntu, type in the following command to get it installed:

sudo apt install bspwm sxhkd
📋
The list is in no particular order of ranking.

2. Qtile

8 Best Window Managers for Linux
Customized Desktop with Qtile by u/lzmkalos

Qtile is a customizable tiling window manager that works on X11 and Wayland.

It packs in various features and yet a simple implementation. You get a command shell to inspect and manage all aspects of the window manager.

One of the highlights of Qtile is complete remote scriptability.

Install Qtlie

You can install Qtile using pip. Once you have pip installed on Ubuntu, run these commands:

pip install xcffib
pip install qtile

Refer to the official documentation or its GitHub page for other Linux distributions.

3. herbstluftwm
8 Best Window Managers for Linux
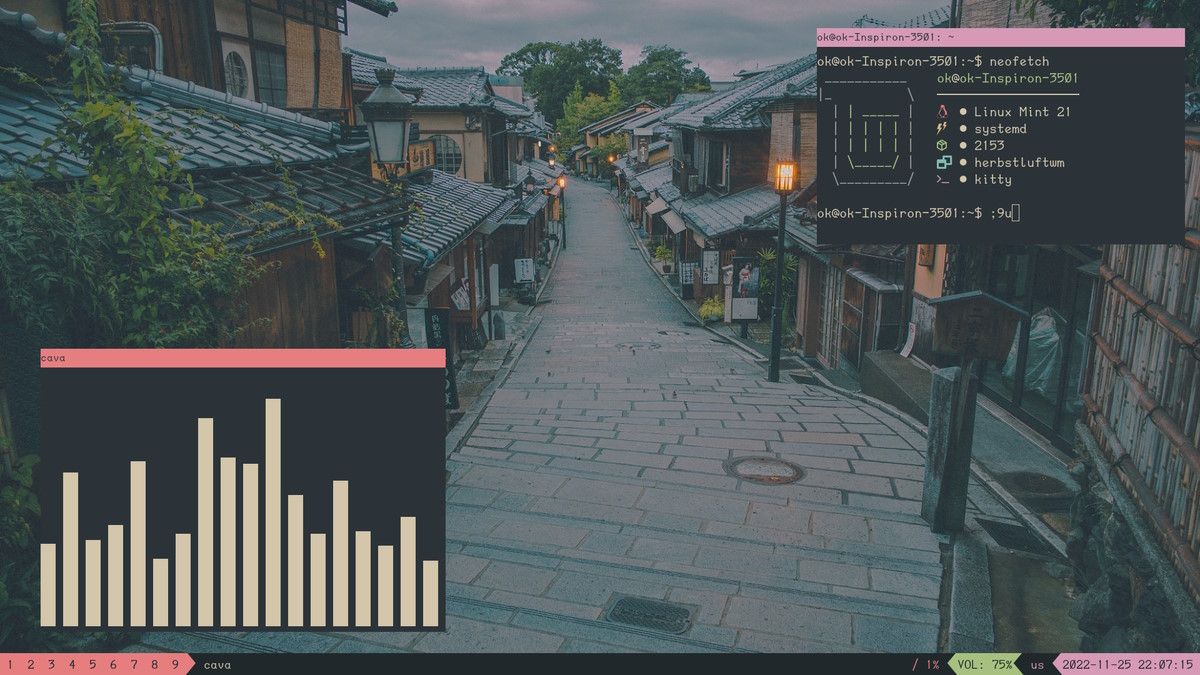
Customized Desktop with herbstluftwm by u/CIMPBIBAI

herbstluftwm (I know, a mouthful) is a manual tiling window manager. Not as popular as other options, but a promising option for Linux users.

The key highlight of the window manager is that the configuration for the tool happens at runtime. So, you do not need to restart the window manager and yet manage to make changes live.

The documentation may not be beginner-friendly, but you can choose to explore parts of it to better understand its functioning.

Install herbstluftwm

You can find it in the official repository. To install it, run the following command:

sudo apt install herbstluftwm

In either case, feel free to explore its official website and GitHub page for more info.

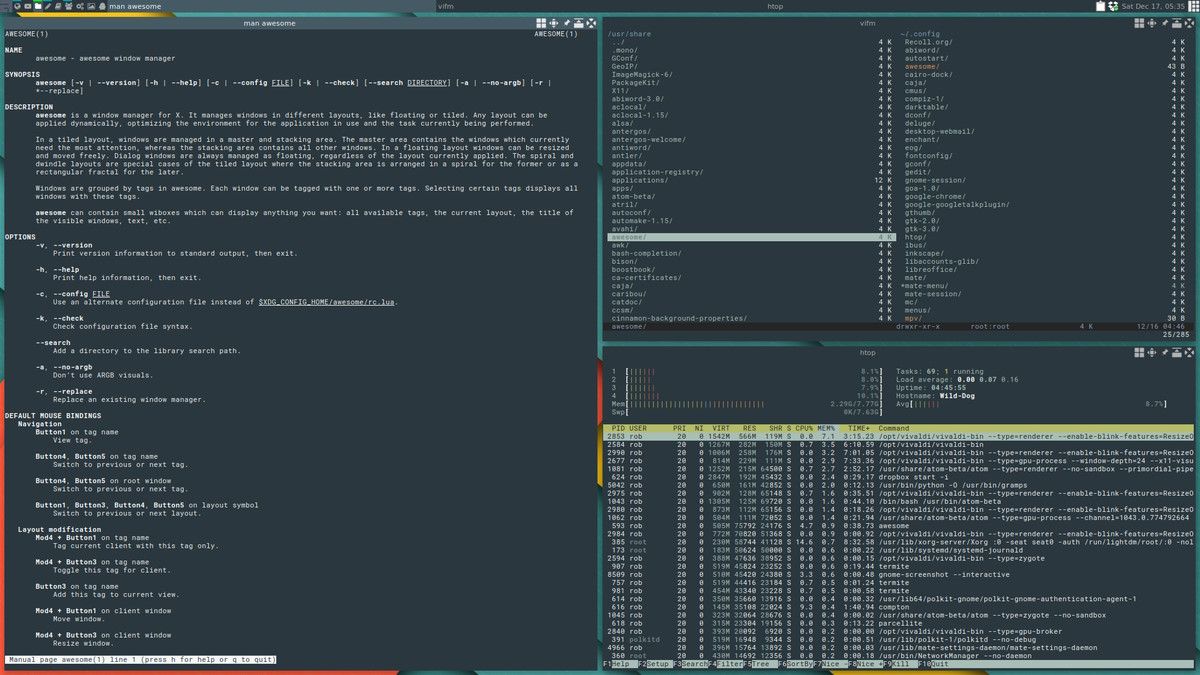
4. awesome
8 Best Window Managers for Linux

awesome is a fast and configurable window manager. It does require a few dependencies along with the installation process to get things working, but it should not be a problem for most.

If you want to access a window manager without needing to configure much from the start, awesomewm should be a good option. It may not look pleasing if you just install and use it without configuration, but you can access most of its functions easily.

The documentation for awesome window manager is valuable enough to make the most out of it.

Install awesome

The package should be available in the repositories of all major distributions. For Ubuntu, you can type in the following command:

sudo apt install awesome

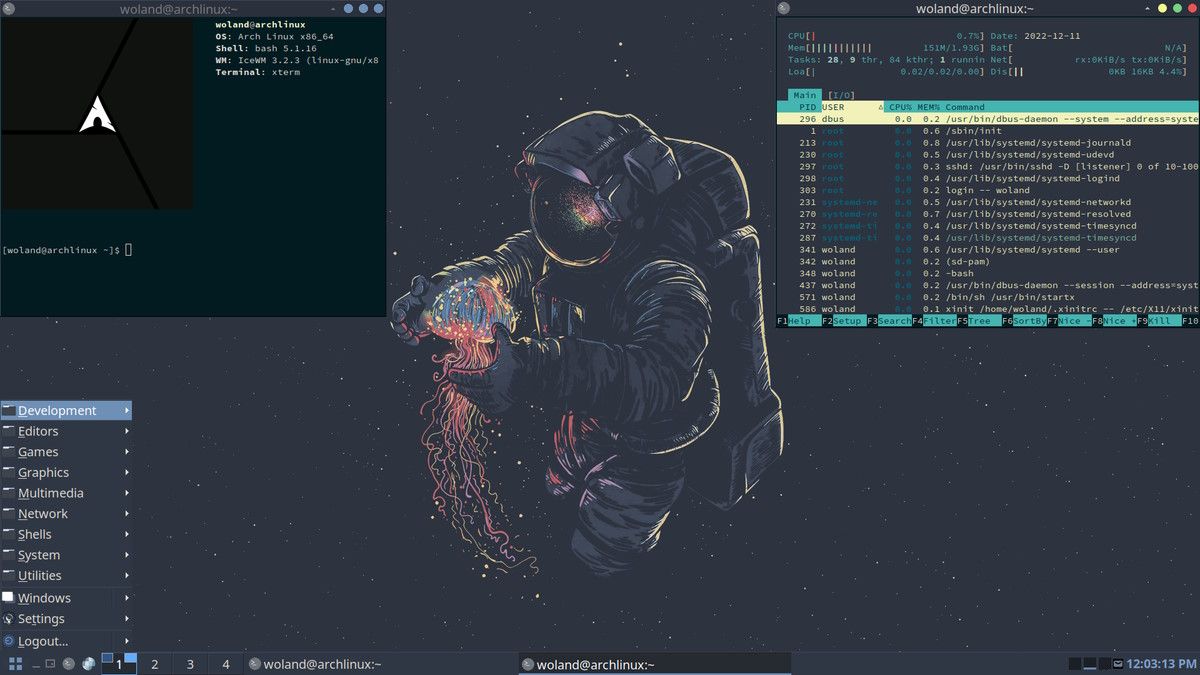
5. IceWM

8 Best Window Managers for Linux
Customized Desktop with icewm by u/Wolandark

IceWM is one of the oldest tiling window managers out there. You can find it as the default window manager with some distributions like antiX.

You may not get an extensive list of functionalities with IceWM, but it has a simple approach that lets you easily use it. By default, it features an app launcher and a taskbar to keep things familiar and accessible.

Head to its official website for documentation and get started.

Install IceWM

IceWM is available in official repositories of all major distros. You can install it on Ubuntu using the following command:

sudo apt install icewm

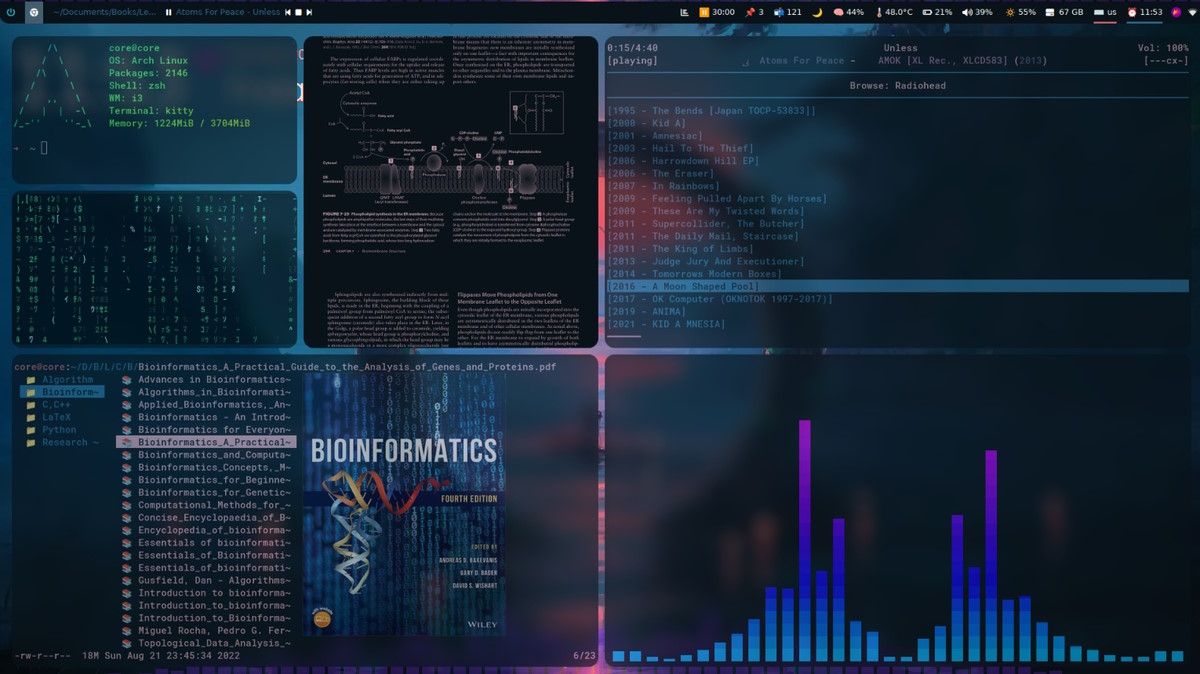
6. i3

8 Best Window Managers for Linux
Customized Desktop with i3 by u/Ramin-Yousefpour

i3 is the most popular option if you are in for an insane amount of customization. Yes, it is aimed at advanced users and developers, but with its well-documented instructions, anyone can try to use it.

You can expect numerous abilities with i3 as long as you can configure them. Whether you have dual-monitor setup, or a multi-monitor setup with horizontal displays, configuration is the key here.

Install i3

i3 is available in repositories for every major distribution. For Ubuntu, you can use the command below to get it installed:

sudo apt install i3

To explore technical details, head to its GitHub page.

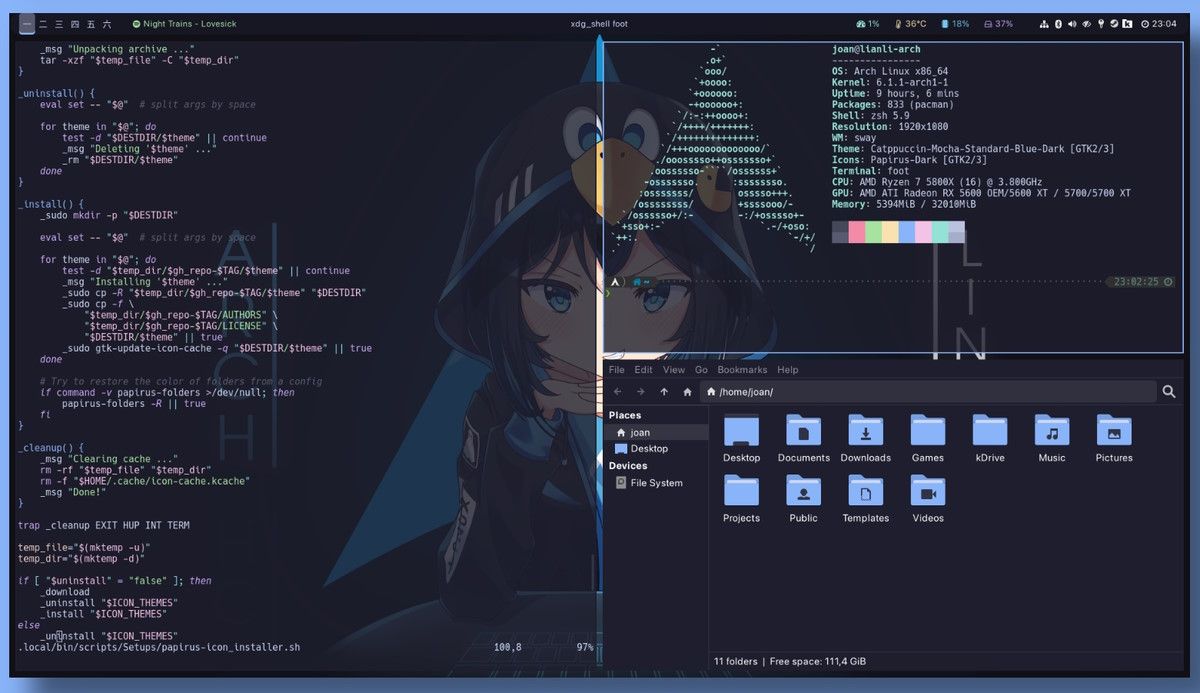
7. Sway
8 Best Window Managers for Linux
Customized Desktop with i3 by u/J_o_a_n

Sway is designed for Wayland sessions while offering compatibility with i3. In other words, the same commands are supported with Sway.

If you are using i3 and want to move to Sway on a Wayland desktop, the transition should be easy by copying the configuration to the correct file.

You should have the essential features here to organize app windows and make efficient use of desktop space.

Install Sway

Most of the popular distributions should already have the package available. For Debian-based systems, you can use the terminal to get it installed:

sudo apt install sway

To explore more, check out its GitHub page.

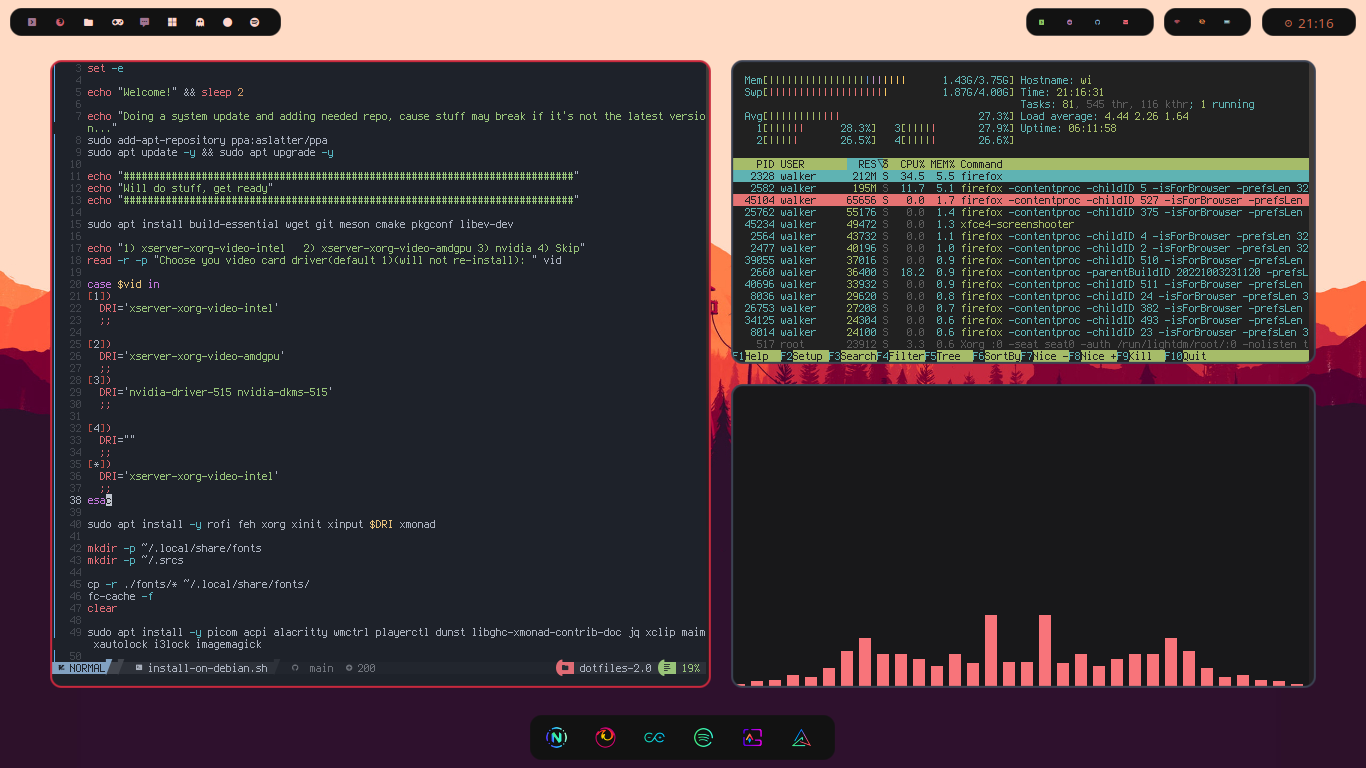
8. xmonad
8 Best Window Managers for Linux
Customized Desktop with xmonad by u/Walker0712

xmonad is a tiling window manager for X11 written and configured in Haskell language.

It aims to provide all kinds of functionalities while making it easier to automate things all the way.

You get a decent documentation to get started and start taking charge of your windows.

Install xmonad

Unlike others, it is not as simple as installing a single package (especially for Debian/Ubuntu users).

So, you may want to follow the official installation instructions and its GitHub page to proceed.

Honorable Mentions

There are various other compositors (Wayland) and window managers like ratpoison that may not be feature-rich or popular enough but can be interesting to try.

Some of those options are:

💬 What are your favorite window managers for Linux? Did we miss any of your favorites? Let us know in the comments section below.


from It's FOSS https://ift.tt/ybPXdYt
via IFTTT

Capítulo 1: Creando y Ejecutando tu Primer Script de Bash Shell

Capítulo 1: Creando y Ejecutando tu Primer Script de Bash Shell

Si tienes que hacerlo más de una vez, ¡automatiza!

A menudo te encontrarás repitiendo una misma tarea en Linux una y otra vez. Puede ser una simple copia de seguridad de un directorio o podría ser la limpieza de archivos temporales o incluso puede ser la clonación de una base de datos.

La automatización de una tarea es uno de los muchos escenarios útiles en los que se puede aprovechar el poder de los scripts de bash.

Permíteme mostrarte cómo crear un simple script de shell bash, cómo ejecutarlo y cuáles son las cosas que debes saber sobre estos.

Cree y ejecute su primer script de shell

Primero vamos a crear un nuevo directorio llamado scripts que albergará todos nuestros scripts bash.

mkdir scripts
cd scripts

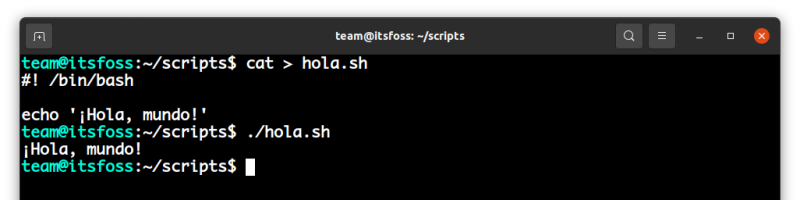
Ahora dentro de este ‘directorio de scripts’, crea un nuevo archivo llamado hola.sh usando el comando cat:

cat > hola.sh

Inserta la siguiente línea dentro del documento escribiéndola en el terminal:

echo '¡Hola, mundo!'

Pulsa Ctrl+D para guardar el texto en el archivo y salir del comando cat.

También puede utilizar un editor de texto basado en terminal como Vim, Emacs o Nano. Si estás utilizando un Linux de escritorio, también puedes utilizar un editor de texto gráfico como Gedit para añadir el texto a este archivo.

Básicamente, estás usando el comando echo para imprimir “Hola Mundo”. Puedes usar este comando en la terminal directamente, pero en esta prueba, ejecutarás este comando a través de un script de shell.

Ahora para lograr que el archivo hello.sh sea ejecutable, utilizaremos el comando chmod de la siguiente manera:

chmod u+x hola.sh

Finalmente, ejecuta tu primer script de shell precediendo a hola.sh con su shell deseado “bash”:

bash hello.sh

Verás que se imprime ¡Hola, mundo! en la pantalla. Probablemente ese ha sido el programa de Hola Mundo más fácil que has escrito, ¿verdad?

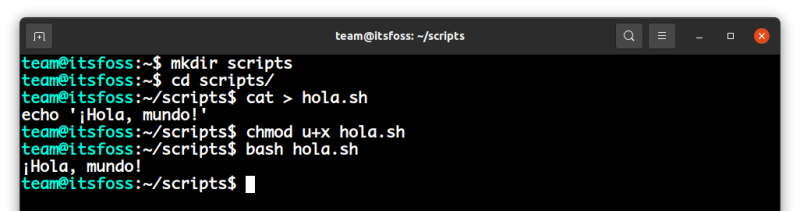
Aquí tienes una captura de pantalla de todos los pasos que has visto arriba:

Capítulo 1: Creando y Ejecutando tu Primer Script de Bash Shell

Convierte tu script de shell en script de bash

¿Confuso? No te confundas todavía. Te explicaré las cosas.

Bash, que es la abreviatura de “Bourne-Again shell”, es sólo un tipo de los muchos shells disponibles en Linux.

Un shell es un intérprete de línea de comandos que acepta y ejecuta comandos. Si alguna vez has ejecutado algún comando de Linux, entonces has utilizado el shell. Cuando abres un terminal en Linux, ya estás ejecutando el shell por defecto de tu sistema.

Bash suele ser el shell por defecto en la mayoría de las distribuciones de Linux. Por ello, bash suele ser sinónimo de shell.

Los scripts del shell suelen tener casi la misma sintaxis, pero también difieren a veces. Por ejemplo, el índice del array comienza en 1 en Zsh en lugar de 0 en bash. Un script escrito para el shell Zsh no funcionará igual en bash si tiene arrays.

Para evitar sorpresas desagradables, debes decirle al intérprete que tu script de shell está escrito para el shell bash. ¿Cómo lo hace? ¡Usando shebang!

La línea SheBang al principio del script de shell

La línea “#!/bin/bash” se conoce como la línea shebang y en alguna literatura, se conoce como la línea hashbang y eso es porque comienza con los dos caracteres hash ‘#’ y bang ‘!’.

#! /bin/bash

echo '¡Hola, mundo!'

Cuando incluyes la línea “#!/bin/bash” en la parte superior de tu script, el sistema sabe que quieres usar bash como intérprete para tu script. Por lo tanto, ahora puedes ejecutar el script hello.sh directamente sin precederlo con bash.

Capítulo 1: Creando y Ejecutando tu Primer Script de Bash Shell

Añade tu script de shell al PATH (para que pueda ser ejecutado desde cualquier directorio)

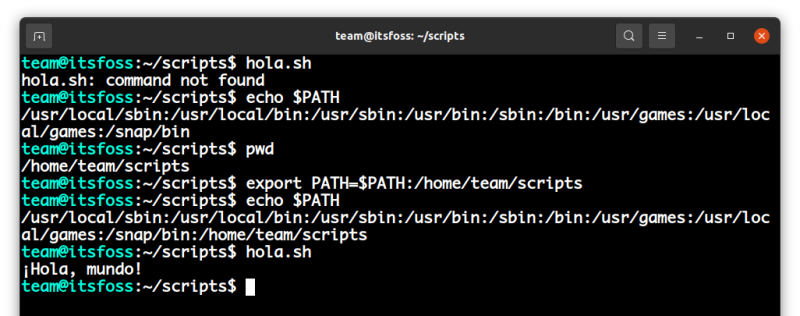
Habrás notado que he utilizado ./hello.sh para ejecutar el script; obtendrás un error si omites el ./ inicial

team@itsfoss:~/scripts$ hello.sh
hello.sh: command not found

Bash pensó que estabas tratando de ejecutar un comando llamado hello.sh. Cuando ejecutas cualquier comando en tu terminal; el shell busca ese comando en un conjunto de directorios que se almacenan en la variable PATH.

Puedes usar echo para ver el contenido de esa variable PATH:

echo $PATH
/usr/local/sbin:/usr/local/bin:/usr/sbin:/usr/bin:/sbin:/bin:/usr/games:/usr/local/games:/snap/bin

El carácter de dos puntos (:) separa la ruta de cada uno de los directorios que su shell explora cada vez que ejecuta un comando.

Los comandos de Linux como echo, cat, etc. pueden ejecutarse desde cualquier lugar porque sus archivos ejecutables se almacenan en los directorios bin. Los directorios bin se incluyen en el PATH. Cuando se ejecuta un comando, el sistema comprueba el PATH para todos los posibles lugares que debe buscar para encontrar el ejecutable para ese comando.

Si quieres ejecutar tu script bash desde cualquier lugar, como si fuera un comando normal de Linux, añade la ubicación de tu script de shell a la variable PATH.

Primero, obten la ubicación del directorio de tu script (asumiendo que está en el mismo directorio), usa el comando PWD:

pwd

Utiliza el comando export para añadir tu directorio de scripts a la variable PATH.

export PATH=$PATH:/home/user/scripts
📋
Observa que he añadido el “directorio de scripts” al final de nuestra variable PATH. Para que la ruta personalizada se busque después de los directorios estándar.

El momento de la verdad está aquí; ejecuta hello.sh:

team@itsfoss:~/scripts$ hello.sh
Hello, World!
Capítulo 1: Creando y Ejecutando tu Primer Script de Bash Shell

Funciona. Esto nos lleva al final de este tutorial. Espero que ahora tengas alguna idea básica sobre el shell scripting.

Aquí te he presentado la variable PATH. En el próximo capítulo te hablaré de ella con más detalle.


from It's FOSS https://ift.tt/mi8Zf5T
via IFTTT
Capítulo 2: Comprendiendo las Variables de Bash Shell

Capítulo 2: Comprendiendo las Variables de Bash Shell

El tiempo cambia, y las variables también.

Debes haber jugado bastante con las variables si hiciste algún tipo de programación.

Si nunca has trabajado con variables, puedes pensar en ellas como un contenedor que almacena una información y que además puede variar con el tiempo.

Las variables siempre son útiles al escribir un script de bash y en este tutorial, aprenderas cómo utilizar las variables en tus scripts de bash.

Uso de variables en scripts de shell bash

En el último capítulo de este curso, aprendiste a escribir un programa hello world en bash.

#! /bin/bash

echo '¡Hola, mundo!'

Ese era un simple script de Hola Mundo, ahora hagamos un mejor Hola Mundo.

Mejoremos este script usando variables de shell para que salude a los usuarios con sus nombres. Edita tu script hello.sh y utiliza el comando read para obtener la entrada del usuario:

#! /bin/bash

echo "¿Cuál es tu nombre?"

read nombre

echo "Hola, $nombre"

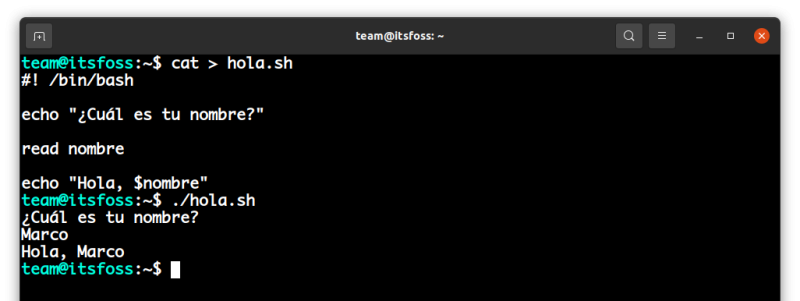
Ahora si ejecutas tu script hello.sh; te pedirá tu nombre y luego te saludará con el nombre que le proporciones:

team@itsfoss:~/scripts$ hola.sh 
¿Cuál es tu nombre?
Marco
Hola, Marco

En el ejemplo anterior, introduje Marco como mi nombre y entonces el script me saludó con “Hola, Marco”. Eso es definitivamente mucho mejor que un programa genérico “Hola, Mundo”. ¿No estás de acuerdo?

Capítulo 2: Comprendiendo las Variables de Bash Shell

Explicación paso a paso del script de shell anterior

Ahora vamos a repasar el script línea por línea para asegurarnos de que lo entiendes todo.

Primero incluí la línea shebang para indicar explícitamente que vamos a usar el shell bash para ejecutar este script.

#!/bin/bash

A continuación, pido al usuario que introduzca su nombre:

echo "¿Cuál es tu nombre?"

Se trata de un simple comando echo para imprimir una línea en el terminal; bastante autoexplicativo.

Ahora es la línea donde ocurre toda la magia:

read nombre

Aquí, utilicé el comando read para transferir el control de la ejecución del script al usuario, para que el usuario pueda ingresar un nombre y luego almacenar lo que el usuario ingresó, en la variable ‘name’.

Por último, el script saluda al usuario con su nombre:

echo "Hola, $nombre"

Fíjate que aquí tienes que preceder el nombre de la variable con un signo de dólar para obtener el valor almacenado en el nombre de la variable. Si omite el signo de dólar, se mostraría “Hola, nombre” en su lugar.

💡
Este signo de dólar se conoce como el operador de referencia en los scripts de bash.

¿Enteros, cadenas o caracteres? ¿Cómo crear diferentes tipos de datos variables en el shell bash?

Vamos a trastear un poco más con las variables.

Puedes usar el signo igual para crear y establecer el valor de una variable. Por ejemplo, la siguiente línea creará una variable llamada edad y establecerá su valor en 27.

edad = 21

Después de haber creado la variable edad, puedes cambiar su valor tanto como quieras.

edad = 3

El comando anterior cambia el valor de la variable edad de 27 a 3. ¡Si los tiempos pudieran volver atrás, te escucho decir!

Las variables pueden contener diferentes tipos de datos; las variables pueden almacenar enteros, cadenas y caracteres.

letra = 'c'
color = 'azul'
año = 2021

Variables constantes en el shell bash

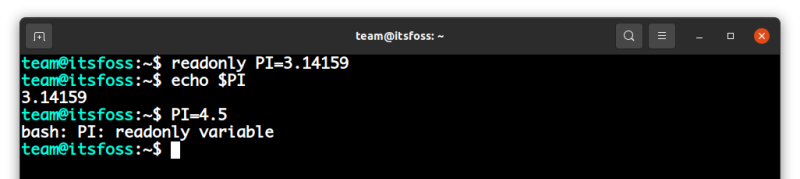
También puedes crear una variable constante, es decir, una variable cuyo valor no cambiará nunca. Esto puede hacerse precediendo el nombre de su variable con el comando readonly:

readonly PI=3.14159

El comando anterior creará una variable constante PI y establecerá su valor de 3.14159. Ahora, no puedes cambiar el valor de la variable constante, si lo intentas, obtendrás un error:

bash: PI: readonly variable

Como puedes ver, sólo puedes leer el valor de una variable constante, pero nunca puedes cambiar su valor después de haberla creado.

Capítulo 2: Comprendiendo las Variables de Bash Shell

Sustituciones de comandos

La capacidad de almacenar la salida de un comando en una variable se llama sustitución de comandos y es, con mucho, una de las características más sorprendentes de bash.

El comando date es un ejemplo clásico para demostrar la sustitución de comandos:

HOY=$(date)

El comando anterior almacenará la salida del comando date en la variable HOY. Fíjate en que tienes que encerrar el comando date entre un par de paréntesis y un signo de dólar (a la izquierda).

Capítulo 2: Comprendiendo las Variables de Bash Shell

También puede encerrar el comando entre un par de comillas:

HOY=`date`

El método de la cita posterior es la forma antigua de hacer la sustitución de comandos, por lo que recomiendo encarecidamente que lo evites y te quedes con el enfoque moderno:

variable=$(comando)

Antes de irte, intenta convertir el script Hola Mundo en un script Hola Mundo inteligente

Ahora que acabas de aprender a hacer la sustitución de comandos, tendría sentido visitar el script Hola Mundo una última vez para perfeccionarlo.

La última vez, pediste al usuario que introdujera su nombre para que el script lo saludara; esta vez, no vas a preguntar, ¡tu script ya lo sabe!

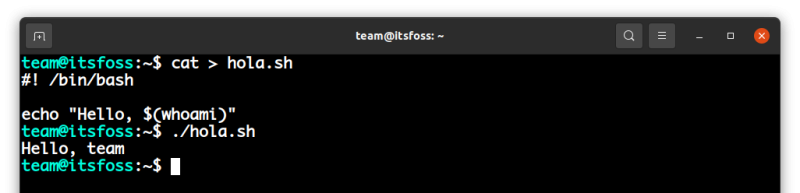
Utiliza el comando whoami junto con la sustitución de comandos para saludar a quien ejecute el script:

#! /bin/bash           

echo "Hello, $(whoami)"

Como puedes ver, ¡sólo has necesitado dos líneas! Ahora ejecute el script:

./hola.sh

¡Funciona de maravilla!

Capítulo 2: Comprendiendo las Variables de Bash Shell

Muy bien, esto nos lleva al final de este tutorial. Espero que hayas disfrutado trabajar con las variables del shell tanto como yo. En el próximo capítulo, voy a discutir cómo puedes pasar argumentos a tus scripts de la shell.


from It's FOSS https://ift.tt/GJki4Xg
via IFTTT

Rabu, 18 Januari 2023

Beyond Bash: 9 Lesser-Known Linux Shells and Their Capabilities

Beyond Bash: 9 Lesser-Known Linux Shells and Their Capabilities

A Shell provides an interface to Linux and Unix-like systems by interpreting commands and acts as an intermediary between the user and the core workings of the operating system.

Undoubtedly, the bash shell is the most popular one, and some users prefer other shells like ZSH, which is the default shell in macOS. But many shells exist other than these popular ones, with different features and use cases.

In this article, we will take a look at some less popular shells that are actively maintained and provide a different user experience.

Learn Linux Quickly - Linux Commands for Beginners
Learn Linux Quickly doesn’t assume any prior Linux knowledge, which makes it a perfect fit for beginners. Nevertheless, intermediate and advanced Linux users will still find this book very useful as it goes through a wide range of topics. Learn Linux Quickly will teach you the following topics:Insta…
Beyond Bash: 9 Lesser-Known Linux Shells and Their Capabilities
Recommended E-book

1. Fish Shell

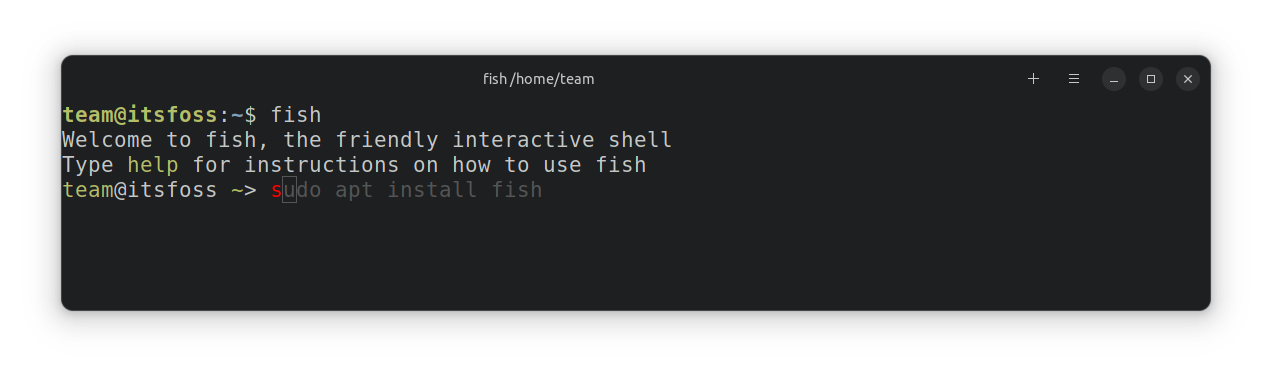
When talking about shells other than bash/zsh, the first name coming to our mind is the fish shell.

Fish is a smart, user-friendly command line shell primarily for UNIX-like operating systems.

Beyond Bash: 9 Lesser-Known Linux Shells and Their Capabilities
Fish Shell

Features of Fish Shell

  • Autosuggestion of commands based on history and completions.
  • Supports 24-bit color.
  • It supports syntax highlighting, and all features work out of the box.

Install Fish

Fish is available in the official repos of almost all Linux distributions. In Ubuntu, you can install it by:

sudo apt install fish

The version in the Ubuntu repos is a bit old. If you want to install the latest version, you can use the official PPA provided by the team.

sudo apt-add-repository ppa:fish-shell/release-3
sudo apt update
sudo apt install fish

Suggested Read 📖

How to Find Which Shell am I Using in Linux [4 Methods]
Here are four simple commands to find out which shell are you using in Linux.
Beyond Bash: 9 Lesser-Known Linux Shells and Their Capabilities

2. Nushell

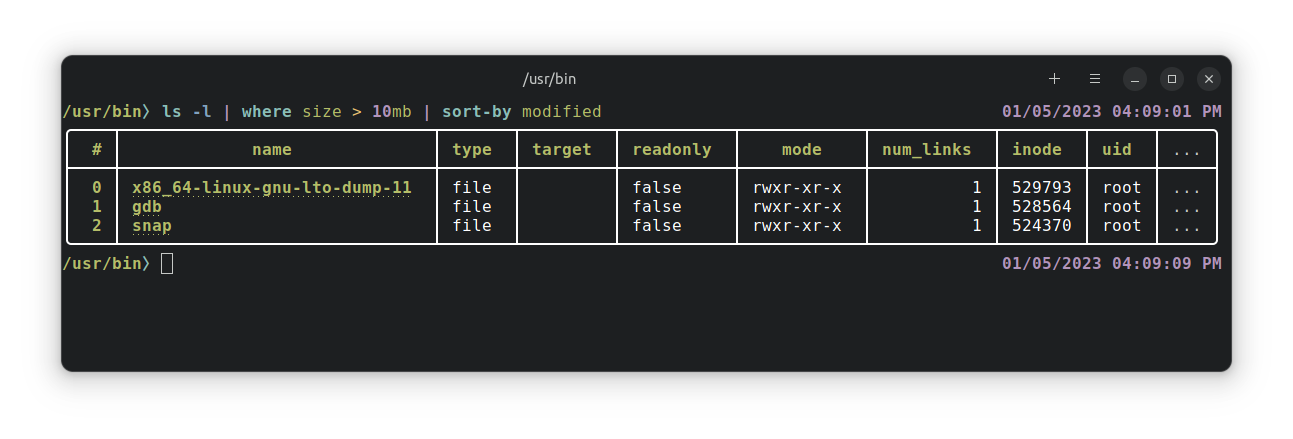
Nushell is a new type of shell that works in Linux, macOS, Windows, BSD, etc. Nu, as it’s also called, it takes its philosophy and inspiration from projects like PowerShell, functional programming languages, and modern CLI tools.

Beyond Bash: 9 Lesser-Known Linux Shells and Their Capabilities
Nushell

Features of Nushell

  • Everything is data: Nu pipelines use structured data so you can safely select, filter, and sort the same way every time.
  • Powerful plugins: It's easy to extend Nu using a powerful plugin system.
  • Easy to read error messages. Nu operates on typed data, so it catches bugs that other shells don’t. And when things break, Nu tells you exactly where and why.
  • Clean IDE support.

Install Nushell

If you’re on Ubuntu, you won’t find an apt repository to install Nushell. But you can build it by installing the required dependencies, as per its instructions on GitHub.

Fortunately, there is a way to install it on any distro using Homebrew. You can refer to our tutorial on installing and using Homebrew Package Manager on Linux.

Once you successfully set it up on Linux, you need to type in the following command to install Nushell:

brew install nushell

Head to its official website to explore more installation options.

3. Dune

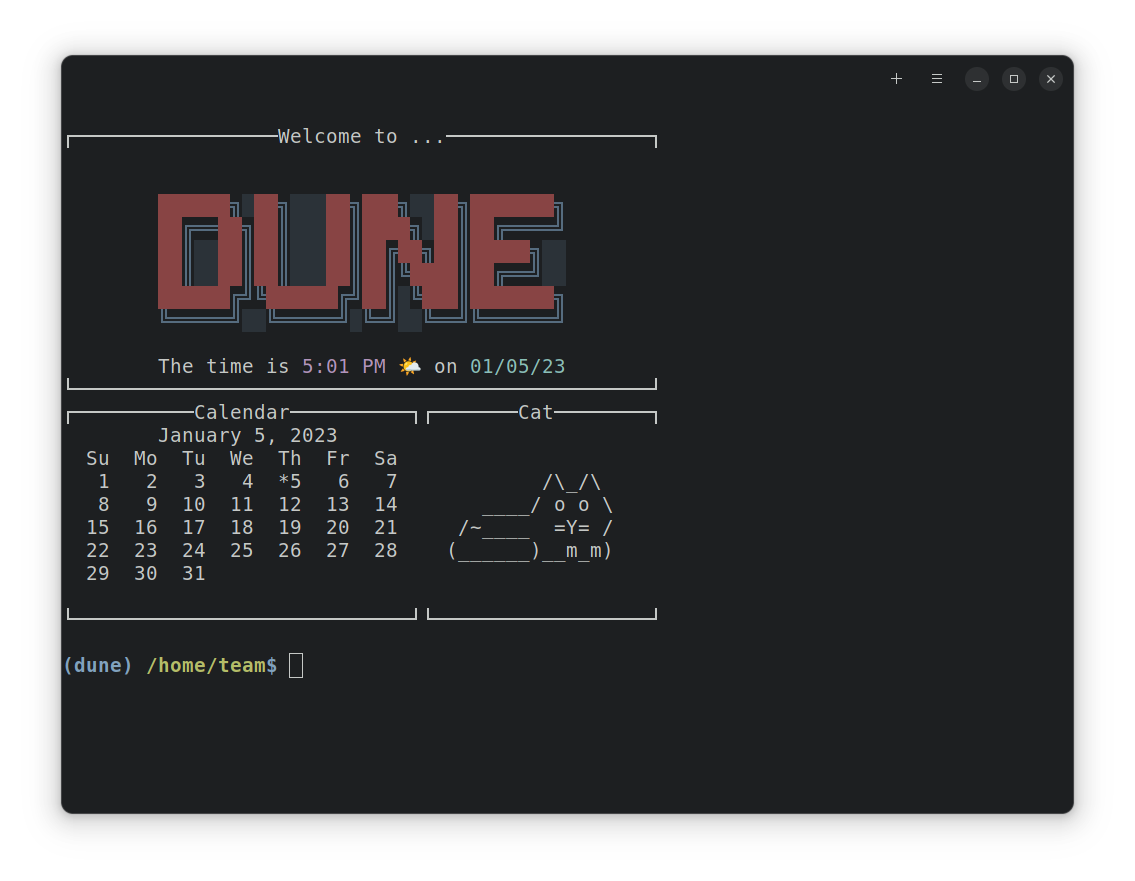
The project's creator describes Dune as a shell by the beach. Dune is a fast, useful and pretty shell, offering a few niche metaprogramming features such as quoting.

Beyond Bash: 9 Lesser-Known Linux Shells and Their Capabilities
Dune Shell

Features of Dune Shell

  • Before entering the interactive mode, Dune executes the prelude, a startup file stored in the home directory.
  • Dune's REPL is entirely customizable
  • You can define aliases by assigning a variable to a program's name
  • Use a macro to write functions that modify your shell's environment and act like commands or programs
  • Dune offers an extensive standard library and also provides a pretty interface to see all the functions available in each module.

Install Dune Shell

Dune shell is available in the Arch Linux repository as dunesh.

For all other users, the Dune shell can be installed with cargo. So first, you need to install the latest version of rust. If you already have rust installed, ensure you have the latest version and then proceed to install Dune.

cargo install -f dune

Once installed, you can access the shell by entering the following:

dunesh

Suggested Read 📖

How to Change Shell in Linux
This quick tutorial shows how to check the running shell, available shell in the system and how to change the default shell in Linux.
Beyond Bash: 9 Lesser-Known Linux Shells and Their Capabilities

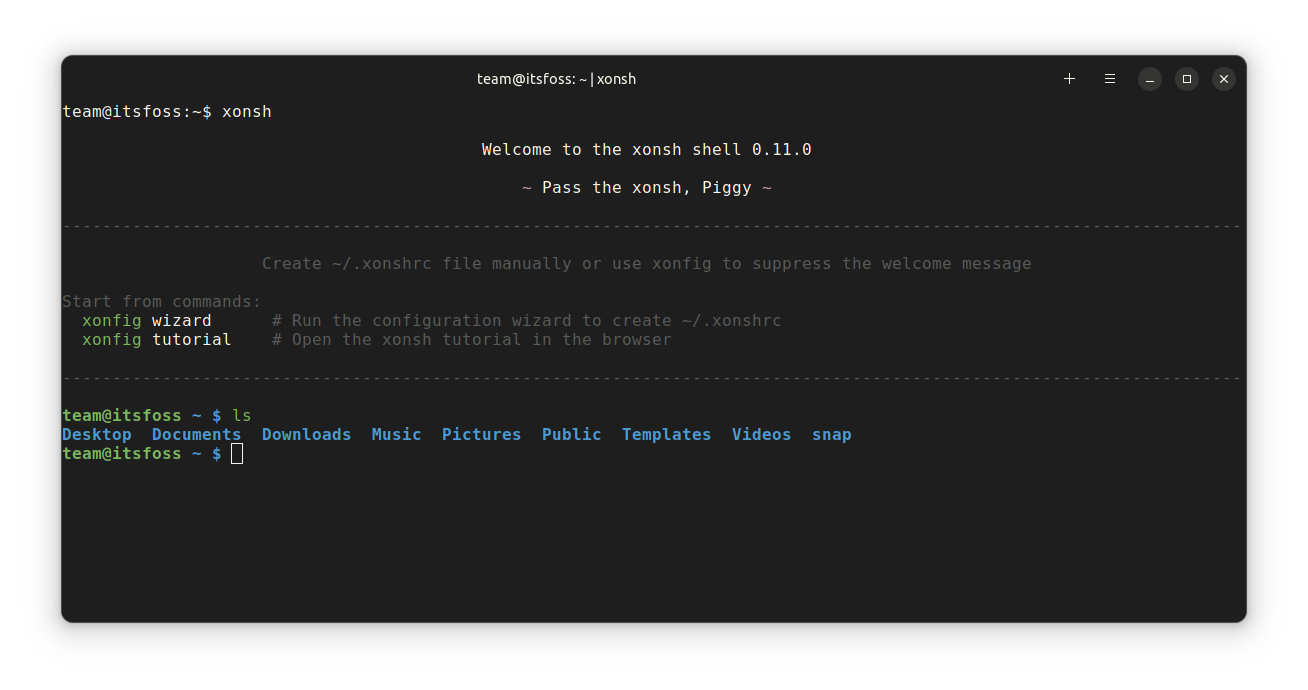
4. Xonsh

Xonsh is a Python-powered, cross-platform shell and command prompt. It combines Python and bash shell so that you can run Python commands directly in the shell. You can even combine Python and shell commands.

Beyond Bash: 9 Lesser-Known Linux Shells and Their Capabilities
Xonsh Shell

We had a separate article on Xonsh if you are curious to learn more:

Xonsh Shell Combines the Best of Bash Shell and Python in Linux Terminal
Which is the most popular shell? I guess you’ll say bash or perhaps zsh and you are right about that. There are several shells available for UNIX and Linux systems. bash, ksh, zsh, fish and more. Recently, I came across another shell which offers a unique twist of combining
Beyond Bash: 9 Lesser-Known Linux Shells and Their Capabilities

Features of Xonsh Shell

  • The Xonsh language has shell primitives that you are used to from Bash
  • Prepare environment variables and arguments in Python and use them in shell commands
  • Xontribs is a 3rd-party extension system
  • Customizable tab completion, key bindings, color styles
  • Rich interface to discover history

Installing Xonsh Shell

Xonsh is available in the repos of many Linux distributions like Ubuntu, Fedora, etc. So, to install it on Ubuntu, run:

sudo apt install xonsh

Xonsh also provides an AppImage package, which can be downloaded from their download page. You may refer to our AppImage guide if you are new to the file format.

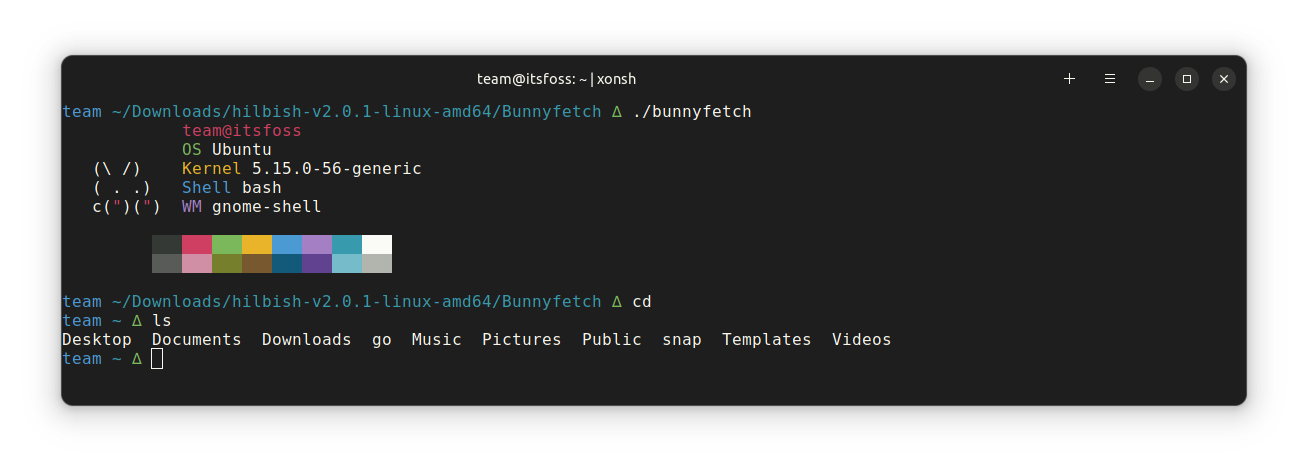
5. Hilbish

Hilbish is an extensible shell that is very customizable via the Lua programming language. The shell is aimed at both casual users and power users.

Beyond Bash: 9 Lesser-Known Linux Shells and Their Capabilities
Hilbish

Features of Hilbish

  • Simple and Easy Scripting
  • History and Completion Menus: Provides the user with proper menus for completions and history searching
  • Syntax highlighting and hinting are available via the Lua API
  • It works on Unix systems and Windows, but on Windows, there may encounter issues.

Installing Hilbish

Hilbish is not available in the package repositories of Ubuntu. So, you will be building it from the source.

To install it, you need Go and task installed.

sudo apt install golang-go
sudo snap install task --classic

Once the dependencies are installed, run the following commands to install Hilbish shell:

git clone --recursive https://github.com/Rosettea/Hilbish
cd Hilbish
go get -d ./...

If you want a stable branch, run these commands:

git checkout $(git describe --tags `git rev-list --tags --max-count=1`)
task build
sudo task install

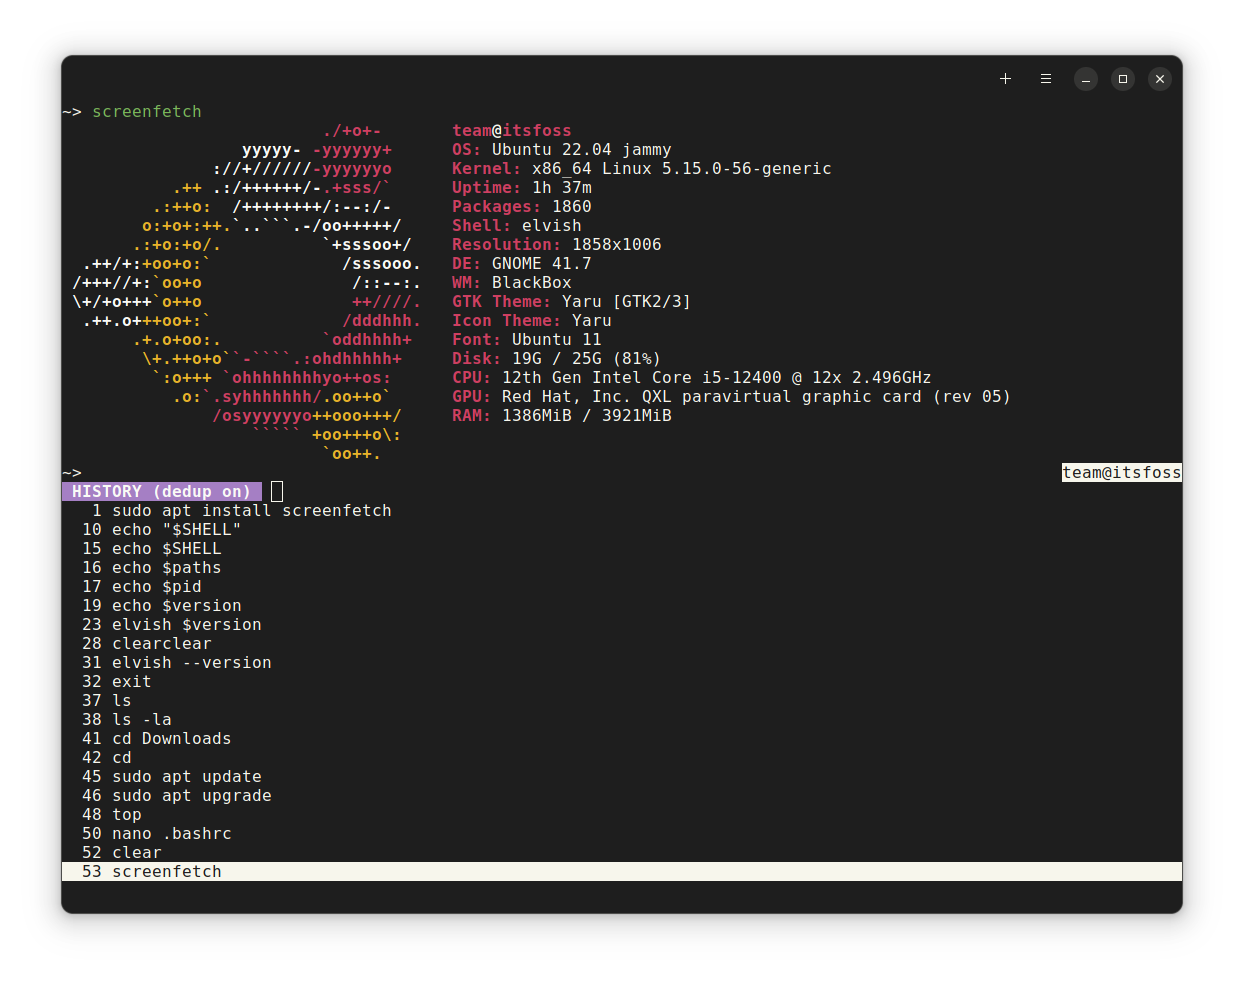
6. Elvish

Elvish is an expressive programming language and a versatile interactive shell. It runs on Linux, Mac, and Windows. Even if v1.0 has not been released, it is already suitable for most daily interactive use.

Beyond Bash: 9 Lesser-Known Linux Shells and Their Capabilities
Elvish

Features of Elvish

  • Powerful Pipelines: Pipelines in Elvish can carry structured data, not just text. You can stream lists, maps, and even functions through the pipeline.
  • Intuitive Control Structures
  • Directory History: Elvish remembers all the directories you have been to. You can access it by pressing CTRL+L.
  • Command History
  • Built-in File Manager: Accessible by pressing CTRL + N

Install Elvish

Elvish shell is available in Ubuntu and Arch Linux package managers. So to install it, open a terminal and run:

sudo apt install elvish

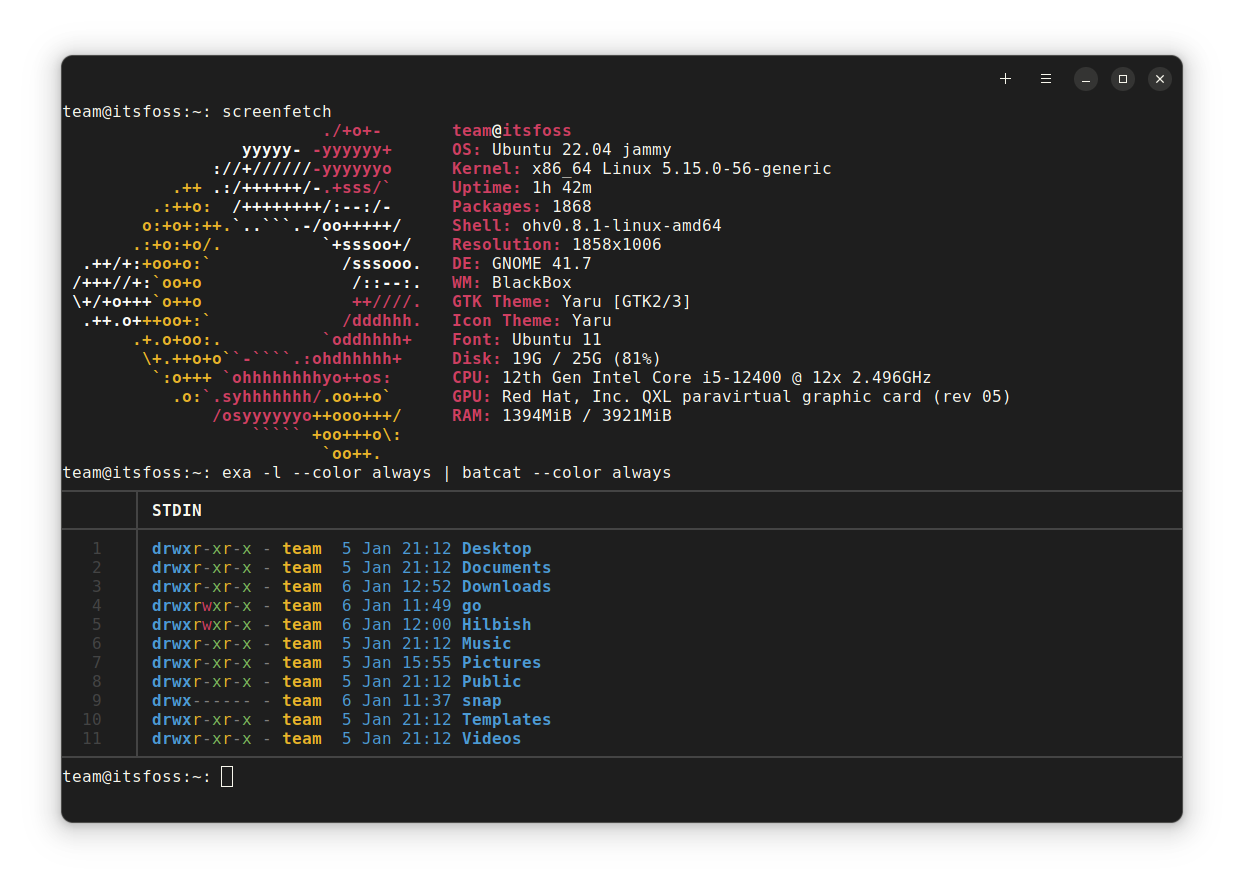
7. Oh

According to its developers, Oh is a reimagining of the Unix shell.

It aims to become a more powerful and robust replacement to modern options while respecting the conventions established by the Unix shell over the last half-century.

Beyond Bash: 9 Lesser-Known Linux Shells and Their Capabilities
Oh Shell

Features of Oh Shell

  • First-class channels, pipes, environments, and functions
  • Rich return values that work with standard shell constructs
  • Support for modularity.
  • A simplified set of evaluation and quoting rules.
  • A syntax that deviates as little as possible from established conventions;

Installing Oh

Oh provides a pre-compiled binary. You need to download it from their official GitHub page.

You need to give execution permission to the file using the command:

chmod +x filename

Now, you can run it by :

./<name of binary file>

Suggested Read 📖

How to Run a Shell Script in Linux [Essentials Explained for Beginners]
There are two ways to run a shell script in Linux. You can use: bash script.sh Or you can execute the shell script like this: ./script.sh That maybe simple, but it doesn’t explain a lot. Don’t worry, I’ll do the necessary explaining with examples so
Beyond Bash: 9 Lesser-Known Linux Shells and Their Capabilities

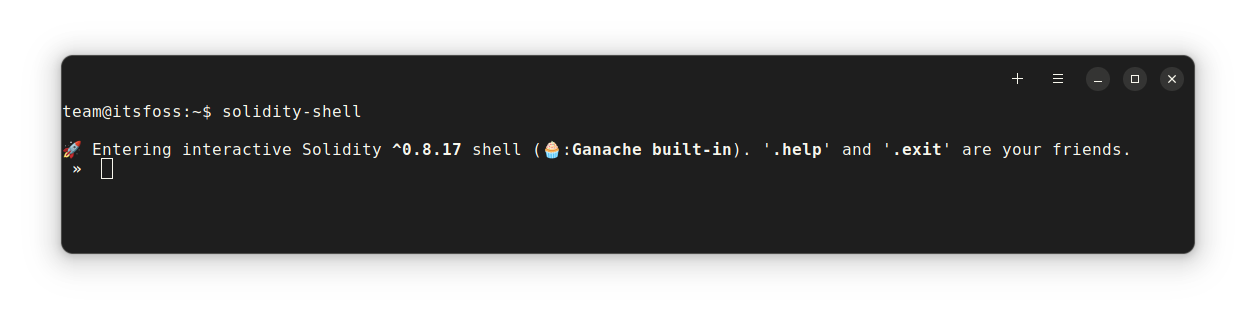
8. Solidity

Solidity is an interactive shell with lightweight session recording and remote compiler support. When you change the solidity pragma/language, it automatically fetches a matching remote compiler.

Beyond Bash: 9 Lesser-Known Linux Shells and Their Capabilities
Solidity Shell

Features of Solidity

  • pragma solidity <version> attempts to dynamically load the selected compiler version
  • Sessions can be saved and restored using the .session  command.
  • Settings are saved on exit (not safe when running concurrent shells).
  • $_ is a placeholder for the last known result.
  • Special commands are dot-prefixed. Everything else is evaluated as Solidity code.

Install Solidity

You can install solidity shell through npm.

Ensure you have the latest version of nodejs and npm installed, then type the following command:

npm install -g solidity-shell

Once installed, run solidity-shell to start the session.

9. Yash

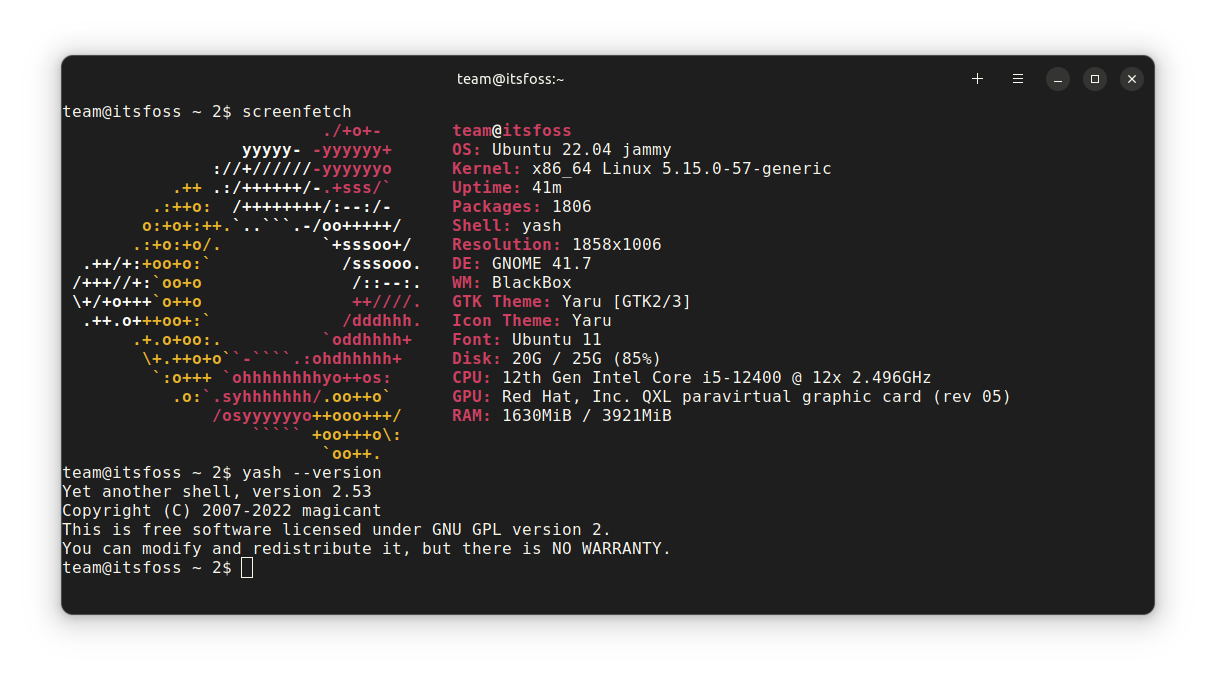
Yash, or yet another shell is a POSIX-compliant command line shell written in C99 (ISO/IEC 9899:1999). It has features for daily interactive and scripting use.

Beyond Bash: 9 Lesser-Known Linux Shells and Their Capabilities
Yash Shell

Features of Yash Shell

  • Global aliases
  • Socket redirection, pipeline redirection, and process redirection
  • Prompt command and command-not-found handler
  • Command line completion with predefined completion scripts for more than 100 commands
  • Command line prediction based on command history

Installing Yash Shell

To install the shell, you need to go to their GitHub releases page and download the tar file. Now extract the tar file; inside it, you will find an INSTALL file with instructions to install it.

Typically, you should execute the below command inside the extracted folder.

./configure && make && sudo make install

Honorable Mentions

  1. Ion: Ion Shell is a modern system shell written in Rust, primarily for RedoxOS. It is still a work in progress, and users should expect syntax changes.
  2. Closh: Closh is a bash-like shell that combines the best of traditional UNIX shells with the power of Clojure. It aims to be a modern alternative to bash. This, too, is in the early stages of development.

💬 What do you think about these shells listed? Would you experiment by changing the default shell to some of the options here? What's your favorite one? Share your thoughts in the comments box below.


from It's FOSS https://ift.tt/UsRy4w3
via IFTTT

Sabtu, 14 Januari 2023

How to Install Go Language on Ubuntu

How to Install Go Language on Ubuntu

Google developed the Go programing language to create a language that is as powerful as C++ but follows simple syntax like Python.

And because of its efficiency, platforms such as Docker, Kubernetes, and Terraform are written in the Go language.

If you are writing code in Go or compiling a Go-based application, you must install it first.

In this tutorial, I'll show the following ways of installing Go on Ubuntu:

  • Using apt from Ubuntu repositories: Simplest option but not the latest version.
  • Using snap: Simple and often newer version.
  • Using source code: Complex method that gives you the latest version.

Let's start with the simplest and most recommended method.

If you don't care about having the most recent version, it can be installed with the following command:

sudo apt install golang

You can check if it has been installed, using the following command:

go version

While writing, you get Go version 1.18.1 which is one point release behind the most recent version:

How to Install Go Language on Ubuntu

Great! So you have checked that Go is installed on your Ubuntu system. But is it working correctly? Let's check that by running a simple Go program.

Run the Simple Go program

Here, I am going to create a simple Hello world program to cross-check the installation.

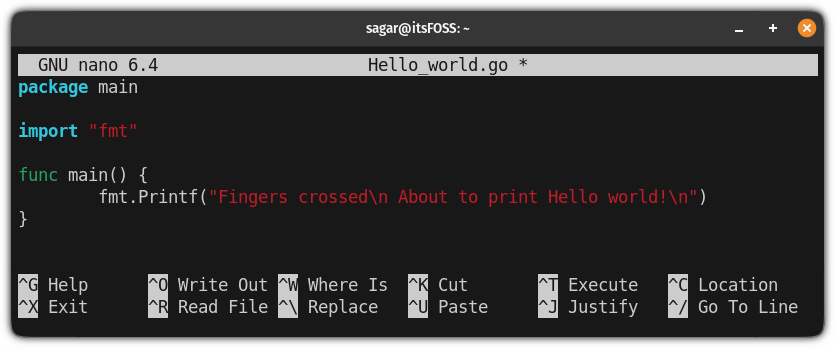
I am going to use nano to create and open the file named Hello_world.go:

nano Hello_world.go

And my file contents are the following (don't judge me, I'm pro okay):

package main

import "fmt"

func main() {
        fmt.Printf("Fingers crossed\n About to print Hello world!\n")
}
How to Install Go Language on Ubuntu

Save the file contents and exit Nano by pressing Ctrl + X.

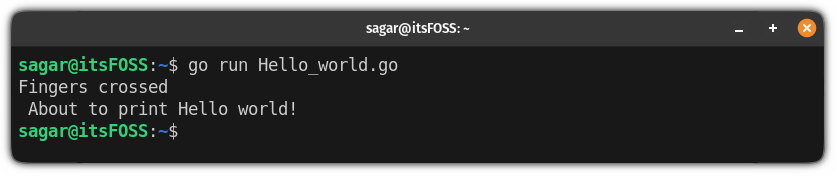
Now, you will have to append the run flag and filename to the command to run the program:

go run Hello_world.go
How to Install Go Language on Ubuntu

Running as expected!

You could also build an executable Go file like this:

go build Hello_world.go

That was simple. You have Go language installed properly. Let's quickly see the removal steps.

Remove Go from Ubuntu

Since you installed it from Ubuntu's repositories using the apt command, the removal is pretty simple.

sudo apt remove golang

You can also run the autoremove afterward.

sudo apt autoremove

Method 2:  Using snap to install a newer version of Go

This is the easiest way to get the most recent version of any package as you don't have to go through any complex rather than executing one command.

And Ubuntu comes pre-configured with snaps so why not to benefit from this? Snap can be easily installed on other distributions as well.

How to Install and Use Snap in Various Linux Distributions
Snaps are Canonical’s way of providing a cross-distribution package management system. In this article, we will see how to install and use snaps in various Linux distributions.
How to Install Go Language on Ubuntu

To install the recent version of Go with snap, use the following command :

sudo snap install go --classic
How to Install Go Language on Ubuntu

And as you can see, it installed Go language version 1.19.5 which is the most recent stable release while writing.

Remove the snap Go

If you no longer need Go language installed on your system or you are just not into using snaps anymore and want to remove it, follow the given command:

sudo snap remove go

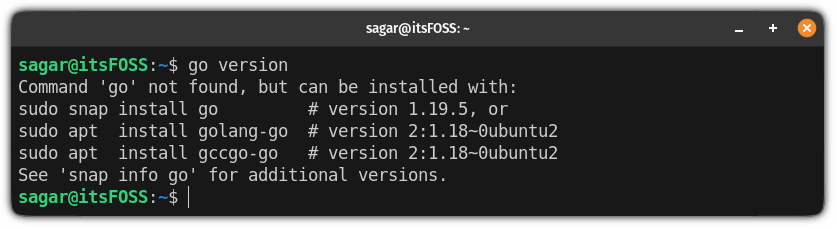
To crosscheck whether it is removed successfully, check the installed version:

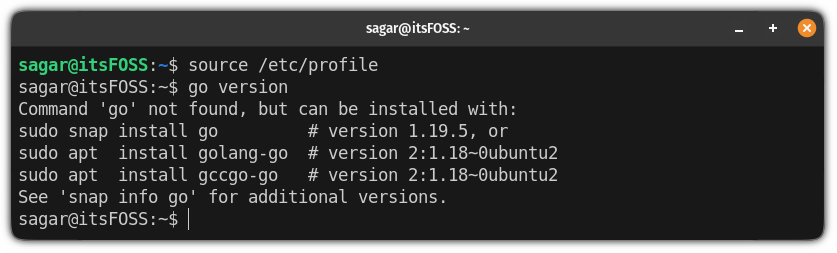
go version
How to Install Go Language on Ubuntu

And if you get the same error, Go has been removed successfully.

🚧
This is the most complicated method and I do not recommend this. I included it for informational purposes.

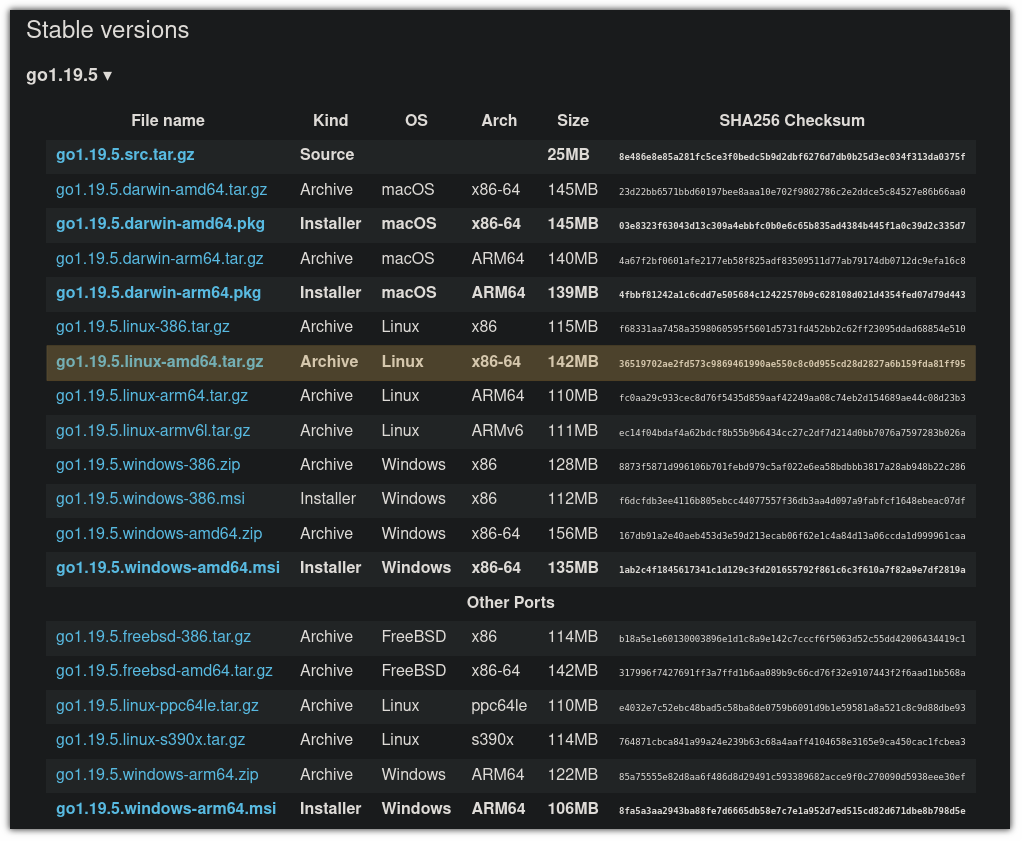
To build Go from source, visit its official download page and choose the package for your system accordingly.

How to Install Go Language on Ubuntu

Next, extract the binaries to the /usr/local directory using the tar command:

sudo tar -xzf go1.19.5.linux-amd64.tar.gz -C /usr/local/

Next, you are required to set the environment variable so that system can figure out where to look for the Go executable.

So first open the /etc/profile using the following command:

sudo nano /etc/profile

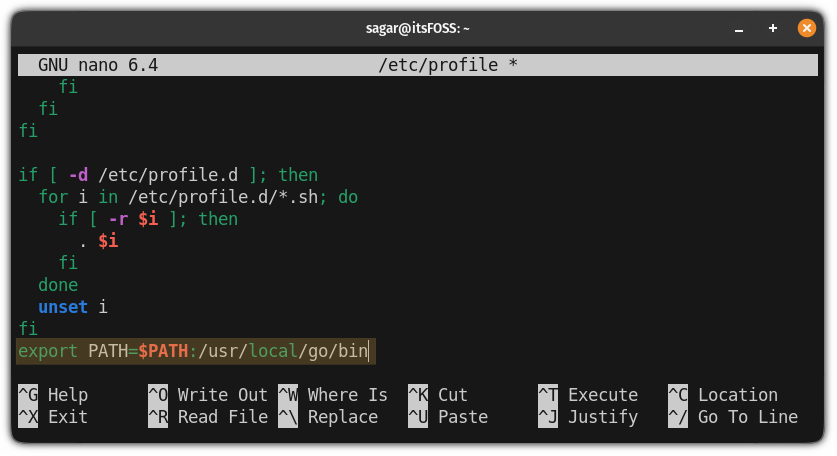
And press Alt + / to jump to the end of a line in the nano text editor and paste the following line:

export PATH=$PATH:/usr/local/go/bin
How to Install Go Language on Ubuntu

Now, save changes and exit from the nano text editor.

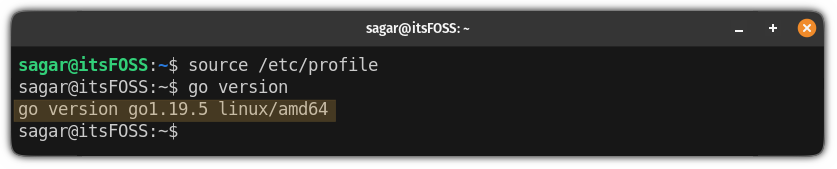
To take effect from the environment path you have just added, you will have to source the file:

source /etc/profile

Go has successfully been installed on your system. You can check the installed version:

go version
How to Install Go Language on Ubuntu

How to uninstall

Removing packages installed from the source code is even more complicated. But you can remove the Go from your system by following three easy steps.

First, remove the Go binaries that you extracted while installing:

sudo rm -rf /usr/local/go

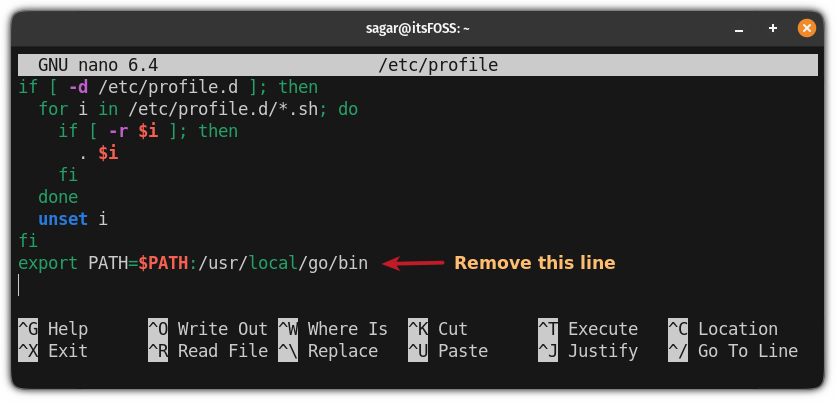
Second, remove the environment path variable form /etc/profile:

sudo nano /etc/profile
How to Install Go Language on Ubuntu

And third, source the file to apply the changes:

source /etc/profile
How to Install Go Language on Ubuntu

Looking for an open-source IDE to run Go programs?

So you learned to install Go on Ubuntu Linux. You also ran a simple Go program. But if you have to write programs in Go, you'll be better off with a proper code editor.

I use VSCode for my daily coding tasks but this can't be the same for you.

So we have compiled a list of modern open-source IDEs on which you can run your Go programs efficiently:

7 Best Modern Open Source Text Editors For Coding in Linux
Looking for the best text editors in Linux for coding? Here’s a list of the best code editors for Linux. The best part is that all of them are free and open-source software. If you ask experienced Linux users, their answers would probably include Vim, Emacs, Nano, etc. No
How to Install Go Language on Ubuntu

And if you are a VSCode user like me and looking for an alternative, you can use the VSCodium 100% open-source version of Microsoft VSCode.

Please use the comment section for any queries related to this guide or suggestions on what I should cover next.


from It's FOSS https://ift.tt/sbOVjB1
via IFTTT