If you are a developer and want to install apps directly to Android for testing purposes, then using adb (Android Debug Bridge) and fastboot will get things done in the most efficient manner possible.
Sure, it can also be useful when you want to access the device shell to execute commands directly which is quite helpful for unlocking the bootloader and installing custom ROMs.
So in this tutorial, I will walk you through how you can install adb and fastboot on various Linux distributions.
How to install ADB and Fastboot on Linux
You get adb and fastboot available in the default repository of almost every modern Linux distribution and it does not require any third-party repository.
So let's take a look at how those two packages can be installed on various Linux distributions.
For Ubuntu/Debian:
sudo apt install adb fastboot
For Fedora Linux:
sudo dnf install android-tools
For Arch Linux:
sudo pacman -S android-tools
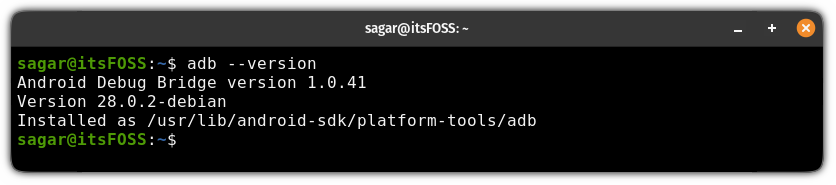
That's it. Once you are done with the installation, you can check the installed version of adb using the following command:
adb --version
🚧
Please note that some manufacturers do not like unlocking bootloader. Do check if it violates the warranty.
How to use ADB in Linux
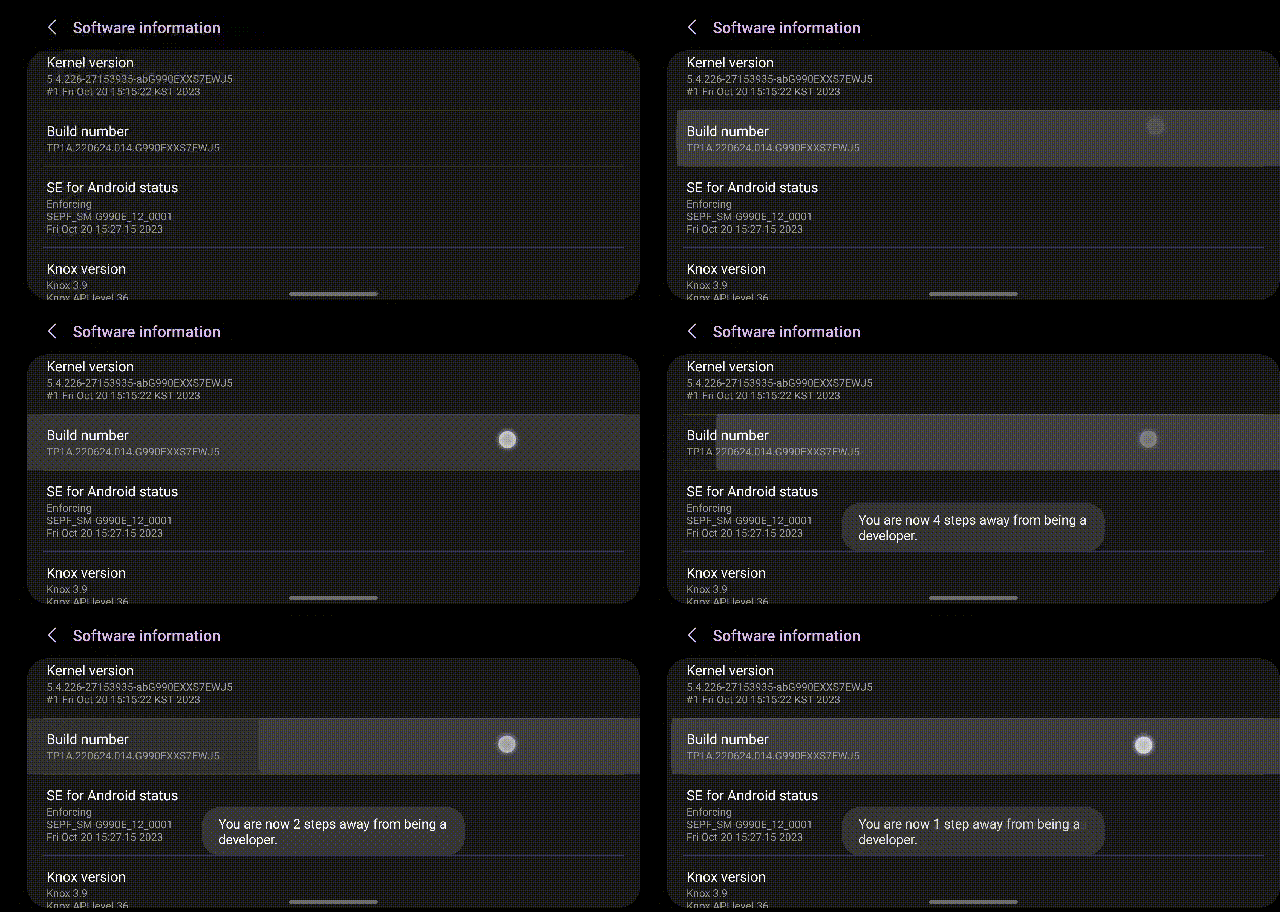
To use adb, the first step is to enable the developer options on your Android device. For that, first, go to Settings and find the software information.
Inside the software information, tap multiple times on the build number and it will enable the developer options for you:
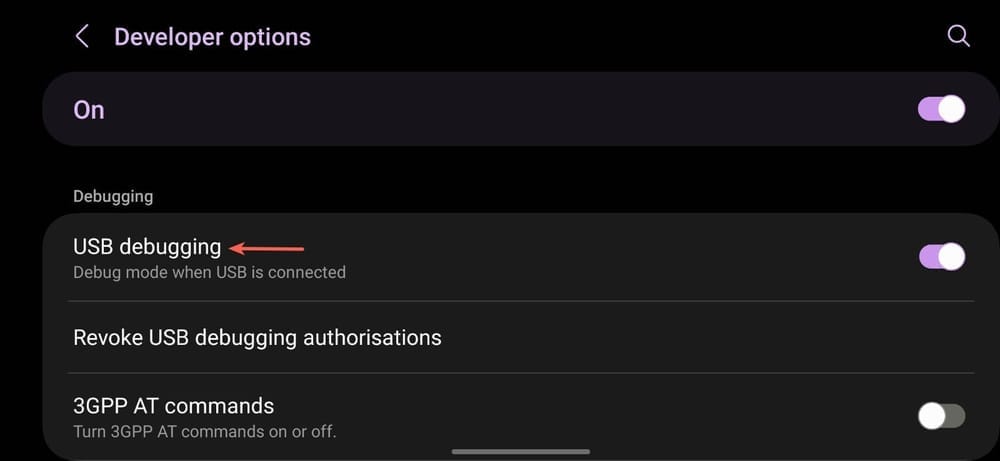
Next, go to the developer options and enable the USB debugging option:
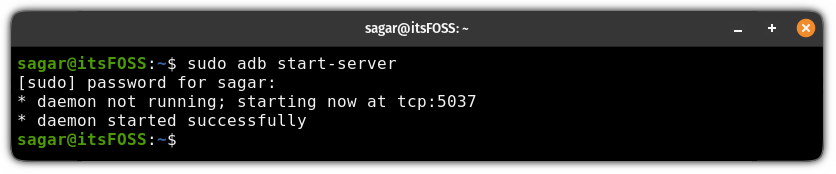
Now, connect your device to your computer and start the adb server using the following command:
sudo adb start-server
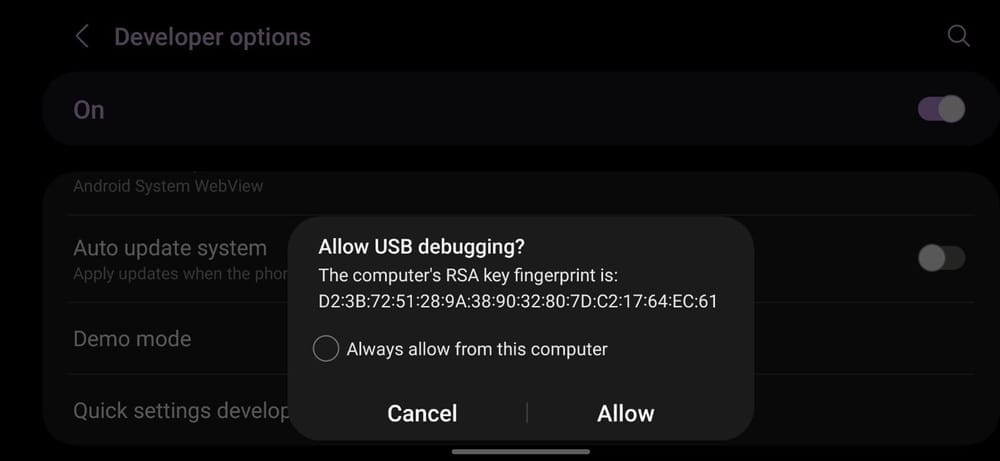
Once you start the adb server, it will prompt you on your phone asking for your permission to allow USB debugging (if you don't see the below prompt, re-enable USB debugging while keeping your phone connected to the computer):
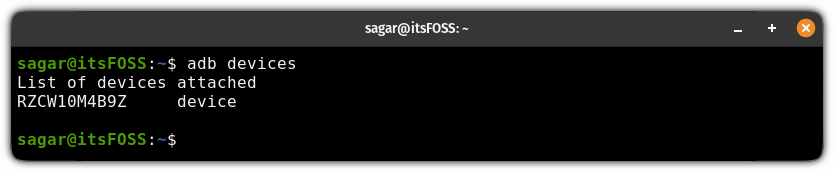
After allowing the USB debugging, check if the device is connected or not using the following:
adb devices
Installing APK using ADB
To install an apk to your Android directly, all you have to do is use the install flag and specify the name or path to the APK you are trying to install:
adb install <apk_name or path/to/apk>
For example, here, I want to install the pianoli.apk file which is located inside the home directory, so I will be using the following:
adb install ~/pianoli.apk
Executing shell commands
To execute shell commands in a connected device, the first step is to get into the shell using the following command:
adb shell
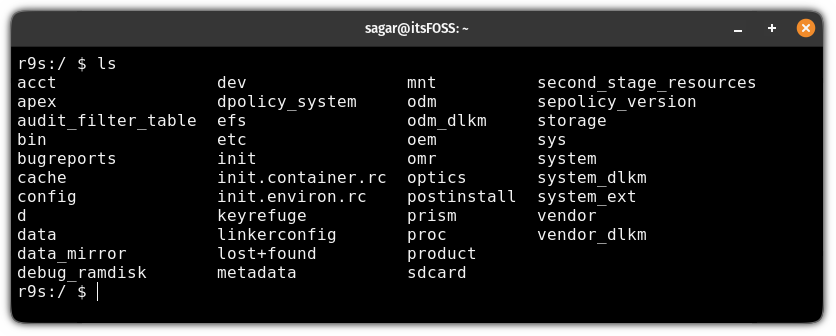
Now, you can use the basic commands. For example, here, I used the ls command to list the content of the current directly:
Sending files from the computer to the Android
To send files to the connected Android, you'd have to use the adb push command by specifying the filename and location where to send the file in Android:
adb push Filename where/to/send/in/Android
Let's say I want to send Image.jpg to the /storage/emulated/0 directory, so I will be using the following:
adb push Image.jpg /storage/emulated/0
Sending files from Android device to local machine
To send files from the connected Android device to your local computer, you'll have to use the adb pull command as shown here:
adb pull /path/to/file/in/Android /target
For example, here, I've sent the Image.jpg file located in the /storage/emulated/0 directory of my Android phone to my home directory:
adb pull /storage/emulated/0/Image.jpg ~/
I hope it gave you enough pointers to get started with adb on Ubuntu. Let me know if you have questions.
Recently, I set up Jellyfin media server on my Raspberry Pi. My Pi is wirelessly connected to the router and one problem I faced with this setup is accessing the media server on the TV or other devices.
Why? Because the Pi got assigned a random IP address at times between reboots. And since I was trying to access the media server running on Raspberry Pi though the IP address, it became an issue.
I had to manually enter the IP address on the TV every time the IP address changed. Finding the IP address of the Raspberry Pi was another challenge.
This is where static IP comes into play. If you Pi uses static IP, the IP address remains the same between the reboots.
This is one of the many scenarios where you are better off with a static IP assigned to your Pi. And in this tutorial, I'll discuss how you can achieve that.
Assigning static IP on Pi device vs on the router
Yes! There are two approaches for your Pi to have a static IP.
You can set static IP on the Raspberry Pi itself
You can have your router assign a static IP to the Pi
Both methods have their pros and cons.
Let's say you set the static IP on the Raspberry Pi. Your Pi will always seek the same IP address from the router (let's say 192.168.1.51). That's fine as long as the router remains the same. If you change your router and the new router insists on using a different subnet (let's say in the 172.16.12.0/32 range), then your PI won't be connected to WiFi like before. You'll have to manually update the network settings on the Pi again to use the new IP range. This could work when you just a couple of Pi devices and you can directly login to them (instead of SSH) or connect to them via Ethernet cable. For a fleet of Pis in random locations in the house.
Let's say you want to assign the Pi a static IP from the router. This way, you are changing nothing on the Pi. If you change the router, the Pi will get an IP address assigned automatically through the DHCP server. The problem is that it's not easy to assign static IP to devices on all the routers. Some internet companies provide routers with very little scope of configuration changes.
📑
To summarize, you should set a static IP on the Raspberry Pi itself if you can easily access the device physically at any time in the future.
I cannot show how to assign static IP to different devices on the router, as it depends on what kind of router you have. So, I'll discuss how you can set static IP on the Raspebrry Pi itself.
Setting static IP on Raspberry Pi
The procedure comprises the following four steps:
Get the current IP address of the Pi (if you want to use this one as static IP)
Get the gateway IP (router's IP)
Get the DNS server address (optional)
Use the above information to change network configuration
The first three steps can be easily done in the command line. The third step can be done easily in both the command line and GUI.
📑
Make sure that your Pi is connected to the router. You can also follow these steps if you connect to Pi via SSH.
Step 1: Get the IP address of Pi
If you want to use the current IP address as the static IP,
This is very simple. In the terminal, type the following command:
hostname -I
You may also use this command:
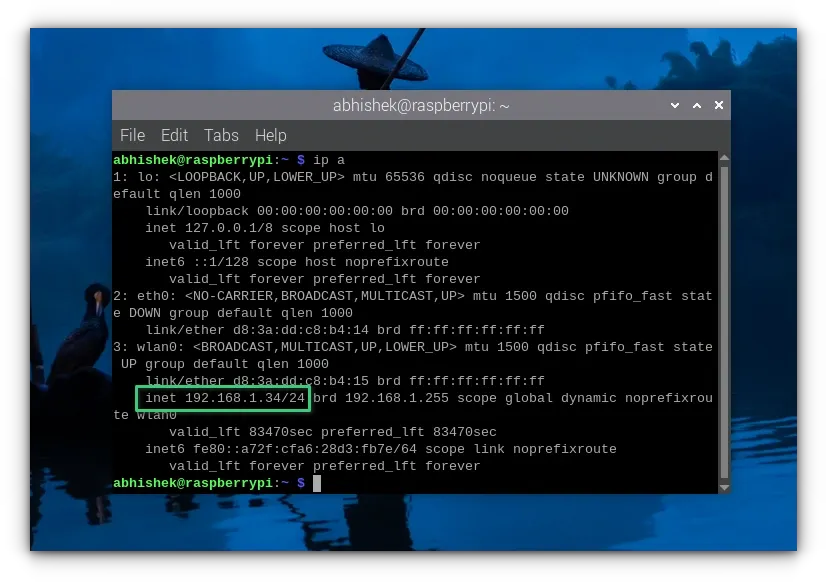
ip a
Both will give you the current IP address of the Raspberry Pi.
As you can see in the screenshot above, my Raspberry Pi's IP address is 192.168.1.34.
Step 2: Get the gateway IP
This is also quite simple. To get the gateway IP address (your router's IP address), use this command:
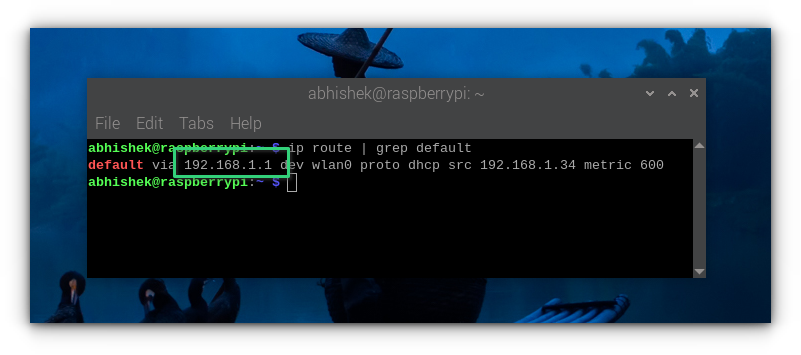
ip route | grep default
As you can see in the screenshot below, the gateway IP in my case is 192.168.1.1.
Step 3: Get the DNS server details (optional)
Some people like to keep the same DNS server which is currently being used on the system. I think you can do without that as well. Most home users have the DHCP server handle it automatically anyway.
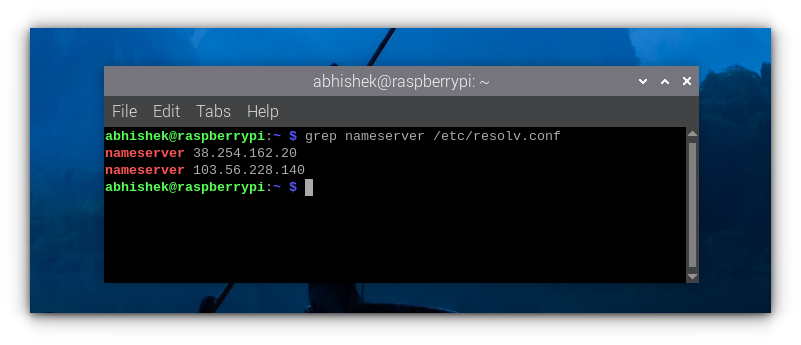
Still, if you want, you can get the DNS server address with:
grep nameserver /etc/resolv.conf
📋
By now you must have realized that you set static IP for a particular network connection. If you connect the Raspberry Pi to some other network, it won't use the same static IP address.
Step 4 (Terminal Method): Change network configuration to set static IP
If you are accessing Raspberry Pi via SSH or if you prefer the command line, you can use the nmtui (network manager in terminal) tool.
✋
These steps have been tested on Raspberry Pi 5. If your system doesn't have nmtui package installed, you may install it and continue following the instructions.
Run this command:
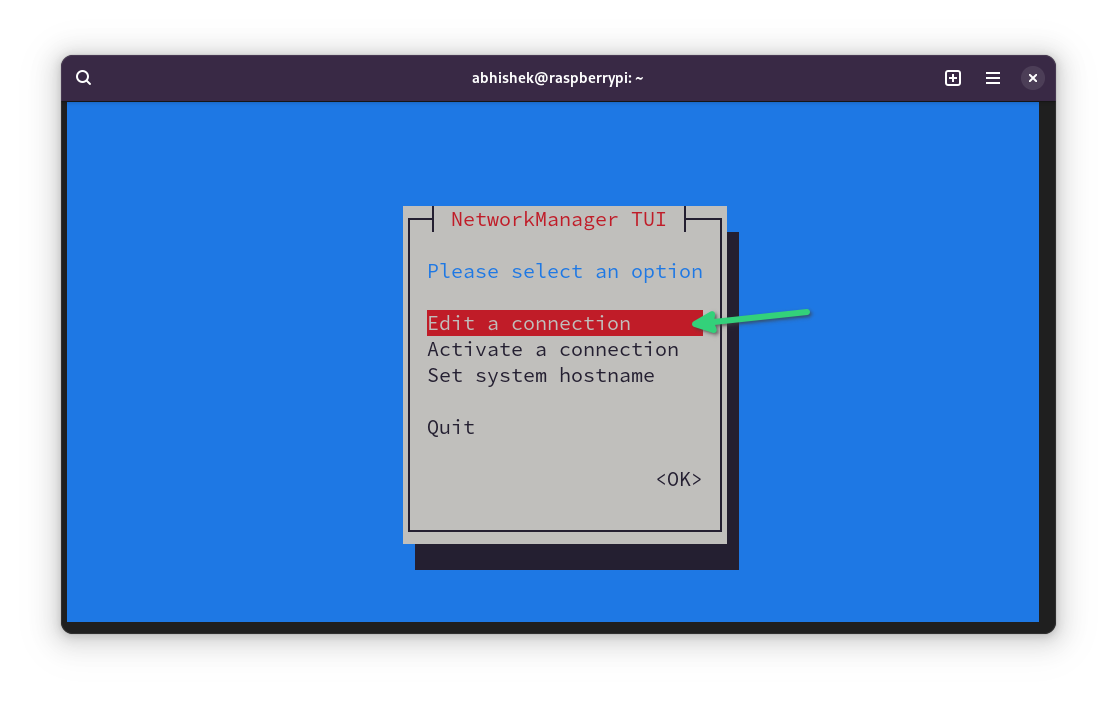
sudo nmtui
You'll see an interface like this. Here, select Edit a connection and press Enter.
💡
In a TUI (Terminal User Interface) tool, use the up and down arrow keys to move between the option. You may also need to use the tab key to move to other options. Press enter on your selected option.
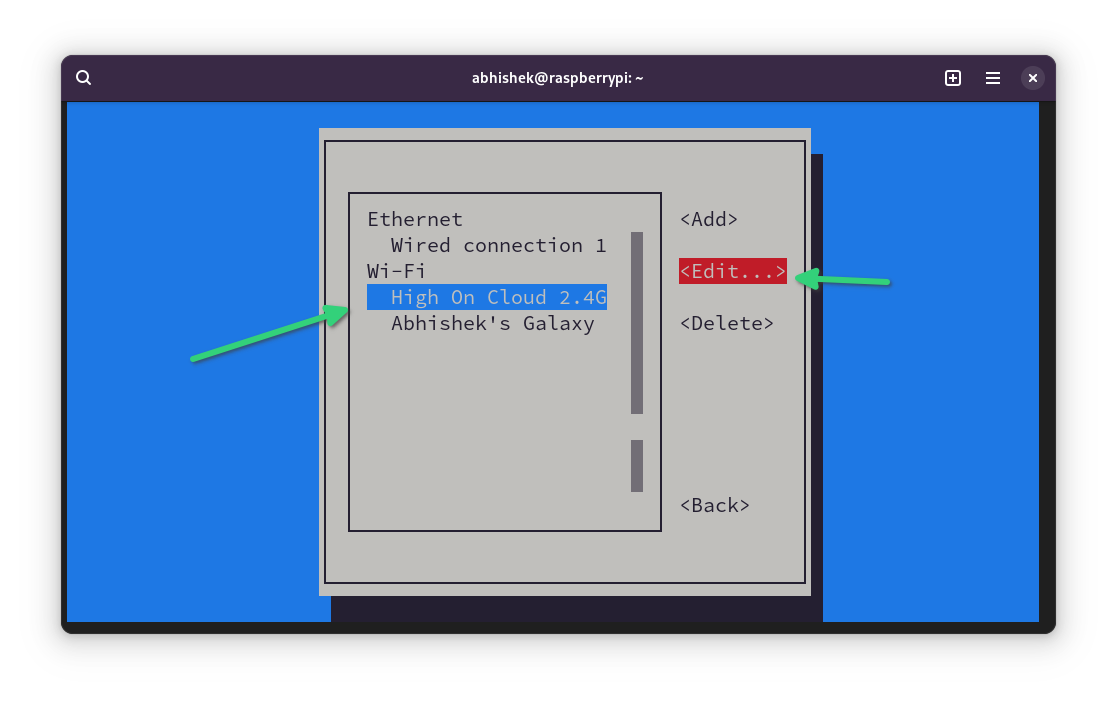
It will show the connections you have had in the past on your Pi. I believe you want to set the static IP for the currently connected network. Move down to the appropriate network. Now press tab a couple of times to select the Edit option and press enter.
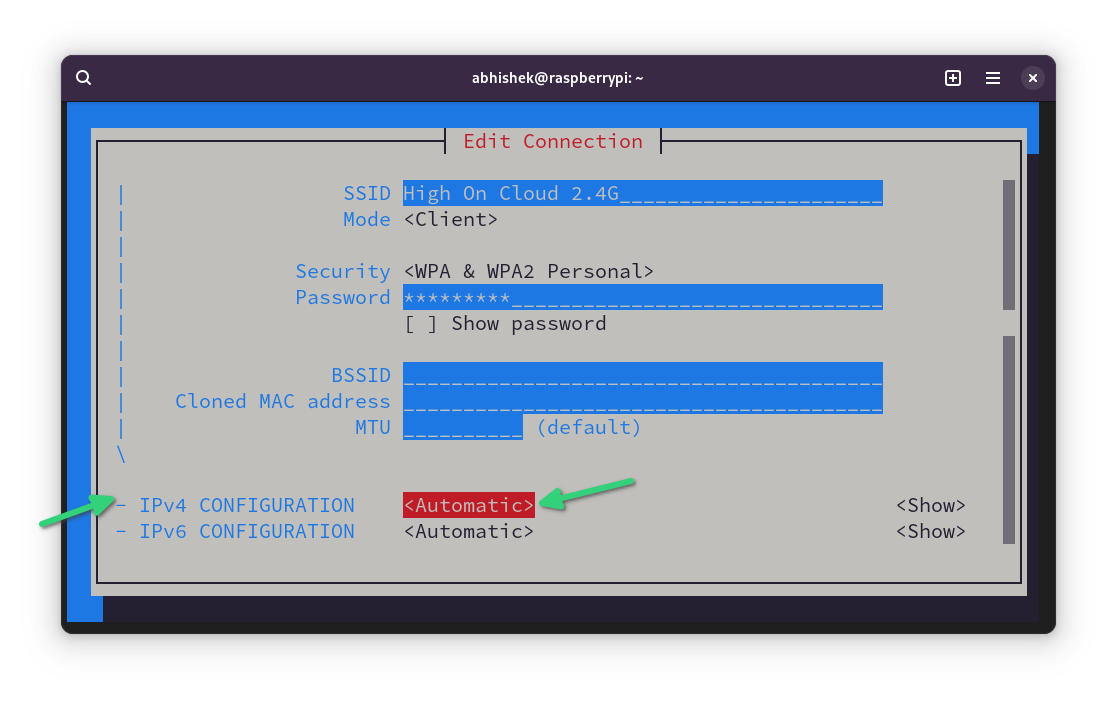
Use the arrow key to scroll down to the IPv4 CONFIGURATION option. Change it from Automatic to Manual.
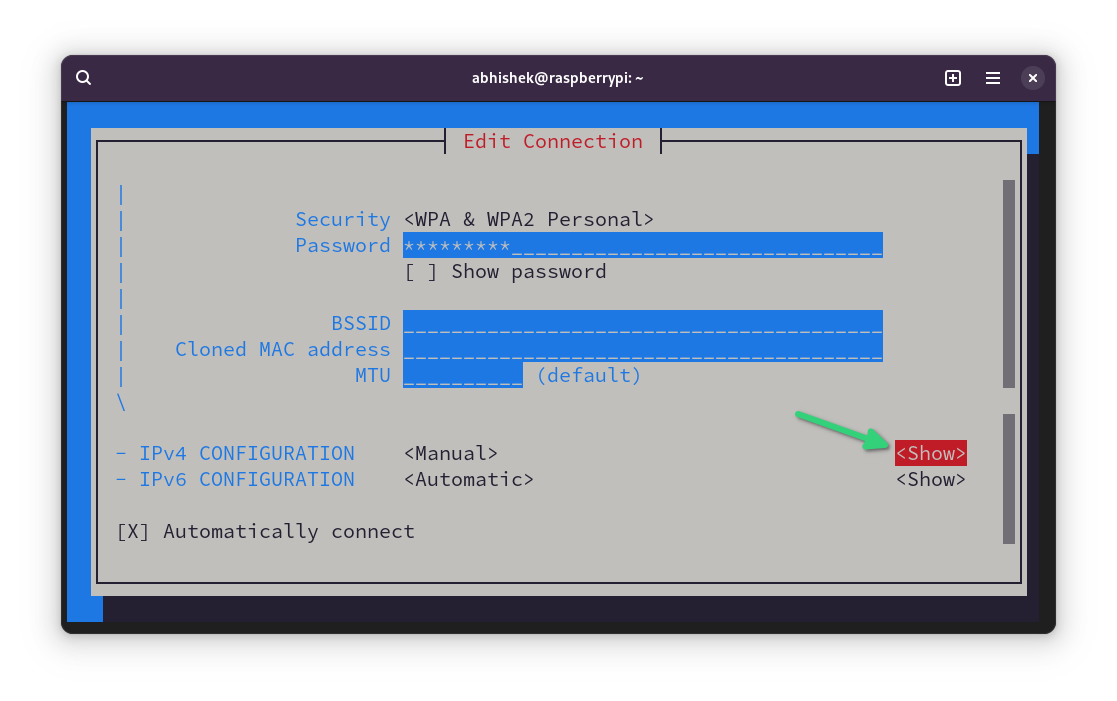
Next, select the Show option of IPv4 CONFIGURATION line.
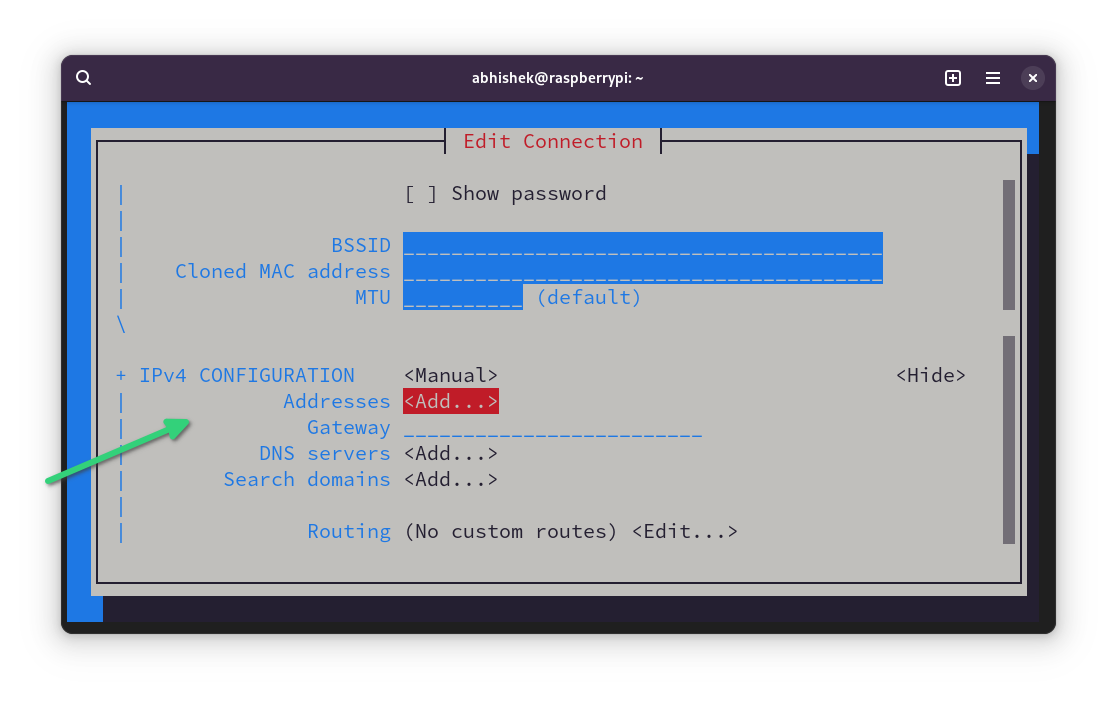
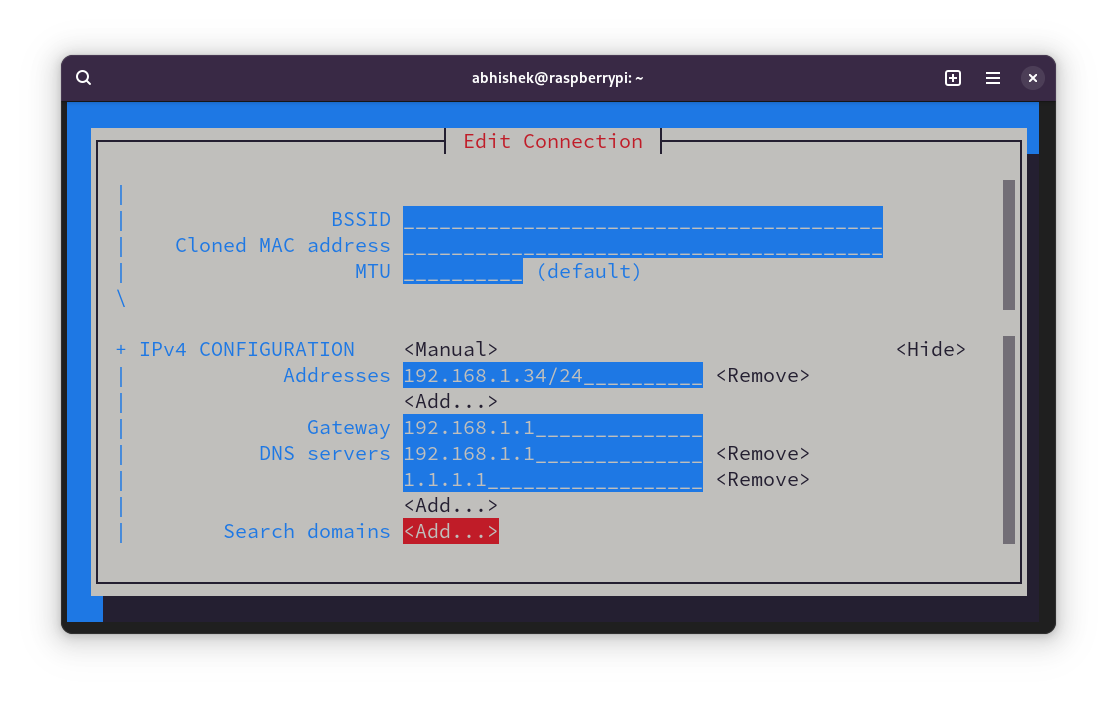
Use the arrow keys to move down again and reach the IPv4 CONFIGURATION section again. This time you'll see option to add Address, Gateway and DNS servers.
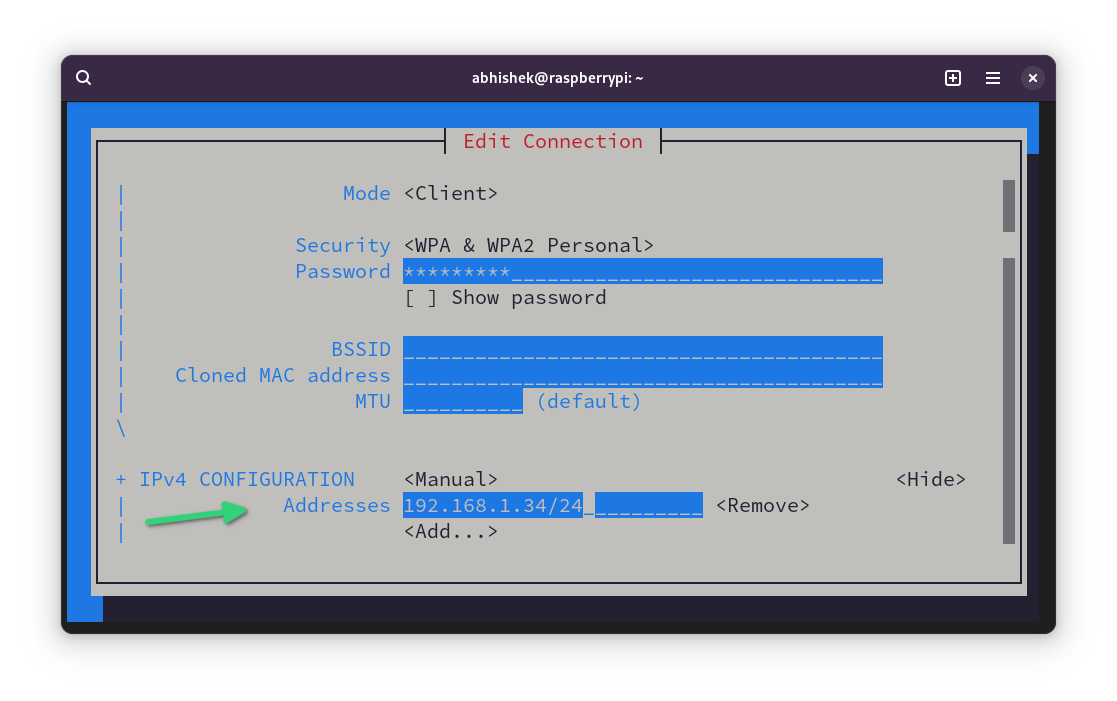
Go to the Addresses line and click enter key. It may take you to the beginning. Scroll down back again.
✋
It is important to enter the IP address of your choice with the subnet mask in the format IP_address/24.
Fill all the details such as IP address with mask, Gateway IP and DNS.
If you notice above, I used the gateway IP in DNS too. I also added 1.1.1.1, DNS of Cloudflare as an alternative.
After filling all the details, scroll down to the bottom, select OK and press enter.
Your changes are saved. You can exit the nmtui interface the same way (press Back and then Quit options).
Restart your Pi for the changes to take effect. You have successfully set up static IP on Raspberry Pi.
Step 4 (GUI Method): Change network configuration to set static IP
The same can be achieved from the graphical interface of Raspberry Pi OS.
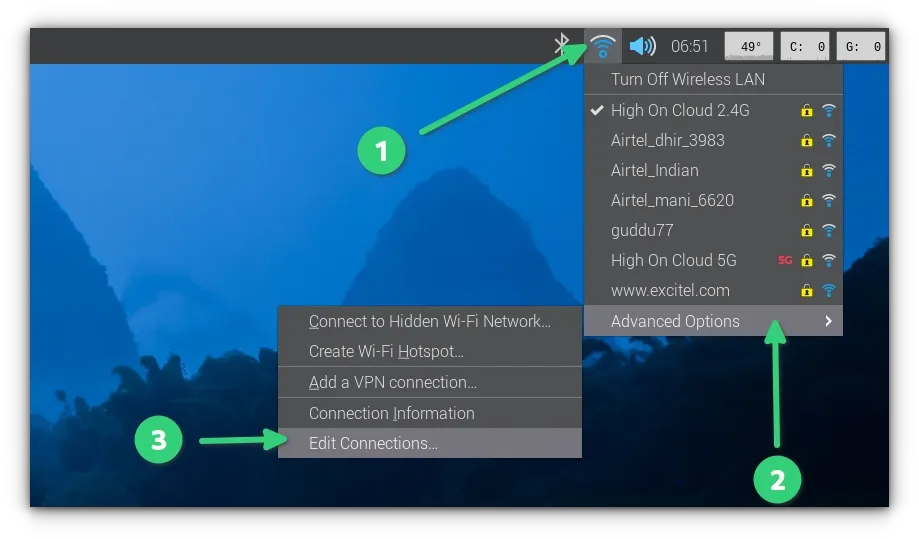
First, click on the network icon and then go to the Advanced options and click Edit connections.
Editing connections in Raspberry Pi
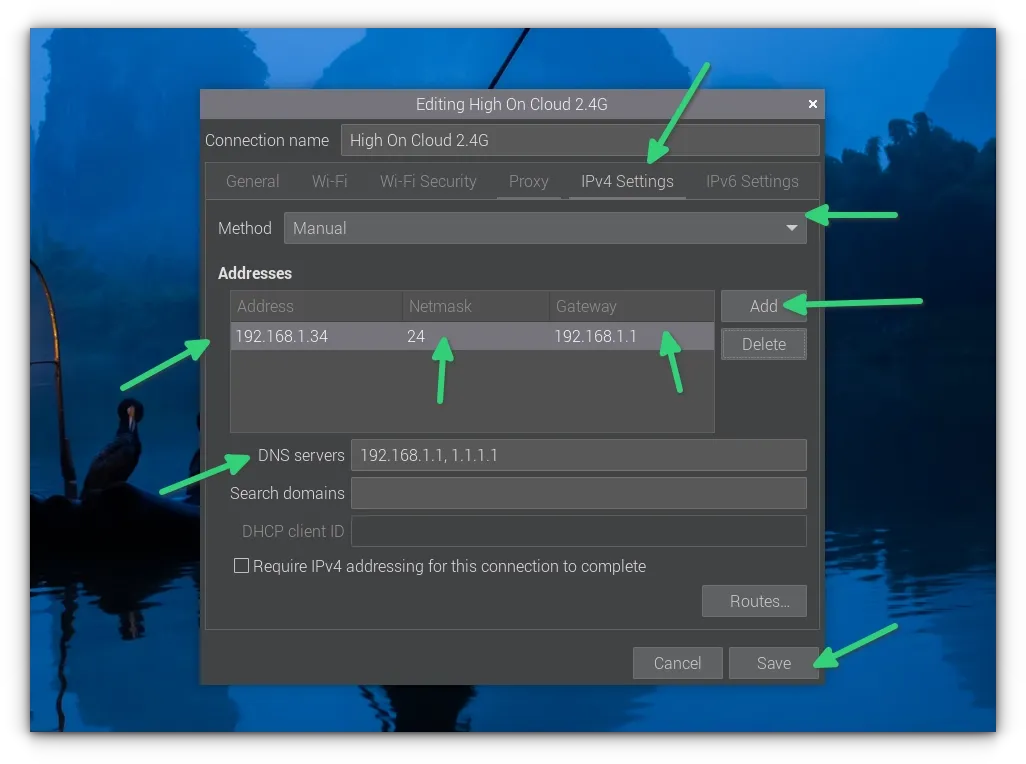
Here you go to IPv4 Settings, set it to manual and then add all the details such as IP address, mask, gateway IP, DNS server etc. You have all the details.
Restart your system and you can see that the static IP is now set on your Pi.
Going back to non static IP
If you don't want to use static IP anymore on Raspberry Pi, you can easily revert the steps and go back to dynamic IP.
How? Simply edit the network connection in question again. This time, change the IPv4 configuration to 'automatic' and save your changes. And that's it. You don't have to provide IP address, gateway IP etc anymore.
Conclusion
As I mentioned at the beginning of this tutorial, you should use a static IP from the router end specially if your Pi won't be easily accessed physically.
But if your device is in your hands all the time, you have the liberty of accessing and changing its configuration.
I hope you find this tutorial on setting a static IP on Raspberry Pi helpful. Please let me know if you have any questions.
This is a special FOSS Weekly edition as it focuses on Homelab. Wondering what is a homelab? Basically, it's a dedicated computer(s) set up which resides in your home and serves various open source software on your local network. So, you run your own cloud storage, media server and a lot more.
That's the simplest of the homelab. There is no limit to what you can do with a homelab. Just browse through the r/homelab subreddit and you'll be amazed at what your peers are doing with their homelab.
In my opinion, when you have been using Linux on your personal computer for long and start wondering what should I do next, the homelab is the answer. Not only you get control over your data, you also enhance your skills. It could also help you reduce electronic waste by putting older hardware to some good use.
We are already covering tutorials on Raspberry Pi and local AI set up. You'll be seeing more educational material on homelabs regularly on It's FOSS.
Based on the feedback I received from the previous newsletter, it seems a good majority of It's FOSS readers want regular recommendation on Android FOSS apps.
💬 Let's see what else you get in this edition:
The XZ Utils backdoor almost causing havoc.
Proxmox wasting no time in saving users from VMware.
And other Linux news, videos and, of course, memes!
This edition of FOSS Weekly is supported byNetdata.
✨ Netdata: Tailored Monitoring Solutions for Home Lab Environments
Netdata is on a mission to revolutionize observability & make it universally accessible. Whether you are a startup or a multinational corporation, a business or a home lab user.
Benefit from the Homelab plan, where for the cost of a beer per month, you can get access to all Business features. Empower your projects with Netdata's best.
By now, you have some idea about what a homelab is. How do you get started with setting your own?
If you can spend some money, you can get Raspberry Pi or any other single board computer. However, recently, I got an excellent 'plug and play' Homelab device in the form of ZimaBoard.
If you don't have the budget, you can use older computers and servers for this purpose. If you have one lying around in your house, good. Otherwise, you may try getting a used one from eBay like websites in your country.
Once you have got the hardware, it's time for the operating system. Now, you may install lightweight Linux distributions or simply go with server distros. But I think it will be easier if you try an operating system specially crafted for Homelab. Here are my recommendations:
If you are a bit experienced, you can have a rather advanced homelab setup using virtualization tools like Proxmox. My colleague Helder prefers this method. Here's a good learning resource on Proxmox, if you are interested.
When you are running too many services in your homelab, it may become difficult to manage them. This is where dashboard software come into the picture.
Talk of this week/month/year/decade is the very sophisticated supply chain attack to install a backdoor in XZ utility to compromise Linux servers running SSH.
How? The attacker gained trust by contributing to the project and became one of the main developers. He pushed some hidden malicious code which gets activated only in certain cases and impacts the SSH connections. And thus compromising the integrity of a Linux server.
The thing is that since it was all open source and hence it got detected by a Microsoft Engineer who noticed a 0.5 second delay with SSH.
Intriguing, isn't it? Imagine if XZ Utils was a proprietary tool. This would have probably never been discovered.
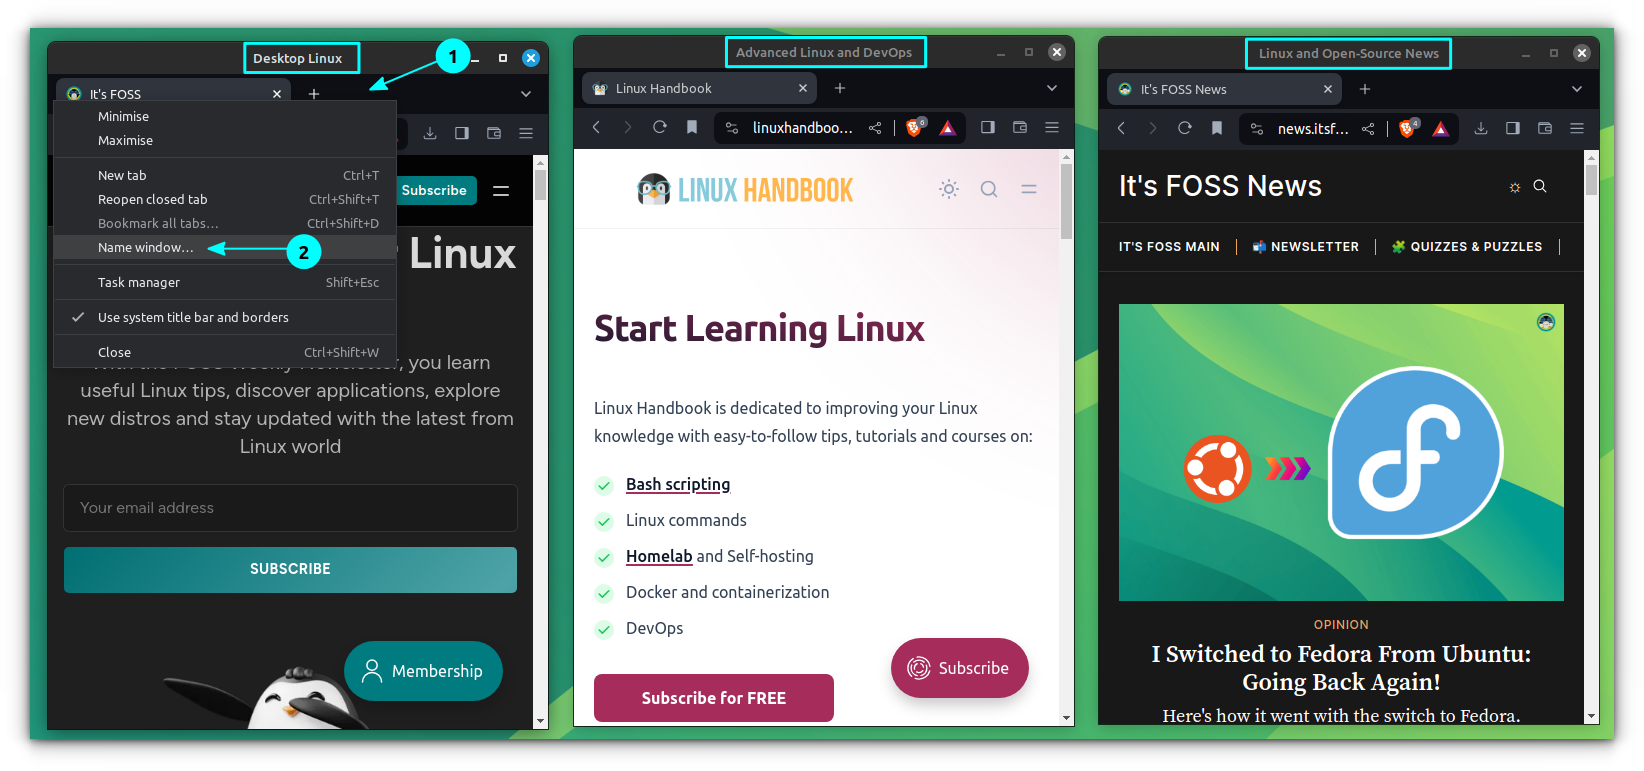
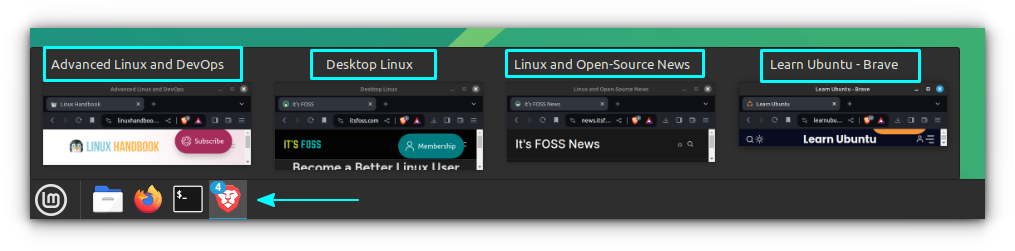
You can name Brave/Chrome browser windows to identify its purpose.
Right-Click on any empty space on the toolbar area and then select the “Name Window” option. Now, type the name you need and click “OK”.
These windows will now be alphabetically shown on Brave/Chrome, when you hover over the icon on the taskbar.
🤣 Meme of the week
The XZ backdoor fiasco also resulted in a memefest
🗓️ Tech Trivia
On April 1,2004. Gmail was launched as an invitation-only mail service that many thought was an April Fool's prank. On that note, did you check out our recent prank?
You can make yourself more productive in the Linux terminal by creating aliases of the most frequently used command combinations.
For example, to update my Ubuntu system, instead of using:
sudo apt update && sudo apt upgrade -y
I just use upd and it works the same. How? Because I set an alias upd to the above update commands combination.
alias upd="sudo apt update && sudo apt upgrade -y"
Seems amazing, right? That's because it is. Let's discuss aliases in detail.
What is the alias command in Linux?
The alias command allows you to create "custom commands" from existing Linux commands. It is primarily used for creating a short form of a long Linux command combination. So instead of typing find / -type f -name *.txt, you create an alias like ftext and just use this smaller 'command'.
This is particularly helpful when you have to regularly use some command combinations. Instead of manually typing them from memory and knowledge or copying it from your script collection, you can create an alias and quickly use them.
How to create an alias in Linux?
To create an alias for the currently logged-in session, you can use the alias command in the following manner:
alias short_name="your custom command here"
The quotes become mandatory if your command has more than one 'word'. I mean you can alias gg=grep but you cannot do gg=grep --color=auto. It has to be gg='grep --color=auto.
There should not be any space around = while using the alias command.
I'll take a simple example here.
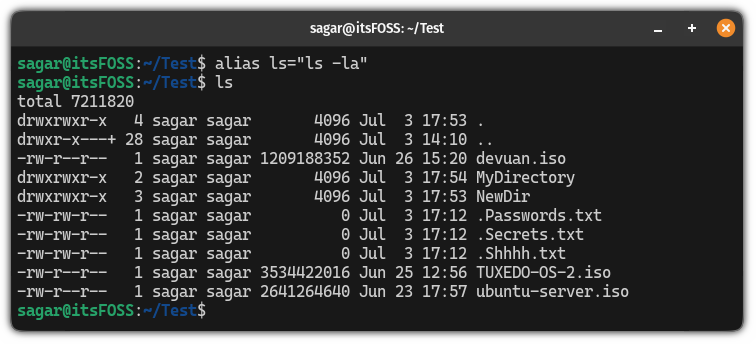
Let's say you are someone who uses ls -la frequently. In that case, you can create an alias for the ls command which will execute the ls -la when you only type ls.
Yes, you can replace an existing command with an alias of the same name.
alias ls="ls -la"
As you can see when I executed ls, it automatically executed ls -la.
This is only temporary. If you log out of the terminal session, your alias will not work the next time.
Make alias permanent
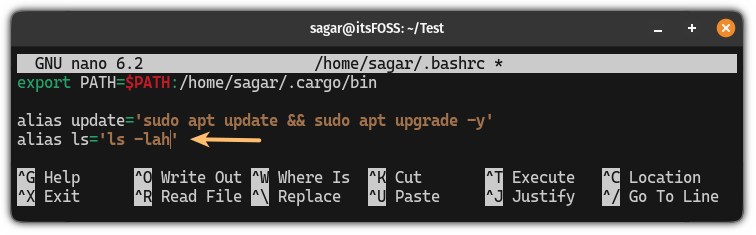
If you want to create a permanent alias, then, you'd have to make changes in your .bashrc file.
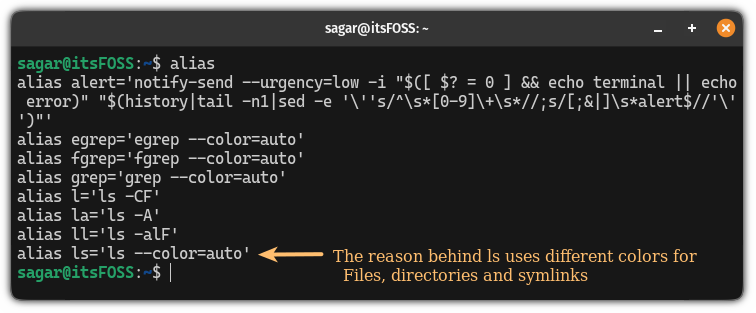
To list existing alias, you can simply execute the following command:
alias
As you can see, there's already one alias set for --color=auto which is the reason why the ls command uses different colors to indicate files, directories, and symlinks by default.
Do you alias?
Trust me, aliases are super handy, specially if you have to work regularly in the terminal. I know a few sysadmins keep a long list of aliases that saves them the trouble of finding and typing complicated commands.
How about you? Do you use aliases on your Linux system? Which ones are you are proud of? Share them in the comments if they are not too sensitive?