This edition of FOSS Weekly is supported byPikaPods.
❇️ PikaPods: Enjoy Self-hosting Hassle-free
PikaPods allows you to quickly deploy your favorite open source software. All future updates are handled automatically by PikaPods while you enjoy using the software. PikaPods also share revenue with the original developers of the software.
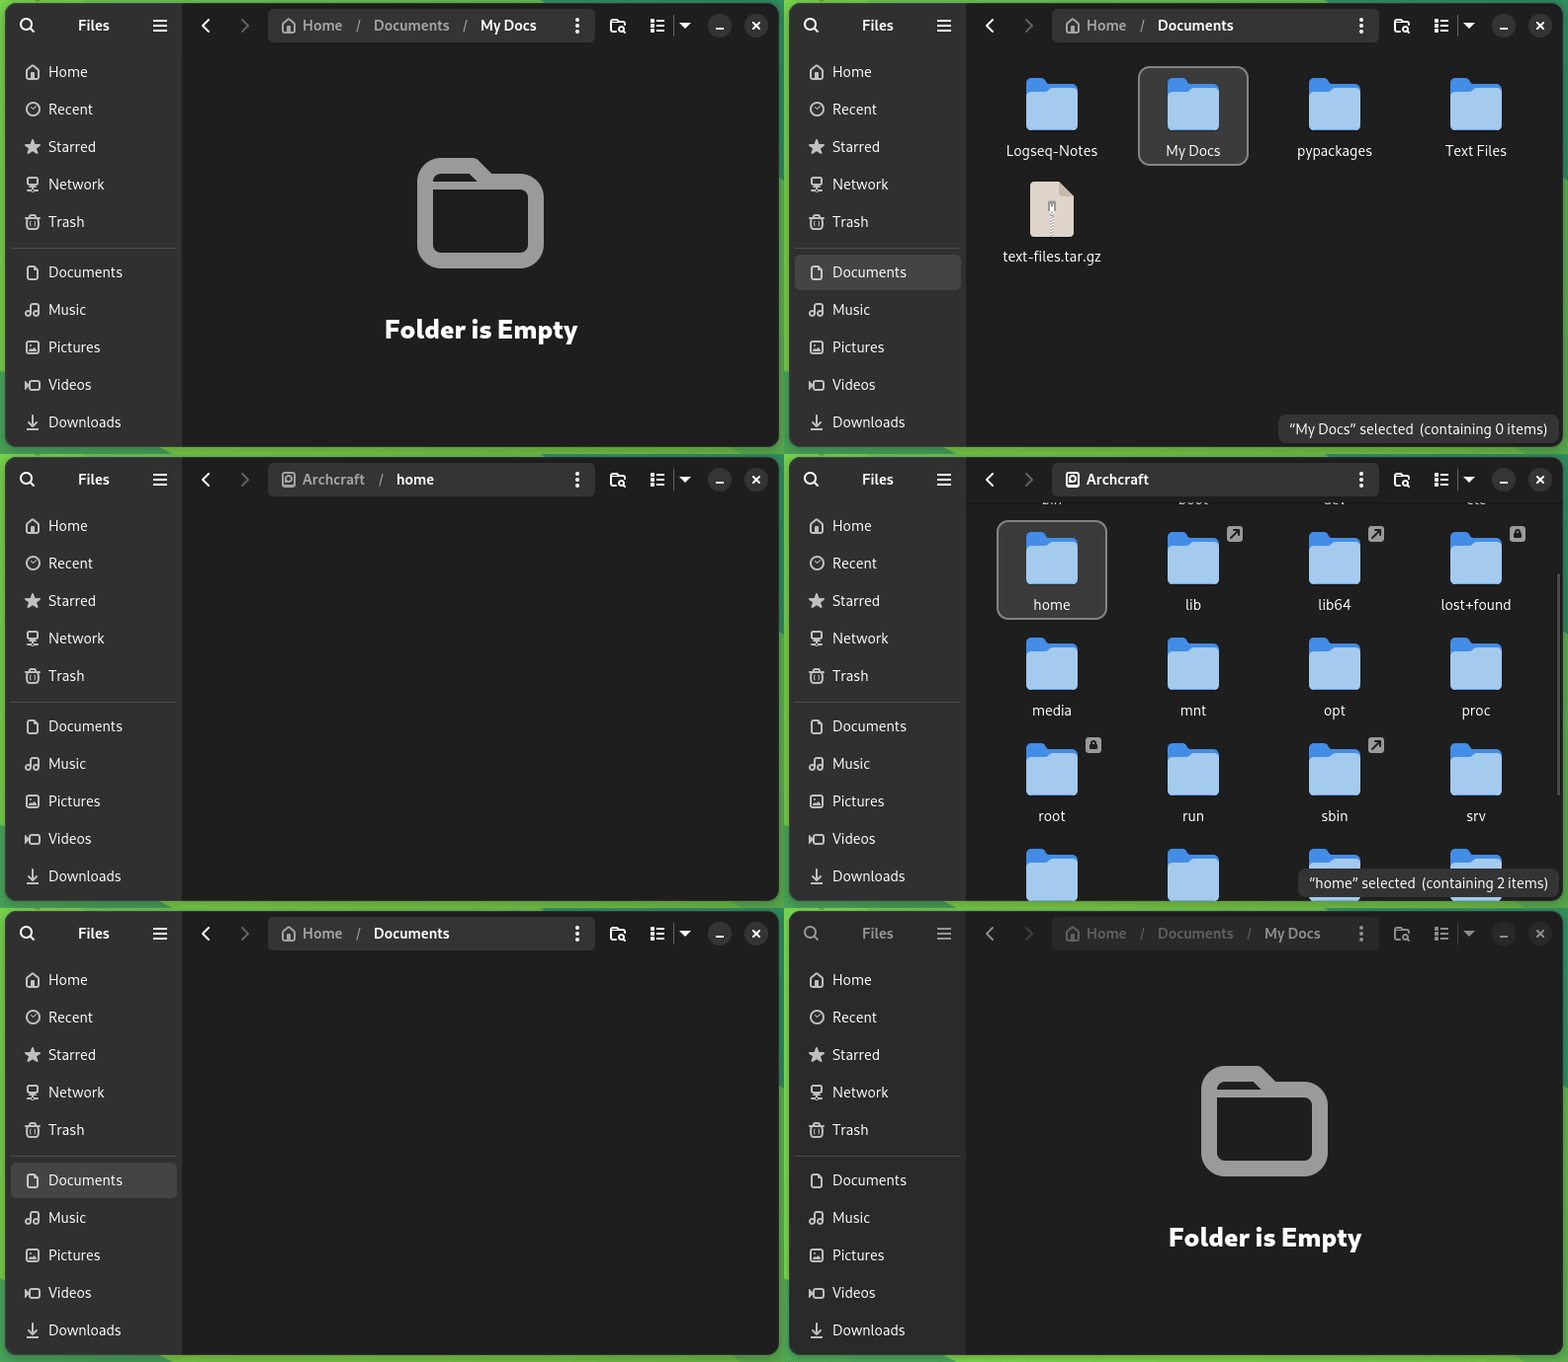
In Nautilus File Manager (GNOME Files), you can go up and down directories using Alt + Up/Down Arrow Keys.
Similarly, you can use Alt + Left/Right Arrow Key to go back and forward.
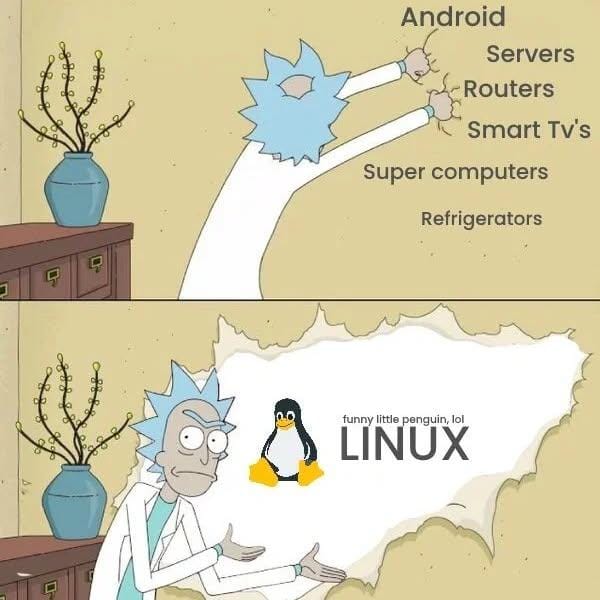
🤣 Meme of the Week
The funny little penguin is why some of us switched to Linux! 🐧
🗓️ Tech Trivia
Ken Thompson, co-creator of UNIX, was born on February 4, 1943. UNIX was developed at AT&T Bell Labs and took inspiration from Multics, the first multi-user, multitasking OS. It quickly gained popularity among engineers and scientists.
🧑🤝🧑 FOSSverse Corner
Pro FOSSer, Jimmy, shares an interesting case where a popular animation-focused YouTuber has moved to Linux Mint years after being exploited by Adobe.
One of the issues I encountered after dual booting Windows with Linux is the missing Windows entry from the grub menu.
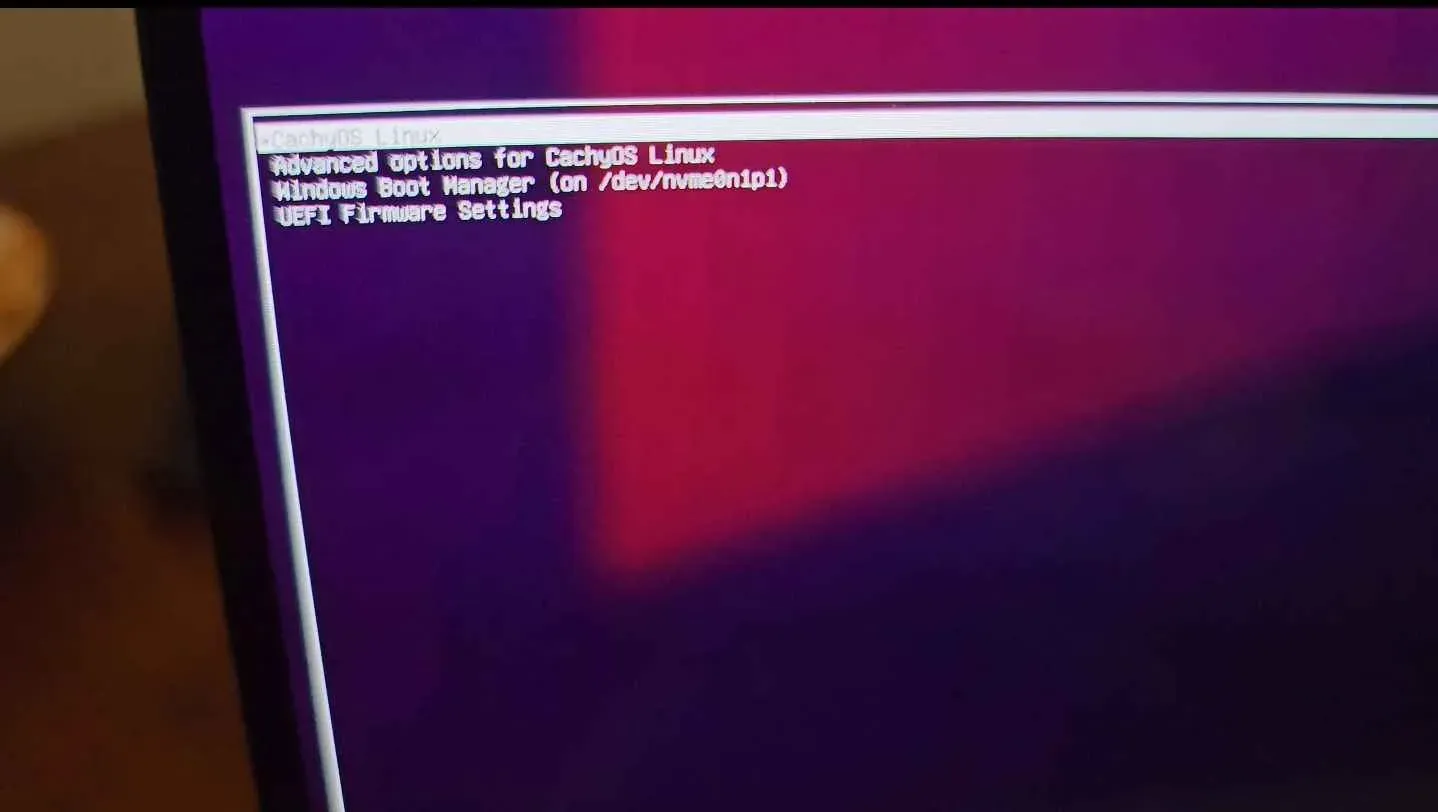
Here's the scenario. Windows was present on the computer. I installed CachyOS alongside Windows. I selected to install the Grub bootloader that allows booting into Linux, Windows (and any other OS present on the system) along with the option to access UEFI.
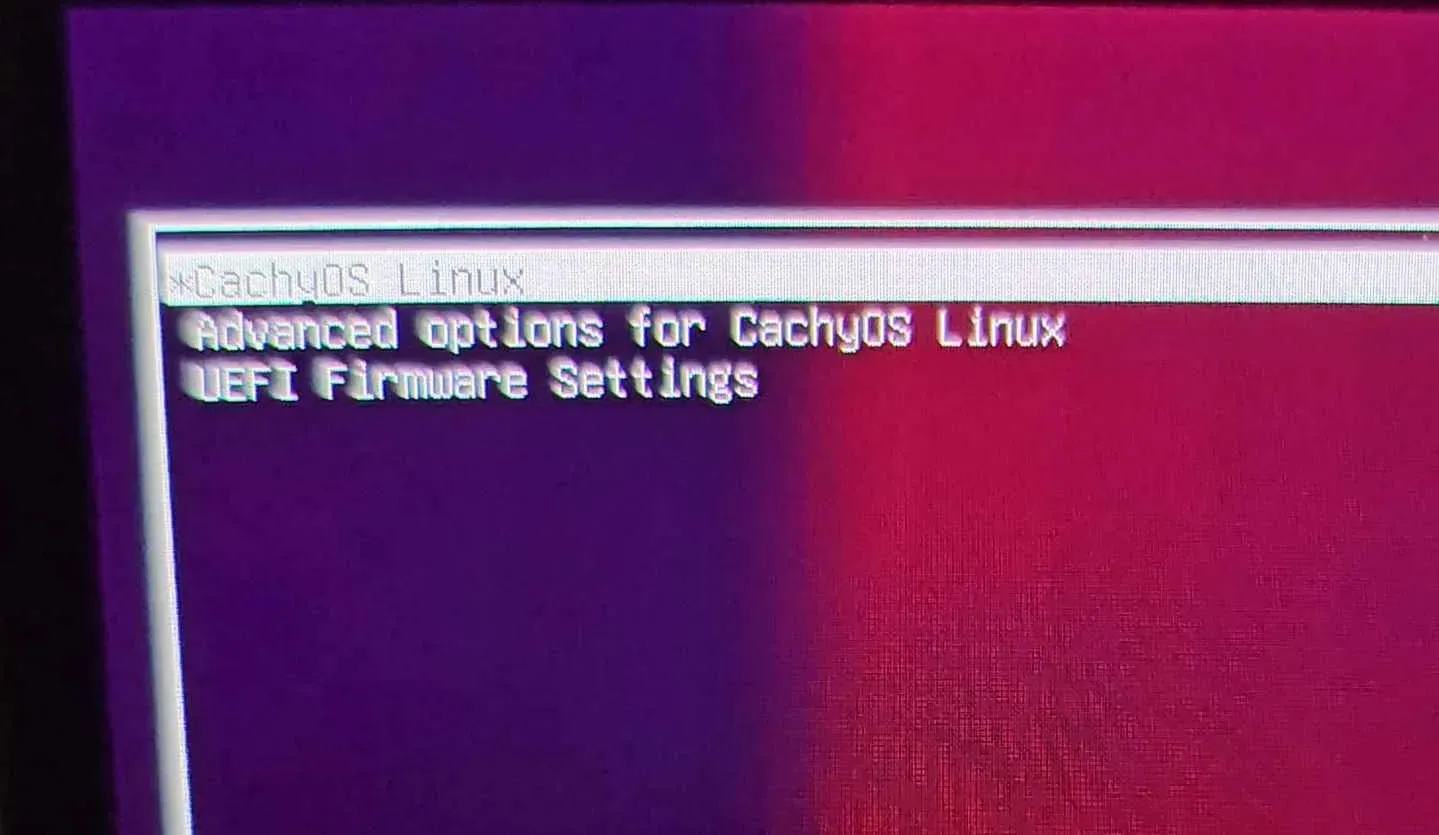
Only this time, Grub did not show Windows in the menu 😔
Missing Windows from Grub bootloader
That was disappointing but not surprising because I am aware that this is a feature.
Let me show you how you can fix this by enabling os-prober feature in Grub and then updating it.
Step 1: Enable os-prober in grub
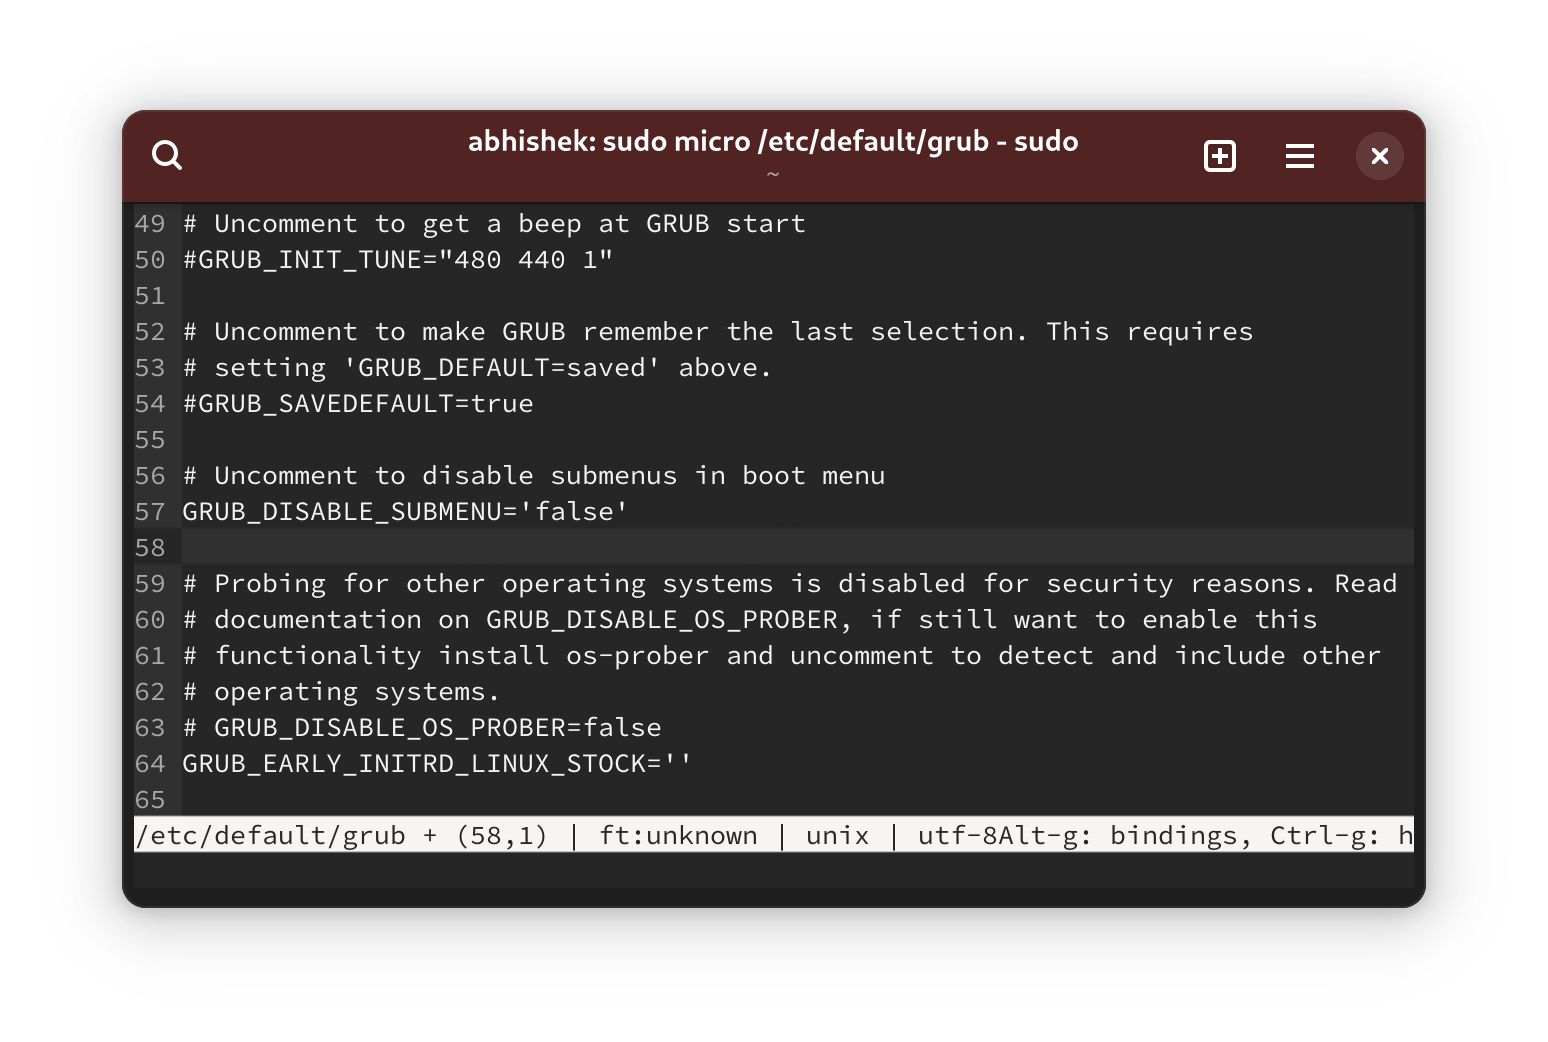
Grub config file is located at /etc/default/grub. If you open it via Nano or some editor, you'll see at the end of this file that os-prober is disabled by default sighting security reasons.
If you are familiar with anyterminal-based text editor, use it to uncomment the line # GRUB_DISABLE_OS_PROBER=false by removing the # at the beginning of the line.
However, if you are absolutely new to the command line, you can use this command in the terminal:
echo "GRUB_DISABLE_OS_PROBER=false" | sudo tee -a /etc/default/grub
It will ask for your password. It should be the same account password you use to log in to the system.
🚧
When you type the password in Linux terminal, nothing is reflected on the screen. It feels as if your system is hanged, as there is no visible feedback. Don't worry. It's a security feature and most Linux terminals won't even show asterisks (*) as you enter the password. Just type it in and enter.
With os-prober enabled, Grub will look for the presence of other operating systems in EFI folder and will add them in the bootloader menu.
There is one little problem. The config changes won't take place unless you update grub.
Step 2: Update grub
On Ubuntu and some other distributions, there is a dedicated command to update grub:
sudo update-grub
However, on Arch and some other distributions, you'll end up with update-grub command not found error.
That's because update-grub is not a standard command. It is just la stub for this command:
sudo grub-mkconfig -o /boot/grub/grub.cfg
Run the above command if your system doesn't have update-grub.
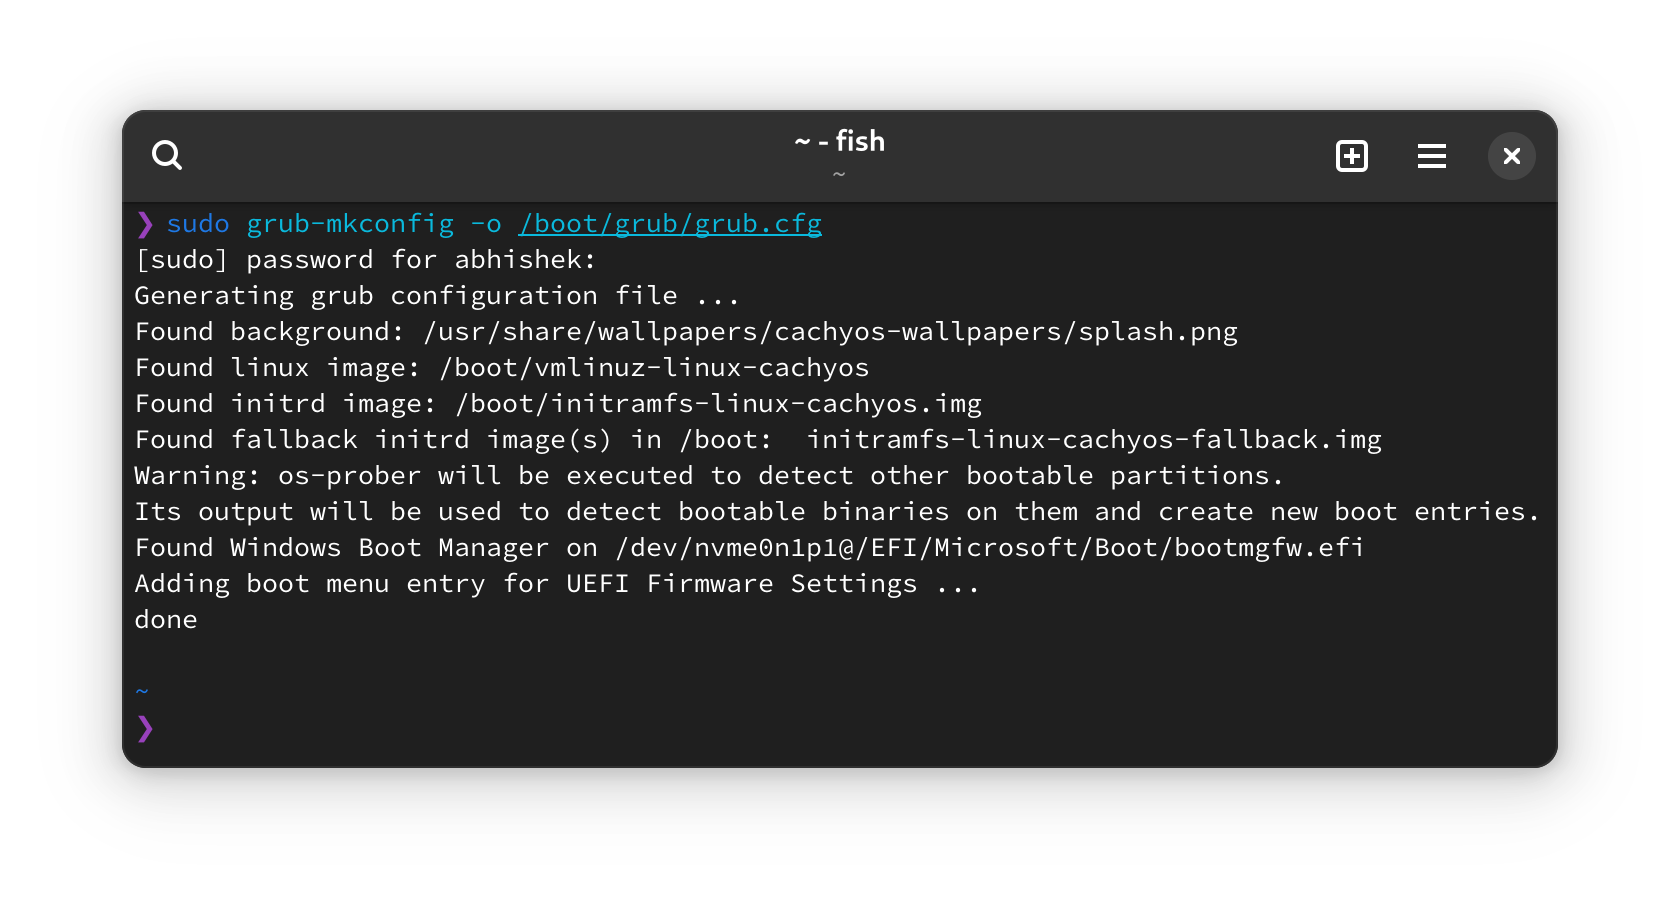
It should show an output like this:
And as you can see in the above output, grub is probing for other OS and has found Windows boot manager. This is an indication that when you reboot the system, grub should show Windows in the available option.
And Windows is back in Grub
Still no Windows boot manager?
See, this method only works when dual boot succeeded properly and you have all EFI settings located in the same folder under the same ESP partition.
If that's not the case, you could try accessing the UEFI settings, go to boot order. Windows boot manager should be present there and if you move it up the order, you can boot from it into Windows.
This is not the most convenient option, I understand but it's a workaround until you figure out why Grub bootloader could not see Windows.
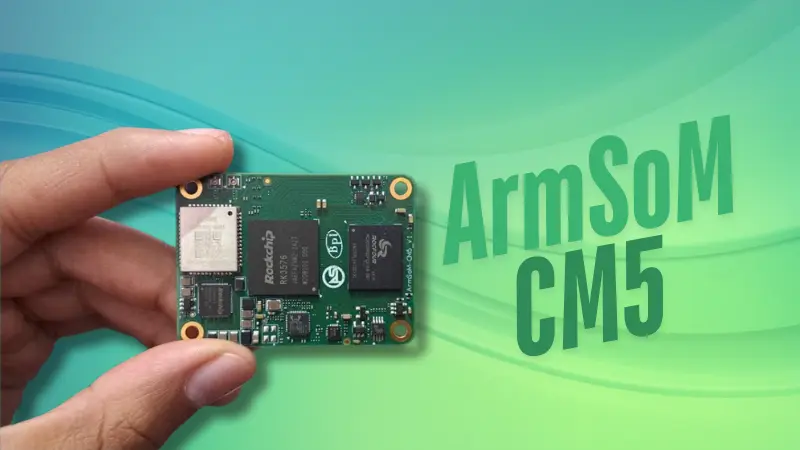
From the title, you might be thinking: yet another clickbait post. But I mean it when I say this, ArmSoM has truly delivered something special.
ArmSoM, yet again, has sent us their Compute Module 5 (CM5) with its IO board for review. Last time, I tested and reviewed their AIM7 board, and my head was blown by its sheer performance. With an RK3588 SoC, 8GB of RAM, and 32GB of storage, it was a beast.
This time around, we’re looking at the CM5, powered by the RK3576, a slight step down from the RK3588 but still impressive.
It comes with 8 GB of RAM (though a 16 GB version is available) and 64 GB of onboard eMMC storage. On paper, it’s shaping up to be a serious contender in the world of compute modules.
In this review, I’ll walk you through its hardware specifications, software support, benchmarks, AI capabilities, and my personal thoughts.
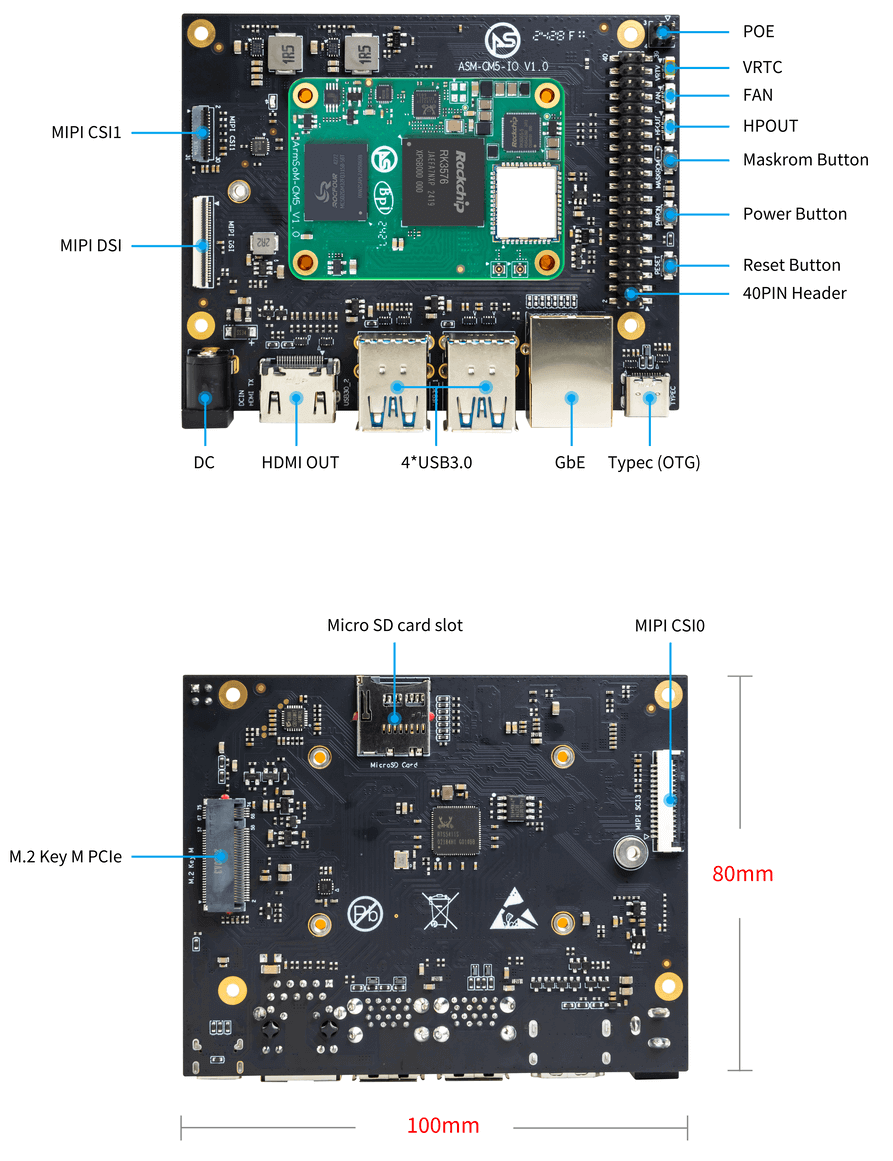
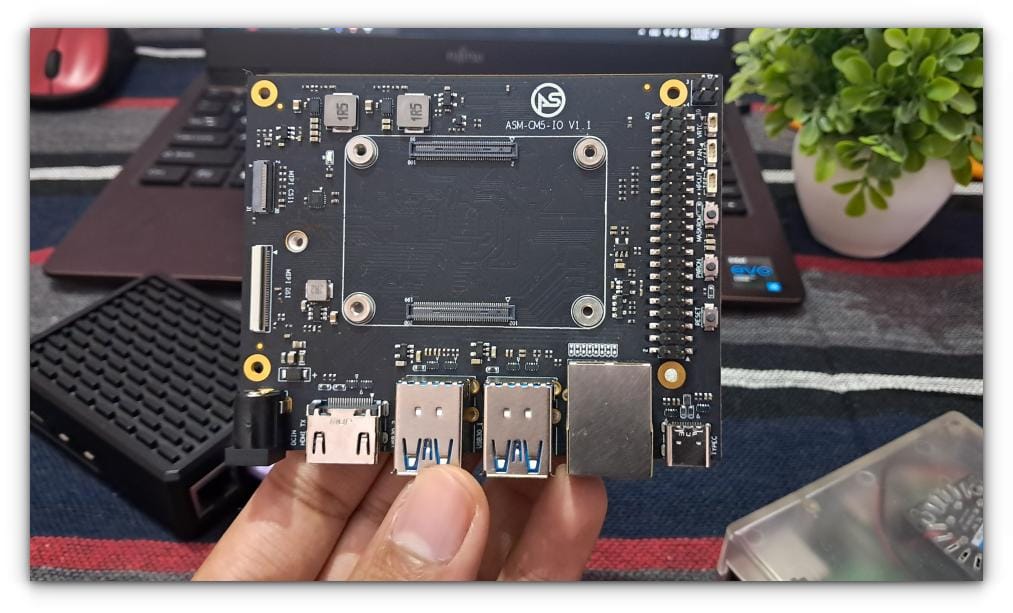
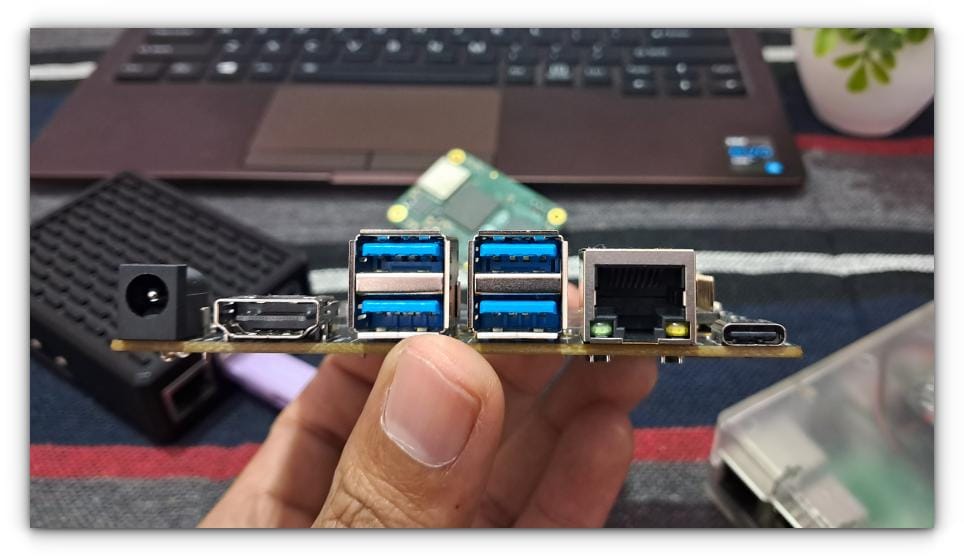
The CM5-IO board is designed to make the most of the CM5 module. It features an HDMI output for 4K displays, four USB 3.0 ports for peripherals, and a Gigabit Ethernet port with PoE support.
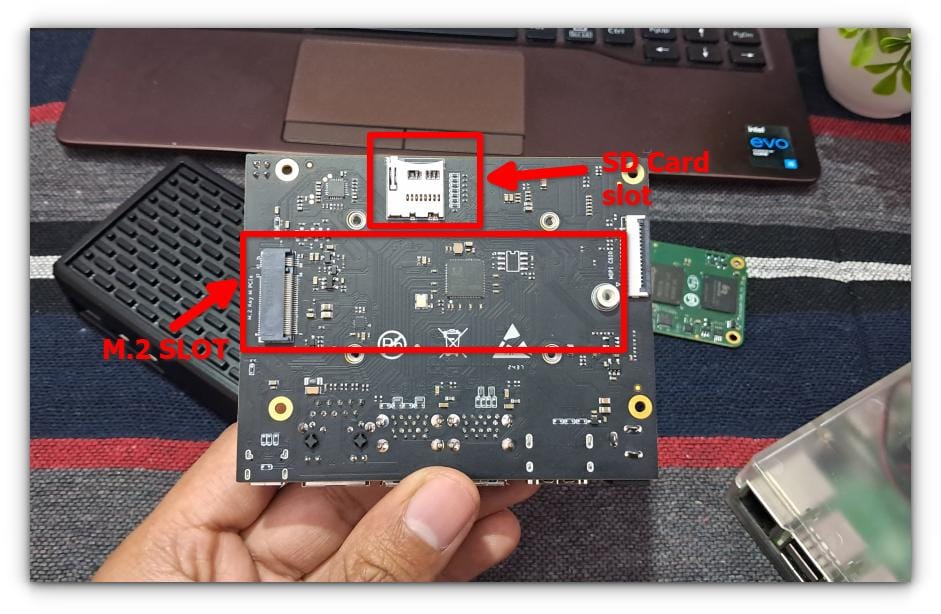
There’s also an SD Card slot and an M.2 slot for adding fast storage or PCIe devices.
With dual MIPI CSI camera interfaces and a 40-pin GPIO header, it’s perfect for projects that demand flexibility.
It’s compact, functional, and pairs seamlessly with the CM5 module to deliver a complete development platform.
Specifications
1x HDMI output
4x USB 3.0 Type-A
Gigabit Ethernet RJ45 with PoE support
Firmware flashing and device mode via USB Type-C
GPIO: 40-PIN header
Power connector: DC Barrel jack for 12V power input
Expansion: M.2 (M-key, supports PCIe), microSD
MIPI DSI: 1x 4-lane MIPI DSI, supports up to 4K@60fps (x4)
MIPI CSI0: 1x 4-lane MIPI CSI, each lane up to 2.5Gbps
MIPI CSI1: 1x 2-lane MIPI CSI, each lane up to 2.5Gbps
Others: HPOUT, FAN, VRTC
Dimensions: 100 x 80 x 29 mm (3.94 x 3.15 x 1.14 inches)
Unboxing and first impression
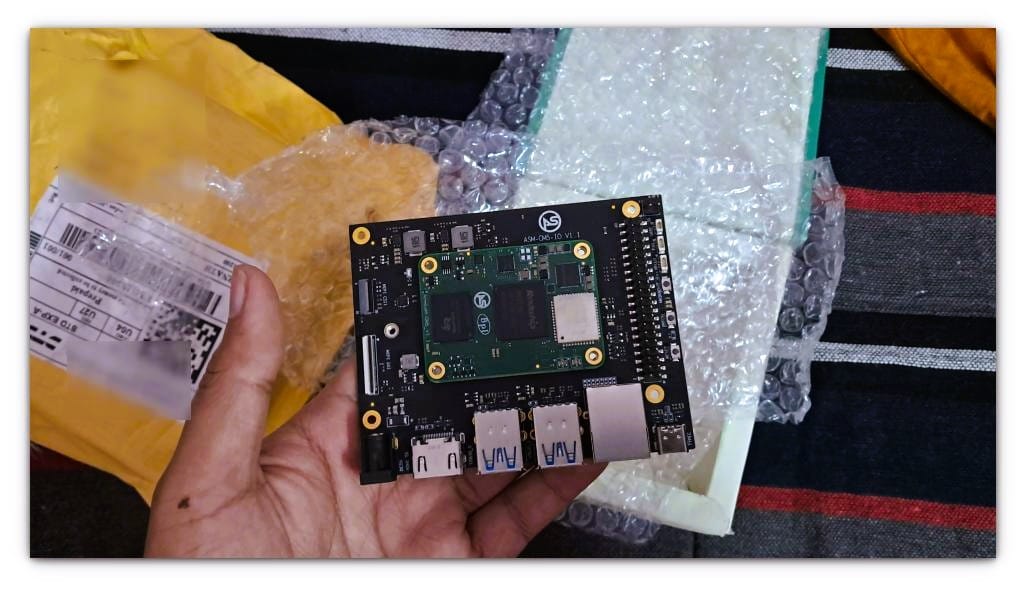
The CM5 and its IO board arrived fully assembled, tucked neatly inside a sturdy, no-nonsense package. While the box wasn’t flashy, it did its job well, everything was secure and free of unnecessary fluff.
Sorry for the potato looking image quality
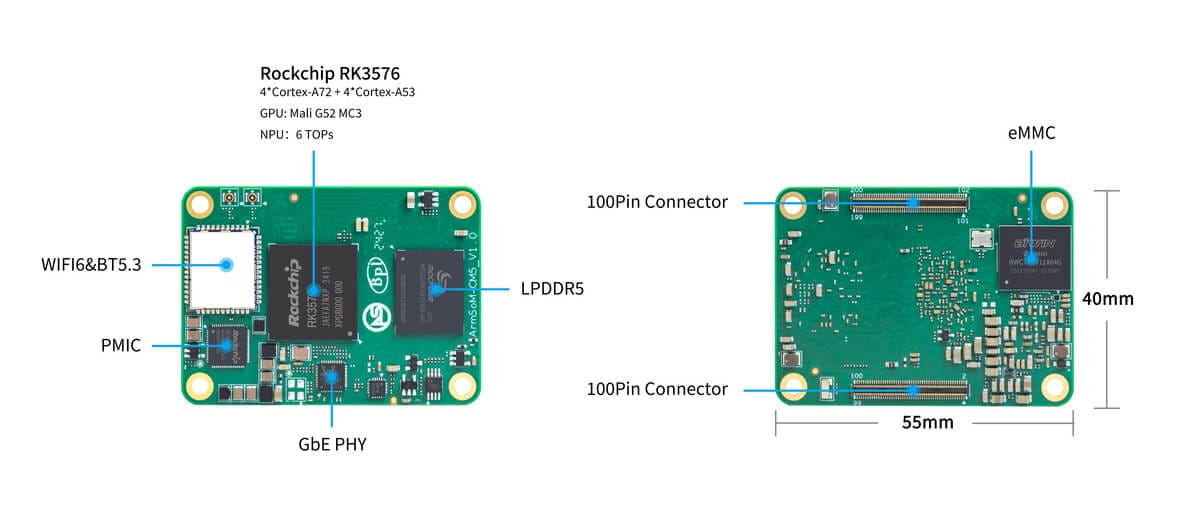
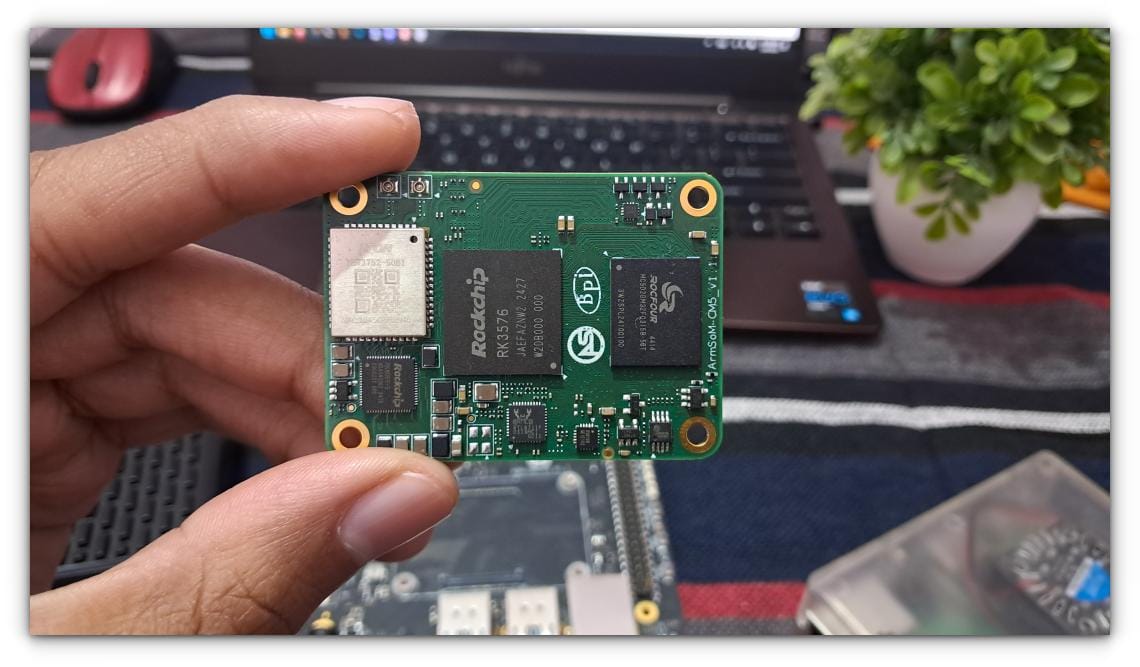
The first thing I noticed was the compactness of the CM5 module. It’s small, yet it feels solid in hand, like it means business. Looking closely, you can immediately spot the essentials: the RK3576 SoC sitting at the heart of the module, flanked by the eMMC storage chip and LPDDR5 RAM.
The layout is efficient and clean, with every component neatly placed. Even the tiny antenna connectors for Bluetooth and WiFi are exposed, ready to connect to external antennas for better wireless performance.
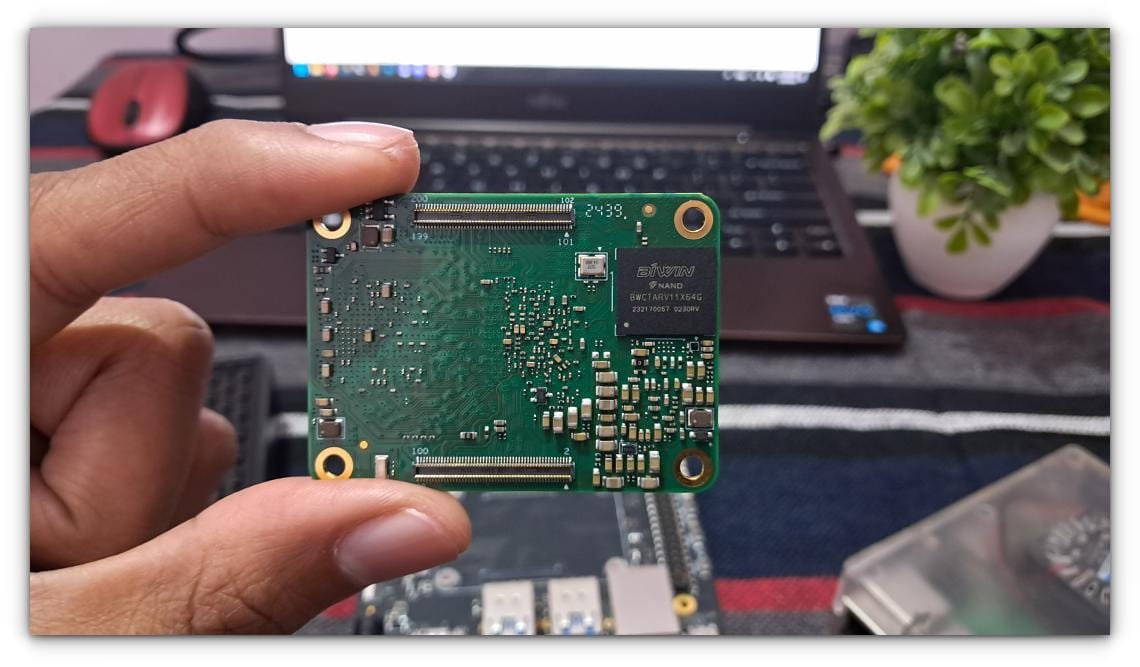
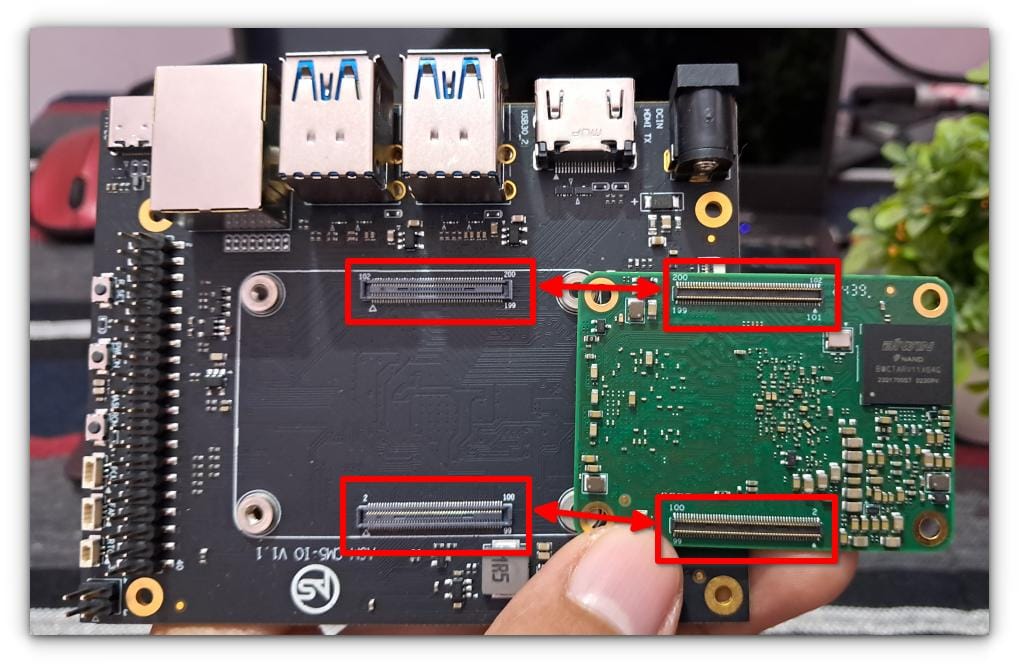
Flipping it over, the 100-pin connector on the back stands out.
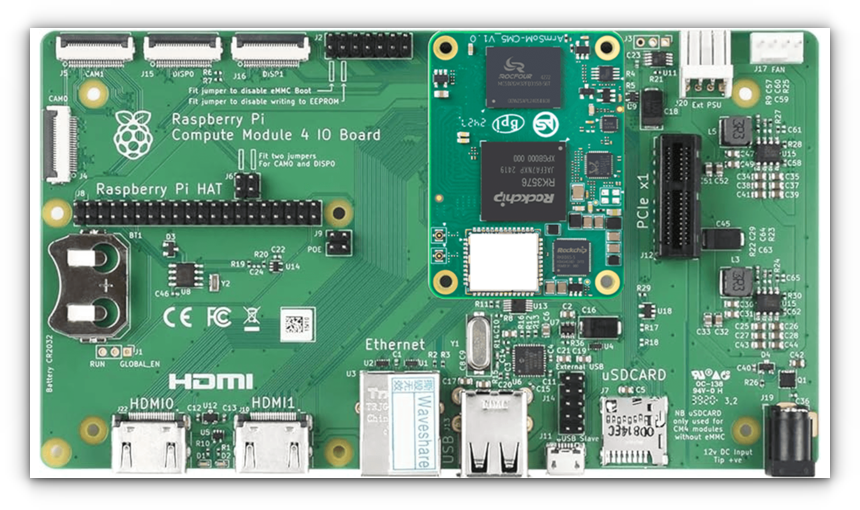
The CM5 is designed to work seamlessly with Raspberry Pi IO boards, making it an excellent choice for anyone looking to upgrade their Pi-based projects.
ArmSoM CM5 supports Raspberry Pi IO board | Source:ArmSoM
The IO board, which came paired with the module, is equally impressive. It’s larger than the CM5 itself but just as well-built.
Ports and connectors are thoughtfully arranged, from the HDMI output and USB 3.0 ports and 40-pin GPIO header.
Getting started with the CM5 was refreshingly simple. The module slid perfectly into the IO board, just look for the markings on the board.
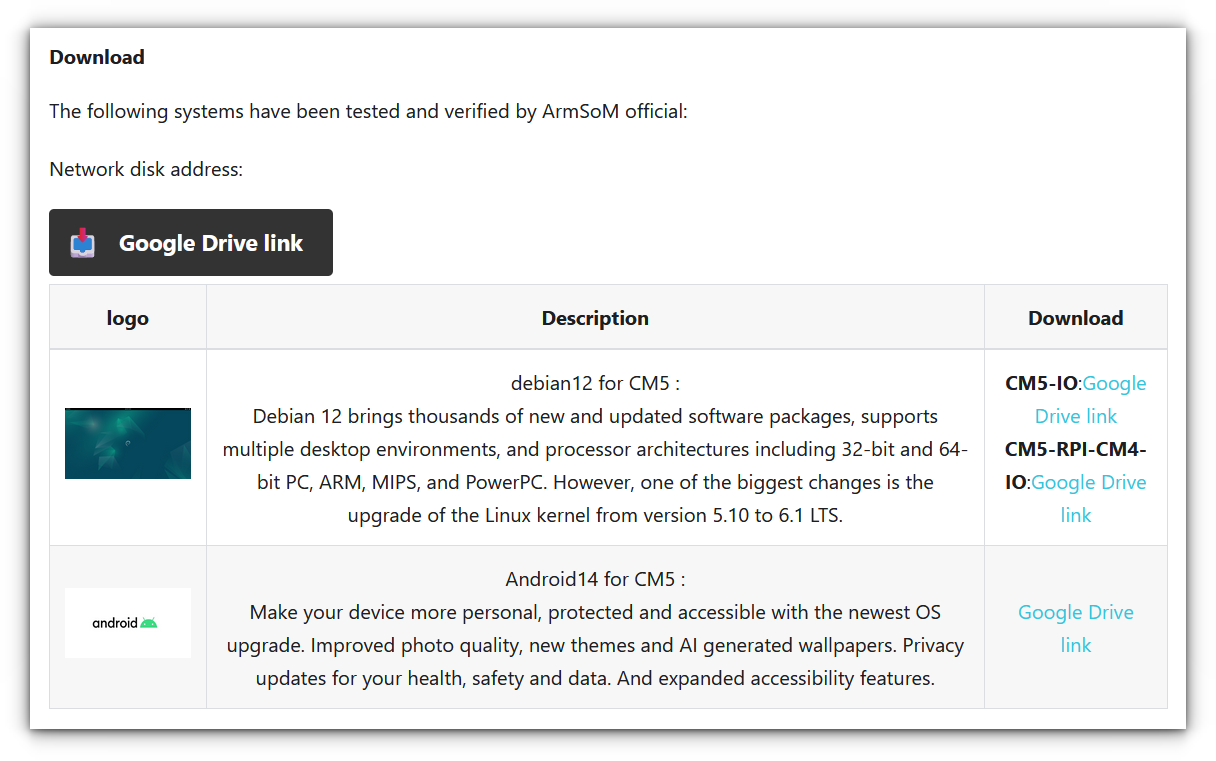
And to my surprise, this time I didn't have to rely on other sources, as ArmSoM has provided a great documentation for setup and links to all the OS images.
OS Installation & first boot
If you are coming from Raspberry Pi ecosystem, you might find it difficult to flash OS images into CM5 but during my experience with AIM7, it was an ease for me.
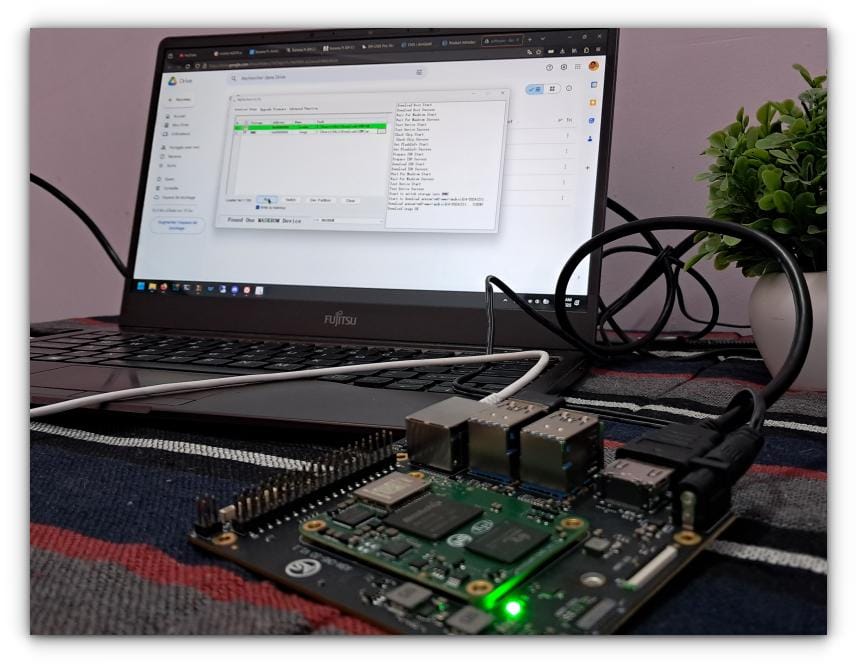
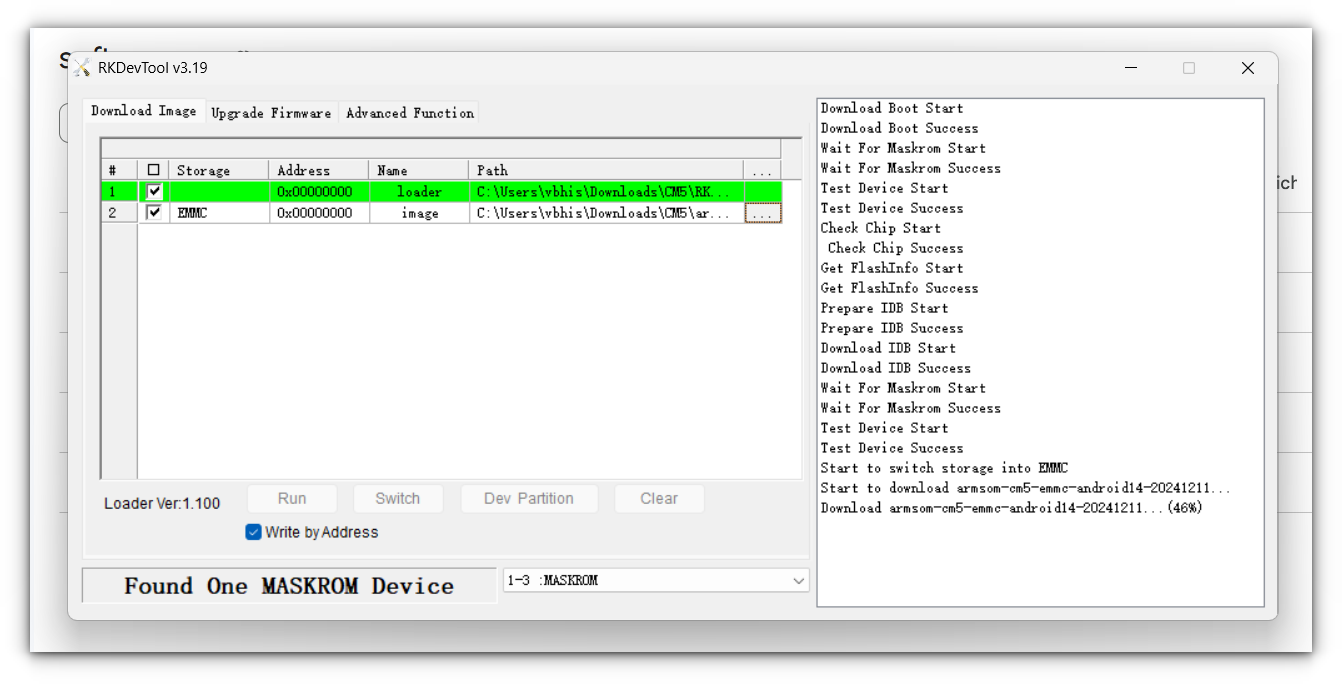
RKDevTool is required to flash an OS image in Rockchip devices.
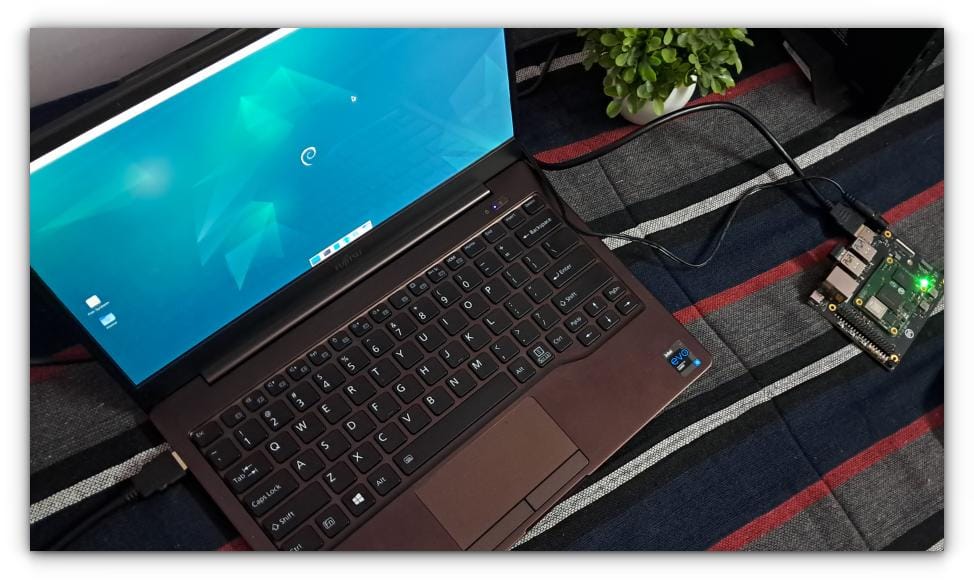
Flashing Android 14 image to CM5 using RKDevTool
Debian
The CM5 came pre-installed with ArmSoM’s custom Debian image, which saved me the hassle of flashing an OS right out of the box.
When I powered it on, the board booted into Debian in under 30 seconds, thanks to the onboard eMMC storage.
However, there was a small hiccup: the default locale was set to Chinese. While this threw me off for a moment, Google Translate came to the rescue. I’ve covered a detailed guide on how to change locales in Debian.
Once the language barrier was out of the way, everything ran smoothly. The system felt responsive, and the ArmSoM image came with just the right balance of pre-installed utilities to get started without feeling bloated.
Android 14
ArmSoM doesn’t just stop at Debian; they also provide an Android 14 image for the CM5, and I couldn’t resist the idea of running Android on this tiny yet powerful board.
Installing it was straightforward, though slightly different from the usual process. Instead of burning the image to an SD card or eMMC, you need to flash it as firmware using the RKDevTool utility.
The process was smooth, and once the flashing was complete, I rebooted the system.
I was greeted with the Android boot animation, and in no time, the familiar Android home screen appeared. Interestingly, the display was in portrait mode, which felt a bit odd on my monitor but didn’t hinder functionality.
The Android image was barebones - just the essentials, nothing more. I scrolled through the settings, checked out the "About" section, and explored the file manager. It felt snappy and responsive, but that was about it.
One noticeable omission was the absence of the Google Play Store. If you’re keen on having it, you can install it using Open GApps Project.
However, since I was pressed for time, I skipped that step and instead sideloaded Geekbench for Android from APKMirror to get straight to benchmarking.
Performance testing
Now comes the most awaited section, the benchmarks!
It’s one thing to talk about specs on paper, but how does the CM5 actually perform in real-world tests? To keep things simple, here’s what I tested:
Geekbench Performance: Evaluating CPU and overall system power.
AI Capabilities: Testing the NPU for AI-related workloads.
YouTube Playback: Checking video performance and hardware acceleration.
📋
The Geekbench test was conducted using the Geekbench Android app. For AI testing, I used the pre-installed Debian image. YouTube performance was tested in the Chromium browser inside Debian as well, with hardware acceleration enabled.
Geekbench results
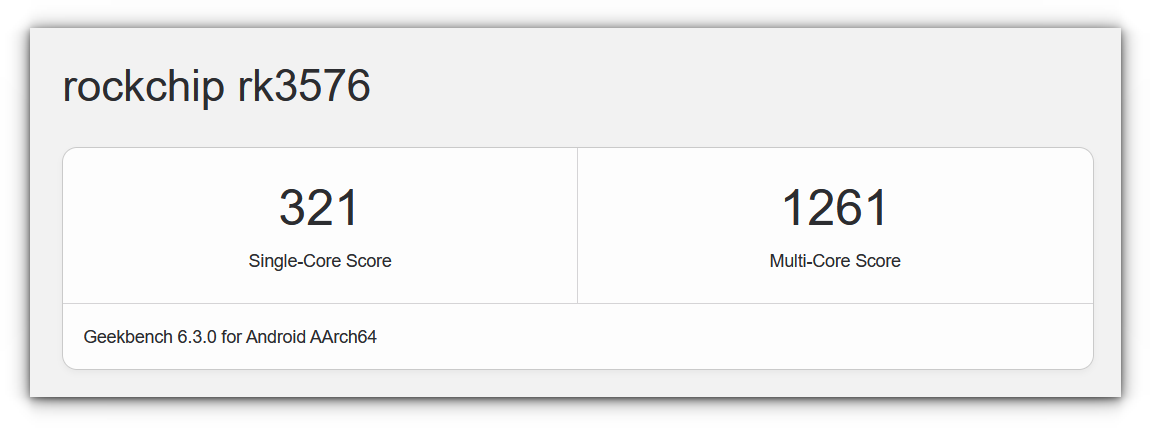
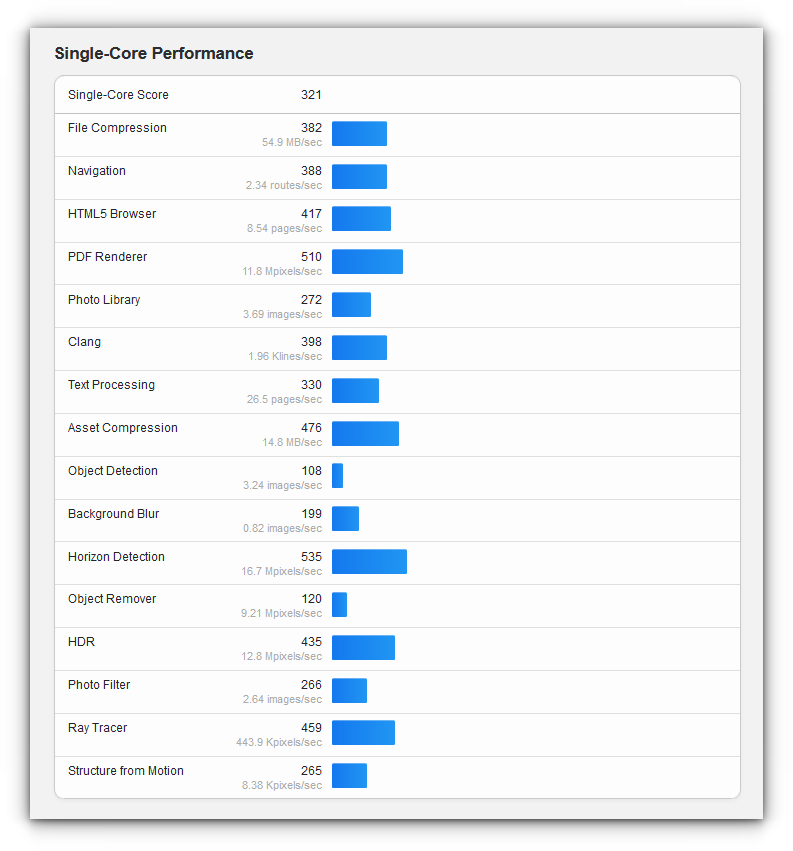
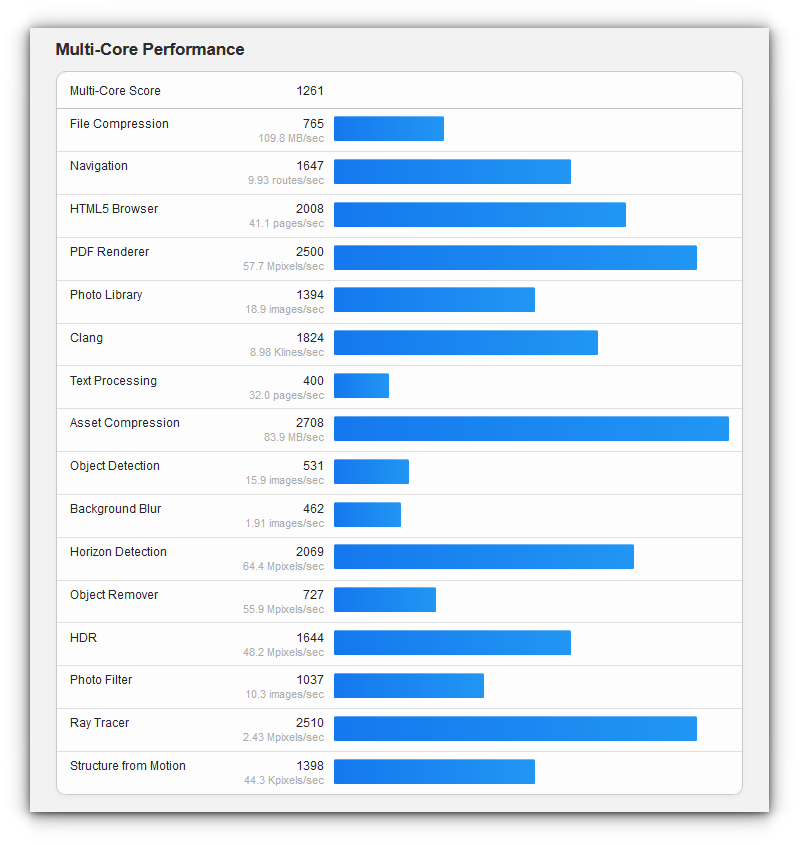
The Geekbench results gave us a good glimpse of the CM5's raw power. With a Single-Core Score of 321 and a Multi-Core Score of 1261, the CM5 delivers solid performance.
The single-core score of 321 might seem modest, but it’s adequate for basic tasks like file compression (54.9 MB/sec) and lightweight navigation (2.34 routes/sec).
If you’re planning to use the CM5 for simple applications, like hosting a lightweight server or running scripts, this score is sufficient.
However, for tasks that demand high single-threaded performance like intensive image processing or compiling large programs, you might notice some lag.
The multi-core score of 1261 is where the RK3576 shines. This score reflects the strength of its eight cores working together, making it ideal for multitasking and workloads that can leverage parallel processing.
AI workload
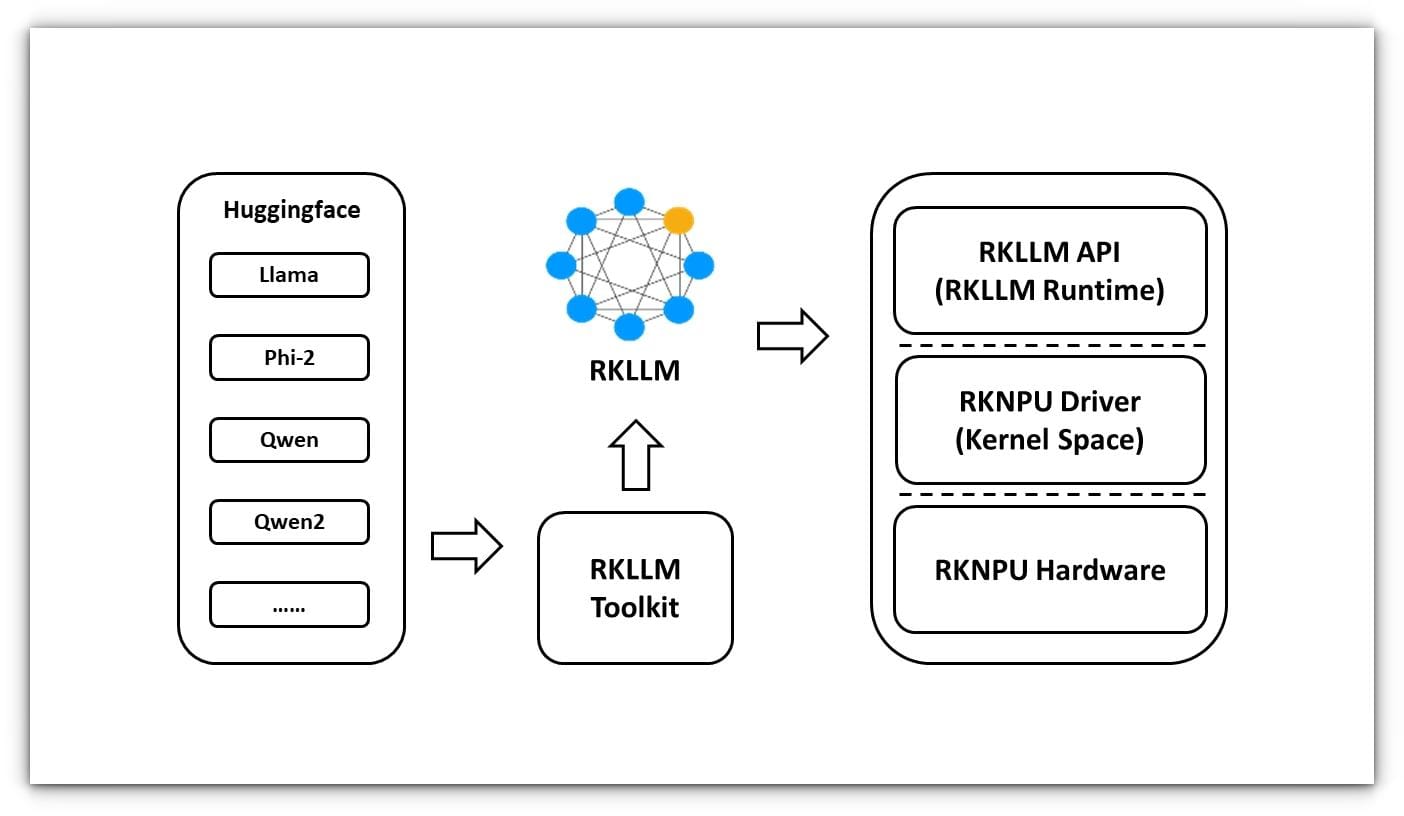
The CM5’s 6 TOPS NPU is designed to handle AI inference efficiently, just like its big sibling, the AIM7.
It supports RKNN-LLM, a toolkit that enables deploying lightweight language models on Rockchip hardware with optimized performance.
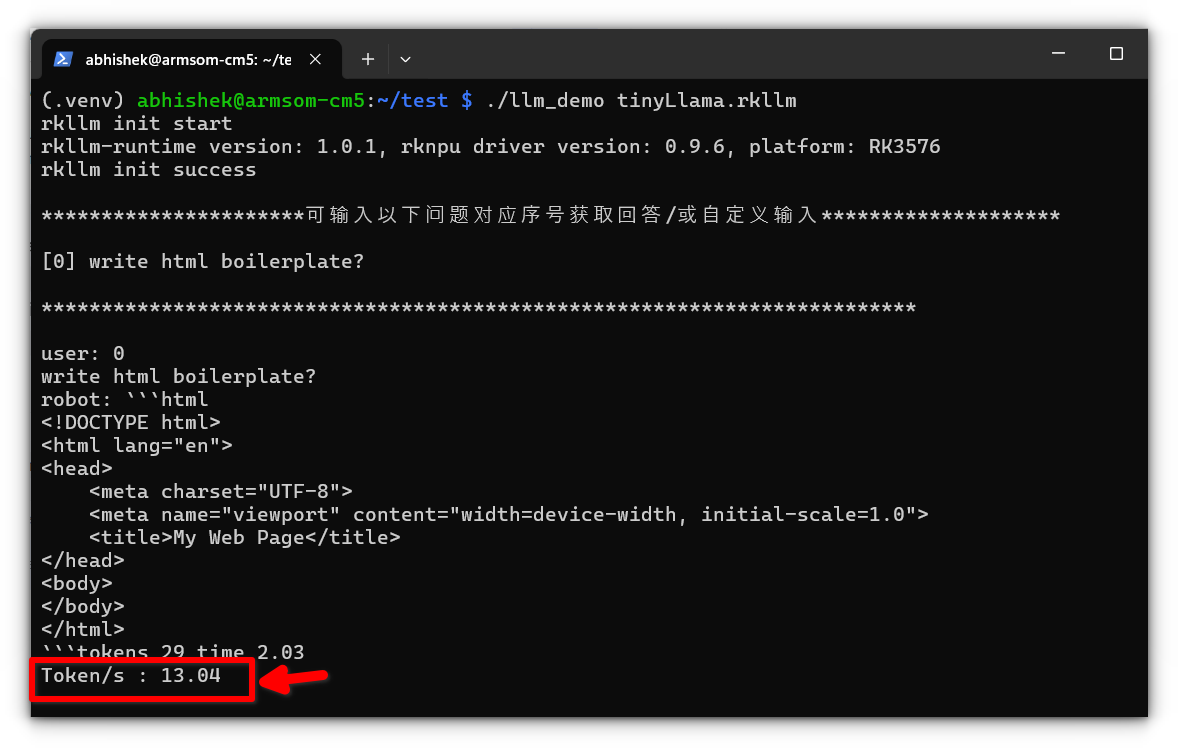
To test its capabilities, I ran the TinyLLAMA model with 1.1 billion parameters, and the results were consistent with the AIM7.
The NPU achieved a throughput of 13 or 14 tokens /second , showcasing its ability to handle lightweight AI workloads with ease.
With NPU handling AI tasks, the GPU stays free for other workloads. This makes CM5 ideal for edge AI projects where efficient resource use is key.
YouTube playback
YouTube playback is my favorite test for any SBC because it’s where many boards, including the Raspberry Pi (even the Pi 5), still stumble.
Playing 1080p consistently is a challenge for most, and 4K? Forget about it. But the CM5 completely shattered my expectations.
Running Chromium on Debian with hardware acceleration enabled, I tested videos at 1080p, 1440p, and 4K. The CM5 didn’t just handle it, it crushed it.
Even at 4K resolution, the playback was smooth, with less than 10 dropped frames throughout the video. That’s right, 4K on an SBC, and it worked beautifully.
What’s more impressive is how efficiently it handled the load. Thanks to hardware decoding, CPU usage stayed low, leaving the board cool and responsive.
I even recorded a video of the CM5 playing a 4K YouTube video to showcase its capabilities.
If you’re considering the CM5 for a media server or as a replacement for your Android TV box, this performance makes it an easy choice. It’s rare to see this level of multimedia smoothness on an SBC, and the CM5 delivers it effortlessly.
What about Raspberry Pi CM5?
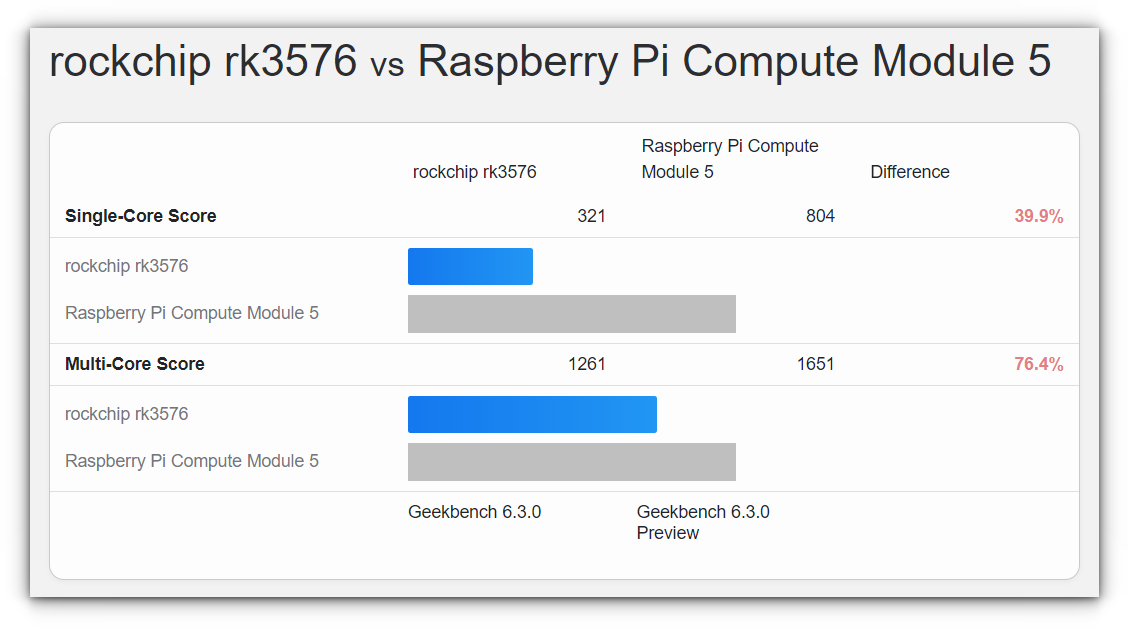
I don't want to sugarcoat it, the Raspberry Pi CM5 outperforms the ArmSoM CM5 in raw processing power, and the benchmarks make that crystal clear.
In single-core performance, the Raspberry Pi CM5 delivers a stellar 804 compared to the ArmSoM CM5’s modest 321. That’s a difference of 39.9%, and it’s noticeable in tasks that rely on single-threaded performance, like browsing, lightweight applications, or running certain server processes.
The gap widens further in multi-core performance, where the Pi CM5 scores an impressive 1651, leaving the ArmSoM CM5 trailing at 1261 a 76.4% lead that makes the Pi CM5 the clear choice for CPU-intensive tasks.
That said, the ArmSoM CM5 isn’t trying to play the same game. It’s built with a different focus, and its strengths lie elsewhere.
The 6 TOPS NPU on the ArmSoM CM5 is a game-changer for AI workloads, allowing it to handle tasks like language models or image recognition with ease, something the Raspberry Pi CM5 lacks entirely.
Final thoughts
After spending time with the ArmSoM CM5, it’s clear that this little board has carved out its niche.
It may not outshine the Raspberry Pi CM5 in raw CPU benchmarks, but it brings its own strengths to the table.
The built-in NPU, seamless 4K playback, and thoughtful design make it a compelling choice for AI-driven edge projects, media servers, or even as a replacement for an Android TV box.
What impressed me most was its support for Raspberry Pi IO boards.
I feel that, the ArmSoM CM5 isn’t trying to be a Raspberry Pi killer. Instead, it’s a specialist board that excels in areas where the Pi falters.
As I wrap up this review, I'm also thinking about running some emulators on the CM5 to dive deeper into its GPU performance and for the fun of it.
Recently, many retro game emulation videos have been popping up in my feed, and they’re tempting me to dip my toes in.
If you want to see that, let me know in the comments section! 🕹️
 Sourav Rudra


 Sourav Rudra
 Phil Salvador
 Abhishek Prakash
 Abhishek Kumar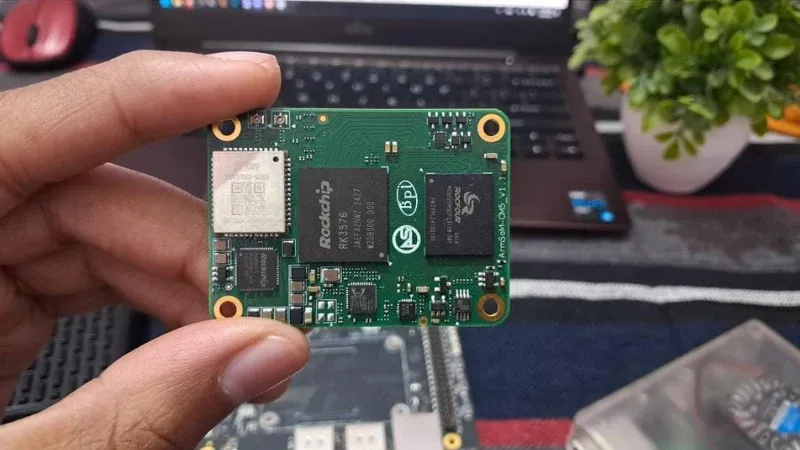
 Sourav Rudra

 Ankush Das
 Akatama