Jumat, 17 Februari 2023

Downgrading a Package via apt-get

Downgrading a Package via apt-get

In a situation where a recently upgraded software is causing issues?

While you can always investigate the issue to fix it, at times, going back to the previous working version saves time and effort.

If the new version introduced a bug, you could do nothing on your end, right?

The good thing is that you can easily downgrade an apt package in Ubuntu and Debian.

All you have to do is to use the apt command like this:

sudo apt install package_name=package-version-number

That seems easy enough but how would you get the exact version number? Which old versions are supported? You can get that detail with:

sudo apt-cache policy package_name

Let me explain all this with a real-life example.

Downgrading apt package

Recently, I was updating the Ubuntu server that hosts It's FOSS Community forum.

I did the usual apt update && apt upgrade and things went bonkers by the time updates were installed.

Apparently, the latest version of Docker didn't support the aufs storage driver. To reduce the downtime, I opted to downgrade to the previous Docker version.

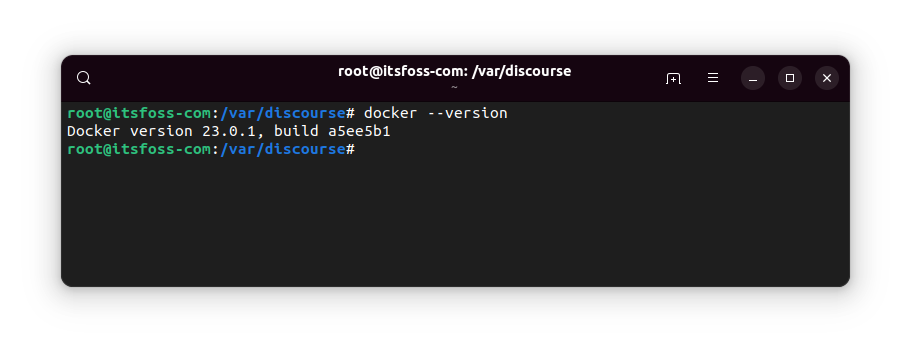
Check the currently installed package version

Downgrading a Package via apt-get
Installed Docker version

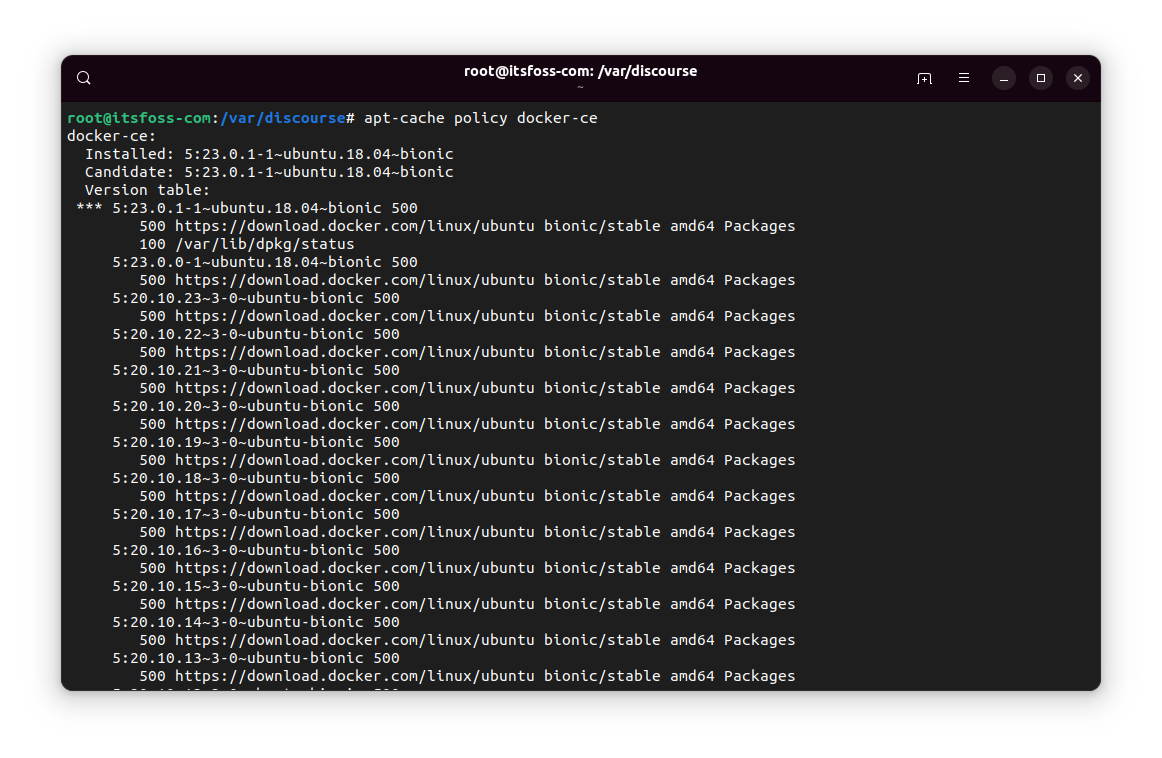
Then check for the available versions that could be installed:

sudo apt-cache policy package_name

It may throw a huge list or just a small one:

Downgrading a Package via apt-get
All installable versions of an apt package

If it shows at least one older version than the current one, you are in luck.

Now, you may think that the version number of a package would be composed of just the numbers. But that may not always be the case.

Basically, you copy the entire stuff before 500 (the priority number).

brave-browser:
  Installed: 1.48.158
  Candidate: 1.48.164
  Version table:
     1.48.164 500
        500 https://brave-browser-apt-release.s3.brave.com stable/main amd64 Packages
 *** 1.48.158 500
        500 https://brave-browser-apt-release.s3.brave.com stable/main amd64 Packages
        100 /var/lib/dpkg/status
     1.47.186 500
        500 https://brave-browser-apt-release.s3.brave.com stable/main amd64 Packages
     1.47.171 500
        500 https://brave-browser-apt-release.s3.brave.com stable/main amd64 Packages
     1.46.153 500

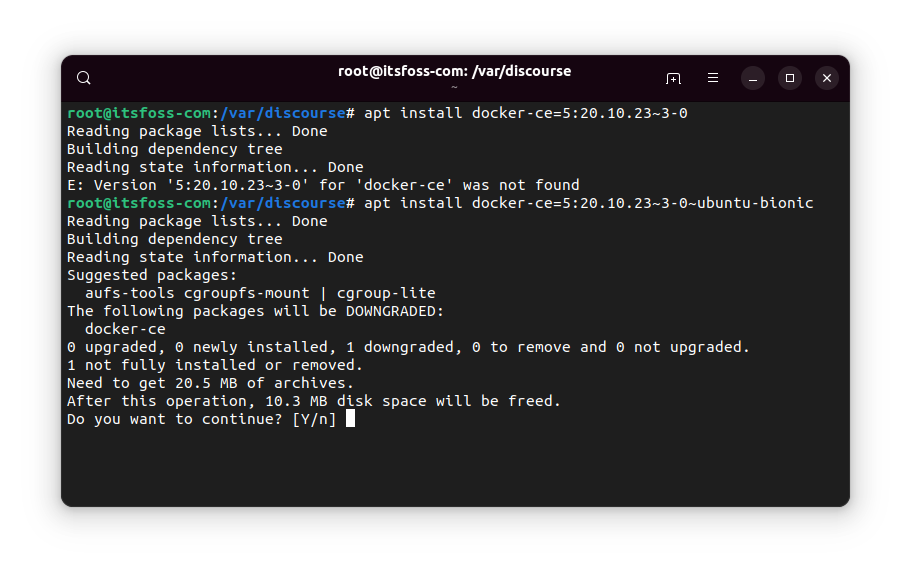
Once you have got the package number, use it to downgrade the installed package like this:

sudo apt install package_name=package-version-number
Downgrading a Package via apt-get
Downgrading an installed package

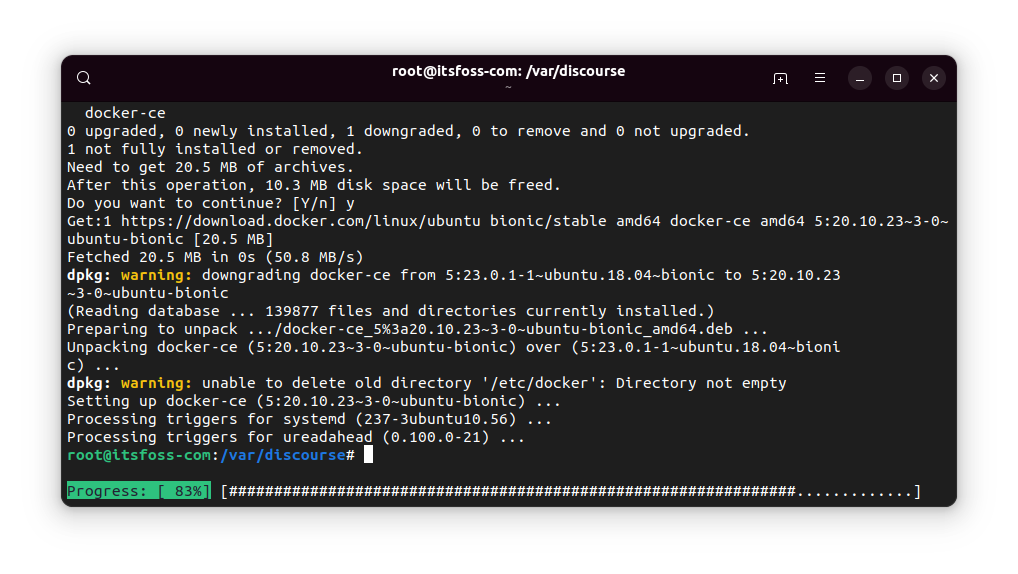
You'll see a warning about downgrading the package, of course.

Downgrading a Package via apt-get

But once the process completes, your package would have been downgraded to the given older version.

So, hold it, maybe?

So, you just learned to downgrade apt packages. But if you don't pay attention, the package will be upgraded again with the next system update.

Don't want that? You can prevent a package from being updated. Use the apt-mark command like this:

sudo apt-mark hold package_name

Want more details? Check out this article.

How to Prevent a Package From Being Updated in Ubuntu and Debian-based Linux Distributions
Brief: Quick tutorial to show you how to prevent certain packages from being updated in Ubuntu and Debian based Linux distributions. When you update your Ubuntu system, all the applications, packages are updated at once. This is of course very convenient as you don’t have to worry about up…
Downgrading a Package via apt-get

I hope this quick tip helps you with downgrading the apt packages when the need arises. Let me know if you have questions or suggestions.


from It's FOSS https://ift.tt/I60m2kM
via IFTTT

Kamis, 16 Februari 2023

FOSS Weekly #23.07: Terminal Basics, KDE Plasma 5.27 and Markdown Guide

FOSS Weekly #23.07: Terminal Basics, KDE Plasma 5.27 and Markdown Guide

For years, the focus of It's FOSS has been on desktop Linux. This is the reason why we mostly go for GUI solutions and tools.

Though this is not changing, knowing the basic Linux commands gives you an edge while troubleshooting.

And hence I am starting a new series this week. It's called 'Terminal Basics'. I aim to give you a base for doing some of the common things in the Linux command line.

The tutorials are written in an interactive 'do it while you read it' manner. I have also added simple exercises to practice what you learn. You can further discuss your solutions and doubts in the community forum.

Here's the first part of the series. Even if you are experienced with the commands, please give it a read and provide feedback by replying to this mail or leaving a comment.

Changing Directories in Linux Terminal
Learn how to change directories in the Linux command line using absolute and relative paths in this part of the Terminal Basics series.
FOSS Weekly #23.07: Terminal Basics, KDE Plasma 5.27 and Markdown Guide

๐Ÿ’ฌ Let's see what else you get in this week's issue:

  • KDE Plasma 5.27 release, among other news
  • Markdown guides
  • And more Linux news, open source applications, videos and memes

๐Ÿ“ฐ Linux News Round-up

๐Ÿ’•Valentine’s Gift for KDE Users Arrive in the Form of Plasma 5.27 Release
KDE Plasma 5.27 has landed with plenty of improvements.
FOSS Weekly #23.07: Terminal Basics, KDE Plasma 5.27 and Markdown Guide

๐Ÿง  What we’re thinking about

It looks like Linux Lite has integrated an AI helper onto the distro. They may be one of the very first ones to do so!

Linux Lite | AI Helper
๐Ÿ—“️
On 15th February 1999, hundreds of computer owners (dominated by Linux users) marched on Microsoft’s offices demanding refunds for the copies of Windows that came pre-installed on their computers. This day came to be known as Windows Refund Day.

๐Ÿ—‚️Markdown guides

Markdown is everywhere. You can write technical documents or take personal notes. It can be rendered beautifully on the web so you can write blogs in Markdown. Many applications like Discord also support Markdown syntax for formatting the content.

Here's a beginner's guide to help you learn Markdown.

Basic Markdown Syntax Explained [With Free Cheat Sheet]
Learning markdown could help you a lot with writing for web. Here’s a complete beginner’s guide to Markdown syntax with downloadable cheat sheet.
FOSS Weekly #23.07: Terminal Basics, KDE Plasma 5.27 and Markdown Guide

There are several variants of Markdown. One of them is for creating R programming-related documents. Here are some details on it.

Beginner’s Guide to R Markdown Syntax [With Cheat Sheet]
R Markdown is an enhanced form of Markdown coupled with in-line R code. Curious? Learn more here.
FOSS Weekly #23.07: Terminal Basics, KDE Plasma 5.27 and Markdown Guide

๐ŸงLinux learning resources

I stumbled across a new Bash scripting book that is available for free legally. You can download it from its official GitHub repository.


๐Ÿ“น What we are watching

Take a look at the newly released KDE Plasma 5.27.


๐Ÿ“ฑApplication highlights

A minimal-looking software tool with essential features, Design aims to be a nice 2D CAD option for Linux users.

Design is a New 2D CAD App for Linux in Development
A minimal-looking software tool with essential features, Design aims to be a nice 2D CAD option for Linux users.
FOSS Weekly #23.07: Terminal Basics, KDE Plasma 5.27 and Markdown Guide

๐ŸŽซ Event Alert: Open Source Summit North America

Open Source Summit is the premier event for open source developers, technologists, and community leaders to collaborate, share information, solve problems, and gain knowledge, furthering open source innovation and ensuring a sustainable open source ecosystem. It is the gathering place for open-source code and community contributors.

The event will be taking place in May in Vancouver, Canada.

Open Source Summit North America | Linux Foundation Events
The premier vendor-neutral conference for open source developers and technologists to collaborate, share information and learn about the latest technologies and innovations across open source.
FOSS Weekly #23.07: Terminal Basics, KDE Plasma 5.27 and Markdown Guide

It's FOSS is a media partner of this event. If you are willing to attend the event, you can get a 20% discount on the tickets using coupon code OSSNA23FOSS20.


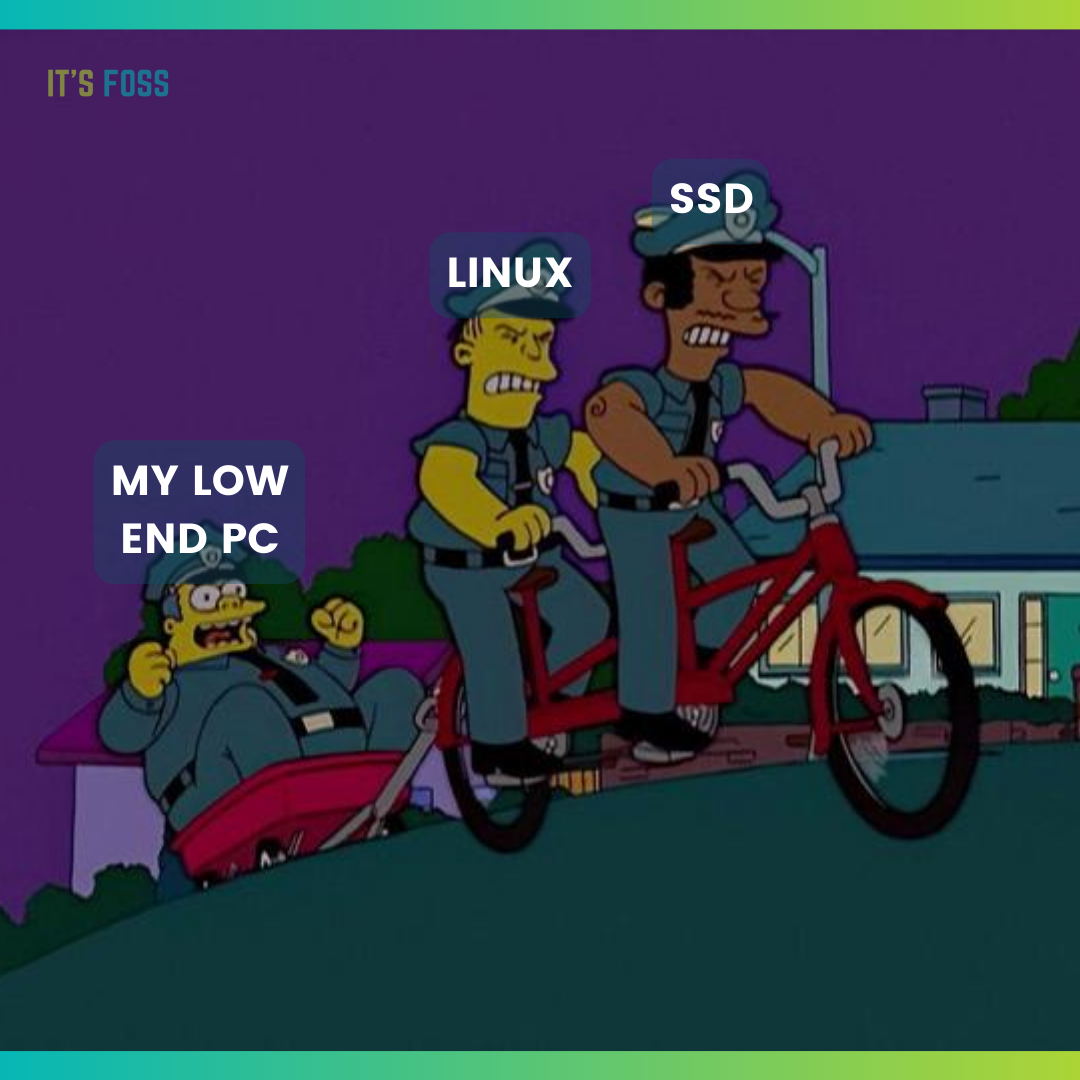
๐Ÿคฃ Linux Humor

Can any of the current-gen proprietary OSes do that? :P

FOSS Weekly #23.07: Terminal Basics, KDE Plasma 5.27 and Markdown Guide

❤️ Enjoying FOSS Weekly?

Forward it to Linux-using friends and encourage them to subscribe (hint: it's here).

Become a Pro member and show your support ๐Ÿ™

Join our Telegram channel.

Something else? Share it with me by pressing the reply button.

Enjoy :)


from It's FOSS https://ift.tt/DhqkfdC
via IFTTT

Rabu, 15 Februari 2023

Beginner's Guide to R Markdown Syntax [With Cheat Sheet]

Beginner's Guide to R Markdown Syntax [With Cheat Sheet]

You probably already know about the lightweight Markdown markup language. Refer to our Markdown guide, if you're new to the concept. Overall, it is a simple and effective language for creating plain-text documents.

However, Markdown may not be enough to make detailed reports or technical documents.

Hence, R Markdown as an interactive file format came into existence back in 2014 thanks to packages like knitr and Pandoc. It combines plain text with in-line R code, helping you make a dynamic document.

To create R Markdown documents, you can use various IDEs and extensions to make it possible. However, the official IDE that helps you do it is RStudio. So, in this article, we will focus on learning R Markdown syntax using RStudio.

๐Ÿ’ก
If you did not know, R programming language is used for statistical computing, graphics representation, and reporting.

Suggested Read ๐Ÿ“–

How to Install and Use R on Ubuntu
Brief: This tutorial teaches you to install R on Ubuntu. You’ll also learn how to run your first R program in Ubuntu using various methods. R, together with Python, is the most commonly used programming language for statistical computing and graphics, making it easy to work with data. With
Beginner's Guide to R Markdown Syntax [With Cheat Sheet]

Setting RStudio

RStudio makes it easy to work with R Markdown by its setup process. You just need to install a package, and you are done for the most part!

Once you have RStudio installed, head to the Tools menu and select the Install Packages option.

Beginner's Guide to R Markdown Syntax [With Cheat Sheet]
Select Install Packages option under Tools menu (click to enlarge image)

On the new dialog box, search for rmarkdown and install it.

Beginner's Guide to R Markdown Syntax [With Cheat Sheet]
Install RMarkdown Package (click to enlarge image)
๐Ÿ’ก
To use code chunks like python, you need to install additional packages. RStudio will prompt you to install the required packages when you try to include them in your document.

Once installed, you can start a new rmarkdown document by selecting File > New > RMarkdown.

Beginner's Guide to R Markdown Syntax [With Cheat Sheet]
Create a new RMarkdown Document (click to enlarge image)

This will prompt you to add some information regarding the document (metadata for the file). Fill those up.

Beginner's Guide to R Markdown Syntax [With Cheat Sheet]
New document in rmarkdown (click to enlarge image)

Or you can create an empty document to start fresh.

RMarkdown Syntax

Since it is just "enhanced Markdown," most syntax remains the same.

There would be some differences when you add things not usually supported with Markdown, like tables, math equations, code chunks, etc.

Here's a quick summary of what we will be covering:

Name of the RMarkdown Block Proper Syntax
Heading # Level 1
## Level 2
### Level 3

Level 1
=======

Level 2
-------
Emphasis *Italics*
_Italics_

**Bold**

__Bold__
List Unordered List
* Item
* Item
+ Sub
+ Sub

Ordered List
1. Item
2. Item
+ Sub
+ Sub
Code Chunk Normal Code Block

```
Code Goes Here
```

R Code Block

```{r}
R CODE
```
You can use other languages also.


Inline `code`
Links Plain Link: Paste the URL
Link with Caption: [Text](URL_Address)
Link to a section: [Text](#Name-of-section)
Table | Column | Column | Column |
| ------ | ------ | ------ |
| Item | Item | Item |
| Item | Item | Item |
Equations In line Equations: $Equations$

Display Equations: $$Equations$$
Images Without Caption: ![](Link-to-Image)

With Caption : ![optional caption text](Location-of-image)
Block Quotes > Type your Block Quotes
Misc Super Script : Text^Superscript^

Horizontal rule or Page Break:

========= or ----------

For Manual Line break, end line with 2+ spaces

The YAML Header

At the top of a Rmarkdown document, there is a YAML header enclosed within two ---. This block usually contains a title, author, date, and the file type you want to output, defining the final look of the document.

The file type is either HTML, PDF, or Word.

---
title: "Sample"
author: "It's FOSS"
date: "2023-02-08"
output: pdf_document
---

This can be added while setting the new document in RStudio, which is shown in the above section.

Heading

In R Markdown, we can give heading in two different methods. Either we can use the # character for different levels of heading like:

# Heading Level 1
## Heading Level 2
### Heading Level 3
#### Heading Level 4
##### Heading Level 5
###### Heading Level 6

Or, = and - for level 1 and 2 headings, respectively.

Level 1 Heading
===============

Level 2 Heading
---------------
Beginner's Guide to R Markdown Syntax [With Cheat Sheet]
Heading levels (click to enlarge image)

Lists

There are two types of Lists, the first one is an Unordered list, or you could call them bullet points:

* Item 1
* Item 2
                + Sub 1
                + Sub 2
* Item 3

And the second one is the Ordered list, which is the numbered type:

1. Item 1
2. Item 2
                + Sub 1
                + Sub 2
3. Item 3
Beginner's Guide to R Markdown Syntax [With Cheat Sheet]

Suggested Read ๐Ÿ“–

Read and Organize Markdown Files in Linux Terminal With Glow
Glow is a CLI tool that lets you render Markdown files in the Linux terminal. You can also organize Markdown files with it.
Beginner's Guide to R Markdown Syntax [With Cheat Sheet]

Format text within a paragraph

There are several ways to format text.

Beginner's Guide to R Markdown Syntax [With Cheat Sheet]

You can add emphasis to the text like italics or bold using:

  • Italics: Place the text in between single asterisks or single underscore
  • Bold: Place the text in between double asterisks or double underscores.
*This is Italicized text*
_This is Italicized text_

**This is Bold Text**
__This is Bold Text__

You can explore on this using our resource on how to add bold and italic text in Markdown.

If you want to add superscript to a text, place the text that should be superscript in between ^ symbol.

Normal Text^super_script^

Or, if you want to add text strike-through, place the text in between two ~~ symbol.

~Strike Through this~~
Beginner's Guide to R Markdown Syntax [With Cheat Sheet]

Adding Code Chunks

Embedding code is the primary purpose of R Markdown. It allows us to add codes in several ways.

Adding Normal code block.

If you want to add a normal code block to separate it from other text, use the syntax below:

```
Your Code Goes Here
```

You can also try adding code blocks with syntax highlighting.

You should append the language in curly braces if you want to add code and embed its output to the document:

```{Language}
Your Code Goes Here
```

Or, you can add inline codes by placing the respective text between ` symbols.

        The `code` is a code

Here's how it should look like:

Beginner's Guide to R Markdown Syntax [With Cheat Sheet]
Code Blocks (click to enlarge image)

To add a link as plain text, just paste the link as it is in a line.

https://itsfoss.com

Or, to make a text hyperlink, use the syntax:

[Text](URL Address)

Another way to add a link is, when you want to link to a section of the page. In this case, use the syntax:

[Text](#Name-of-section)
Beginner's Guide to R Markdown Syntax [With Cheat Sheet]

Tables

The syntax for adding tables is similar to that of markdown.

|Column|Column|Column|
| --- | --- | --- |
|Item|Item|Item|
|Item|Item|Item|
Beginner's Guide to R Markdown Syntax [With Cheat Sheet]
๐Ÿ“‹
Curious to know more? Refer to our guide on creating tables in Markdown.

Images

To add an image, use the syntax:

![](http://example.com/logo.png)

OR

![optional caption text](figures/img.png)
Beginner's Guide to R Markdown Syntax [With Cheat Sheet]

Block Quotes

RMarkdown allows you to add block quotes. To use this, use the > (greater than) symbol in front of the line/paragraph you want to quote.

This is a normal text

> This is a Block Quote
Beginner's Guide to R Markdown Syntax [With Cheat Sheet]

If you want to explore more use cases of blockquote, head to our Markdown quotes guide.

Equations

Using RMarkdown, you can add either equations or display complex LaTex equations.

For example:

In line Pythagorean Theorem: $Equation$

Display Equation: $$Equation$$
Beginner's Guide to R Markdown Syntax [With Cheat Sheet]
Adding equations (click to enlarge image)

Horizontal Rule / Page Break

Use three or more asterisks or dashes to add a horizontal rule /page break.

************

------------

If you want to add a manual line break, end that line with two or more spaces.

Summary

R Markdown is Useful (Cheat Sheet)

Whether you are working with scientific reports or want to create any other type of dynamic document, R Markdown is your best bet to make the most out of Markdown.

Here's a cheat sheet to help you summarize it all:

Beginner's Guide to R Markdown Syntax [With Cheat Sheet]

๐Ÿ’ฌ Did we miss something that you use with R Markdown? Share your thoughts in the comments down below.


from It's FOSS https://ift.tt/3LzjHXy
via IFTTT

Login as Root in Ubuntu GUI

Login as Root in Ubuntu GUI

By default, Ubuntu disables the root account. You must use the sudo command for any tasks requiring root privileges.

This is for your own security, of course. Using the system as root all the time is like running around with a sword in your hand. It increases the chances of messing up things.

Logging in as root is still common in the servers. On the desktop side, it's quite rare to log in as root. Even Kali Linux has changed it.

And yet, a few desktop users want to log in as root. This is not something advisable but surely doable.

in this guide, I will show you how to log in as a root in your GNOME desktop using Ubuntu.

How to login as a root in the GNOME desktop

๐Ÿšง
I won't advise login as root on the desktop. You have sudo mechanism for all your root needs. Do it only if you have a good enough reason. This tutorial is for demo purposes only. You have been cautioned.

Step 1: Enable root account

You want to log in as root. But the root account is disabled by default. The first step is to enable it.

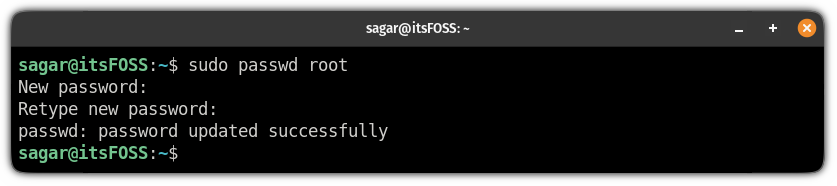
Change the root account password that will eventually enable the root account for you:

sudo passwd root
Login as Root in Ubuntu GUI

It goes without saying that you should not forget the root password.

Step 2: Change GDM configuration

๐Ÿšง
This part of the tutorial is only valid for GNOME. Please check your desktop environment and ensure that it is GNOME.

Ubuntu uses GNOME by default and GNOME uses the GDM display manager.

To allow log in as root into GNOME, you need to make some changes in the GDM configuration file located at /etc/gdm3/custom.conf.

Make a backup of the config file:

cp /etc/gdm3/custom.conf /etc/gdm3/custom.conf~

In the worst case, if you somehow mess things up, the back up file can be used to replace the existing one from the TTY.

Now, open the GDM file with the following command:

sudo nano /etc/gdm3/custom.conf

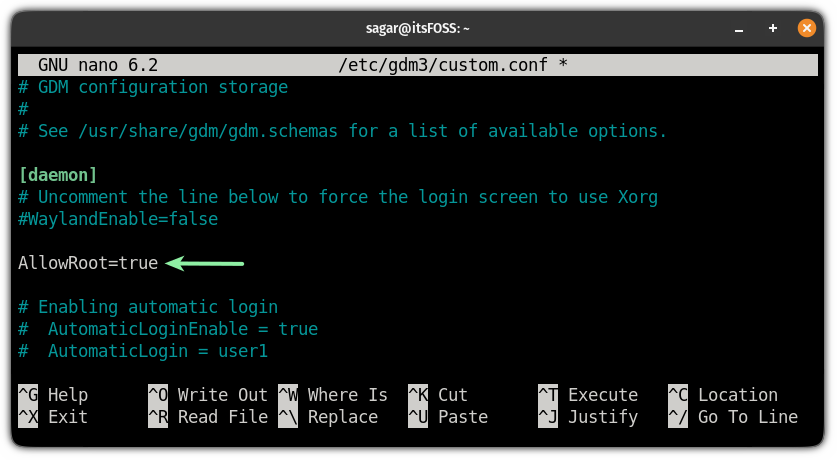
And add the following line to allow the root login:

AllowRoot=true
Login as Root in Ubuntu GUI

Press Ctrl+X to exit Nano while saving it.

Step 3: Configure PAM authentication

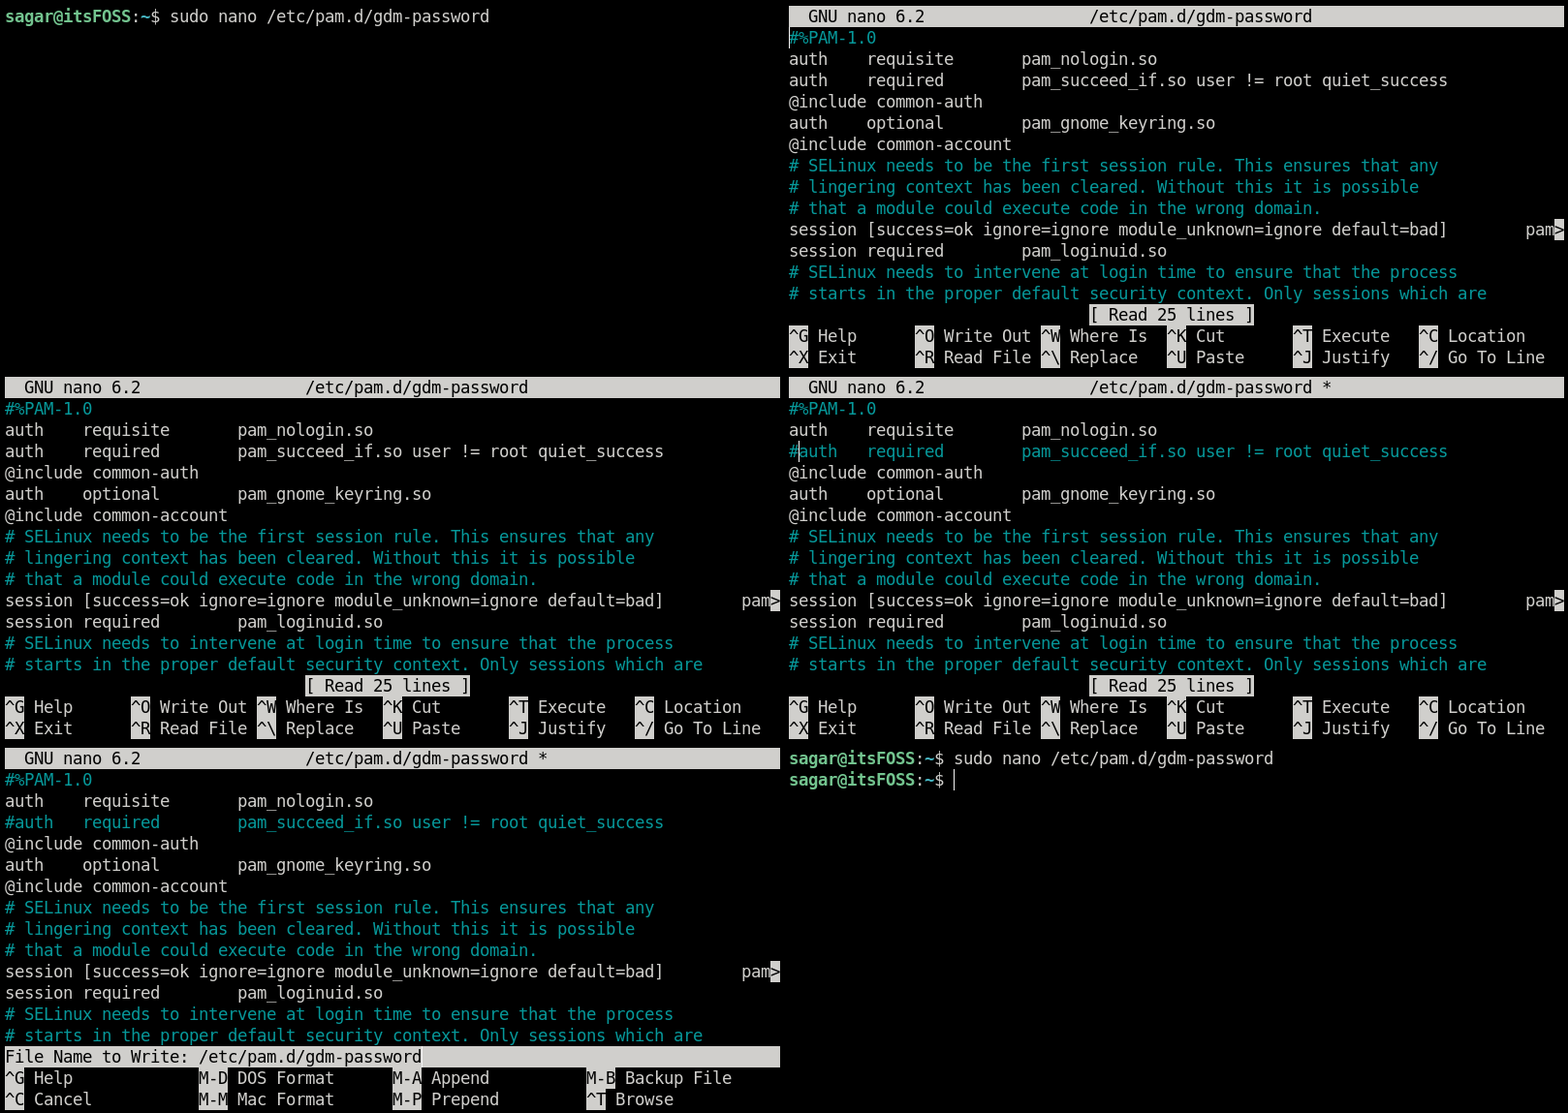
Now, you will have to configure the PAM authentication daemon file, which can be opened by the following command:

sudo nano /etc/pam.d/gdm-password

In this file, you will have to comment out the following line with the # symbol that denies the root access in GUI:

auth   required        pam_succeed_if.so user != root quiet_success
Login as Root in Ubuntu GUI

Save changes and exit from the nano text editor.

Step 4: Log in as root

Now, reboot your system:

reboot

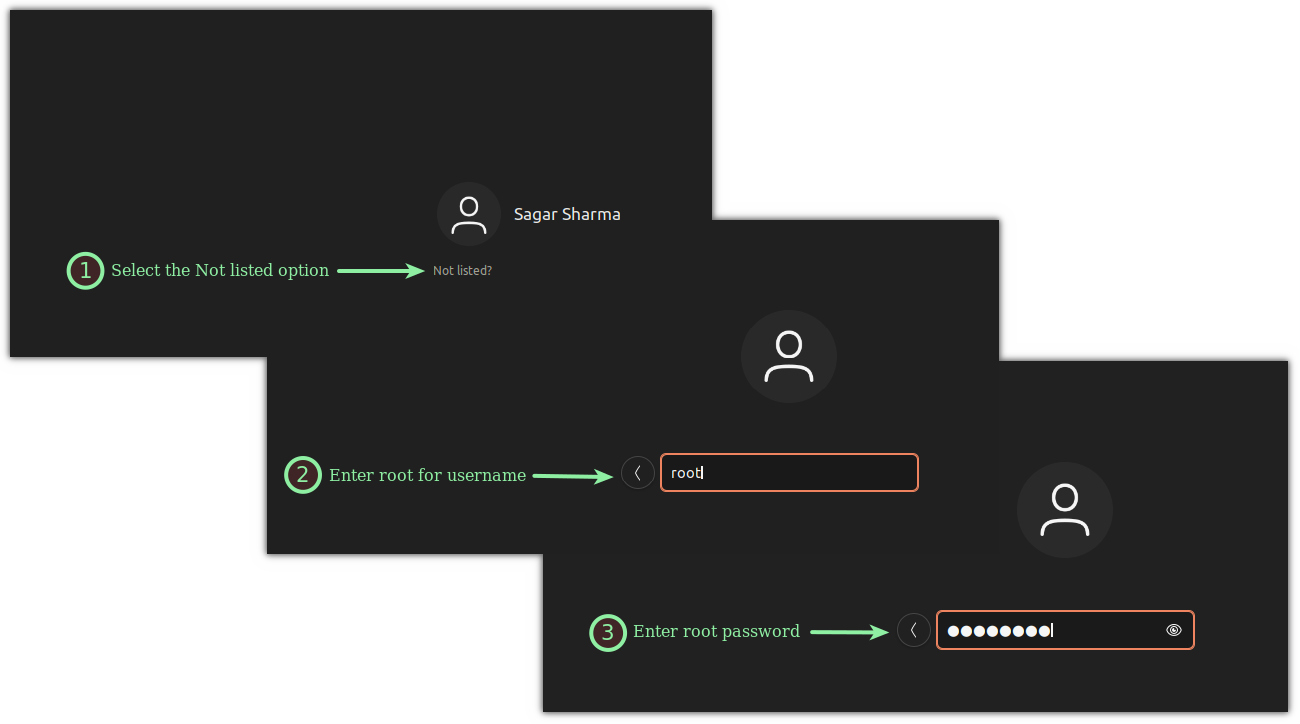
At the login screen, select the Not listed option, enter root in username and enter the password that you configured at the beginning of this guide:

Login as Root in Ubuntu GUI
Logging as root (Click to enlarge)

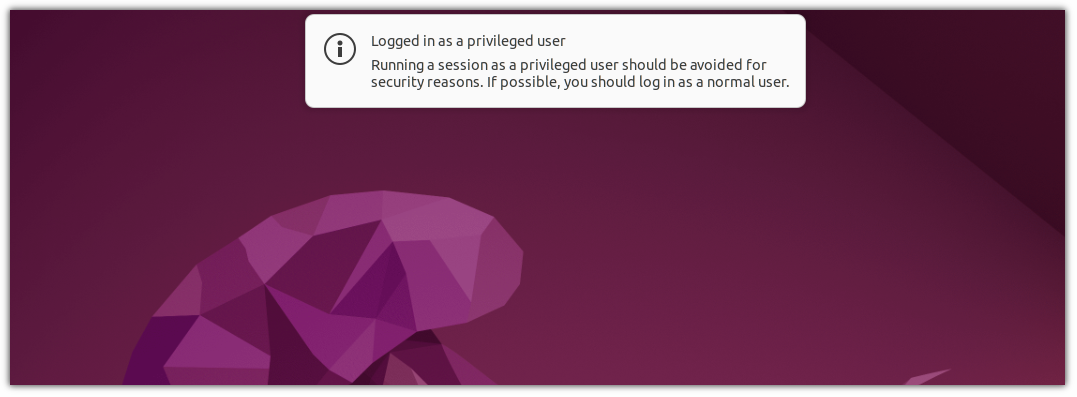
Once you log in, it will notify you by saying, "logged in as a privileged user":

Login as Root in Ubuntu GUI

That's it! Now, you are running your Ubuntu system as a root.

Things you should know when running the system as a root user

There is a reason why Ubuntu disables a root account by default. Want to know why? Here you have it:

Root User in Ubuntu- Important Things You Should Know
How do you become root user in Ubuntu? Either you run commands with root privilege like this: sudo any_command Or you switch user in Ubuntu to root user like this: sudo su In both cases, you’ll have to enter your own user account’s password. But there’s
Login as Root in Ubuntu GUI

And again, it is not advisable to log in a s root in your desktop Linux system. Please follow the norms and stay away from such (mis) adventures.


from It's FOSS https://ift.tt/NYE2rpu
via IFTTT