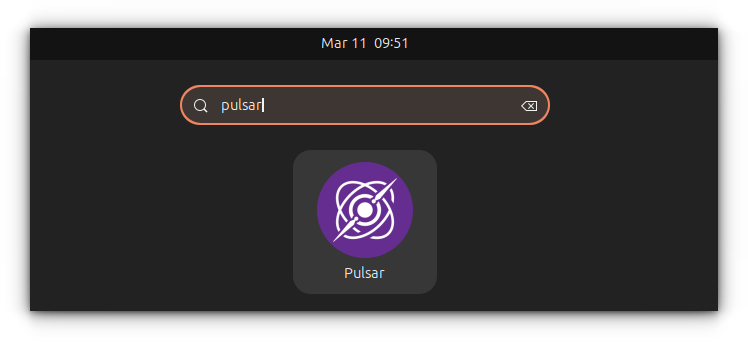
Imagine you found a cool text editor like Pulsar and downloaded it in the AppImage format. You enjoy using it and now want to make it the default application for markdown files.
You right-click on the file and click 'open with' option, but here, you don't see the Pulsar listed here.
That's a problem, right? But it can be easily fixed by creating a desktop entry for that AppImage application.
Let me show you how to do that.
Step 1: Create a desktop entry for AppImage
The very first step is to create a desktop file for the AppImage application. Here, we will use the Gear Lever app to create the desktop entry.
Anyway, if you have Flatpak support enabled, install Gear Lever with this command:
flatpak install flathub it.mijorus.gearlever
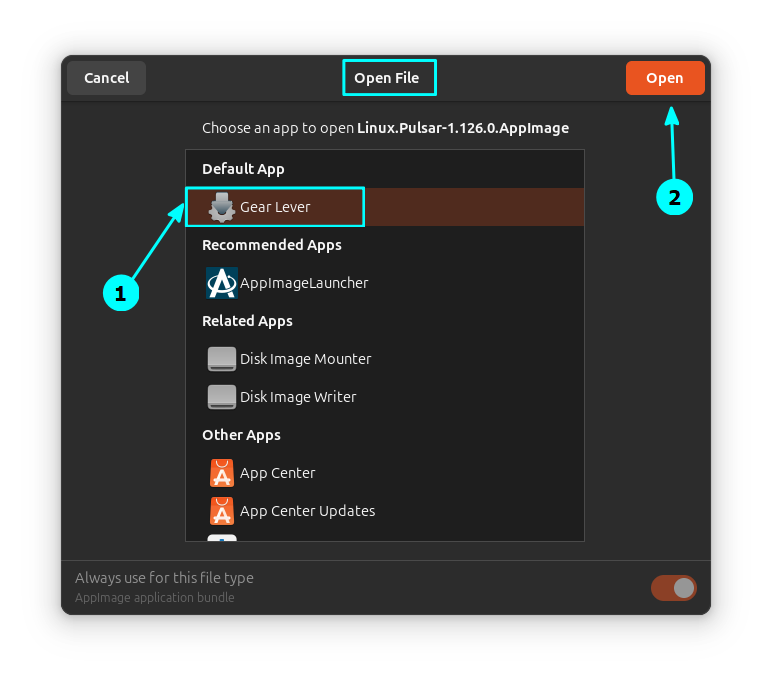
Now, right-click on the AppImage file you downloaded and select Open With Gear Lever.
Open AppImage in Gear Lever
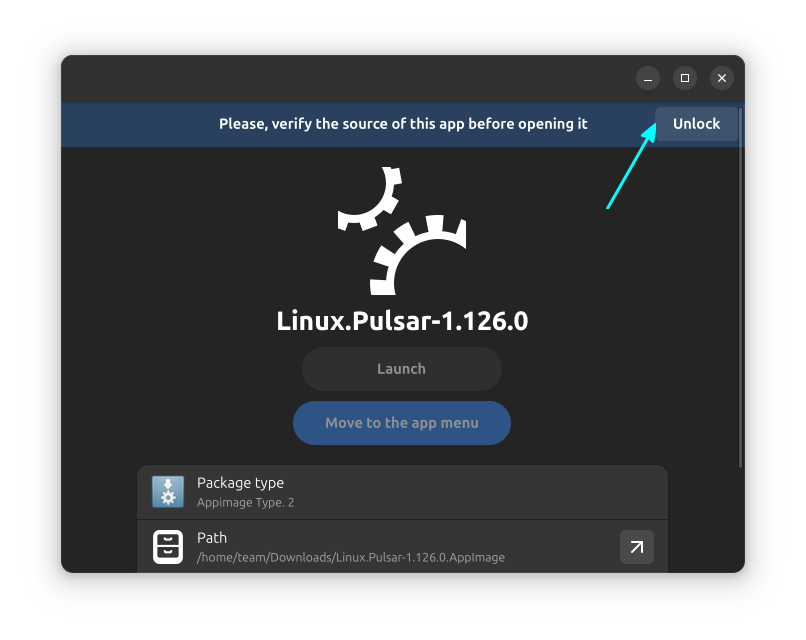
Click on the Unlock button in Gear Lever.
Click on Unlock
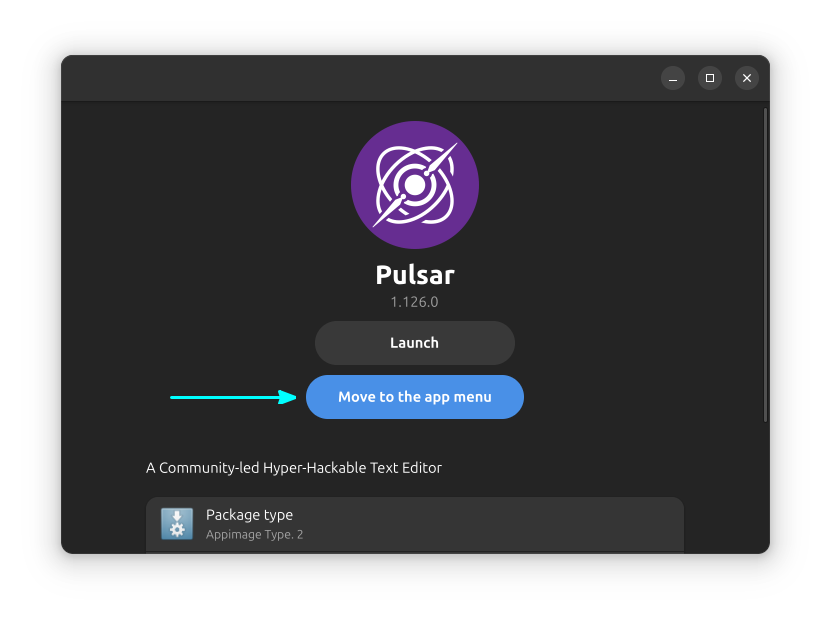
Now click on the "Move to app menu" button.
Click on the "Move to the app menu" button
Verify everything is ok by searching for the app in the system menu.
Verify the app integration
Great! So we have the application integrated in the desktop. Let's move to the second step.
Step 2: Setting default app through file manager
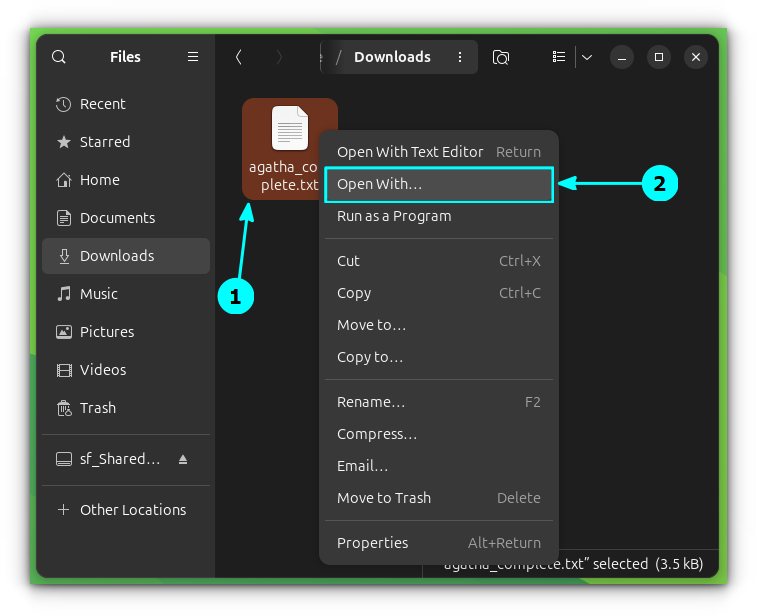
Let's say you want to open all your .txt text files in the Pulsar editor.
The easiest way to achieve is through the File Manager.
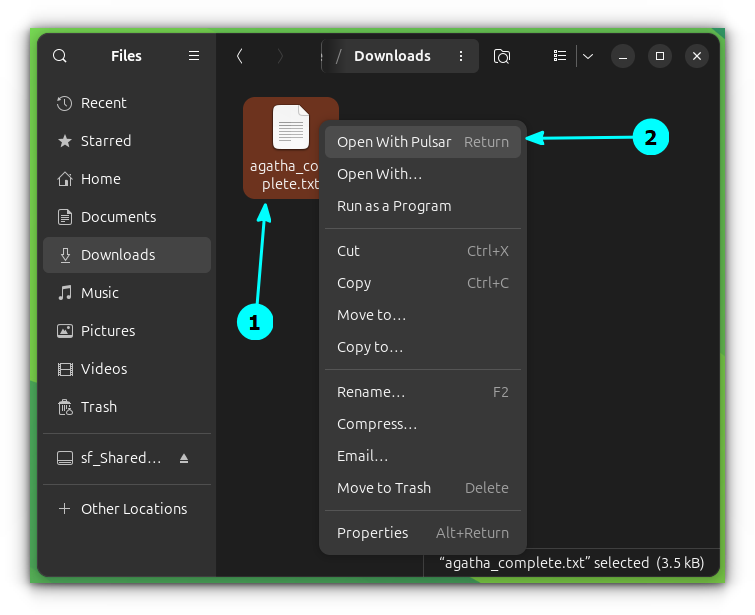
Open the file manager and right-click on the file of your choice. Now select the Open With option.
Select the "Open With" option
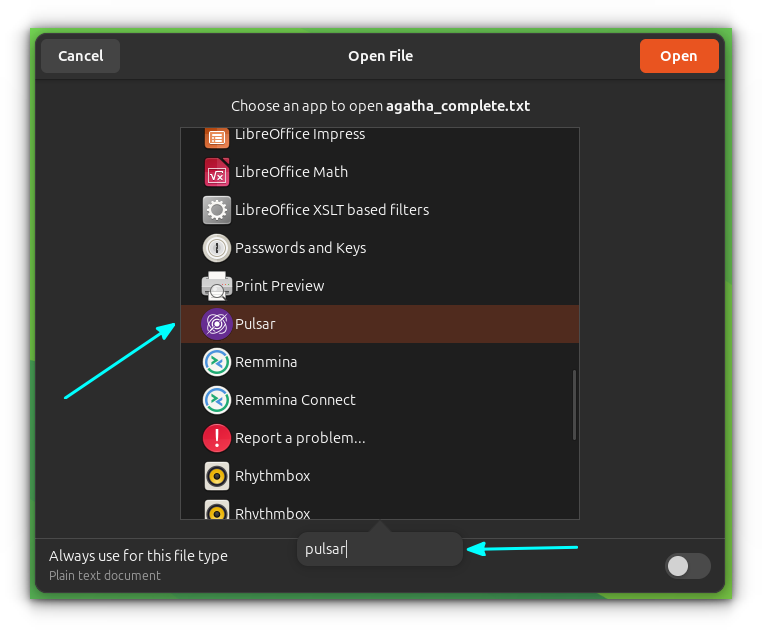
In the next window, you can start typing the name of the application to begin a search. It will also show you the AppImage program you integrated with the desktop previously.
Search for an App
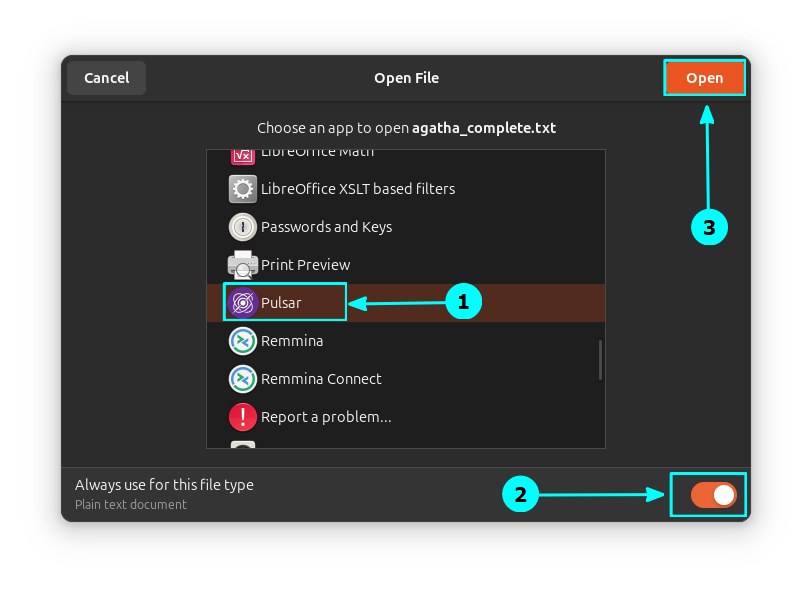
Once you spot the app, click on it to select and then enable the "Always use for this file type" toggle button. Then click Open as shown in the screenshot below.
Set a default app
That's it. From now on, your file will be opened in the AppImage of your choice. To verify this, you can right-click on the file. The first entry on the context menu will be the name of your AppImage application. In this case, Pulsar.
First item in the context menu
Alternative method: Change apps from settings
Let's say you have an AppImage for applications like Web Browser, Music Player, etc. These can be changed from the system settings.
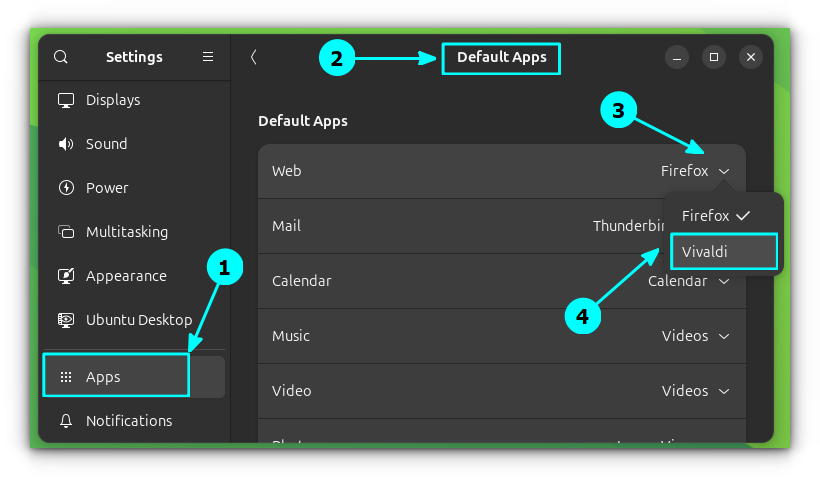
Given you have created the AppImage desktop entry following the first step, open the system settings in Ubuntu.
Go to Apps → Default Apps.
Here, set the apps for categories you want.
Set Default Browser
If you click on the drop-down menu corresponding to a category in settings, you can select an app. The AppImage app will also be listed here. In the screenshot above, you can see Vivaldi AppImage is set as the default browser.
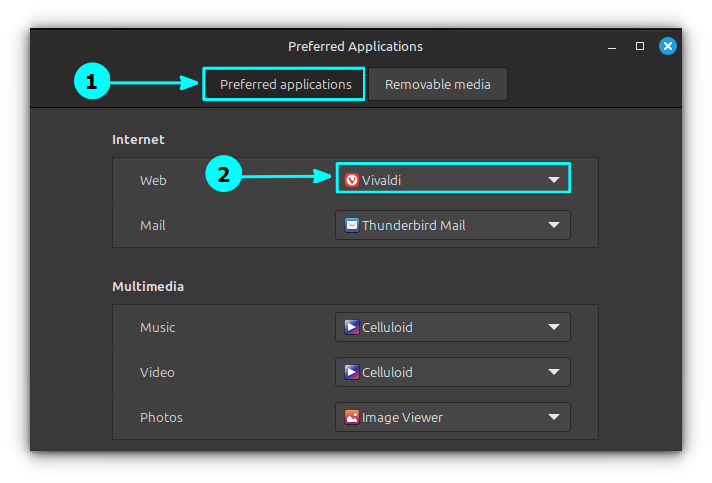
For Linux Mint users, you can set it using the Preferred Application settings.
Preferred application in Linux Mint
Conclusion
A lot of AppImage 'issue' or should I say shortcomings, can be solved by desktop integration. It surprises me that AppImage doesn't provide an official way of doing these things.
Well, we have the wonderful open source developers that help us by creating helpful utilities like Gear Lever here.
I hope this quick little tip helps you enjoy your AppImages 😄
In this guide, I'll walk you through some essential Ollama commands, explaining what they do and share some tricks at the end to enhance your experience.
💡
If you're new to Ollama or just getting started, we've already covered a detailed Ollama installation guide for Linux to help you set it up effortlessly.
Checking available commands
Before we dive into specific commands, let's start with the basics. To see all available Ollama commands, run:
ollama --help
This will list all the possible commands along with a brief description of what they do. If you want details about a specific command, you can use:
ollama <command> --help
For example, ollama run --help will show all available options for running models.
Here's a glimpse of essential Ollama commands, which we’ve covered in more detail further in the article.
Command
Description
ollama create
Creates a custom model from a Modelfile, allowing you to fine-tune or modify existing models.
ollama run <model>
Runs a specified model to process input text, generate responses, or perform various AI tasks.
ollama pull <model>
Downloads a model from Ollama’s library to use it locally.
ollama list
Displays all installed models on your system.
ollama rm <model>
Removes a specific model from your system to free up space.
ollama serve
Runs an Ollama model as a local API endpoint, useful for integrating with other applications.
ollama ps
Shows currently running Ollama processes, useful for debugging and monitoring active sessions.
ollama stop <model>
Stops a running Ollama process using its process ID or name.
ollama show <model>
Displays metadata and details about a specific model, including its parameters.
ollama run <model> "with input"
Executes a model with specific text input, such as generating content or extracting information.
ollama run <model> < "with file input"
Processes a file (text, code, or image) using an AI model to extract insights or perform analysis.
1. Downloading an LLM
If you want to manually download a model from the Ollama library without running it immediately, use:
ollama pull <model_name>
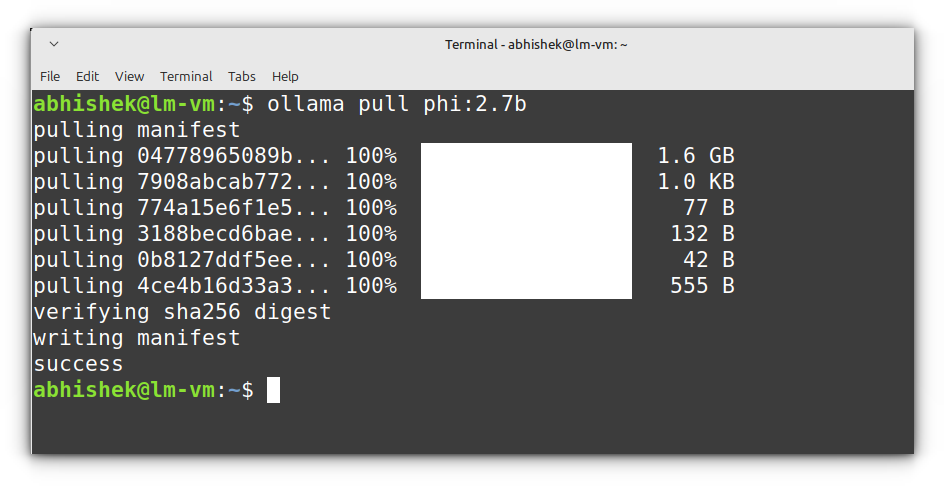
For instance, to download Llama 3.2 (300M parameters):
ollama pull phi:2.7b
This will store the model locally, making it available for offline use.
📋
There are no ways of fetching available model names from Hugging Face. You have to visit Ollama website and get the available model names to use with the pull command.
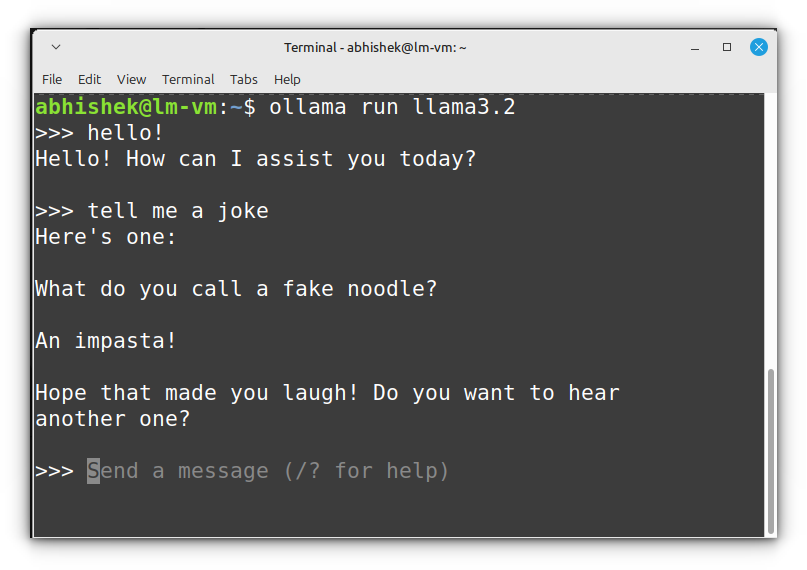
2. Running an LLM
To begin chatting with a model, use:
ollama run <model_name>
For example, to run a small model like Phi2:
ollama run phi:2.7b
If you don’t have the model downloaded, Ollama will fetch it automatically. Once it's running, you can start chatting with it directly in the terminal.
Some useful tricks while interacting with a running model:
Type /set parameter num_ctx 8192 to adjust the context window.
Use /show info to display model details.
Exit by typing /bye.
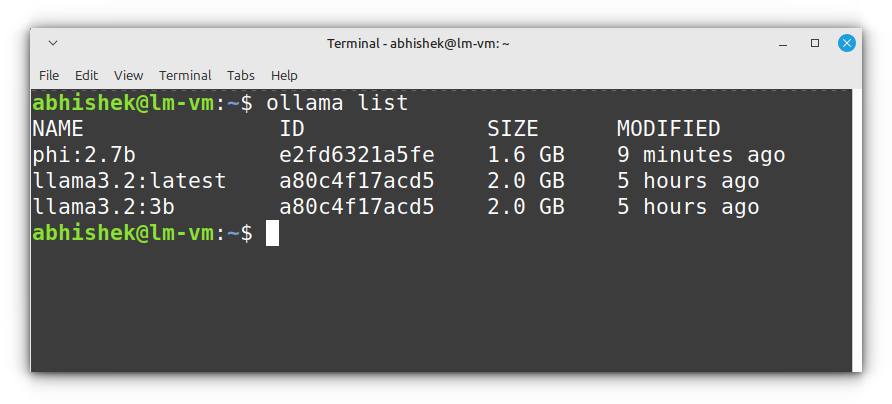
3. Listing installed LLMs
If you’ve downloaded multiple models, you might want to see which ones are available locally. You can do this with:
ollama list
This will output something like:
This command is great for checking which models are installed before running them.
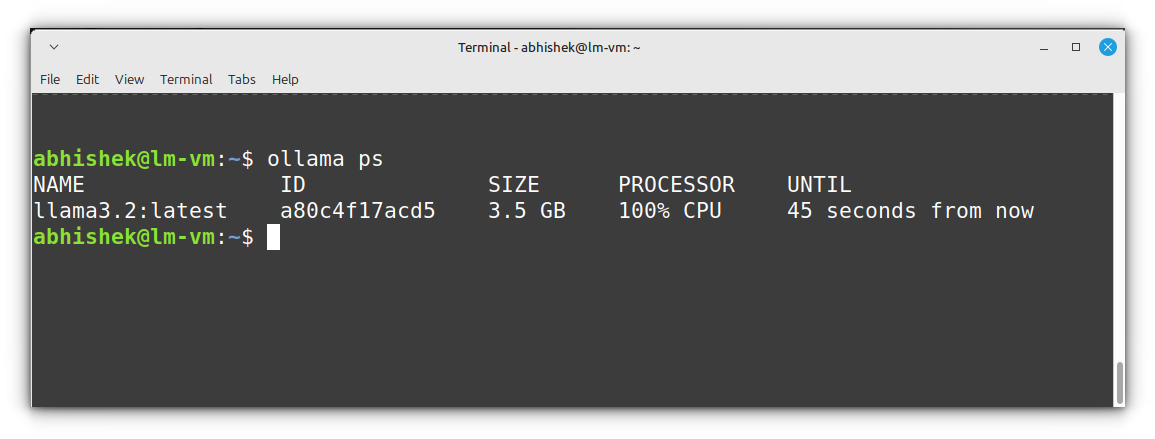
4. Checking running LLMs
If you're running multiple models and want to see which ones are active, use:
ollama ps
You'll see an output like:
To stop a running model, you can simply exit its session or restart the Ollama server.
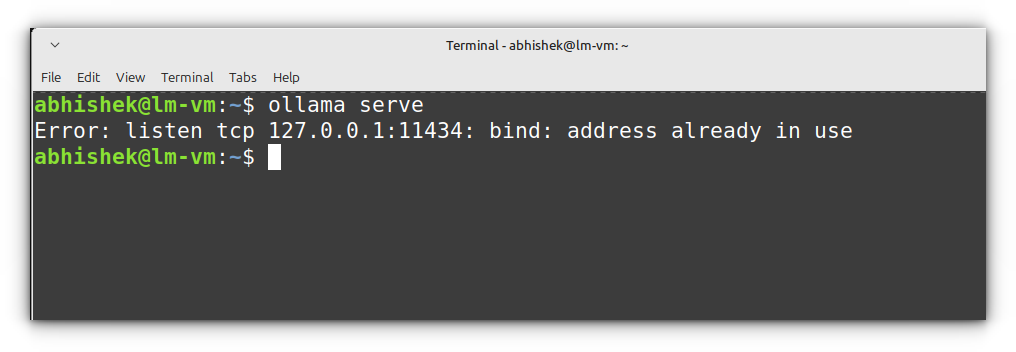
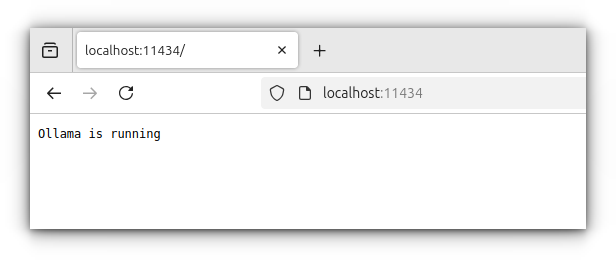
5. Starting the ollama server
The ollama serve command starts a local server to manage and run LLMs.
This is necessary if you want to interact with models through an API instead of just using the command line.
ollama serve
By default, the server runs on http://localhost:11434/, and if you visit this address in your browser, you'll see "Ollama is running."
You can configure the server with environment variables, such as:
OLLAMA_DEBUG=1 → Enables debug mode for troubleshooting.
OLLAMA_HOST=0.0.0.0:11434 → Binds the server to a different address/port.
6. Updating existing LLMs
There is no ollama command for updating existing LLMs. You can run the pull command periodically to update an installed model:
ollama pull <model_name>
If you want to update all the models, you can combine the commands in this way:
Here's how the command works (if you don't want to ask your local AI).
Ollama lists all the models and you take the ouput starting at line 2 as line 1 doesn't have model names. And then AWK command gives the first column that has the model name. Now this is passed to xargs command that puts the model name in {} placeholder and thus ollama pull {} runs as ollama pull model_name for each installed model.
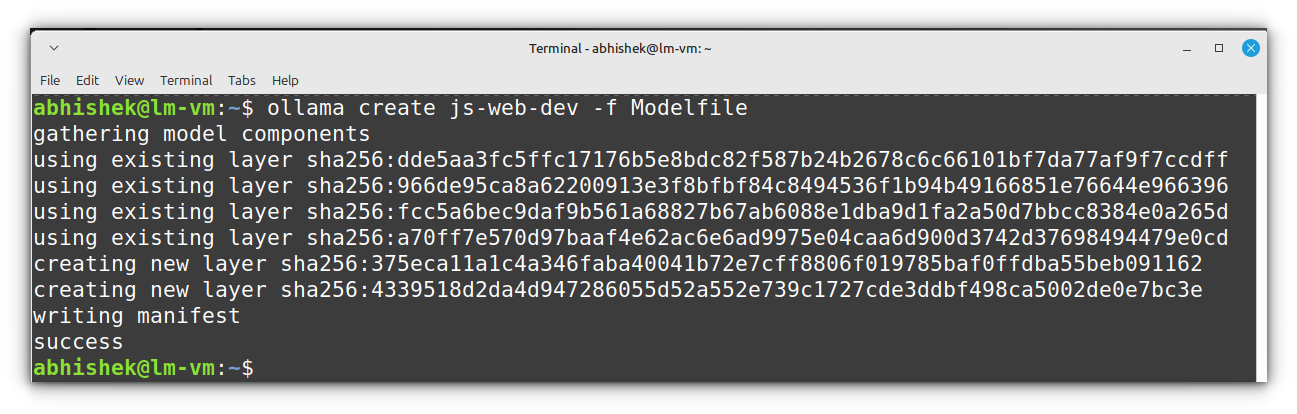
7. Custom model configuration
One of the coolest features of Ollama is the ability to create custom model configurations.
For example, let’s say you want to tweak smollm2 to have a longer context window.
First, create a file named Modelfile in your working directory with the following content:
FROM llama3.2:3b
PARAMETER temperature 0.5
PARAMETER top_p 0.9
SYSTEM You are a senior web developer specializing in JavaScript, front-end frameworks (React, Vue), and back-end technologies (Node.js, Express). Provide well-structured, optimized code with clear explanations and best practices.
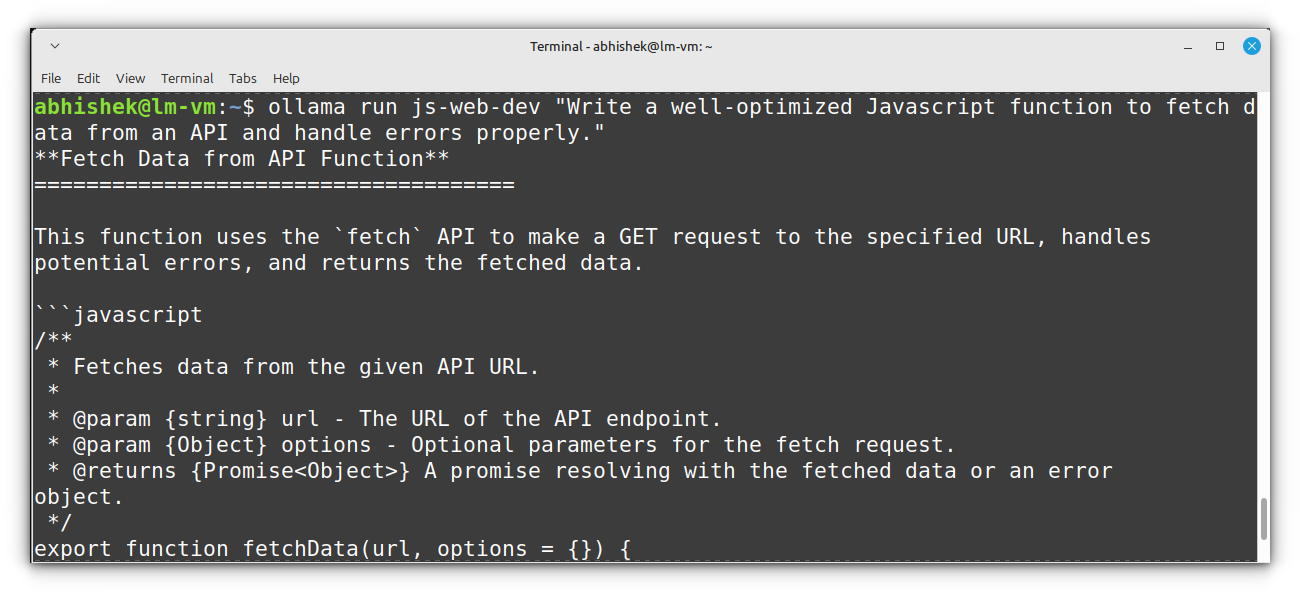
Now, use Ollama to create a new model from the Modelfile:
ollama create js-web-dev -f Modelfile
Once the model is created, you can run it interactively:
ollama run js-web-dev "Write a well-optimized JavaScript function to fetch data from an API and handle errors properly."
If you want to tweak the model further:
Adjust temperature for more randomness (0.7) or strict accuracy (0.3).
Modify top_p to control diversity (0.8 for stricter responses).
Add more specific system instructions, like "Focus on React performance optimization."
Some other tricks to enhance your experience
Ollama isn't just a tool for running language models locally, it can be a powerful AI assistant inside a terminal for a variety of tasks.
Like, I personally use Ollama to extract info from a document, analyze images and even help with coding without leaving the terminal.
💡
Running Ollama for image processing, document analysis, or code generation without a GPU can be excruciatingly slow.
Summarizing documents
Ollama can quickly extract key points from long documents, research papers, and reports, saving you from hours of manual reading.
That said, I personally don’t use it much for PDFs. The results can be janky, especially if the document has complex formatting or scanned text.
If you’re dealing with structured text files, though, it works fairly well.
ollama run phi "Summarize this document in 100 words." < french_revolution.txt
Image analysis
Though Ollama primarily works with text, some vision models (like llava or even deepseek-r1) are beginning to support multimodal processing, meaning they can analyze and describe images.
This is particularly useful in fields like computer vision, accessibility, and content moderation.
ollama run llava:7b "Describe the content of this image." < cat.jpg
Code generation and assistance
Debugging a complex codebase? Need to understand a piece of unfamiliar code?
Instead of spending hours deciphering it, let Ollama have a look at it. 😉
ollama run phi "Explain this algorithm step-by-step." < algorithm.py
Additional resources
If you want to dive deeper into Ollama or are looking to integrate it into your own projects, I highly recommend checking out freeCodeCamp’s YouTube video on the topic.
It provides a clear, hands-on introduction to working with Ollama and its API.
Conclusion
Ollama makes it possible to harness AI on your own hardware. While it may seem overwhelming at first, once you get the hang of the basic commands and parameters, it becomes an incredibly useful addition to any developer's toolkit.
That said, I might not have covered every single command or trick in this guide, I’m still learning myself!
If you have any tips, lesser-known commands, or cool use cases up your sleeve, feel free to share them in the comments.
I feel that this should be enough to get you started with Ollama, it’s not rocket science. My advice? Just fiddle around with it.
Try different commands, tweak the parameters, and experiment with its capabilities. That’s how I learned, and honestly, that’s the best way to get comfortable with any new tool.
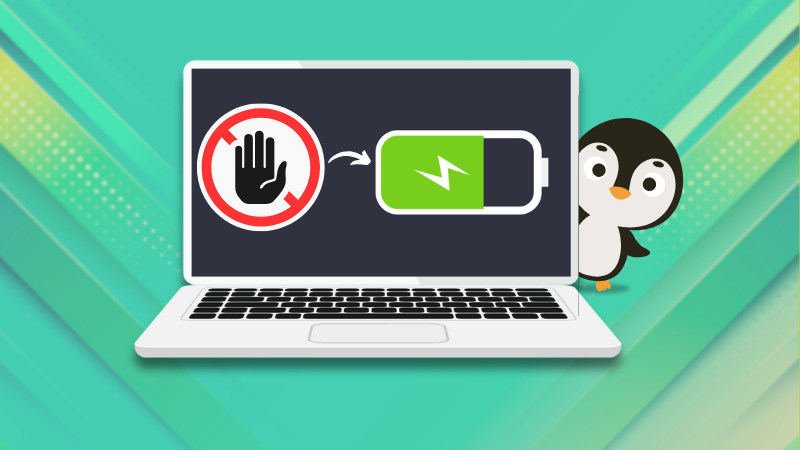
Keeping your laptop always plugged-in speeds up the deterioration of its battery life. But if you are using a docking station, you don't have the option to unplug the power cord.
And other Linux news, tips, and, of course, memes!
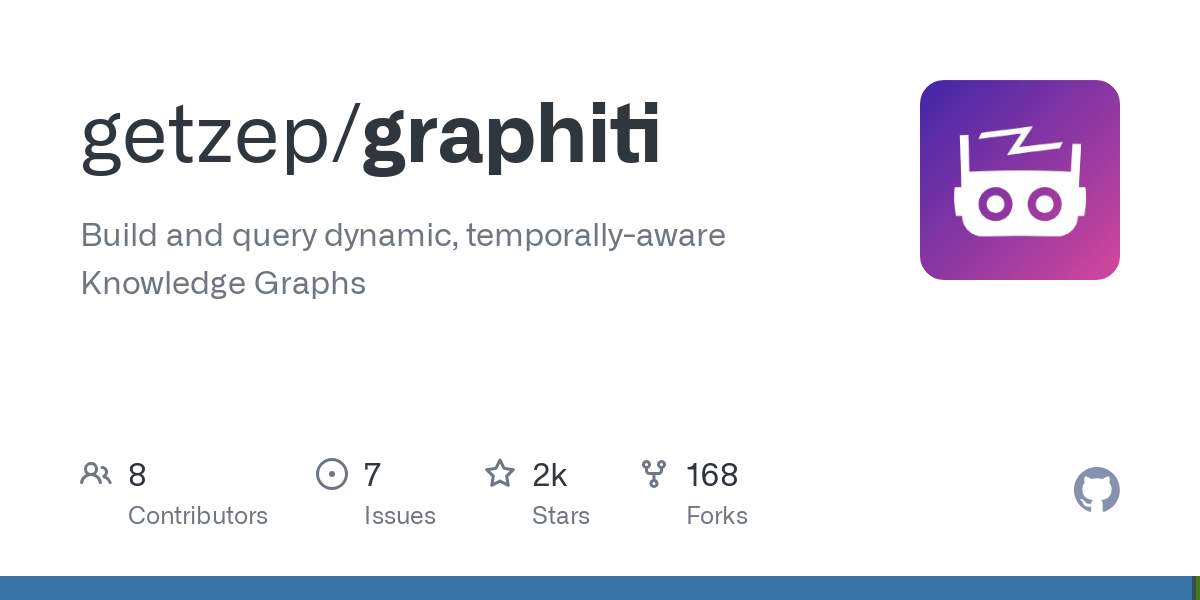
This edition of FOSS Weekly is supported byZep's Graphiti.
✨ Zep’s Graphiti – Open-Source Temporal Knowledge Graph for AI Agents
Traditional systems retrieve static documents, not evolving knowledge. Zep’s Graphiti is an open-source temporal knowledge graph that helps AI agents track conversations and structured data over time—enabling better memory, deeper context, and more accurate responses.
Built to evolve, Graphiti goes beyond static embeddings, powering AI that learns. Open-source, scalable, and ready to deploy.
Searching for files in Linux is synonymous to commands like find, xargs and grep. But not all of us Linux users are command line champs, right? Thankfully, even the file explorers like Nautilus have good search features.
On Brave, you can search the history/bookmarks/tabs etc. from the address bar. Simply type @ in the address bar and start searching.
🤣 Meme of the Week
Are you even a real Linux user if you aren't excited when you see a Penguin? 🐧🤔
🗓️ Tech Trivia
TRADIC, developed by Bell Labs in 1954, was one of the first transistorized computers. It used nearly 800 transistors, significantly reducing power consumption.
TRADIC operated on less than 100 watts, a fraction of what vacuum tube computers needed at that time. Initially, a prototype, it evolved into an airborne version for the U.S. Air Force. This innovation paved the way for future low-power computing systems.
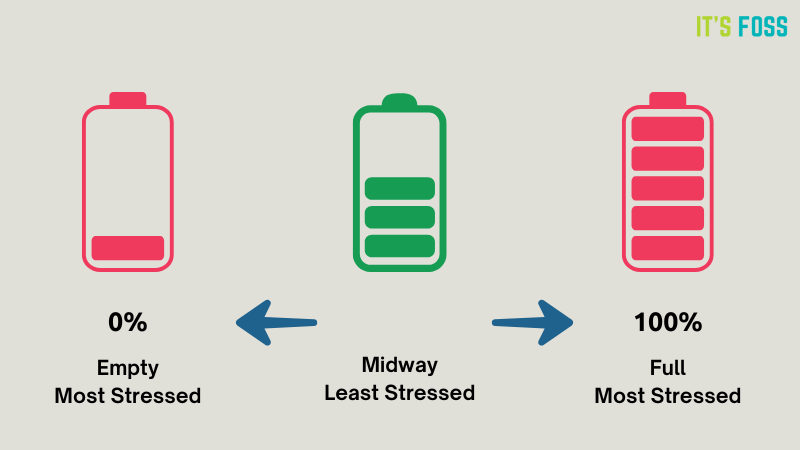
In case you didn't know it already, regularly charging the battery to 100% or fully discharging it puts your battery at stress and may lead to poor battery life in long run.
I am not making claims on my own. This is what the experts and even the computer manufactures tell you.
As you can see in the official Lenovo video above, continuous full charging and discharging accelerate the deterioration of battery health. They also tell you that the optimum battery charging range is 20-80%.
Although Lenovo also tells you that battery these days are made to last longer than your computer. Not sure what's their idea of an average computer lifespan, I would prefer to keep the battery life healthy for a longer period and thus extract a good performance from my laptop as long as it lives.
I mean, it's all about following the best practices, right?
Now, you could manually plug and unplug the power cord but it won't work if you are connected to a docking station or use a modern monitor to power your laptop.
What can you do in that case? Well, to control the battery charging on Linux, you have a few options:
KDE Plasma has this as an in-built feature. That's why KDE is ❤️
GNOME has extensions for this. Typical GNOME thing.
There are command line tools to limit battery charging levels. Typical Linux thing 😍
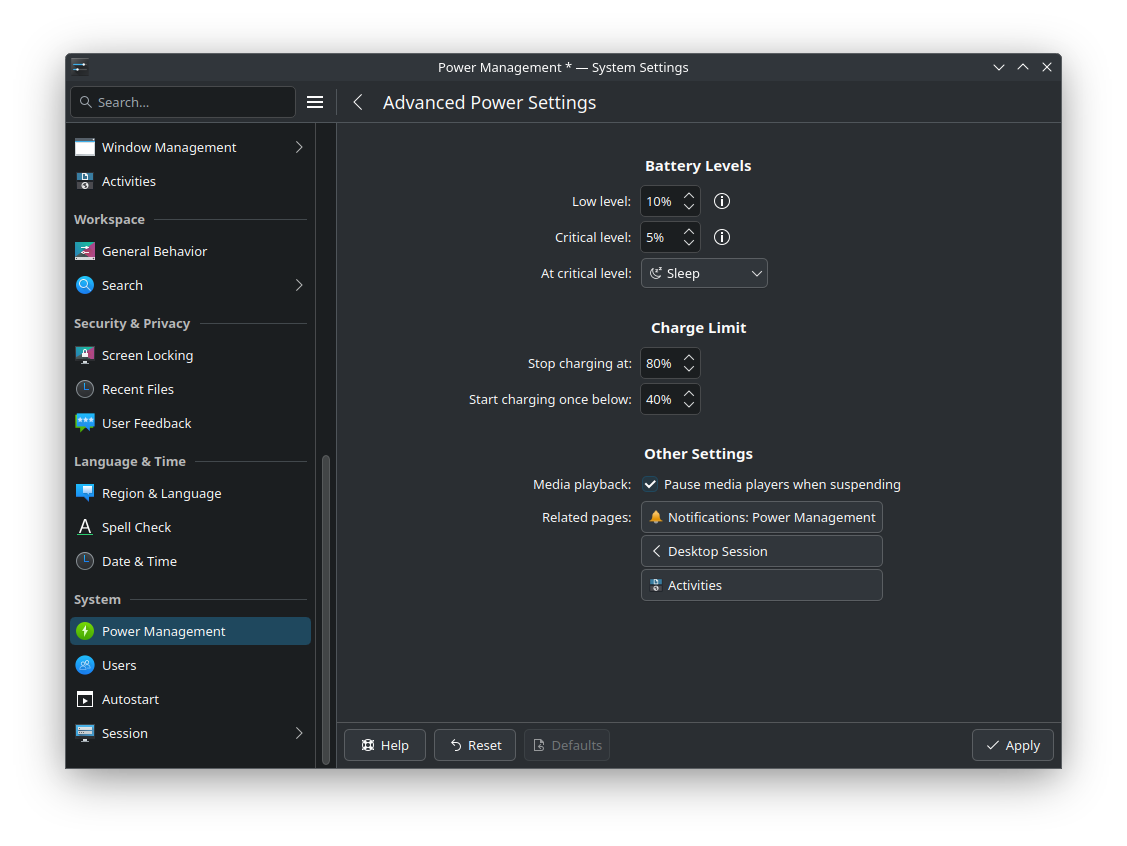
If you are using KDE Plasma desktop environment, all you have to do is to open the Settings app and go to Power Management. In the Advanced Power Settings, you'll see the battery levels settings.
I like that KDE informs the users about reduced battery life due to overcharging. It even sets the charging levels at 50-90% by default.
Of course, you can change the limit to something like 20-80. Although, I am not a fan of the lower 20% limit and I prefer 40-80% instead.
That's KDE for you. Always caring for its kusers.
💡
It is possible that the battery charging control feature may need to be enabled from the BIOS. Look for it under power management settings in BIOS.
Set battery charging limit in GNOME
Like most other things, GNOME users can achieve this by using a GNOME extension.
There is an extension called ThinkPad Battery Threshold for this purpose. Although it mentions ThinkPad everywhere, you don't need to own a Lenovo ThinkPad to use it.
From what I see, the command it runs should work for most, if not all, laptops from different manufacturers.
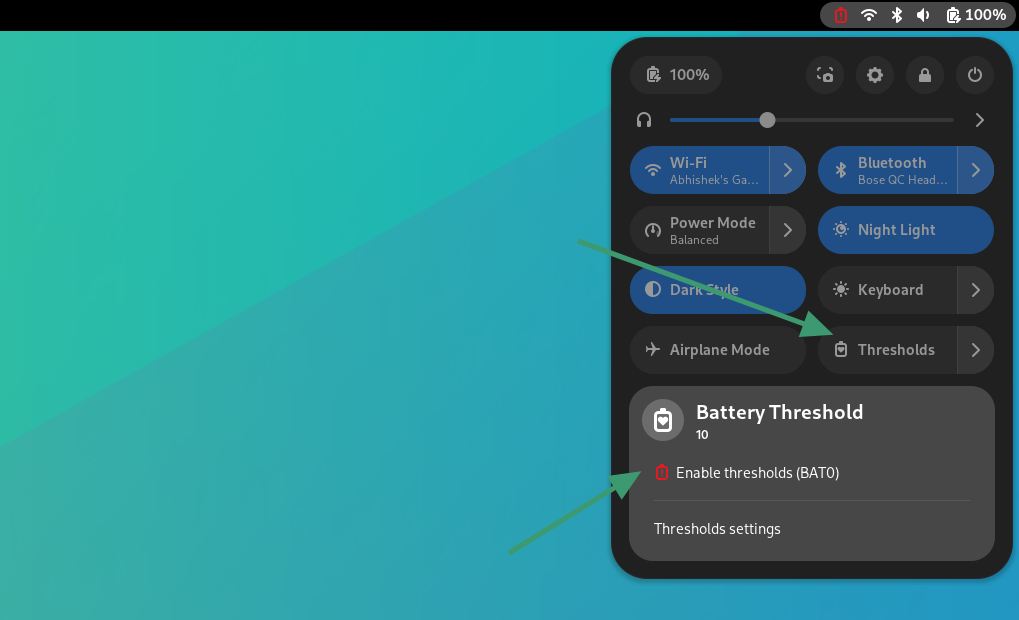
Once the extension is enabled, you can find it in the system tray. On the first run, it shows red exclamation mark because it is not enabled yet.
If you click on the Threshold settings, you will be presented with configuration options.
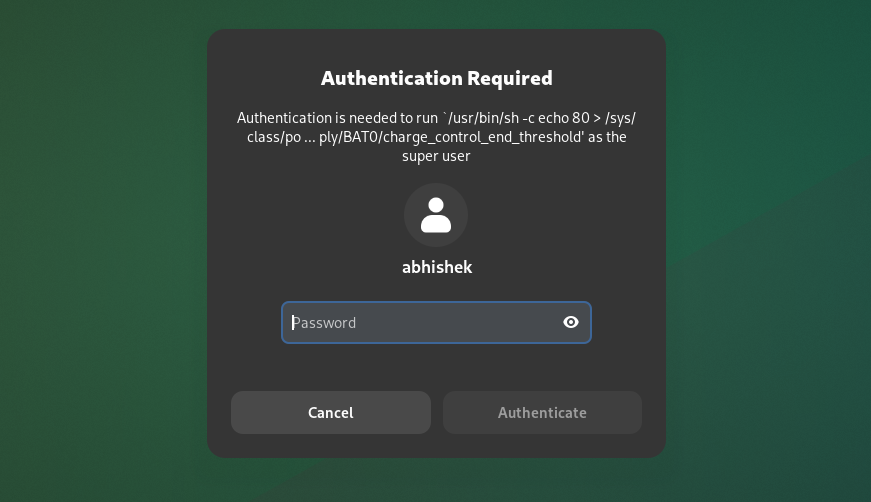
Once you have set the desired values, click on apply. Next, you'll have to click Enable thresholds. When you hit that, it will ask for your password.
At this screen, you can have a partial hint about the command it is going to run it.
📋
From what I experienced, while it does set an upper limit, it didn't set the lower limit for my Asus Zenbook. I'll check it on my Tuxedo laptop later. Meanwhile, if you try it on some other device, do share if it works for the lower charging limit as well.
Using command line to set battery charging thresholds
Here's the thing. For most laptops, there should be file(s) to control battery charging in /sys/class/power_supply/BAT0/ directory but the file names are not standard. It could be charge_control_end_threshold or charge_stop_threshold or something similar.
Also, you may have more than one battery. For most laptops, it will be BAT0 that is the main battery but you need to make sure of that.
Install the upower CLI tool on your distribution and then use this command:
upower --enumerate
It will show all the power devices present on the system:
You can also use tlp for this purpose by editing the /etc/tlp.conf file.
Conclusion
See, if you were getting 10 hours of average battery life on a new laptop, it is normal to expect it to be around 7-8 hours after two years. But if you leave it at full charge all the time, it may come down to 6 hours instead of 7-8 hours. The numbers are for example purpose.
This 20-80% range is what the industry recommends these days. On my Samsung Galaxy smartphone, there is a "Battery protection" setting to stop charging the device after 80% of the charge.
If you are someone interested in self-hosting, home automation, or just want to tinker with your Raspberry Pi, you have various options to get started.
But, if you are new, and want something easy to get you up to speed, CasaOS is what you can try.
CasaOS isn't your ordinary operating system. It is more like a conductor, bringing all your favorite self-hosted applications together under one roof.
Built around the Docker ecosystem, it simplifies the process of managing various services, apps, and smart devices from a browser-based dashboard.
CasaOS interface running on ZimaBoard
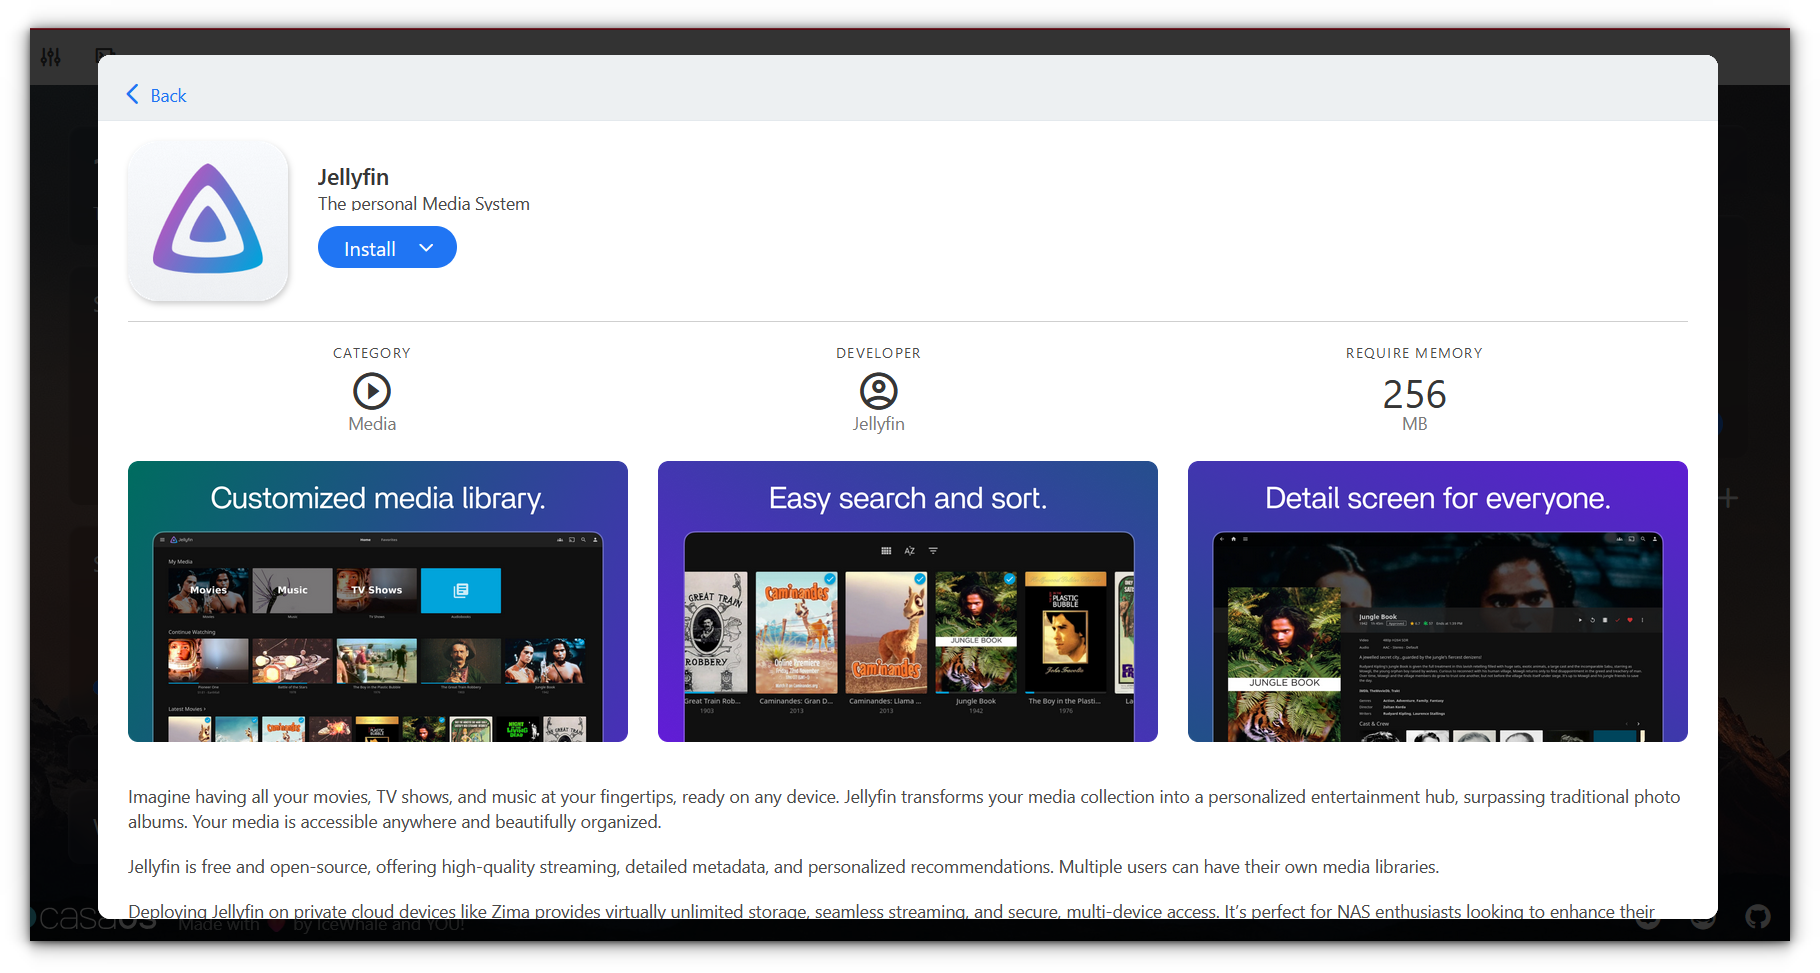
Originally developed by the makers of ZimaBoard, CasaOS makes the deployment of tools like Jellyfi, Plex, Immich, PhotoPrism a matter of a few clicks.
Let us find out more and explore how CasaOS can help can transform our simple Raspberry Pi into a powerful personal cloud.
What is CasaOS?
Think of CasaOS (Casa being "home" in Spanish) as a home for your Raspberry Pi or similar device.
It sits on top of your existing operating system, like Ubuntu or Raspberry Pi OS, and transforms it into a self-hosting machine.
CasaOS simplifies the process of installing and managing applications you'd typically run through Docker containers by blending the user-friendliness of docker management platform like Portainer.
It acts as the interface between you and your applications, providing a sleek, user-friendly dashboard that allows you to control everything from one place.
You can deploy various applications, including media servers like Jellyfin or file-sharing platforms like Nextcloud, all through its web-based interface.
Installing CasaOS on Raspberry Pi
Installing CasaOS on a Raspberry Pi is as easy as running a single bash script. But first, let’s make sure your Raspberry Pi is ready:
💡
Feeling a bit hesitant about running scripts? CasaOS offers a live demo on their website (username: casaos, password: casaos) to familiarize yourself with the interface before taking the plunge.
Ensure your Pi’s operating system is up-to-date by running the following commands:
sudo apt update && sudo apt upgrade -y
If you do not have curl installed already, install it by running:
sudo apt install curl -y
Now, grab the installation script from the official website and run it:
curl -fsSL https://get.casaos.io | sudo bash
Access the CasaOS web interface
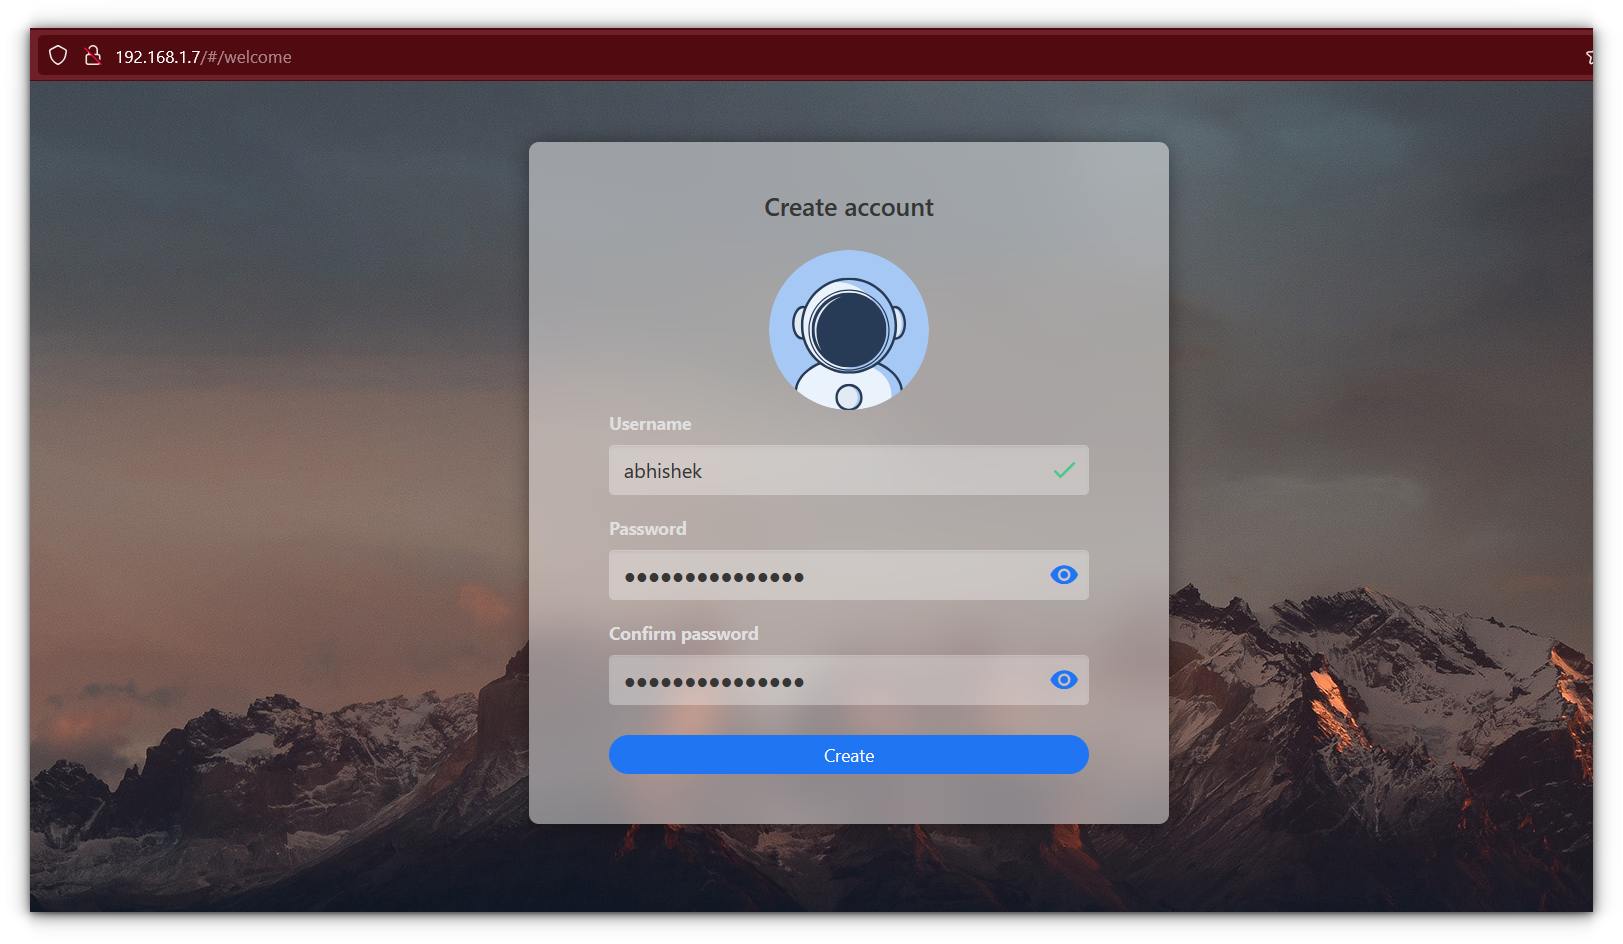
After the installation completes, you will receive the IP address in the terminal to access CasaOS from your web browser.
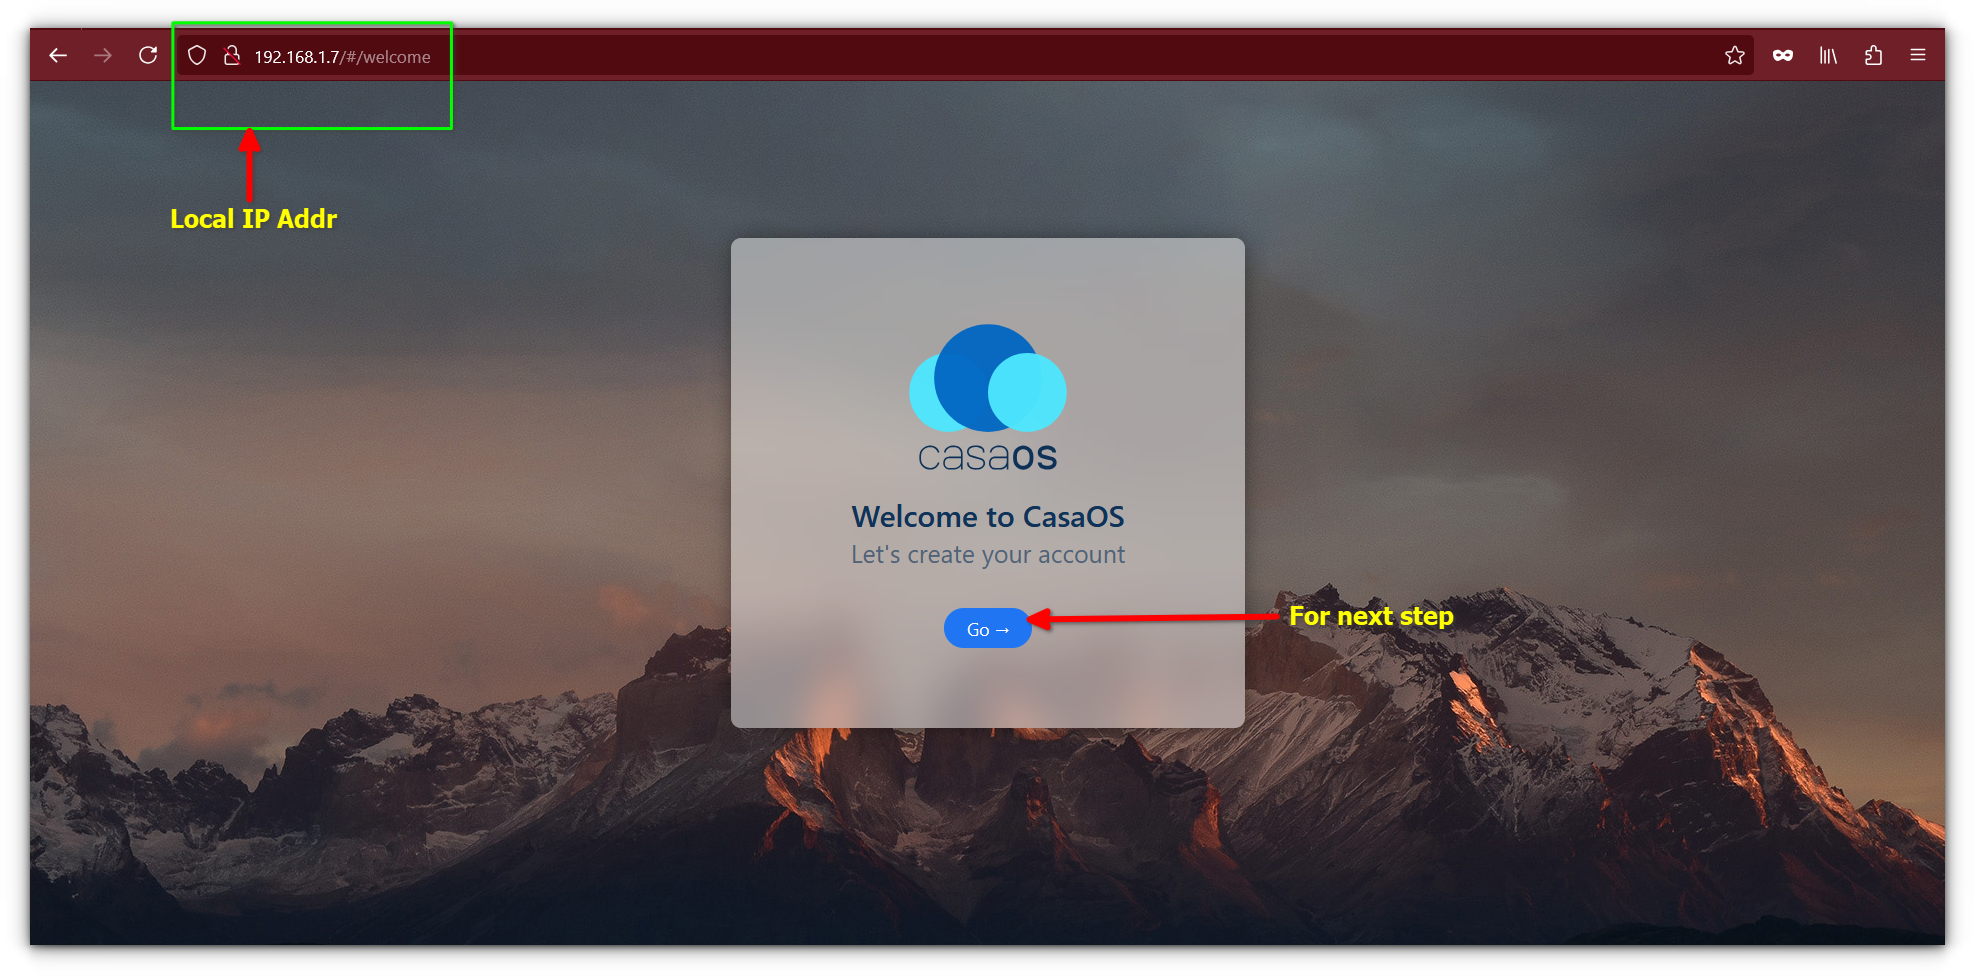
Simply type this address into your browser or if you are unsure type hostname -I on the Raspberry Pi to get your IP, and you will be greeted by the CasaOS welcome screen.
The initial setup process will guide you through creating an account and getting started with your personal cloud.
Getting Started
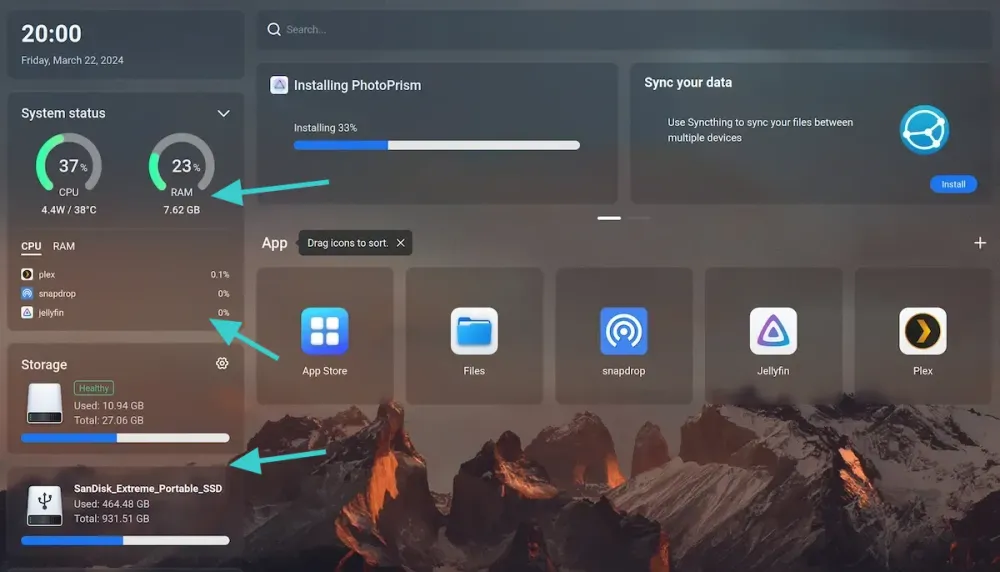
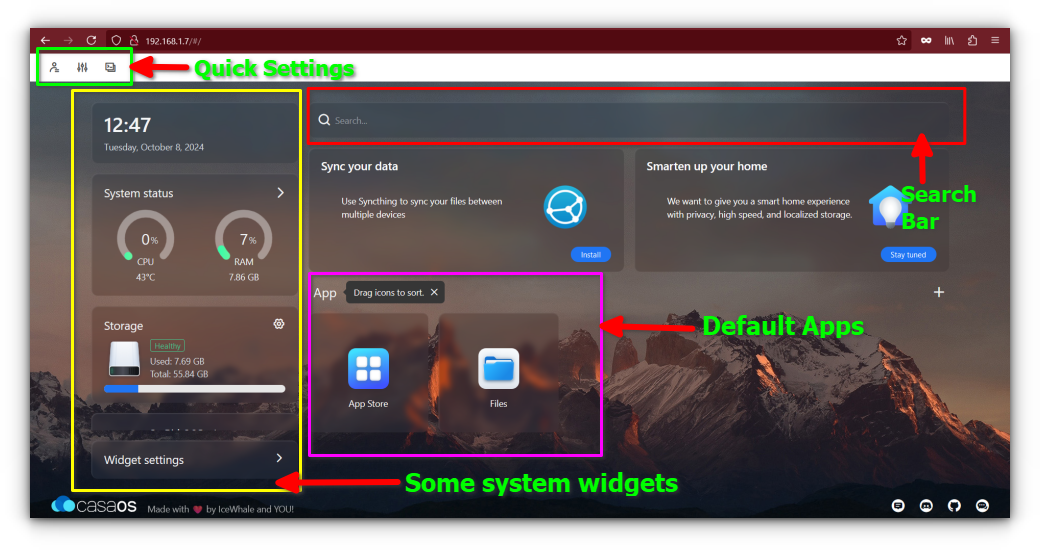
Once inside, CasaOS welcomes you with a clean, modern interface. You’ll see system stats like CPU usage, memory, and disk space upfront in widget-style panels.
There’s also a search bar for easy navigation, and at the heart of the dashboard lies the app drawer—your gateway to all installed and available applications.
CasaOS comes pre-installed with two main apps: Files and the App Store. While the Files app gives you easy access to local storage on your Raspberry Pi, the App Store is where the magic really happens.
From here, you can install various applications with just a few clicks.
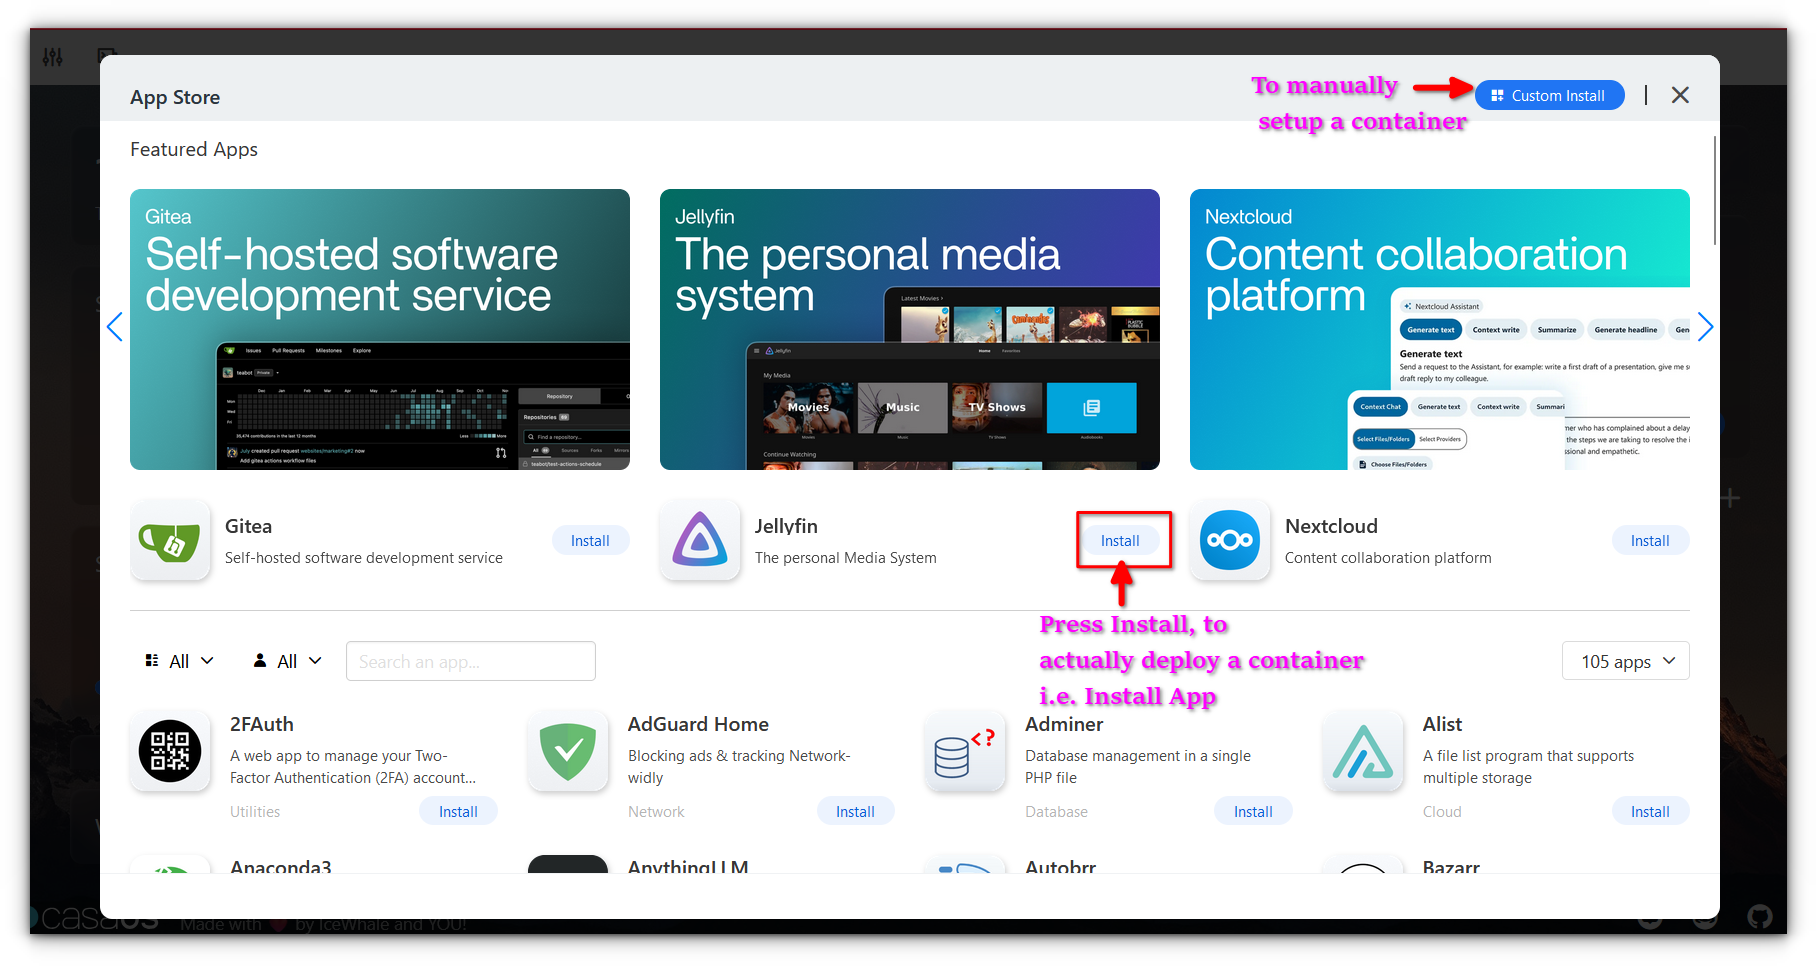
Exploring the magical app store
The App Store is one of the main attractions of CasaOS. It offers a curated selection of applications that can be deployed directly on your Pi with minimal effort.
Here’s how you can install an app:
Go to the app store
From the dashboard, click on the App Store icon.
Browse or search for an app
Scroll through the list of available apps or use the search bar to find what you’re looking for.
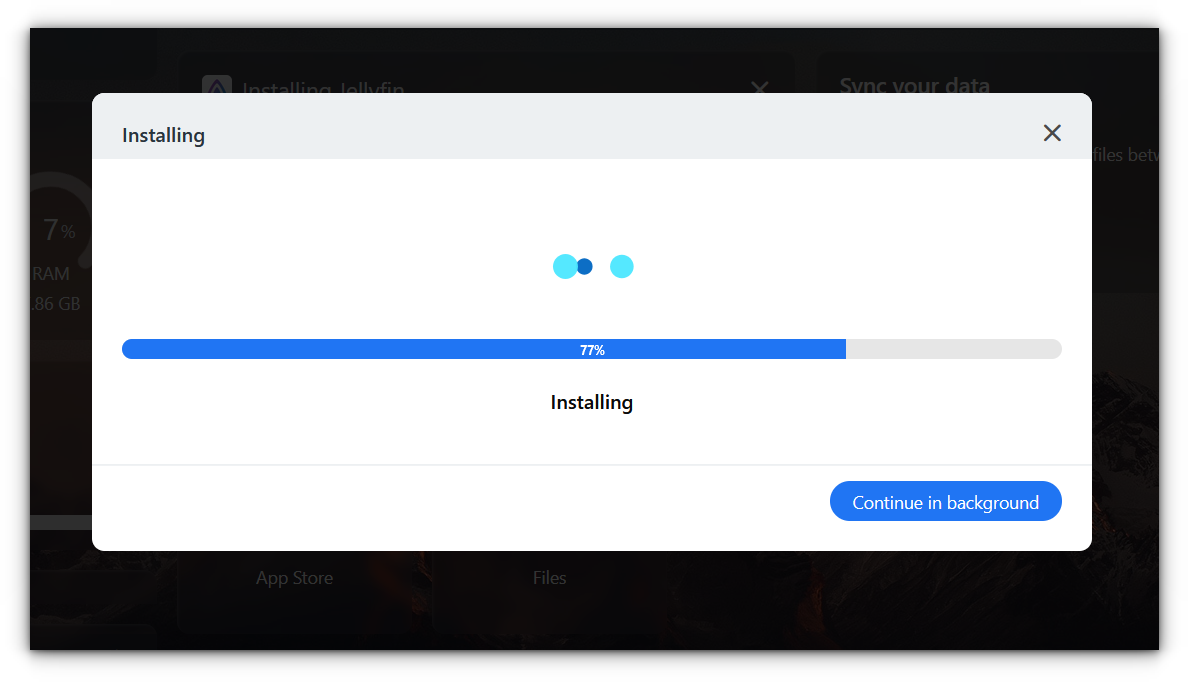
Click install
Once you find the app you want, simply click on the installation button, and CasaOS will handle the rest.
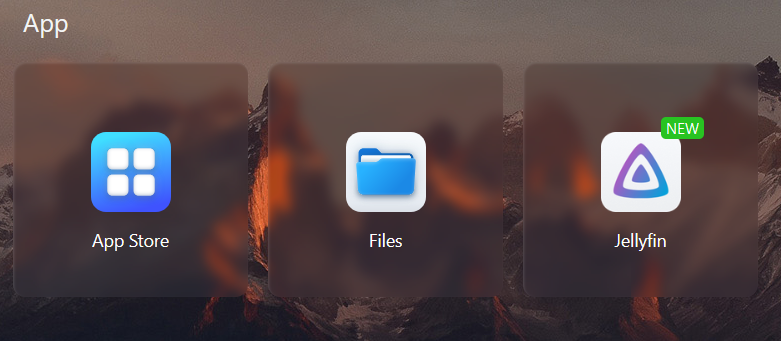
The app will appear in your app drawer once the installation is complete.
It is that simple.
💡
Container-level settings for the apps can be accessed by right clicking the app icon in the dashboard. It lets you map (docker volume) directories on the disk with the app. For example, if you are using Jellyfin, you should map your media folder in the Jellyfin (container) setting. You should see it in the later sections of this tutorial.
Access
Once you have installed applications in CasaOS, accessing them is straightforward, thanks to its intuitive design.
All you have to do is click on the Jellyfin icon, and it will automatically open up in a new browser window.
Each application you install behaves in a similar way, CasaOS takes care of the back-end configurations to make sure the apps are easily accessible through your browser.
No need to manually input IP addresses or ports, as CasaOS handles that for you.
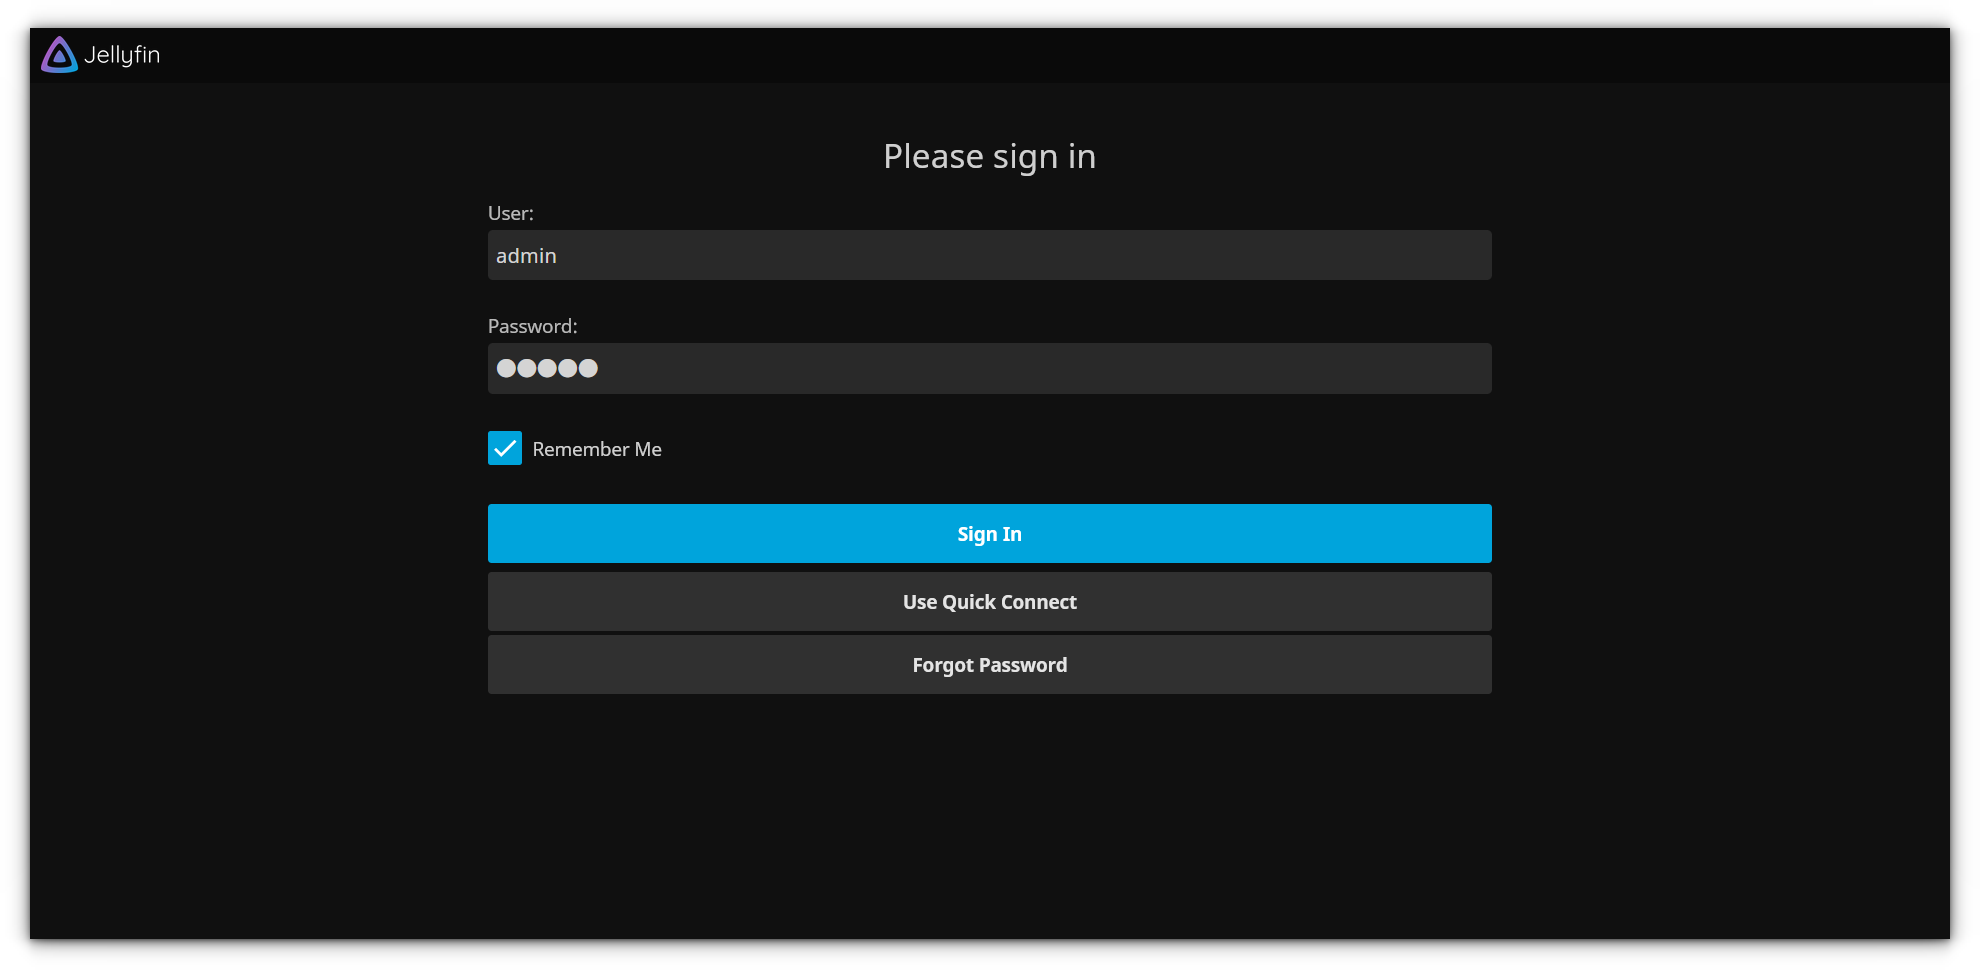
For applications like Jellyfin or any self-hosted service, you will likely need to log in with default credentials (which you can and should change after the first use).
In the case of Jellyfin, the default login credentials were:
Username:admin
Password:admin
Of course, CasaOS allows you to customize these credentials when setting up the app initially, and it's always a good idea to use something more secure.
My experience with CasaOS
For this article, I installed a few applications on CasaOS tailored to my homelab needs:
A custom Docker stack for hosting a WordPress site.
I spent a full week testing these services in my daily routine and jotted down some key takeaways, both good and bad.
While CasaOS offers a smooth experience overall, there are some quirks that require you to have Docker knowledge to work with them.
💡
I faced a few issues that were caused by mounting external drives and binding them to the CasaOS apps. I solved them by automounting an external disk.
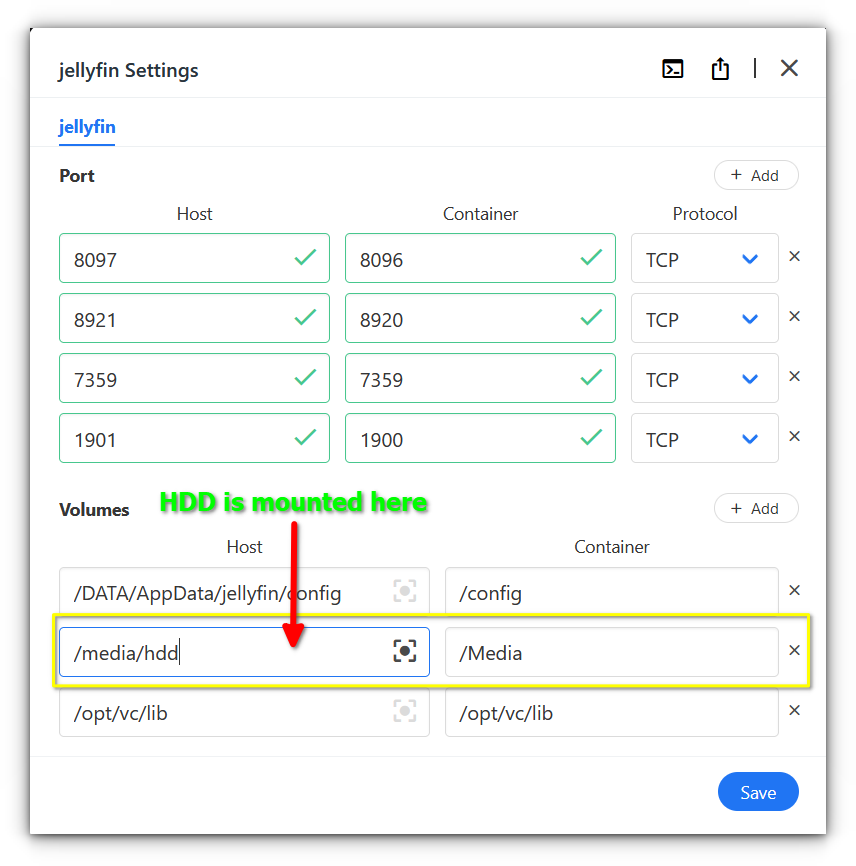
Jellyfin media server: Extra drive mount issue
When I first set up Jellyfin on day one, it worked well right out of the box. However, things got tricky once I added an extra drive for my media library.
I spent a good chunk of time managing permissions and binding volumes, which was definitely not beginner-friendly.
For someone new to Docker or CasaOS, the concept of binding volumes can be perplexing. You don’t just plug in the drive and expect it to work, it requires configuring how your media files will link to the Jellyfin container.
You need to edit thefstabfile if you want it to mount at the exact same location every time
Even after jumping through those hoops, it wasn’t smooth sailing. One evening, I accidentally turned off the Raspberry Pi.
When it booted back up, the additional drive wasn’t mounted automatically, and I had to go through the whole setup process again ☹️
So while Jellyfin works, managing external drives in CasaOS feels like it could be a headache for new users.
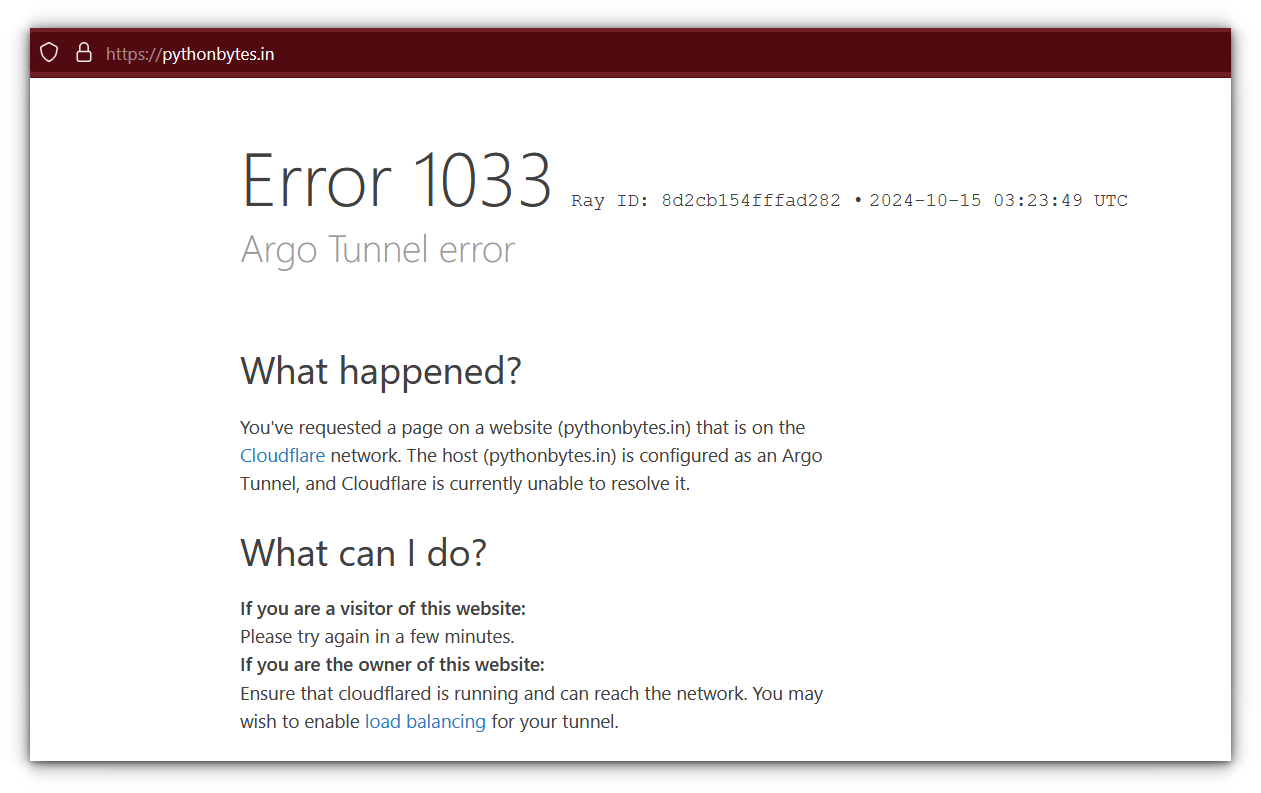
It was a bit of a mixed bag. For the most part, it worked fine, but there were brief periods where the connection was not working even if said that it was connected.
The connection would just drop unexpectedly, and I’d have to fiddle around with it to get things running again.
After doing some digging, I found out that the CLI tool for Cloudflare Tunnels had recently been updated, so that might’ve been the root of the issue.
Hopefully, it was a temporary glitch, but it is something to keep in mind if you rely on stable connections.
Transmission torrent Client: Jellyfin's Story Repeats
💡
The default username & password is casaos. The tooltip for some applications contain such information. You can also edit them and add notes for the application.
Transmission was solid for saving files locally, but as soon as I tried adding the extra drive to save files on my media library, I hit the same wall as with Jellyfin.
The permissions errors cropped up, and again, the auto-mount issue reared its head.
So, I would say it is fine for local use if you’re sticking to one drive, but if you plan to expand your storage, be ready for some trial and error.
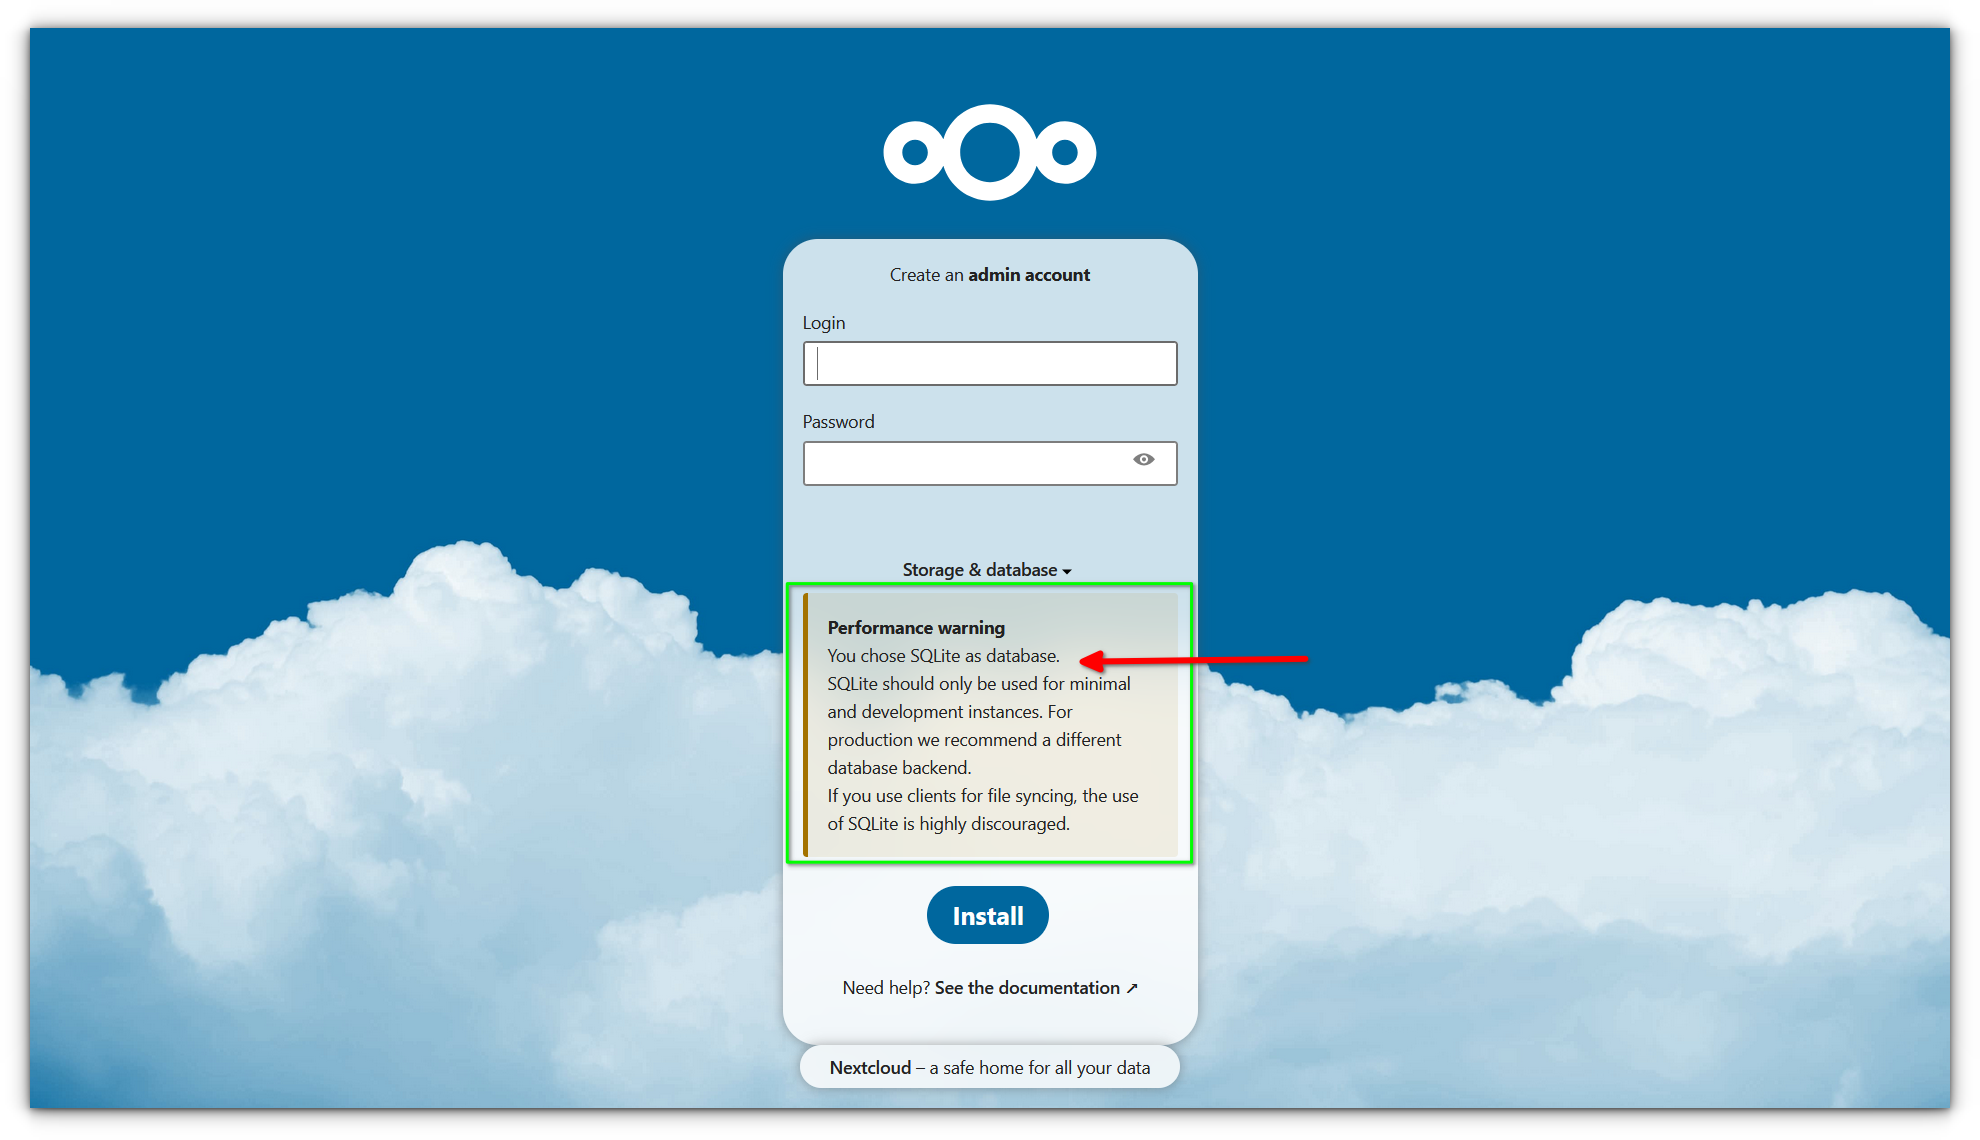
Nextcloud: Good enough but not perfect
Setting up a basic Nextcloud instance in CasaOS was surprisingly easy. It was a matter of clicking the install button, and within a few moments, I had my personal cloud up and running.
However, if you’re like me and care about how your data is organized and stored, there are a few things you’ll want to keep in mind.
When you first access your Nextcloud instance, it defaults to using SQLite as the database, which is fine for simple, small-scale setups.
But if you’re serious about storing larger files or managing multiple users, you’ll quickly realize that SQLite isn’t the best option. Nextcloud itself warns you that it’s not ideal for handling larger loads, and I would highly recommend setting up a proper MySQL or MariaDB database instead.
Doing so will give you more stability and performance in the long run, especially as your data grows.
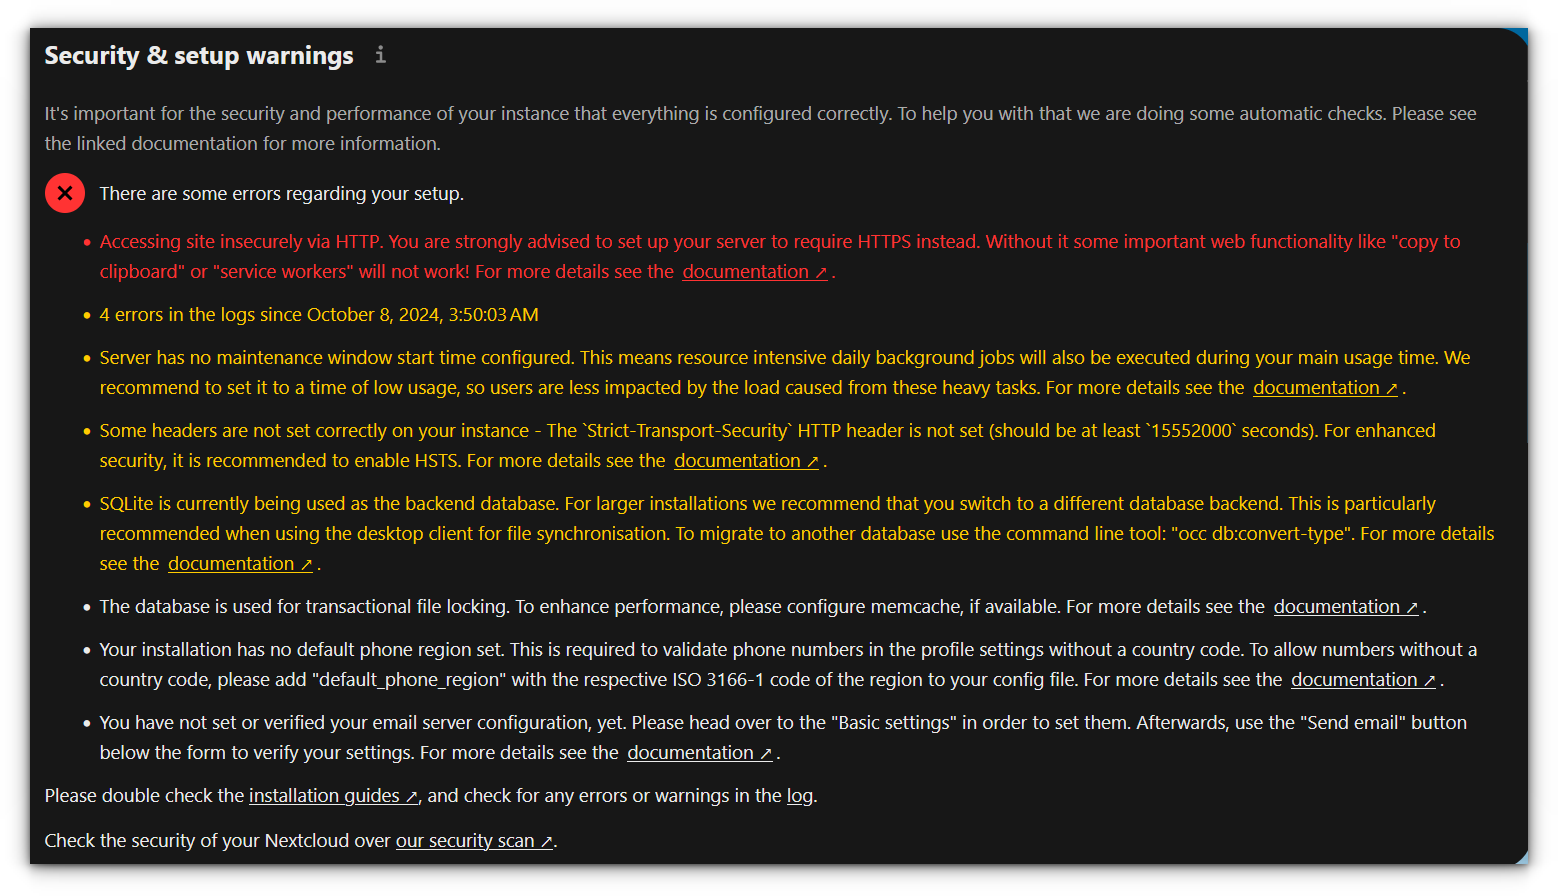
Beyond the database choice, I found that even after using the default setup, Nextcloud’s health checks flagged several issues.
For example, it complained about the lack of an HTTPS connection, which is crucial for secure file transfers.
If you want your Nextcloud instance to be properly configured and secure, you'll need to invest some time to set up things like:
Setting up secure SSL certificate
Optimizing your database
Handling other backend details that aren’t obvious to a new user.
So while Nextcloud is easy to get running initially, fine-tuning it for real-world use takes a bit of extra work, especially if you are focused on data integrity and security.
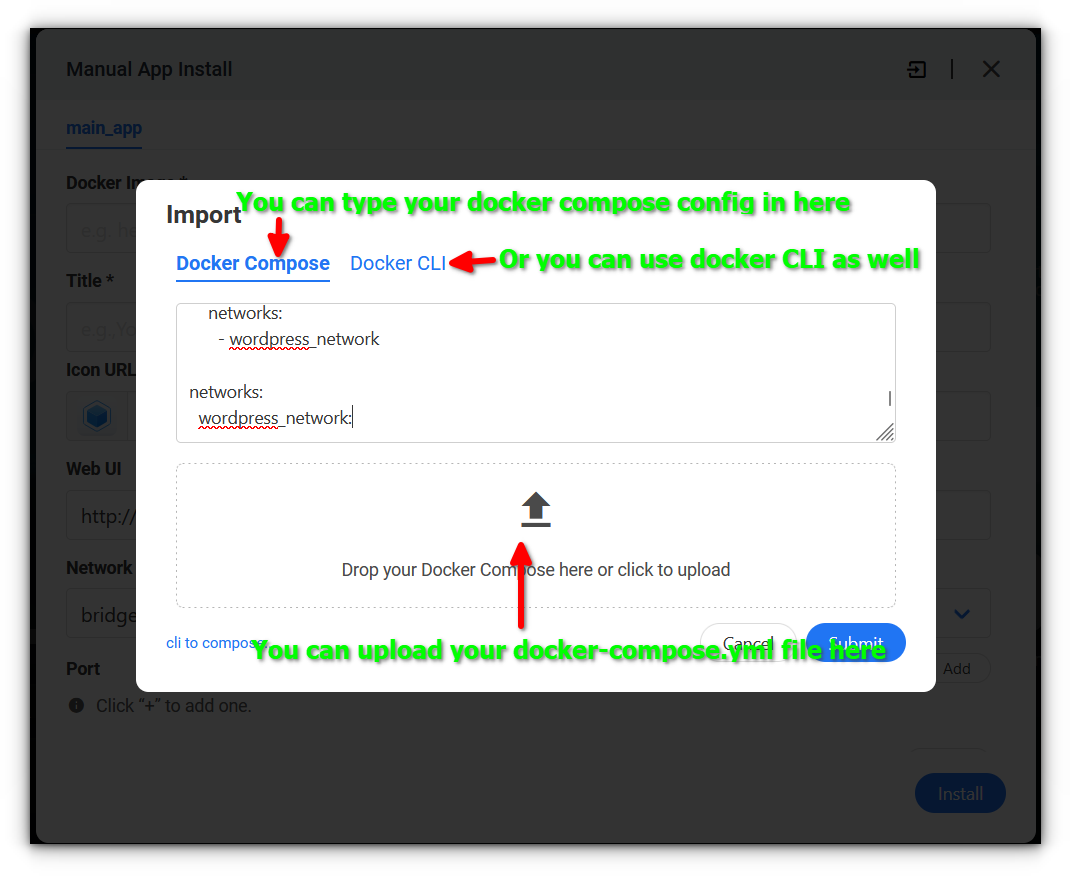
Custom WordPress stack: Good stuff!
Now, coming to the WordPress stack I manually added, this is where CasaOS pleasantly surprised me.
While I still prefer using Portainer to manage my custom Docker stacks, I have to admit that CasaOS has put in great effort to make the process intuitive.
It is clear they’ve thought about users who want to deploy their own stacks using Docker Compose files or Docker commands.
Adding the stack was simple, and the CasaOS interface made it relatively easy to navigate.
Final thoughts
After using CasaOS for several days, I can confidently say it’s a tool with immense potential. The ease of deploying apps like Jellyfin and Nextcloud makes it a breeze for users who want a no-hassle, self-hosted solution.
However, CasaOS is not perfect yet. The app store, while growing, feels limited, and those looking for a more customizable experience may find the lack of advanced Docker controls frustrating at first.
That said, CasaOS succeeds in making Docker and self-hosting more accessible to the masses.
For homelab enthusiasts like me, it is a great middle ground between the complexity of Docker CLI and the bloated nature of full-blown home automation systems.
Whether you are a newcomer or a seasoned tinker, CasaOS is worth checking out, if you are not afraid to deal with a few bumps along the way.