Tampilkan postingan dengan label It's FOSSIT Foss. Tampilkan semua postingan

Sabtu, 17 Mei 2025

Automatically Format Code On File Save in Visual Studio Code

Automatically Format Code On File Save in Visual Studio Code

Manually formatting code can be tedious, especially in fast-paced or collaborative development environments.

While consistent formatting is essential for readability and maintainability, doing it by hand slows you down and sometimes leads to inconsistent results across a project.

In this article, I’ll walk you through the steps to configure Visual Studio Code to automatically format your code each time you save a file.

We'll use the VS Code extension called Prettier, one of the most widely adopted tools for enforcing code style in JavaScript, TypeScript, and many other languages.

By the end of this guide, you'll have a setup that keeps your code clean with zero extra effort.

Step 1: Install Prettier extension in VS Code

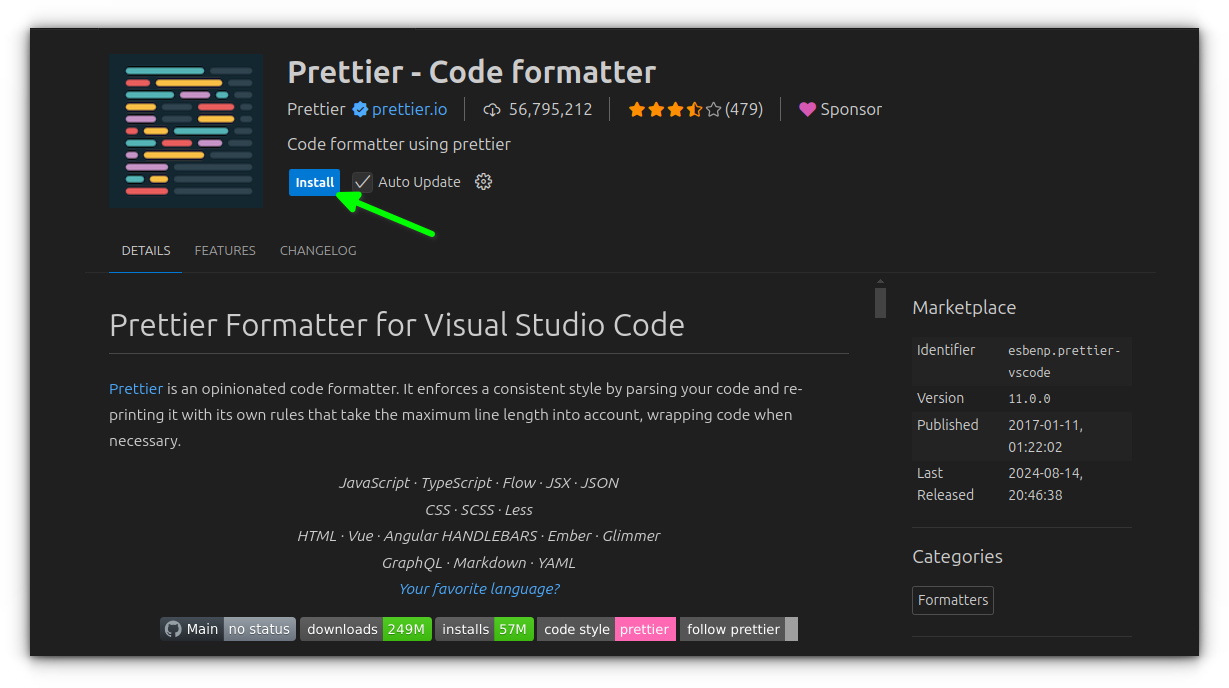
To start, you'll need the Prettier - Code Formatter extension. This tool supports JavaScript, TypeScript, HTML, CSS, React, Vue, and more.

Open VS Code, go to the Extensions sidebar (or press Ctrl + Shift + X), and search for Prettier.

Click on Install and reload VS Code if prompted.

Automatically Format Code On File Save in Visual Studio Code

Step 2: Enable format on save

Now that Prettier is installed, let’s make it run automatically whenever you save a file.

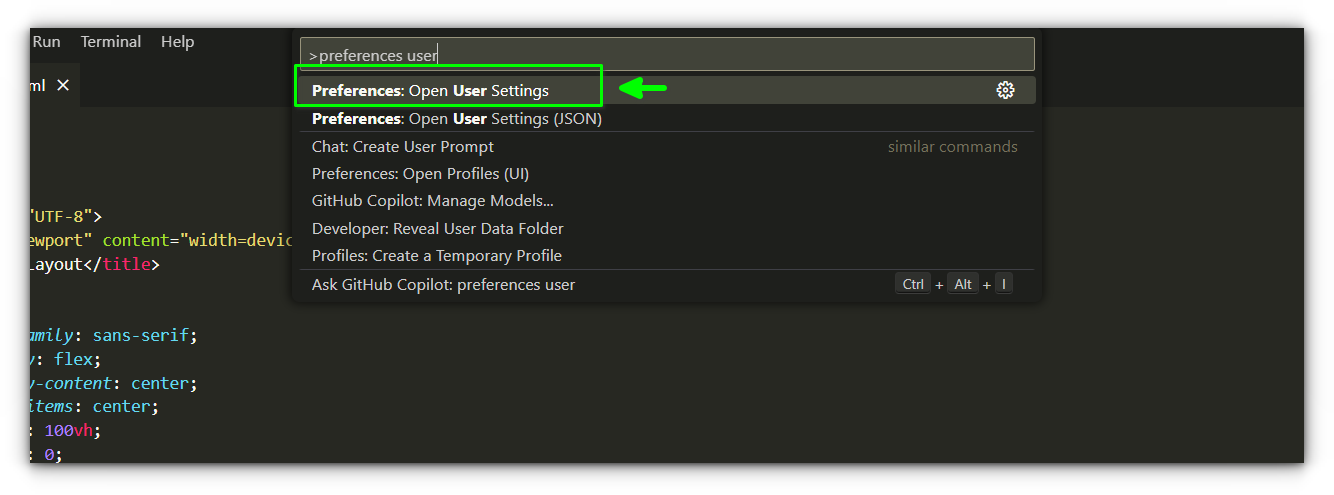
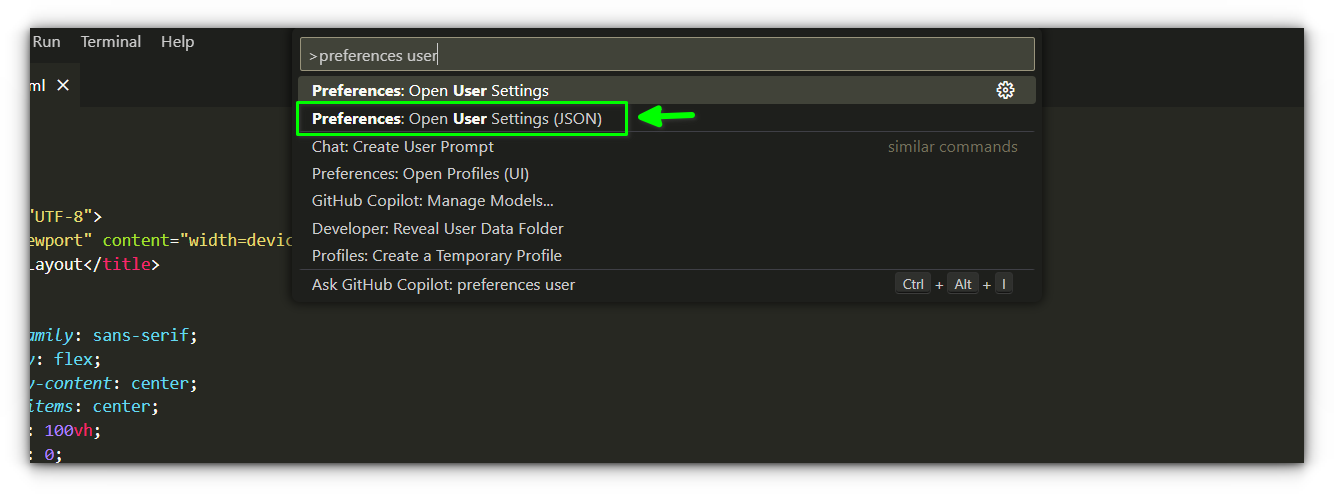
Open Settings via Ctrl + , or by going to File > Preferences > Settings.

Automatically Format Code On File Save in Visual Studio Code

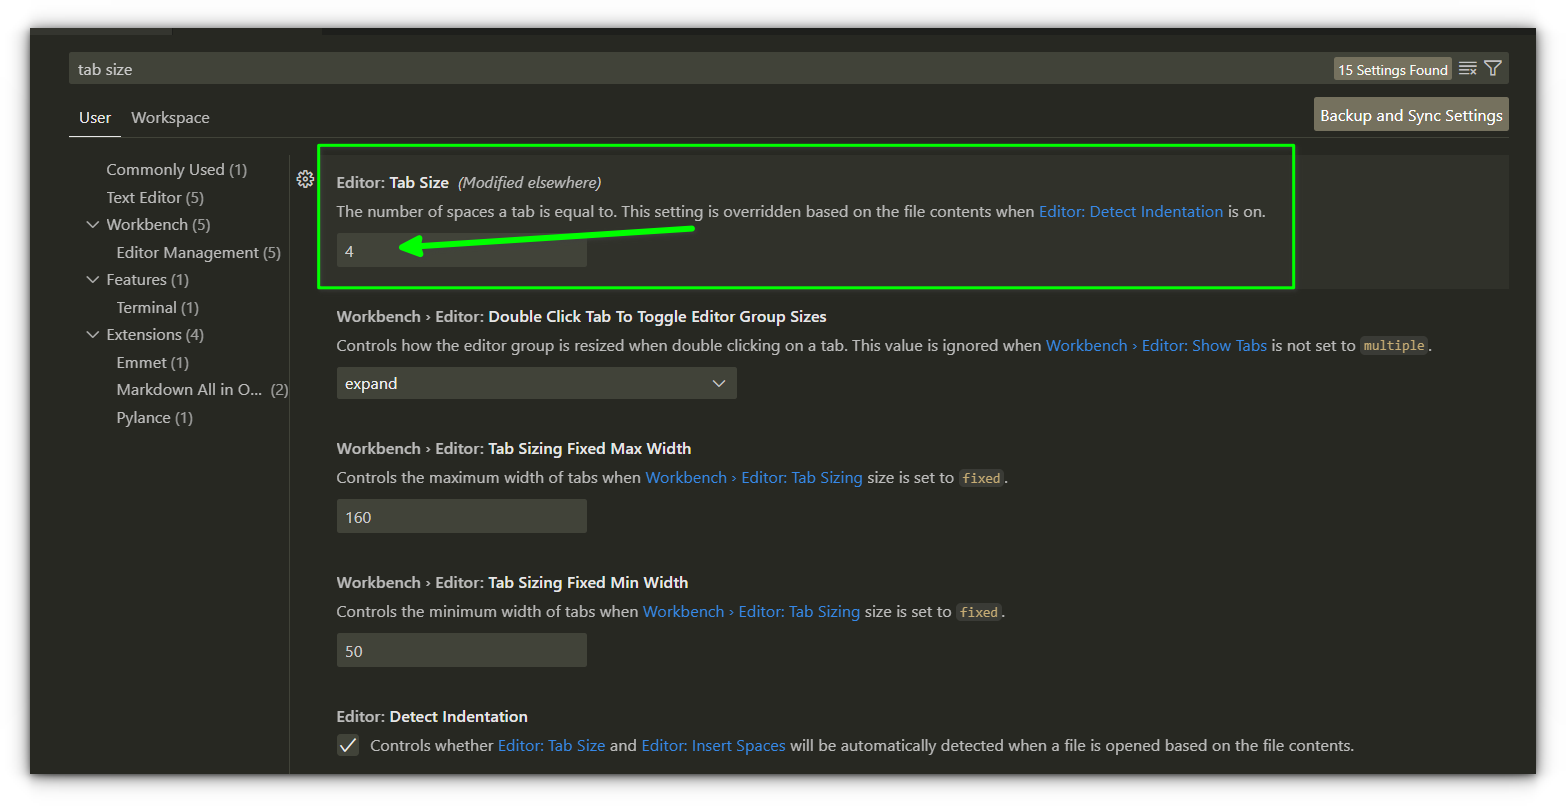
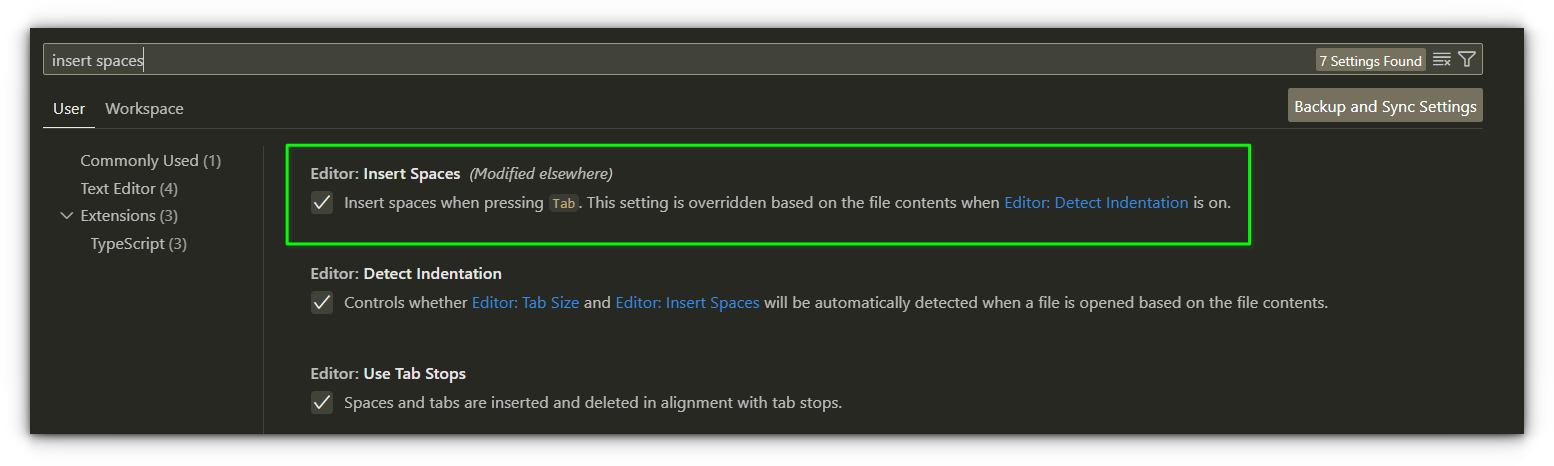
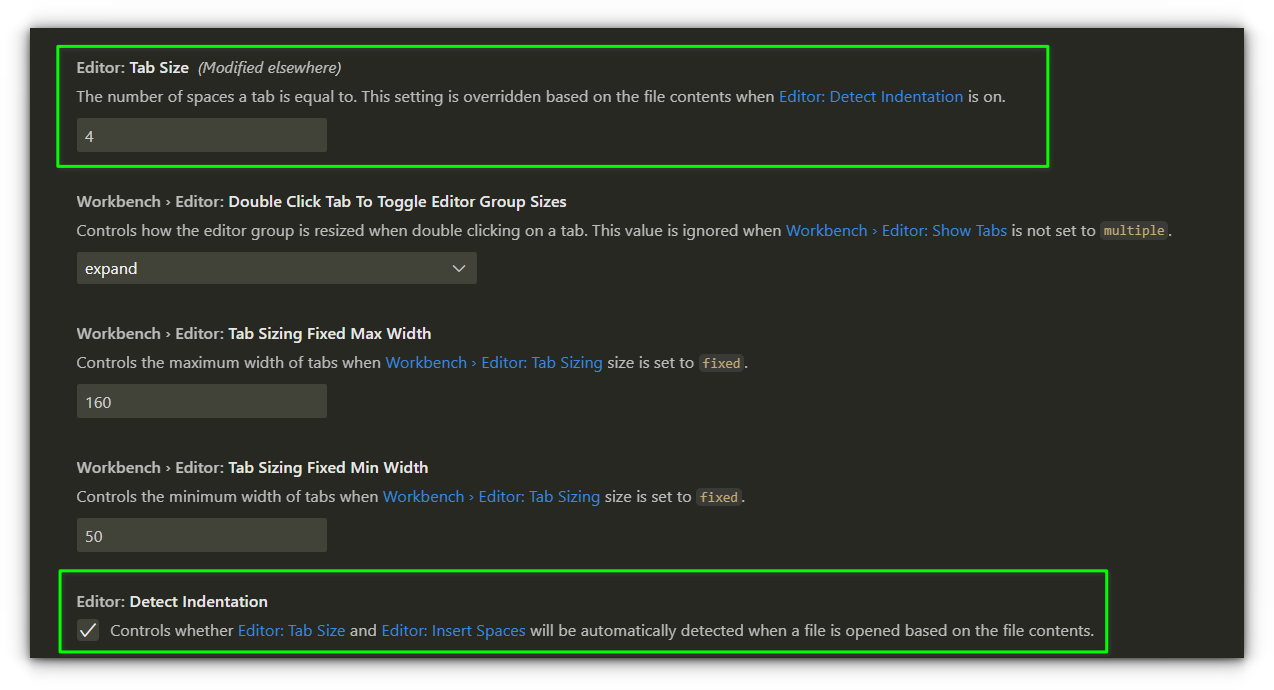
In the search bar at the top, type format on save and then Check the box for Editor: Format On Save.

Automatically Format Code On File Save in Visual Studio Code

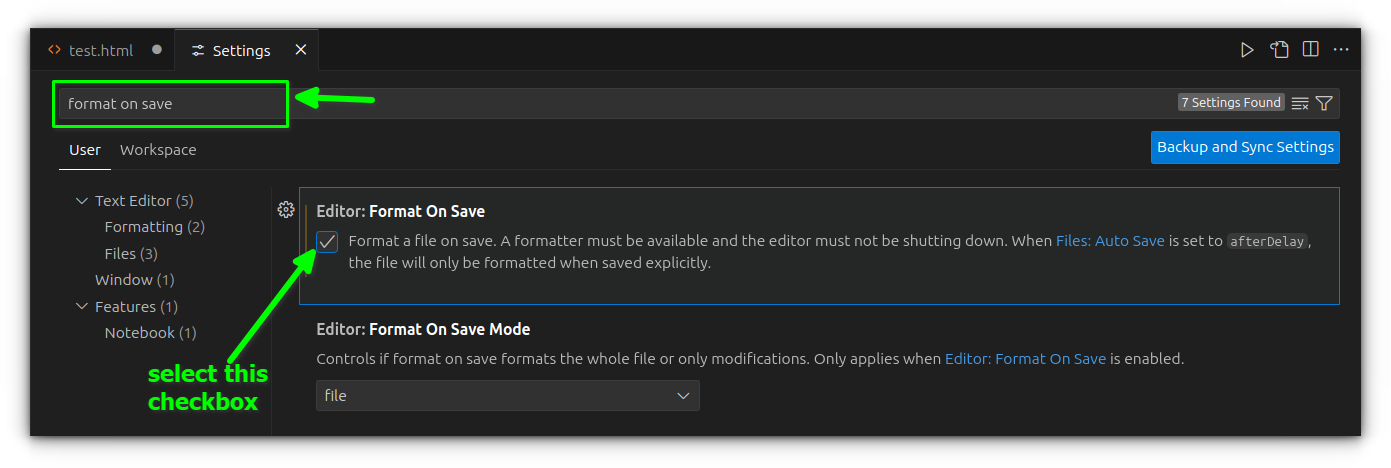
This tells VS Code to auto-format your code whenever you save a file, but that’s only part of the setup.

Troubleshooting

If saving a file doesn’t automatically format your code, it’s likely due to multiple formatters being installed in VS Code. Here’s how to make sure Prettier is set as the default:

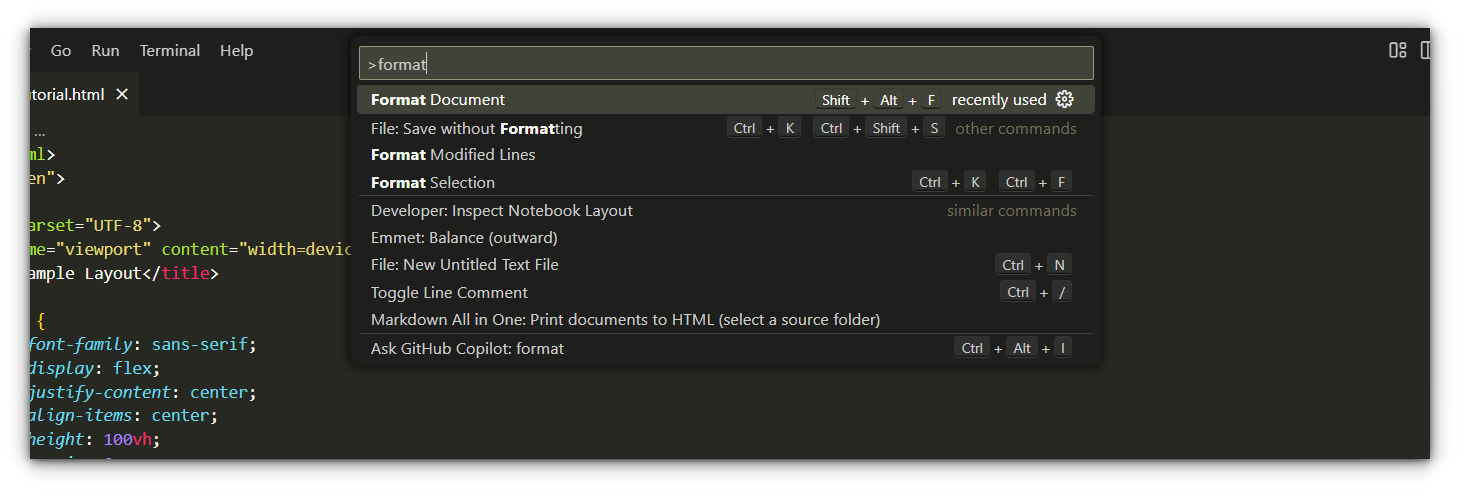
  • Open any file in VS Code and press
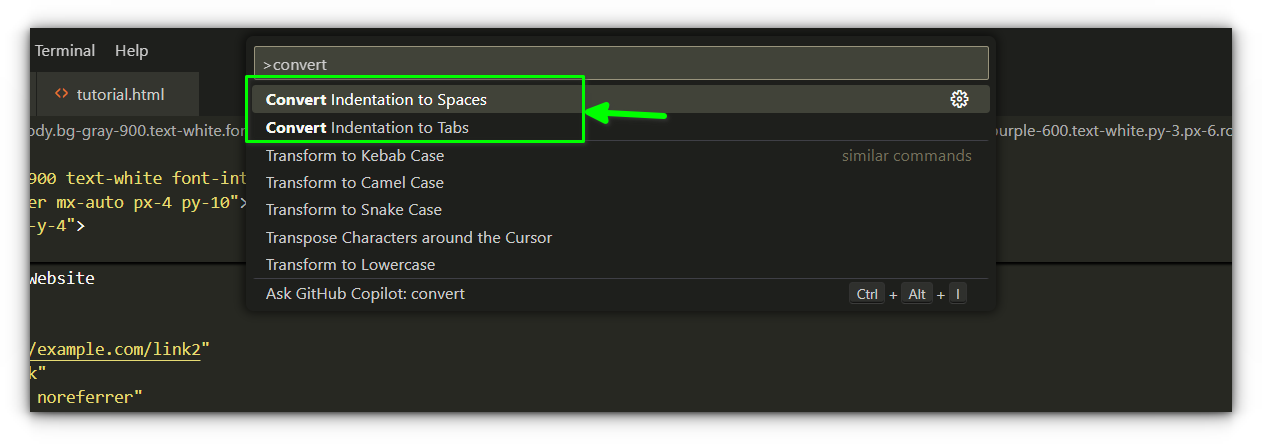
 Ctrl + Shift + P (or Cmd + Shift + P on Mac) to bring up the Command Palette.
  • Type “Format Document” and select the option that appears.
Automatically Format Code On File Save in Visual Studio Code
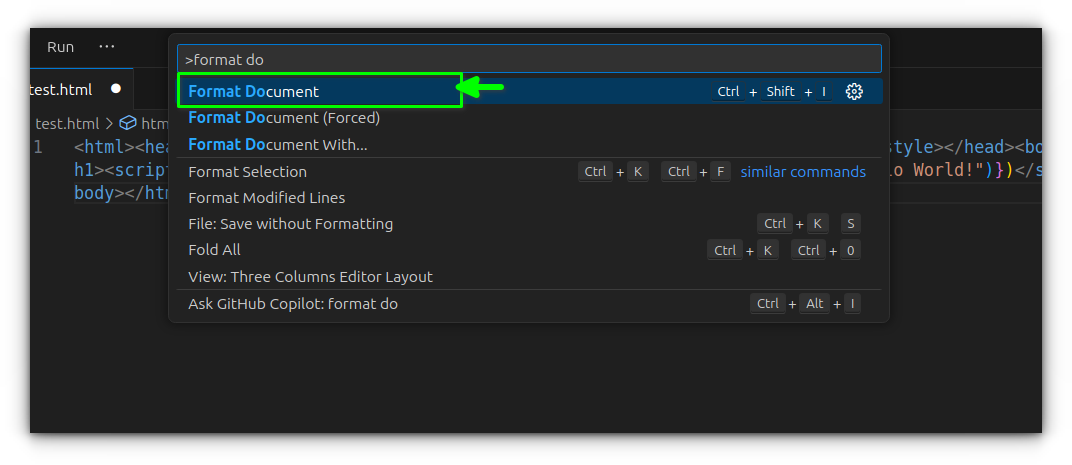
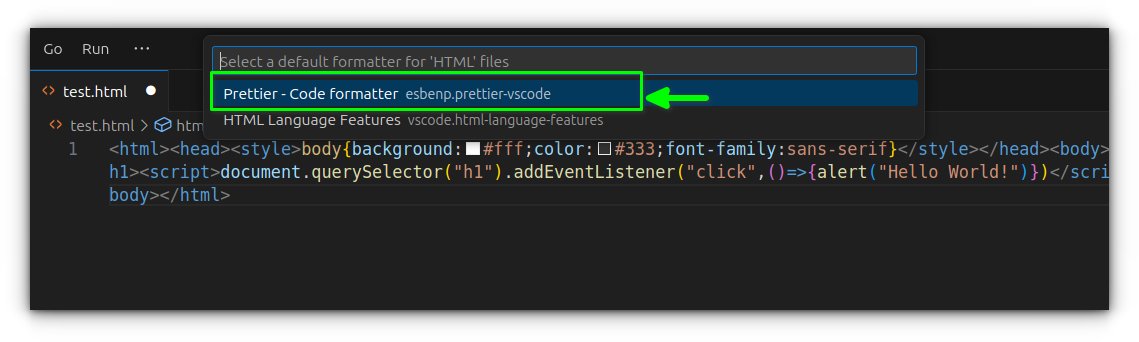
  • If multiple formatters are available, VS Code will prompt you to choose one.
Automatically Format Code On File Save in Visual Studio Code
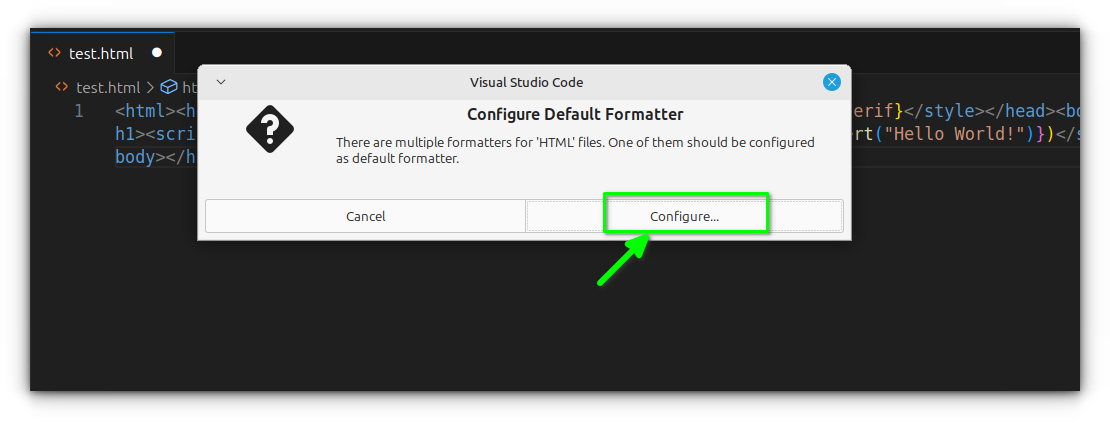
  • Select “Prettier - Code formatter” from the list.
Automatically Format Code On File Save in Visual Studio Code

Now try saving your file again. If Prettier is correctly selected, it should instantly reformat the code on save.

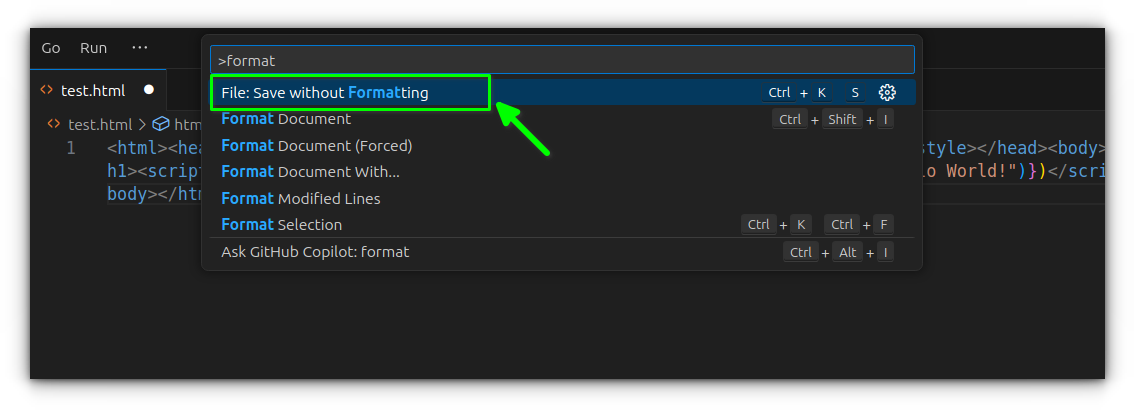
In some cases, you might want to save a file without applying formatting, for example, when working with generated code or temporary formatting quirks. To do that, open the Command Palette again and run “Save Without Formatting.”

Automatically Format Code On File Save in Visual Studio Code

Optional: Advanced configuration

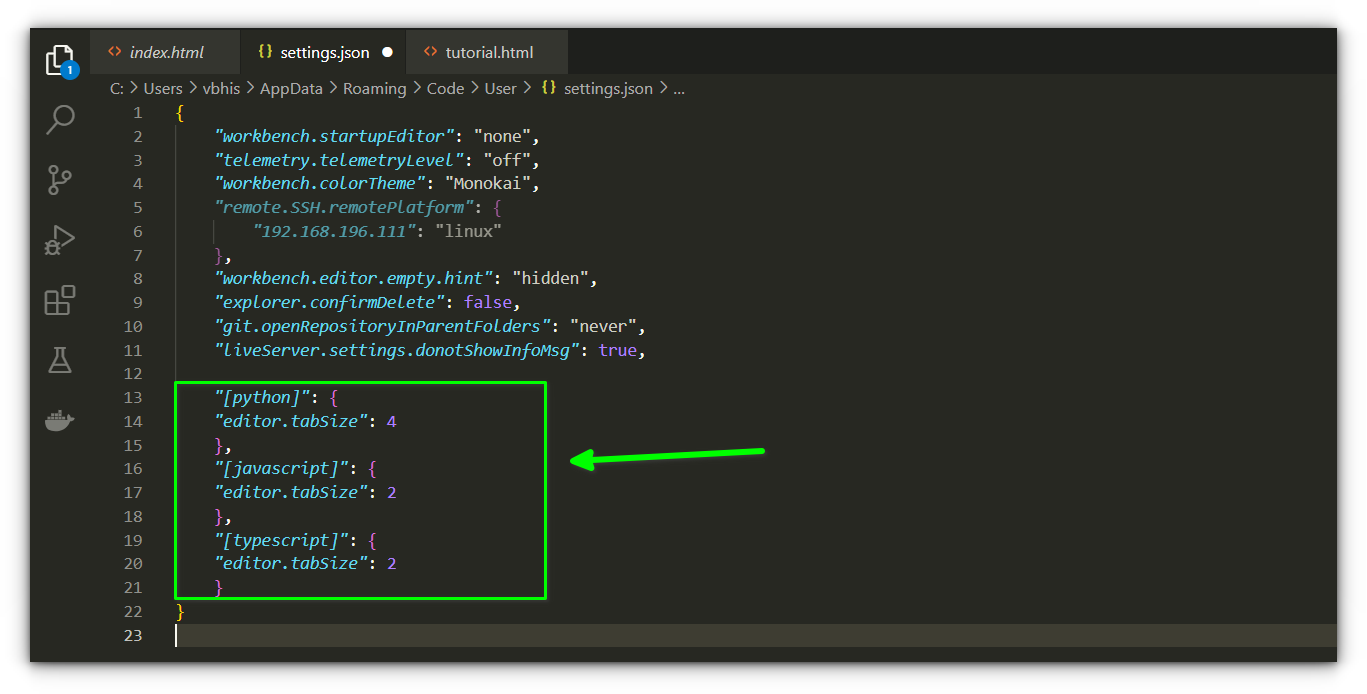
Prettier works well out of the box, but you can customize how it formats your code by adding a .prettierrc configuration file at the root of your project.

Here’s a simple example:

{
  "singleQuote": true,
  "trailingComma": "es5",
  "semi": false
}

This configuration tells Prettier to use single quotes, add trailing commas where valid in ES5 (like in objects and arrays), and omit semicolons at the end of statements.

There are many other options available such as adjusting print width, tab width, or controlling how JSX and HTML are handled.

You can find the full list of supported options in Prettier’s documentation, but for most projects, a few key settings in .prettierrc go a long way.

Try It Out

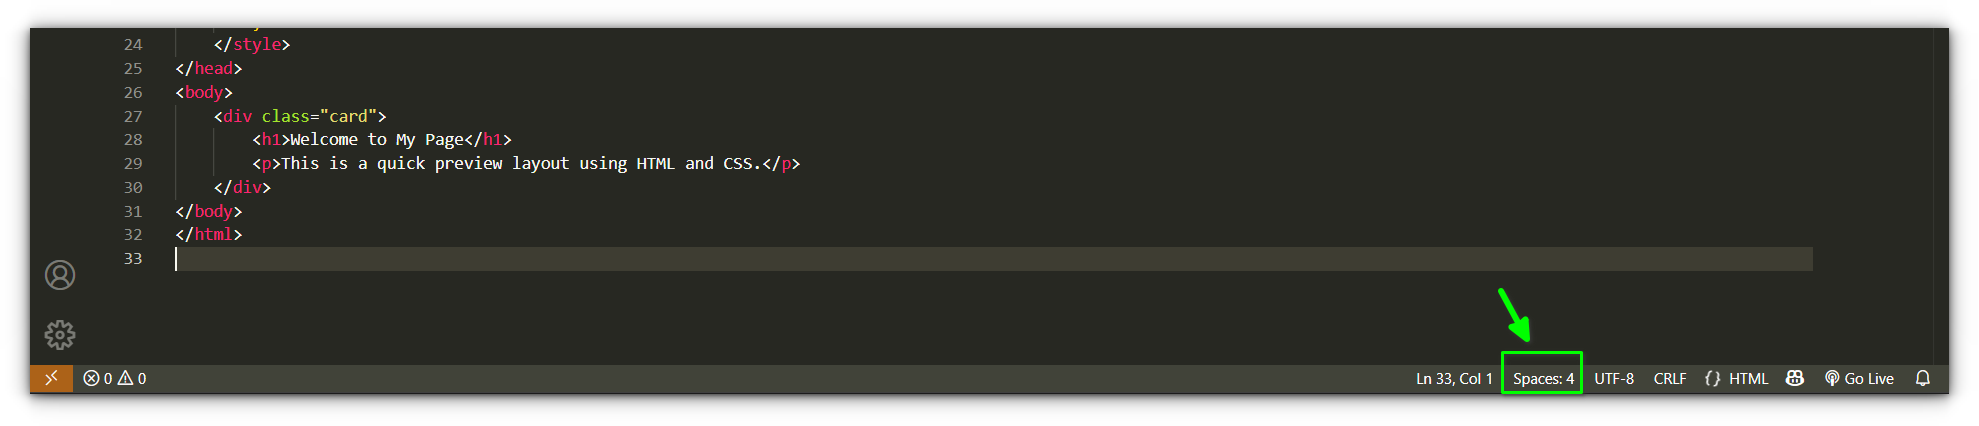
Create or open any file, JavaScript, TypeScript, HTML, etc. Add some poorly formatted code.

<html><head><style>body{background:#fff;color:#333;font-family:sans-serif}</style></head><body><h1>Hello</h1><script>document.querySelector("h1").addEventListener("click",()=>{alert("Hello World!")})</script></body></html>
Automatically Format Code On File Save in Visual Studio Code

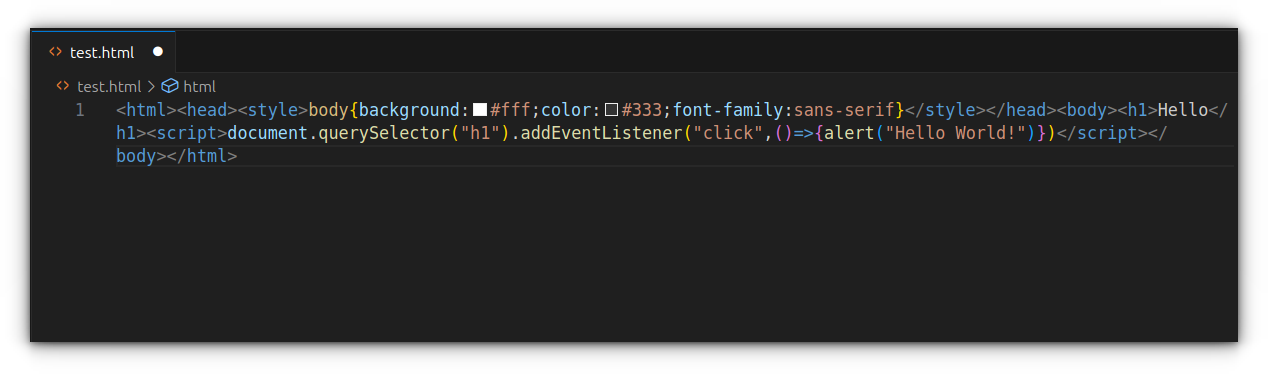
Then simply save the file (Ctrl + S or Cmd + S), and watch Prettier instantly clean it up.

Automatically Format Code On File Save in Visual Studio Code

As you can see, Prettier neatly indents and spaces each part of the html code, even across different embedded languages.

Wrapping Up

It doesn't matter if you are vibe coding or doing everything on your own, proper formatting is a sign of writing good code.

We’ve already covered the fundamentals of writing clean, consistent code - indentation, spacing, and word wrap, and automatic formatting builds directly on top of those fundamentals.

Once configured, it removes the need to think about structure while coding, letting you focus on the logic.

If you're also wondering how to actually run JavaScript or HTML inside VS Code, we've covered that as well, so check those guides if you're setting up your workflow from scratch.

If you’re not already using automatic formatting, it’s worth making part of your workflow.

And if you use a different tool or approach, I’d be interested to hear how you’ve set it up, let us know in the comments. 🧑‍💻


from It's FOSS https://ift.tt/10LxOt5
via IFTTT

Jumat, 16 Mei 2025

Play With Words in Linux Terminal With This Bookmark Inspired Game

Play With Words in Linux Terminal With This Bookmark Inspired Game

Sausage is a word forming game, inspired by the classic Bookworm. Written in bash script, you can use it on any Linux distribution.

Play With Words in Linux Terminal With This Bookmark Inspired Game
Playing Sausage

The goal of the game is simple.

  • Earn points by spotting words.
  • Longer word spotting results in coloured letters. Using coloured letters give more points.
  • Smaller words introduces red letters, which when reached bottom, you lose the game.

Installation

Since it's a terminal-based game, it requires a few commands for installation. I advise learning the command line essentails from our terminal basics series.

You need to have git installed on your system.

Use git to clone the official Sausage repository:

git clone https://gitlab.com/christosangel/sausage.git

Switch to the clone directory:

cd sausage

Give execution permission to the install.sh shell script.

chmod +x install.sh

Run the script:

./install.sh

Once the installation is finished, open Sausage in the same location using:

./sausage.sh

Essential commands and shortcuts

📋
Sausage needs a 60 Column x 34 Lines terminal to work properly.

The interface has all the key combinations described properly. Even the direction of motion is displayed.

To move without selecting any word, use the arrow key.

Once a starting word is decided, press the Space/Enter key to select that letter. Now, use the navigation keys to continue selection.

Navigation Key
↑ (Up) k or Up Arrow
↓ (Down) j or Down Arrow
↗ (Right and Up) L or Shift + Right Arrow
↘ (Right and Down) l or Right Arrow
↖ (Left and Up) H or Shift + Left Arrow
↙ (Left and Down) h or Left Arrow

To show all the words, press the b key in the game.

Play With Words in Linux Terminal With This Bookmark Inspired Game
Show all words

To undo a letter select, press the Backspace key. Undo a word selection with the Delete key.

Play With Words in Linux Terminal With This Bookmark Inspired Game
Select/Unselect letters

Press r key in game to reshuffle. Each reshuffle loses a turn and introduces multiple red cells. Existing red cell drop one cell down.

Play With Words in Linux Terminal With This Bookmark Inspired Game
Reshuffle in Sausage

Configuration

Limited configuration is possible here. Either manually edit ~/.config/sausage/sausage.config file or use the c key in the game start page.

Play With Words in Linux Terminal With This Bookmark Inspired Game
Sausage Config

You can find more gameplay details on its official GitLab page.

Removing Sausage

Technically, you run Sausage from the script itself. Still, initially, it has created a few directories. This screenshot from the official repository shows them:

Play With Words in Linux Terminal With This Bookmark Inspired Game

So, to 'uninstall' Sausage, you have to remove the cloned repository and if you want to remove the game related files, check the screenshot above and remove them.

Up for a (word) game?

If you ever played the classic Bookworm, Sausage will be pure nostalgia. And if you never played that before, it could still be fun to try it f you like these kinds of game.

It's one of those amusing things you can do in the terminal.

I let you leave a few words in the comments 😉


from It's FOSS https://ift.tt/fkTMbtq
via IFTTT

Rabu, 14 Mei 2025

FOSS Weekly #25.20: KDE Widgets, Deepin Security Issues, New GNOME Player and More Linux Stuff

FOSS Weekly #25.20: KDE Widgets, Deepin Security Issues, New GNOME Player and More Linux Stuff

An interesting development has taken place as openSUSE has decided to not offer Deepin Desktop anymore over repeated security concerns.

Deepin Desktop Removed from openSUSE over Security Concerns
openSUSE is not happy with Deepin Desktop and they have their reasons for that.
FOSS Weekly #25.20: KDE Widgets, Deepin Security Issues, New GNOME Player and More Linux Stuff

💬 Let's see what else you get in this edition

  • A new OpenSearch release.
  • GNOME's new default video player.
  • What went down at GrafanaCON 2025.
  • And other Linux news, tips, and, of course, memes!
  • This edition of FOSS Weekly is supported by Aiven for OpenSearch®.

❇️ Supercharge Your Search with Aiven for OpenSearch® – Get $100 Sign-Up Bonus! 🚀

If you've been searching for a way to effortlessly deploy and manage OpenSearch, I've got great news for you! Aiven for OpenSearch® lets you deploy powerful, fully managed search and analytics clusters across AWS, Google Cloud, DO and Azure – all without the hassle of infrastructure management.

🔥 Why Choose Aiven for OpenSearch®?

  • Streamlined Search Applications – Focus on building, not maintaining.
  • Real-Time Visualization – Instantly visualize your data with OpenSearch Dashboards.
  • 99.99% Uptime – Reliable and always available.
  • Seamless Integrations – Plug into Kafka, Grafana, and more with a few clicks.

Sign up using this link and claim a $100 bonus credit to explore and test Aiven for OpenSearch®! 💰

📰 Linux and Open Source News

GrafanaCON 2025 didn't disappoint, with Grafana 12 and Grafana Assistant making a debut.

Grafana 12 & Grafana Assistant Making a Debut at GrafanaCON 2025
GrafanaCON 2025 was an absolute banger, packed with exciting new launches.
FOSS Weekly #25.20: KDE Widgets, Deepin Security Issues, New GNOME Player and More Linux Stuff

🧠 What We’re Thinking About

UC Berkley demos that a humanoid robot can be built under $5,000. If it comes in mass-production, are we looking at robotic house helps in the near future?

You Can Build an Open Source Humanoid Robot for Just $5,000
UC Berkley shows an interesting project for the open source and robotics community.
FOSS Weekly #25.20: KDE Widgets, Deepin Security Issues, New GNOME Player and More Linux Stuff

🧮 Linux Tips, Tutorials and More

Manage your photo collection in Linux with these software.

9 Best Linux Photo Management Software
Looking for a replacement for the good-old Picasa on Linux? Take a look at best photo management applications available for Linux.
FOSS Weekly #25.20: KDE Widgets, Deepin Security Issues, New GNOME Player and More Linux Stuff

Desktop Linux is mostly neglected by the industry but loved by the community. For the past 12 years, It's FOSS has been helping people use Linux on their personal computers. And we are now facing the existential threat from AI models stealing our content.

If you like what we do and would love to support our work, please become It's FOSS Plus member. It costs $24 a year (less than the cost of a burger meal each month) and you get an ad-free reading experience with the satisfaction of helping the desktop Linux community.

Join It's FOSS Plus

👷 Homelab and Maker's Corner

Reuse, reinvent, rock out. Abhishek (not me, the other one) shared how he gave his old speakers a new life with this DIY guide:

How I Turned My Old Hi-Fi Speakers into Bluetooth Ones with Raspberry Pi
Curiosity, more than sustainability, drove me to add Bluetooth features to my old speakers and thus play Spotify and other players wirelessly through it.
FOSS Weekly #25.20: KDE Widgets, Deepin Security Issues, New GNOME Player and More Linux Stuff

My favorite Raspberry Pi case, Pironman 5, has just received an upgrade!

FOSS Weekly #25.20: KDE Widgets, Deepin Security Issues, New GNOME Player and More Linux Stuff

Pre-order will get you a 25% discount. Check out more on their webpage.

✨ Apps Highlight

RSS Guard is a no-nonsense feed reader app for Linux.

RSS Guard: A Superb Open Source Feed Reader App
A cross-platform open source feed reader that gets the job done.
FOSS Weekly #25.20: KDE Widgets, Deepin Security Issues, New GNOME Player and More Linux Stuff

📽️ Videos I am Creating for You

Have fun in the terminal by flying a train.

🧩 Quiz Time

How much knowledge do you have about the Linux kernel? This trivia quiz will test that:

Kernel Chronicles: Linux kernel Insights
Think you know about the Linux kernel? Answer these questions!
FOSS Weekly #25.20: KDE Widgets, Deepin Security Issues, New GNOME Player and More Linux Stuff

💡 Quick Handy Tip

In Linux Mint Cinnamon panel, you can change the way time is displayed. Just right-click on the time in the panel and select Configure. In the configuration window, enable the "Use a custom date format" option.

FOSS Weekly #25.20: KDE Widgets, Deepin Security Issues, New GNOME Player and More Linux Stuff

Now, enter your preferred format in the "Date format" and "Date format for tooltip" fields.

You can click on the "Show information on date format syntax" button, which will lead you to a detailed documentation about available date format options if you feel lost.

🤣 Meme of the Week

The hate is real with this one. ☠️

FOSS Weekly #25.20: KDE Widgets, Deepin Security Issues, New GNOME Player and More Linux Stuff

🗓️ Tech Trivia

To challenge Intel's 486 dominance in the early 1990s, Texas Instruments (TI) sold their own line of 486 microprocessors. However, these TI-branded chips were actually designed by Cyrix, offering software compatibility at a potentially lower cost, yet ultimately failing to dethrone Intel in the microprocessor market.

🧑‍🤝‍🧑 FOSSverse Corner

I recently made a new post, in which I explain the differences between the 2.4G and 5G Wi-Fi bands.

Difference between 2.4G and 5G Wifi
Not strictly related to Linux but I recently had an interesting discussion with a not-so-technical friend who confused 2.4G and 5G wifi as 2nd generation and 5th generation. I can see why there is a confusion. Terms like 3G, 4G and 5G got popular due to the rise of smartphones. It is easy to mistake 5G of wifi connection for 5th generation of network. Here’s the thing: In terms of Wi-Fi networks, G in 2.4G and 5G are the frequency unit GHz. It has nothing to with 5th generation of cellular da…
FOSS Weekly #25.20: KDE Widgets, Deepin Security Issues, New GNOME Player and More Linux Stuff

❤️ With love

Share it with your Linux-using friends and encourage them to subscribe (hint: it's here).

Share the articles in Linux Subreddits and community forums.

Follow us on Google News and stay updated in your News feed.

Opt for It's FOSS Plus membership and support us 🙏

Enjoy FOSS 😄


from It's FOSS https://ift.tt/go7qN4M
via IFTTT

Selasa, 13 Mei 2025

Handling Indentation in VS Code

Handling Indentation in VS Code

Indentation is how code is visually spaced. It helps define structure, scope, and readability. For example, Python requires indentation to define blocks of code.

Other languages might not require it, but messy indentation can make code really hard to read (and debug). Common indentation styles include:

  • 2 spaces (popular in JS, HTML, CSS)
  • 4 spaces (common in Python, Java)
  • Tabs (some devs swear by them)

VS Code lets you customize indentation per file, per language, or globally.

Let’s explore all the ways to tweak that!

1. Change indentation via the status bar (per-file basis)

This is the easiest method and perfect when you're editing just one file.

  1. Open a file in VS Code.
  2. Look at the bottom-right corner of the window. You’ll see something like Spaces: 4 or Tab Size: 4.
Handling Indentation in VS Code
  1. Click that label, a menu pops up!

Now, you can choose:

  • Indent Using Tabs
  • Indent Using Spaces
Handling Indentation in VS Code

And below that, choose how many spaces (2, 4, 8 - up to you).

Just changing the indentation setting doesn’t automatically re-indent the whole file. You’ll want to reformat the document too.

Here’s how:

  • Press Ctrl + Shift + P (Linux/Windows) or Cmd + Shift + P (macOS).
  • Type Format Document and select it.
Handling Indentation in VS Code
  • Or use the shortcut:
    • Ctrl + Shift + I on Linux
    • Shift + Alt + F on Windows
    • Shift + Option + F on macOS

Boom! The file gets prettied up with your chosen indentation.

2. Set global indentation in user settings

Want to make your indentation choice apply to all new files in VS Code? Here’s how:

  1. Open Command Palette with Ctrl + Shift + P or F1.
  2. Type Preferences: Open User Settings.
Handling Indentation in VS Code
  1. In the Settings UI, search for Tab Size and set it (e.g., 4).
Handling Indentation in VS Code
  1. Then search Insert Spaces and make sure it’s checked.
Handling Indentation in VS Code

This tells VS Code:

“Whenever I press Tab, insert 4 spaces instead.”

Also check for Detect Indentation, if it’s ON, VS Code will override your settings based on the file content. Disable it if you want consistency across files.

3. Set project-specific indentation (Workspace settings)

Maybe you want different indentation just for one project, not globally.

  1. Open the project folder in VS Code.
  2. Go to the Command Palette and select Preferences: Open Workspace Settings.
Handling Indentation in VS Code
  1. Switch to the Workspace tab.
  2. Search and set the same Tab Size, Insert Spaces, and Detect Indentation options.
Handling Indentation in VS Code

These get saved inside your project’s .vscode/settings.json file.

Perfect if you want 2-space indentation in a JS project but 4 spaces in a Python project you're working on separately.

4. Set indentation based on programming language

Now, here's the power-user move. Let’s say you want:

  • 4 spaces for Python
  • 2 spaces for JavaScript and TypeScript

Easy!

  1. Open the Command Palette → Preferences: Open User Settings (JSON)
Handling Indentation in VS Code
  1. Add this snippet:
"[python]": {
  "editor.tabSize": 4
},
"[javascript]": {
  "editor.tabSize": 2
},
"[typescript]": {
  "editor.tabSize": 2
}

This overrides the indentation per language.

Handling Indentation in VS Code

You can find all language identifiers in the VS Code docs if you want to customize more.

You can also drop this into your .vscode/settings.json file if you want project-level overrides.

Bonus Tip: Convert tabs to spaces (and vice versa)

Already working on a file but the indentation is inconsistent?

  • Open the Command Palette → Type Convert Indentation
  • Choose either:
    • Convert Indentation to Spaces
    • Convert Indentation to Tabs
Handling Indentation in VS Code

You can also do this from the status bar at the bottom.

If you need to convert all tabs in the file to spaces:

  1. Press Ctrl + F
  2. Expand the search box
  3. Enable Regex (.* icon)
  4. Search for \t and replace it with two or four spaces

Wrapping up

Like word wrapping in VS Code, indentation may seem like a small thing, but it's one of the cornerstones of clean, readable code.

Whether you're coding solo or collaborating on big projects, being consistent with indentation helps avoid annoying bugs (especially in Python!) and keeps the codebase friendly for everyone.

VS Code makes it super easy to control indentation your way, whether you want to set it globally, per project, or even per language.

We’ll be back soon with another helpful tip in our VS Code series.


from It's FOSS https://ift.tt/eSsMtGm
via IFTTT

Sabtu, 10 Mei 2025

How I Turned My Old Hi-Fi Speakers into Bluetooth Ones with Raspberry Pi

How I Turned My Old Hi-Fi Speakers into Bluetooth Ones with Raspberry Pi

Sometimes I do weird things for the sake of it. Like once, I used Raspberry Pi as a WiFi extender for fun. This is one of those stories.

I had an old pair of hi-fi speakers gathering dust in a forgotten corner of the house.

The only problem? They needed a Bluetooth dongle and DAC to work, and I didn’t have either. But with my love for DIY and a determination to salvage my musical aspirations, I decided to take a different route.

I thought of giving my old speakers a new life by if converting them into Bluetooth speakers. In this article, I’ll take you through my journey of reviving these old speakers.

From putting together a DAC, connecting both speakers, and grappling with my first soldering iron (spoiler: it wasn’t pretty), to finally using my old Raspberry Pi 3 as the brains behind a fully functional Bluetooth speaker system.

It wasn’t perfect, but the experience taught me a lot and gave me a setup that delivers impressive sound without spending a fortune.

Let’s dive into the details!

What I used

I gathered a mix of new and existing components. Here’s everything I used for this project:

Two Hi-Fi Speakers: These were the stars of the show— old obviously that had been lying unused for years. Their sound potential was too good to ignore, and this project was all about giving them a second chance.

How I Turned My Old Hi-Fi Speakers into Bluetooth Ones with Raspberry Pi
Yep, I forgot to clean the speakers before capturing this picture

DAC Chipset: A Digital-to-Analog Converter (DAC) was essential to drive the speakers. I used a basic DAC module that supported input from a 3.5mm jack and output for the speakers.

How I Turned My Old Hi-Fi Speakers into Bluetooth Ones with Raspberry Pi
You need to check your speakers before ordering a DAC for yourself, It provides a stereo output of 30W each and requires 12-24V

Soldering Iron: This was my first time using a soldering iron, and let’s just say my initial attempts were far from perfect. I used it to solder the speaker wires to the DAC, which was crucial for connecting the entire system.

How I Turned My Old Hi-Fi Speakers into Bluetooth Ones with Raspberry Pi
Simple ol' soldering iron, nothing fancy here. It gets the job done.

12V 2A Power Supply: To power the DAC, I used a 12V 2A adapter. Make sure your power supply matches the specifications of your DAC module for safe and efficient operation.

3.5mm Audio Cable: This was used to connect the DAC’s audio output to the Raspberry Pi’s 3.5mm jack.

Raspberry Pi 3: I used an old Raspberry Pi 3 that I had lying around. Any Raspberry Pi model with a 3.5mm jack will work for this project, but if you have a newer model with HDMI-only output, additional configuration may be required.

How I Turned My Old Hi-Fi Speakers into Bluetooth Ones with Raspberry Pi
My Raspberry Pi 3

With these items in hand, I was ready to transform my speakers into a powerful Bluetooth system.

If you’re planning to try or follow along this project, you should likely already have some of these components at home, making it a cost-effective way to repurpose old equipment.

Connecting the DAC with the Speakers

The DAC I ordered didn’t come with convenient connectors, so I had to get my hands dirty—literally.

I rummaged through my dad’s toolbox and found an old soldering iron, which I hadn’t used before. After watching a couple of quick tutorials online, I felt brave enough to give it a shot.

Soldering the speaker wires to the DAC wasn’t as straightforward as I had imagined. But after a few tries, and a lot of patience, I managed to secure the wires in place.

How I Turned My Old Hi-Fi Speakers into Bluetooth Ones with Raspberry Pi
Here's you can see my exceptional soldering skills

Before closing the speaker lids, I decided to test the connection directly. I powered up the DAC, connected it to the speakers, and played some music through a temporary audio input.

How I Turned My Old Hi-Fi Speakers into Bluetooth Ones with Raspberry Pi

To my relief, sound filled the room. It wasn’t perfect yet, but it was enough to confirm that my soldering job worked.

With the DAC connected, I was ready to move on to the next part of the build!

Adding Bluetooth functionality with Raspberry Pi

There are countless guides and projects for turning a Raspberry Pi into a Bluetooth receiver, but I stumbled upon a GitHub project that stood out for its simplicity. It is called Raspberry Pi Audio Receiver.

The project had a script that automated the entire setup process, including installing all necessary dependencies. Here’s how I did it:

Download the Installation Script

First, I downloaded the script directly from the GitHub repository:

wget https://raw.githubusercontent.com/nicokaiser/rpi-audio-receiver/main/install.sh
How I Turned My Old Hi-Fi Speakers into Bluetooth Ones with Raspberry Pi

Run the Script

bash install.sh
How I Turned My Old Hi-Fi Speakers into Bluetooth Ones with Raspberry Pi

For first-timers or DIY enthusiasts new to this, the installation screen might seem a bit overwhelming. You’ll be prompted several times to install various components and make decisions about the setup.

Don’t worry, I’ll break down what’s happening so you can follow along with confidence.

Hostname:
The script lets you set up the hostname (the internal name for your Raspberry Pi) and a visible device name (referred to as the "pretty hostname").

This visible name is what other devices will see when connecting via Bluetooth, AirPlay, or Spotify Connect. For example, you could name it something like DIY-Speakers.

Bluetooth Configuration:
The script installs Bluetooth-related packages and sets up an agent to accept all incoming connections.

The Pi is configured to play audio via ALSA (Advanced Linux Sound Architecture), and a smart script disables Bluetooth discoverability whenever the Pi is connected to a device.

How I Turned My Old Hi-Fi Speakers into Bluetooth Ones with Raspberry Pi

AirPlay 2 Setup:
This feature installs Shairport Sync, allowing the Raspberry Pi to act as an AirPlay 2 receiver. It’s perfect for Apple users who want to stream music directly from their devices.

How I Turned My Old Hi-Fi Speakers into Bluetooth Ones with Raspberry Pi

Spotify Connect:
Finally, the script installs Raspotify, an open-source Spotify client for Raspberry Pi. This enables the Raspberry Pi to act as a Spotify Connect device, letting you stream music straight from the Spotify app on your phone or computer.

How I Turned My Old Hi-Fi Speakers into Bluetooth Ones with Raspberry Pi

Each step is straightforward, but you’ll need to be present during the installation to approve certain steps and provide input.

This process takes about 5 minutes to complete, but once done, your Raspberry Pi transforms into a multi-functional audio receiver, supporting Bluetooth, AirPlay 2, and Spotify Connect.

Testing the DIY Bluetooth speakers

With the hardware setup complete and the Raspberry Pi configured as a Bluetooth audio receiver, it was time for the moment of truth - testing the DIY speakers.

The goal was to see how well this entire setup performed and whether all the effort I put in was worth it.

To test the system, I decided to connect the speakers to my smartphone via Bluetooth.

How I Turned My Old Hi-Fi Speakers into Bluetooth Ones with Raspberry Pi
Sorry for the image quality, had to use an old phone to capture this image

After pairing, I opened my music app and selected a random song to play. The sound flowed seamlessly through the speakers.

I’ll admit, hearing music come out of the old hi-fi speakers felt incredibly rewarding. It was proof that all the soldering, scripting, and configuring had paid off.

How did It perform?

  • Audio Quality: The sound quality was surprisingly good for a DIY setup. The DAC delivered clear audio with no noise, and the hi-fi speakers held up well despite being unused for a long time.
  • Bluetooth Range: The range was decent since my Pi is in this plastic enclosure, I could move around my room and still maintain a stable connection.
  • Responsiveness: There was no noticeable delay or lag in audio playback, whether I streamed music or used Spotify Connect.

Final thoughts

This project was a blend of frustration, curiosity, and pure DIY joy. What started as an attempt to salvage some old, forgotten hi-fi speakers turned into a rewarding learning experience.

From figuring out how to solder for the first time (and not doing a great job) to repurposing my old Raspberry Pi 3 as a Bluetooth receiver, every step had its challenges but that’s what made it so satisfying.

The best part? Hearing music blast through those old speakers again, knowing I brought them back to life with a bit of effort and creativity.

It’s proof that you don’t always need to spend a fortune to enjoy modern tech; sometimes, all it takes is what you already have lying around and a willingness to tinker.

If you’ve got old speakers collecting dust, I highly recommend giving this a shot. It’s not just about the outcome; the journey itself is worth it.

How I Turned my Raspberry Pi into a Wi-Fi extender
Here is how I re-purposed my Raspberry Pi to a Wi-Fi extender! A good way to spend your weekend with your Raspberry Pi.
How I Turned My Old Hi-Fi Speakers into Bluetooth Ones with Raspberry Pi

💬 And if you did something like this in your home setup, please share it in the comments. I and other readers may get some interesting ideas for the next weekend projects.


from It's FOSS https://ift.tt/Bwd1WEq
via IFTTT