Minggu, 31 Agustus 2025

Installing Proxmox on a Raspberry Pi to run Virtual Machines on it

Installing Proxmox on a Raspberry Pi to run Virtual Machines on it

The other day, a friend and I were talking about virtualization, spinning up virtual machines (VMs), containerization, and all that fun tech stuff.

He casually said, “You know, even a Raspberry Pi can run a VM these days.” I laughed, thinking he was joking.

A Raspberry Pi? Running a virtual machine? Come on. But he wasn’t kidding.

Later that week, I stumbled across a discussion about Proxmox and how it supports ARM-based devices like the Raspberry Pi (not officially 😉).

I’m a naturally curious person, and once I read that Proxmox now can be installed on an ARM device, I couldn’t resist. I grabbed my Raspberry Pi 5, rolled up my sleeves, and decided to give it a shot.

If you’ve never heard of Proxmox, let me introduce you.

What is Proxmox, again?

In case you didn't know, Proxmox Virtual Environment (VE) is a powerful, open-source platform designed for virtualization. It allows you to manage virtual machines and containers through an intuitive web interface.

Think of it as the command center for running multiple operating systems on a single device, with added features like software-defined storage, network configuration, and clustering.

However, before you get too excited, let’s be real: the Pi is a capable little workhorse, but it’s no match for high-performance processors or dedicated server hardware.

It has its limits, and while it’s fun to tinker with, expecting it to handle heavy virtual machine workloads is asking too much. That said, for lightweight tasks and experimentation, it’s more than up for the challenge!

Now, let me take you through the steps I followed to get Proxmox up and running on my Raspberry Pi.

What you'll need to install Proxmox on Raspberry Pi

Here’s your checklist:

  • Raspberry Pi 4 or 5 (8GB RAM recommended)
  • MicroSD card (class 10 or better for faster read/write speeds)
  • 64-bit Raspberry Pi OS Lite (Bookworm)
  • Power supply and Ethernet cable (or Wi-Fi, but wired is preferred)

Step 1: Start with a clean slate

First things first, make sure you’re using a fresh installation of Raspberry Pi OS Lite (64-bit, Bookworm).

During my testing, I found that using an older or cluttered setup led to unexpected errors, especially when dealing with package dependencies. A clean OS makes everything smoother.

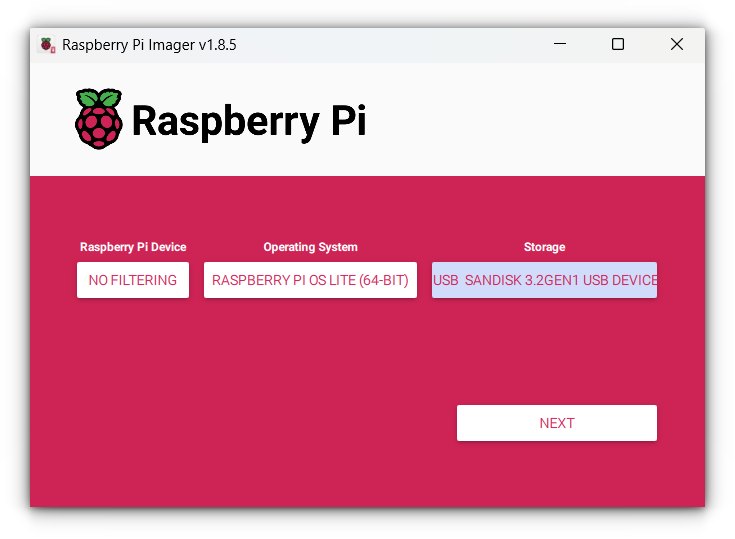
If you haven’t done so already, download the Bookworm image from the Raspberry Pi website and flash it onto your SD card using a tool like Raspberry Pi Imager.
Installing Proxmox on a Raspberry Pi to run Virtual Machines on it

Step 2: Update and upgrade your Pi

Once your Raspberry Pi is booted and connected, log in via SSH or directly on the terminal. Run these commands to update your system:

sudo apt update && sudo apt upgrade -y

This step ensures your Pi is up to date with the latest security patches and fixes.

We’ll use curl to grab the GPG key for the Proxmox repository later, so let’s ensure it’s installed.

If it’s missing, you can install it with this command:

sudo apt install curl

Step 3: Set a static IP address

Now, here’s a crucial part. Proxmox expects a stable network connection, and having a dynamic IP (which can change after a reboot) will break the setup.

Trust me, I learned this the hard way when my web interface refused to load after a restart.

The easiest way is to set up a DHCP reservation in your router.

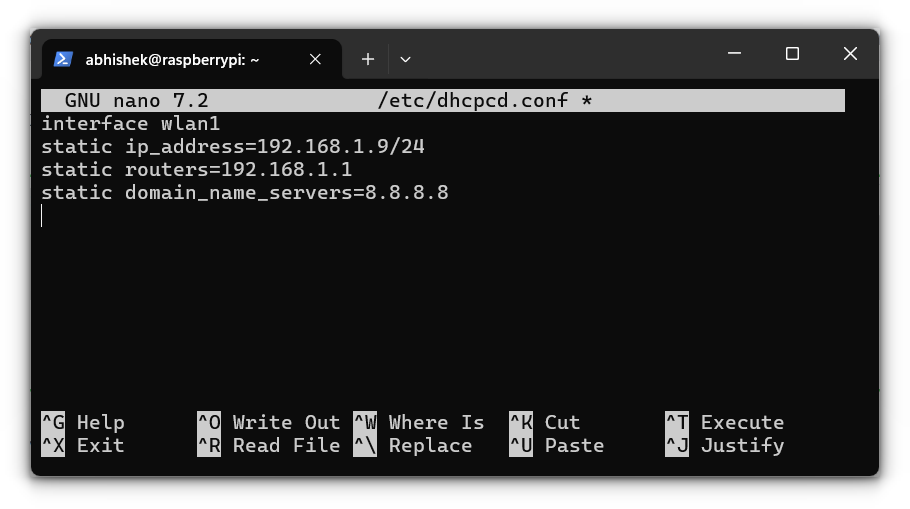
But if you don’t have access to your router, you can configure the static IP directly on your Pi. Edit the dhcpcd.conf file:

sudo nano /etc/dhcpcd.conf

Add the following lines at the end (replace the placeholders with your details):

interface [INTERFACE]
static ip_address=[STATIC IP ADDRESS YOU WANT]/24
static routers=[ROUTER IP]
static domain_name_servers=[DNS IP]
Installing Proxmox on a Raspberry Pi to run Virtual Machines on it

Save and reboot with:

sudo reboot now

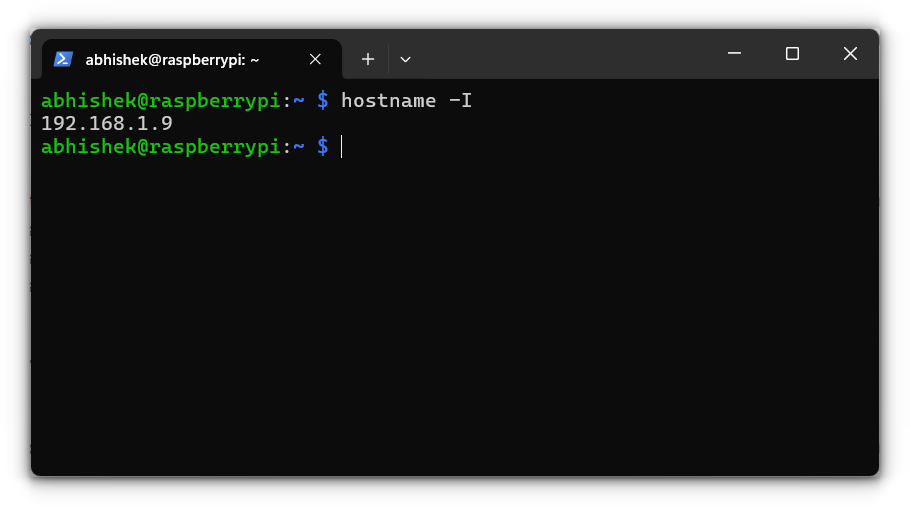
After the reboot, verify your static IP with:

hostname -I
Installing Proxmox on a Raspberry Pi to run Virtual Machines on it

Step 4: Modifying the hosts file

With your static IP set, we need to make Proxmox aware of it by updating the hosts file. This ensures your Pi’s hostname maps correctly to its IP address.

Open the hosts file for editing:

sudo nano /etc/hosts

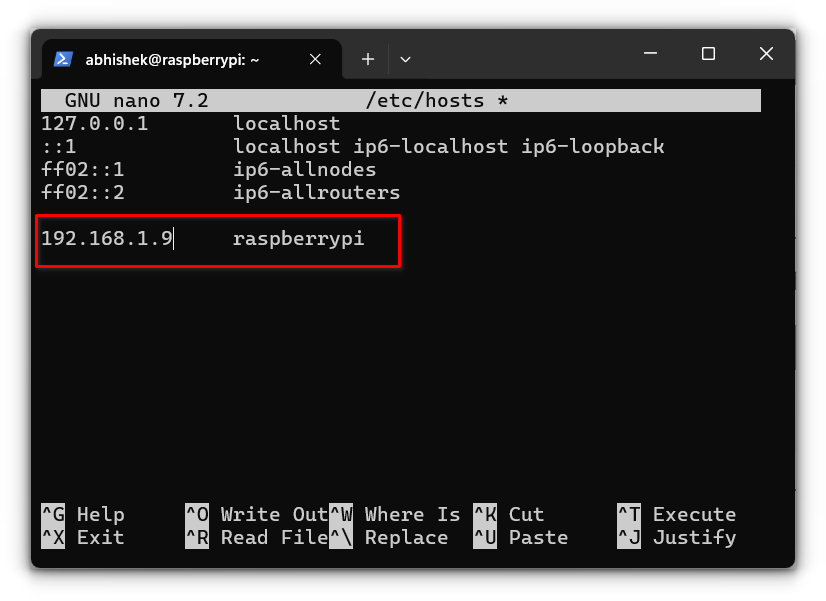
You’ll see a line like this:

127.0.1.1    raspberrypi

Replace 127.0.1.1 with your Pi’s static IP. For example:

192.168.1.9    raspberrypi
Installing Proxmox on a Raspberry Pi to run Virtual Machines on it

Step 5: Setting up the root user

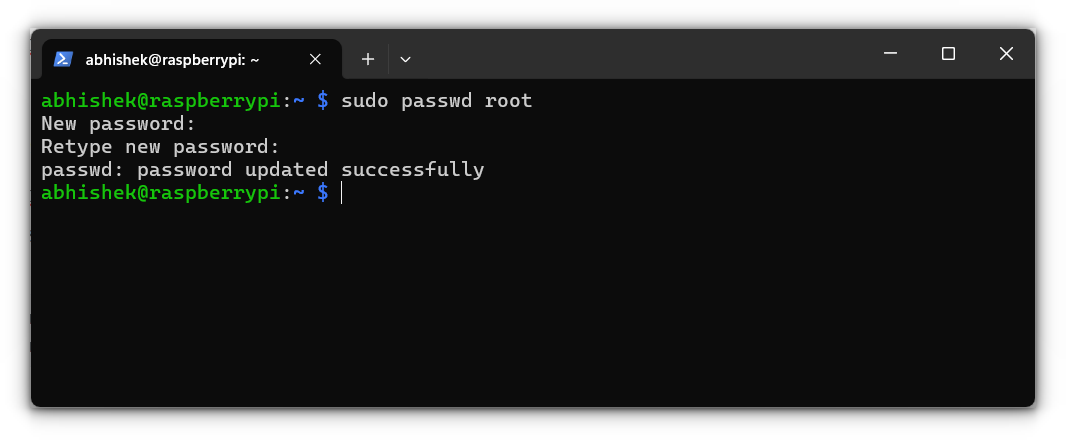
Proxmox requires the root user for its web interface. By default, Raspberry Pi OS doesn’t have a password set for the root user, so let’s create one:

sudo passwd root

Enter a strong password when prompted. You’ll need this later to log in to Proxmox.
Installing Proxmox on a Raspberry Pi to run Virtual Machines on it

Step 6: Add the GPG key

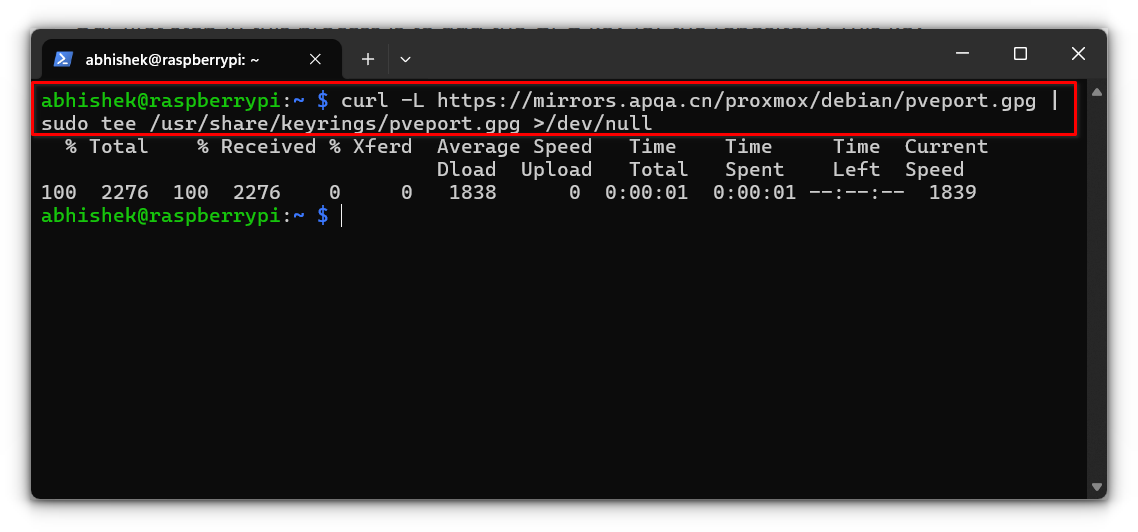
Proxmox for ARM isn’t officially supported, but a third-party repository makes it possible. First, we need to add its GPG key to authenticate the packages:

curl -L https://mirrors.apqa.cn/proxmox/debian/pveport.gpg | sudo tee /usr/share/keyrings/pveport.gpg >/dev/null

This step ensures that the packages we’re about to install are legitimate.
Installing Proxmox on a Raspberry Pi to run Virtual Machines on it

Step 7: Add the repository

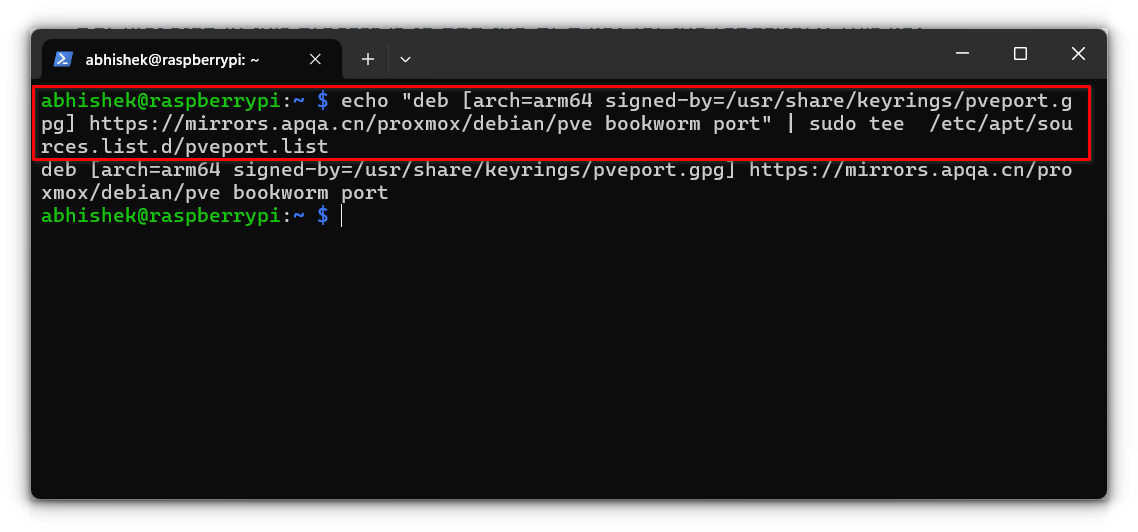
Now, let’s add the Proxmox repository to the package manager’s sources list:

echo "deb [arch=arm64 signed-by=/usr/share/keyrings/pveport.gpg] https://mirrors.apqa.cn/proxmox/debian/pve bookworm port" | sudo tee /etc/apt/sources.list.d/pveport.list
Installing Proxmox on a Raspberry Pi to run Virtual Machines on it

Step 8: Update the package list

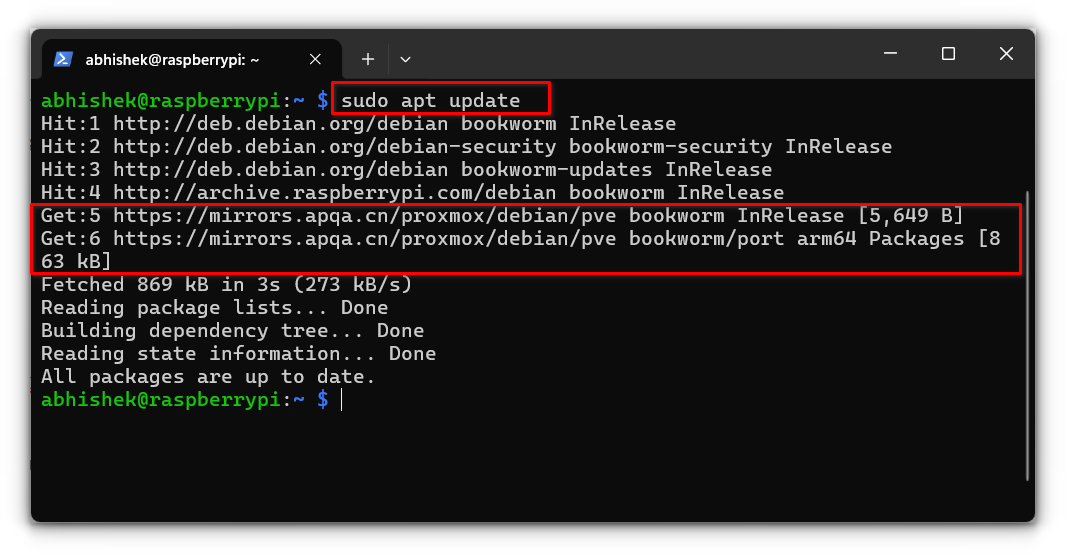
Whenever you add a new repository, you need to refresh the package list so your system knows about the new software:

sudo apt update
Installing Proxmox on a Raspberry Pi to run Virtual Machines on it

Step 9: Install Proxmox

Finally, install Proxmox and its required packages:

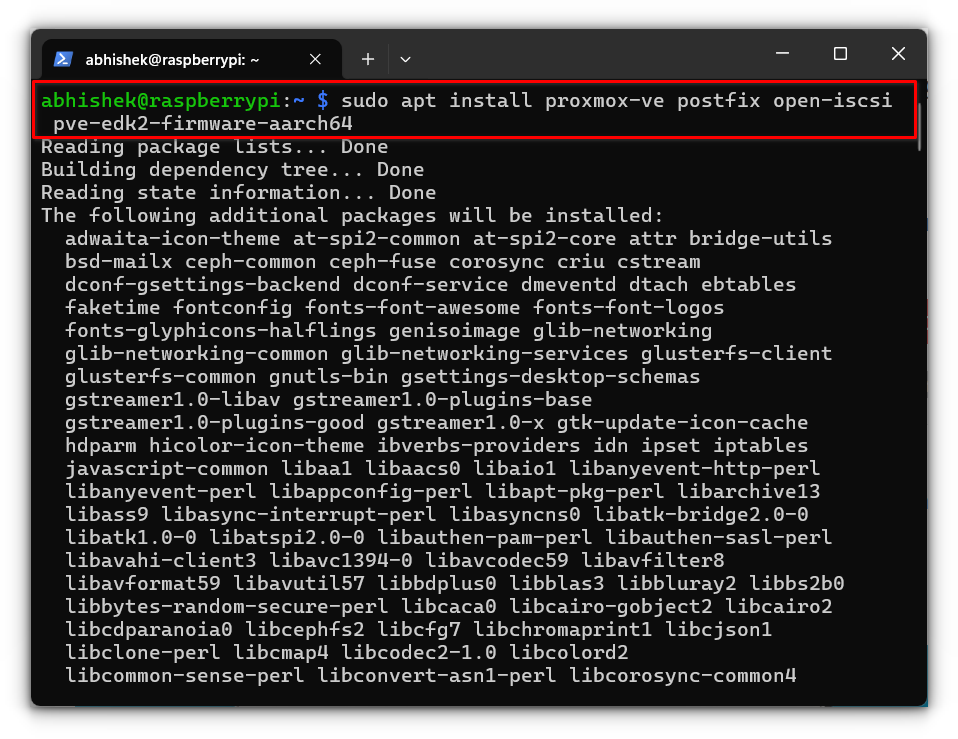
sudo apt install proxmox-ve postfix open-iscsi ifupdown2 pve-edk2-firmware-aarch64
  • proxmox-ve: This is the main Proxmox Virtual Environment package that sets up the Proxmox server, including the tools and user interface for managing virtual machines and containers.
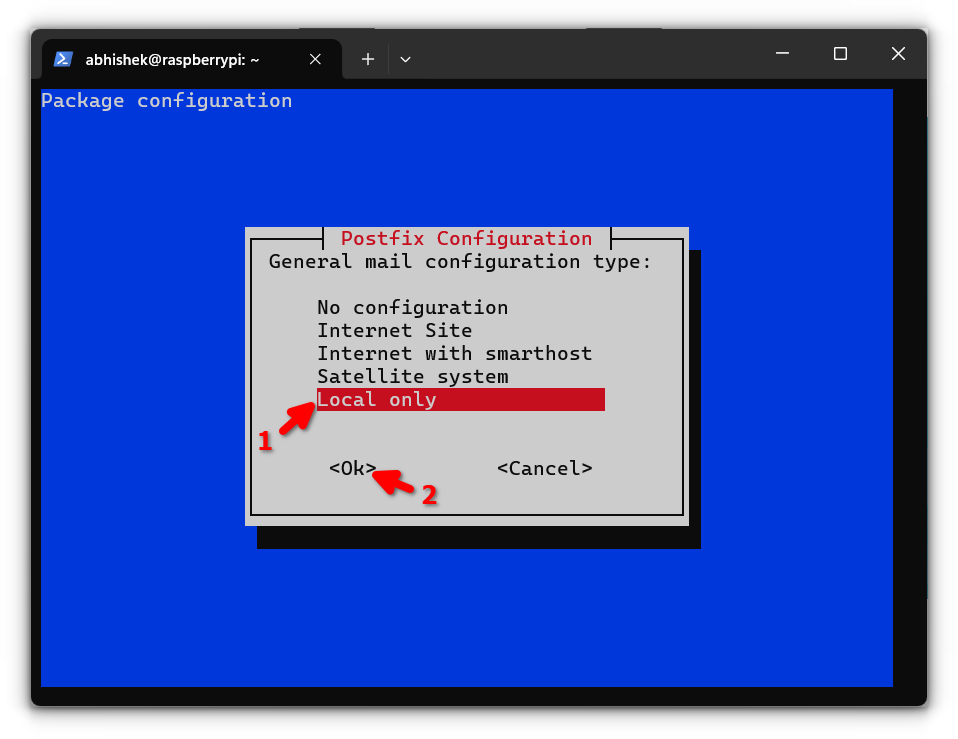
  • postfix: A mail server used by Proxmox to send email notifications, such as alerts or updates about your virtual environment. You can configure it as "Local only" if you're unsure or don't need external email functionality.
  • open-iscsi: Provides iSCSI (Internet Small Computer Systems Interface) support, enabling Proxmox to connect to and manage remote storage over a network.
  • ifupdown2: A network management tool that Proxmox relies on for configuring and managing network interfaces, especially for virtual machine bridge setups.
  • pve-edk2-firmware-aarch64: This is the ARM64 firmware package for Proxmox, enabling the virtualization of ARM-based systems, which is essential for running Proxmox on Raspberry Pi.
Installing Proxmox on a Raspberry Pi to run Virtual Machines on it

During installation, select “Local only” when configuring Postfix,
Installing Proxmox on a Raspberry Pi to run Virtual Machines on it

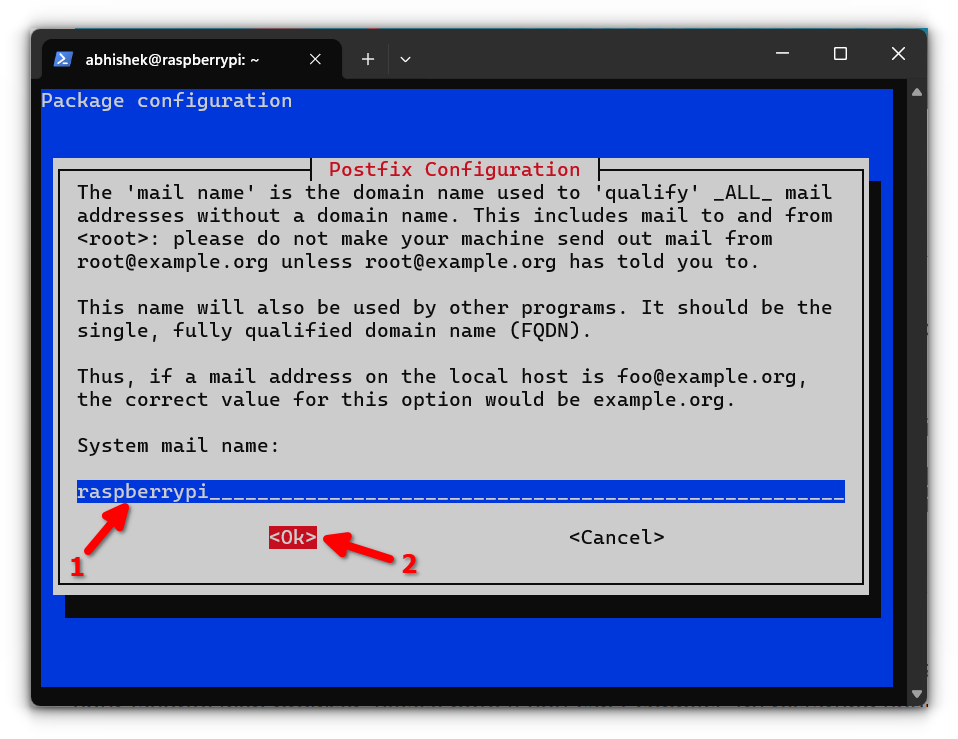
and use the default mail name if unsure.
Installing Proxmox on a Raspberry Pi to run Virtual Machines on it

Step 10: Accessing the proxmox web interface

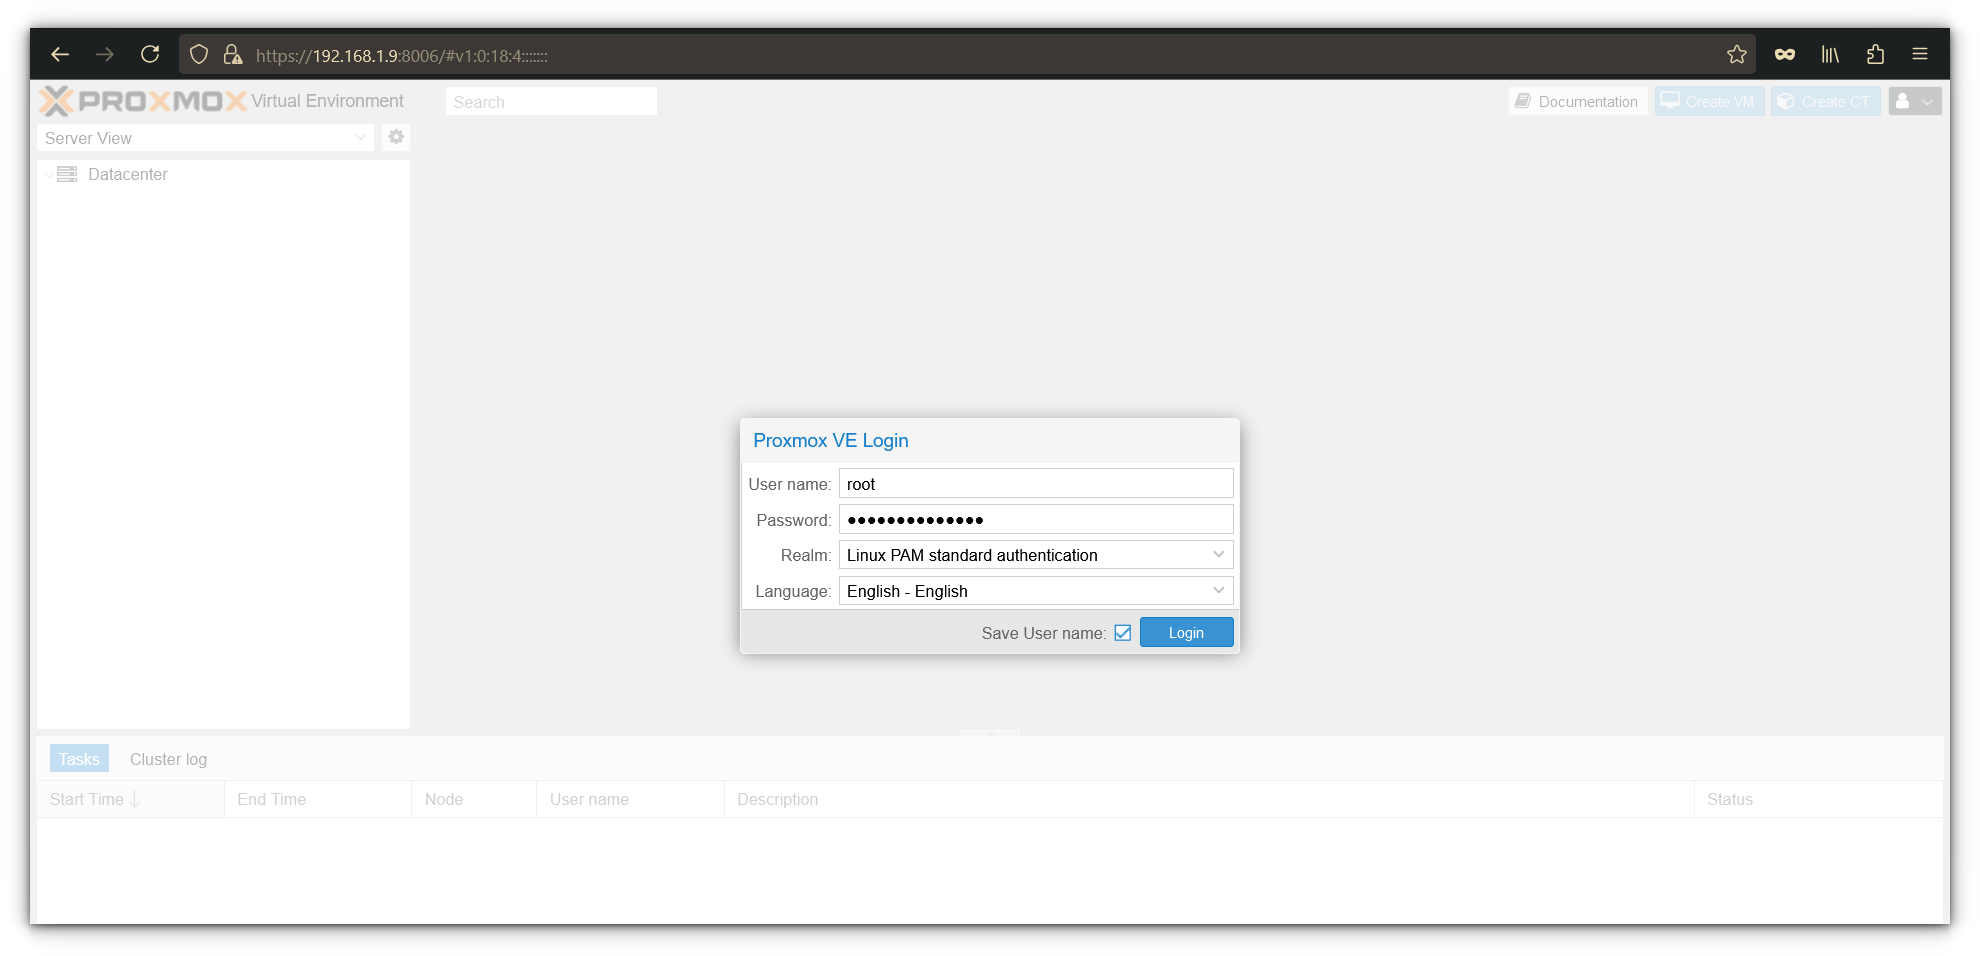
After installation, access the Proxmox web interface in your browser:

https://<IPADDRESS>:8006

Since Proxmox uses a self-signed SSL certificate, you’ll likely encounter a warning about the site’s security.

Don’t worry, this is expected. Simply proceed by clicking through the warning, and you’ll land on the Proxmox login page.

Installing Proxmox on a Raspberry Pi to run Virtual Machines on it

Log in using root as the username and the password you set earlier.
Installing Proxmox on a Raspberry Pi to run Virtual Machines on it

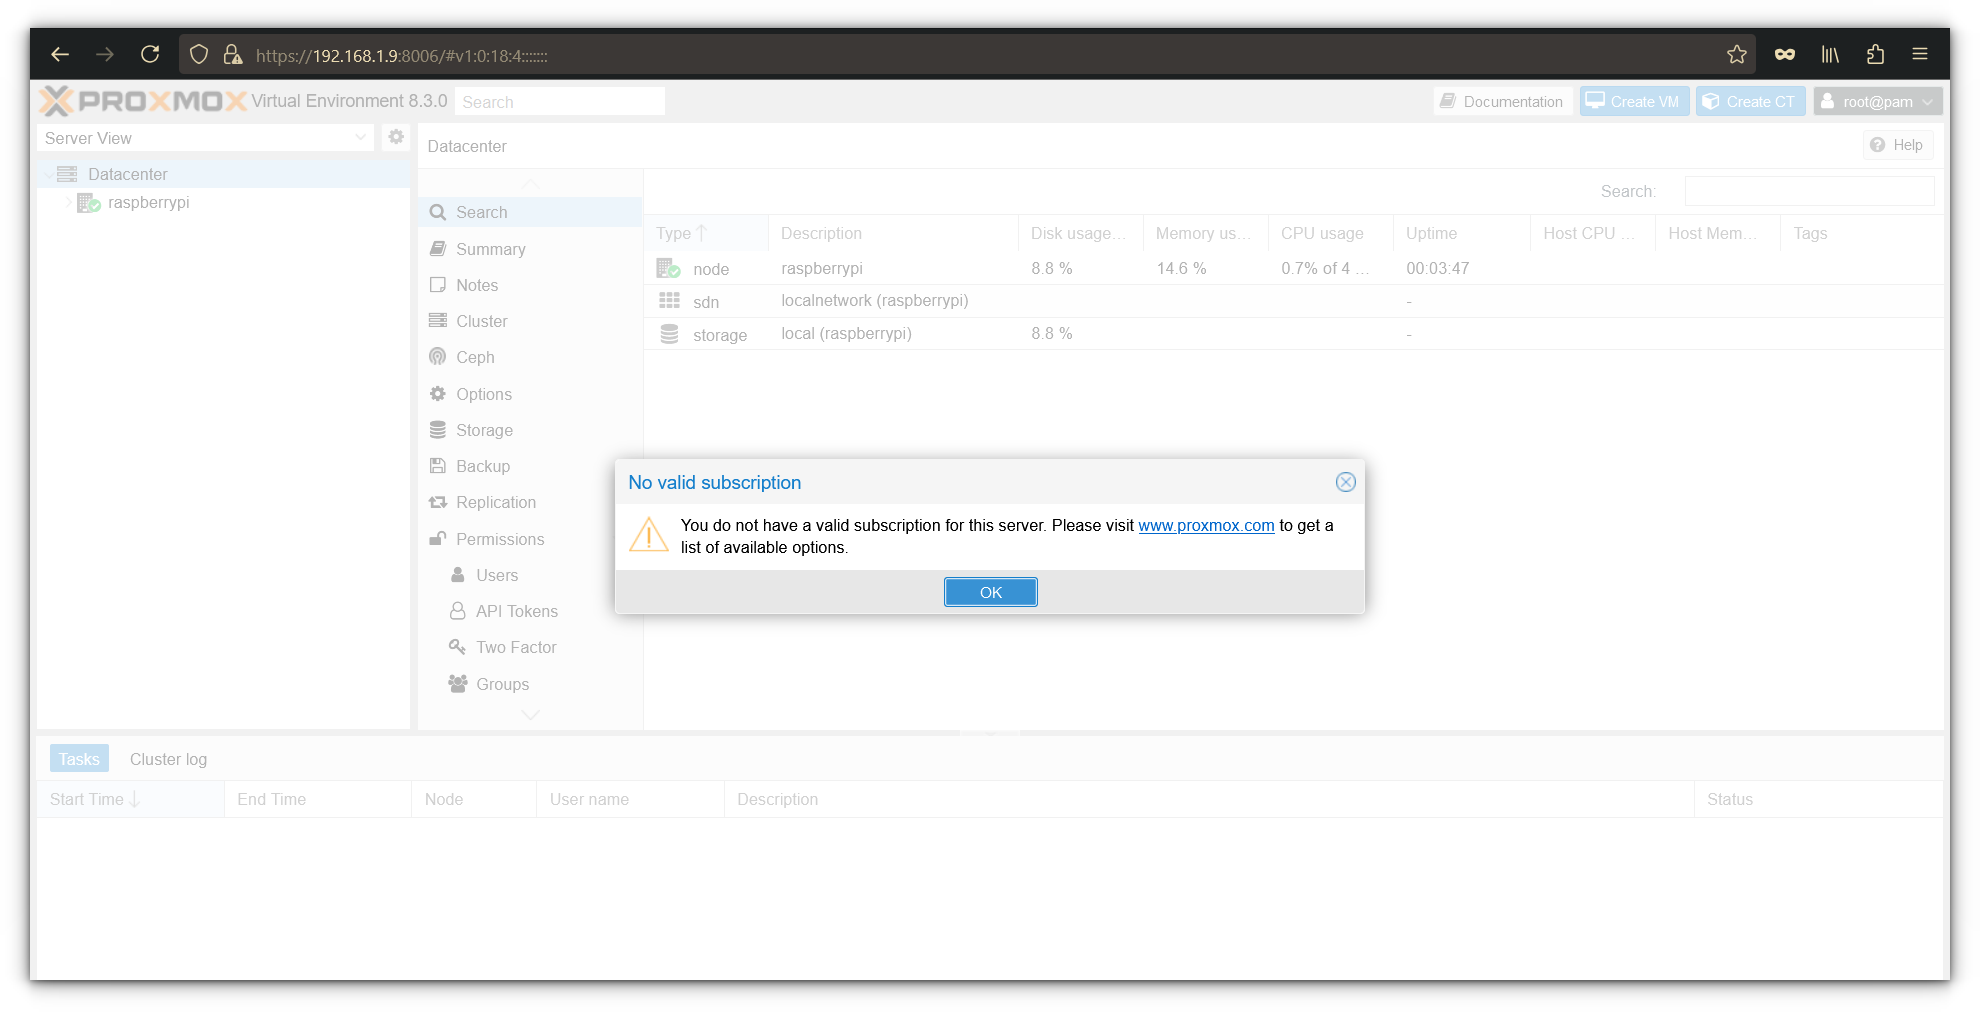
After logging in for the first time, Proxmox will greet you with a notification about an invalid subscription.

This is because the free version of Proxmox doesn’t come with a commercial subscription. Just click OK to dismiss the message.
Installing Proxmox on a Raspberry Pi to run Virtual Machines on it

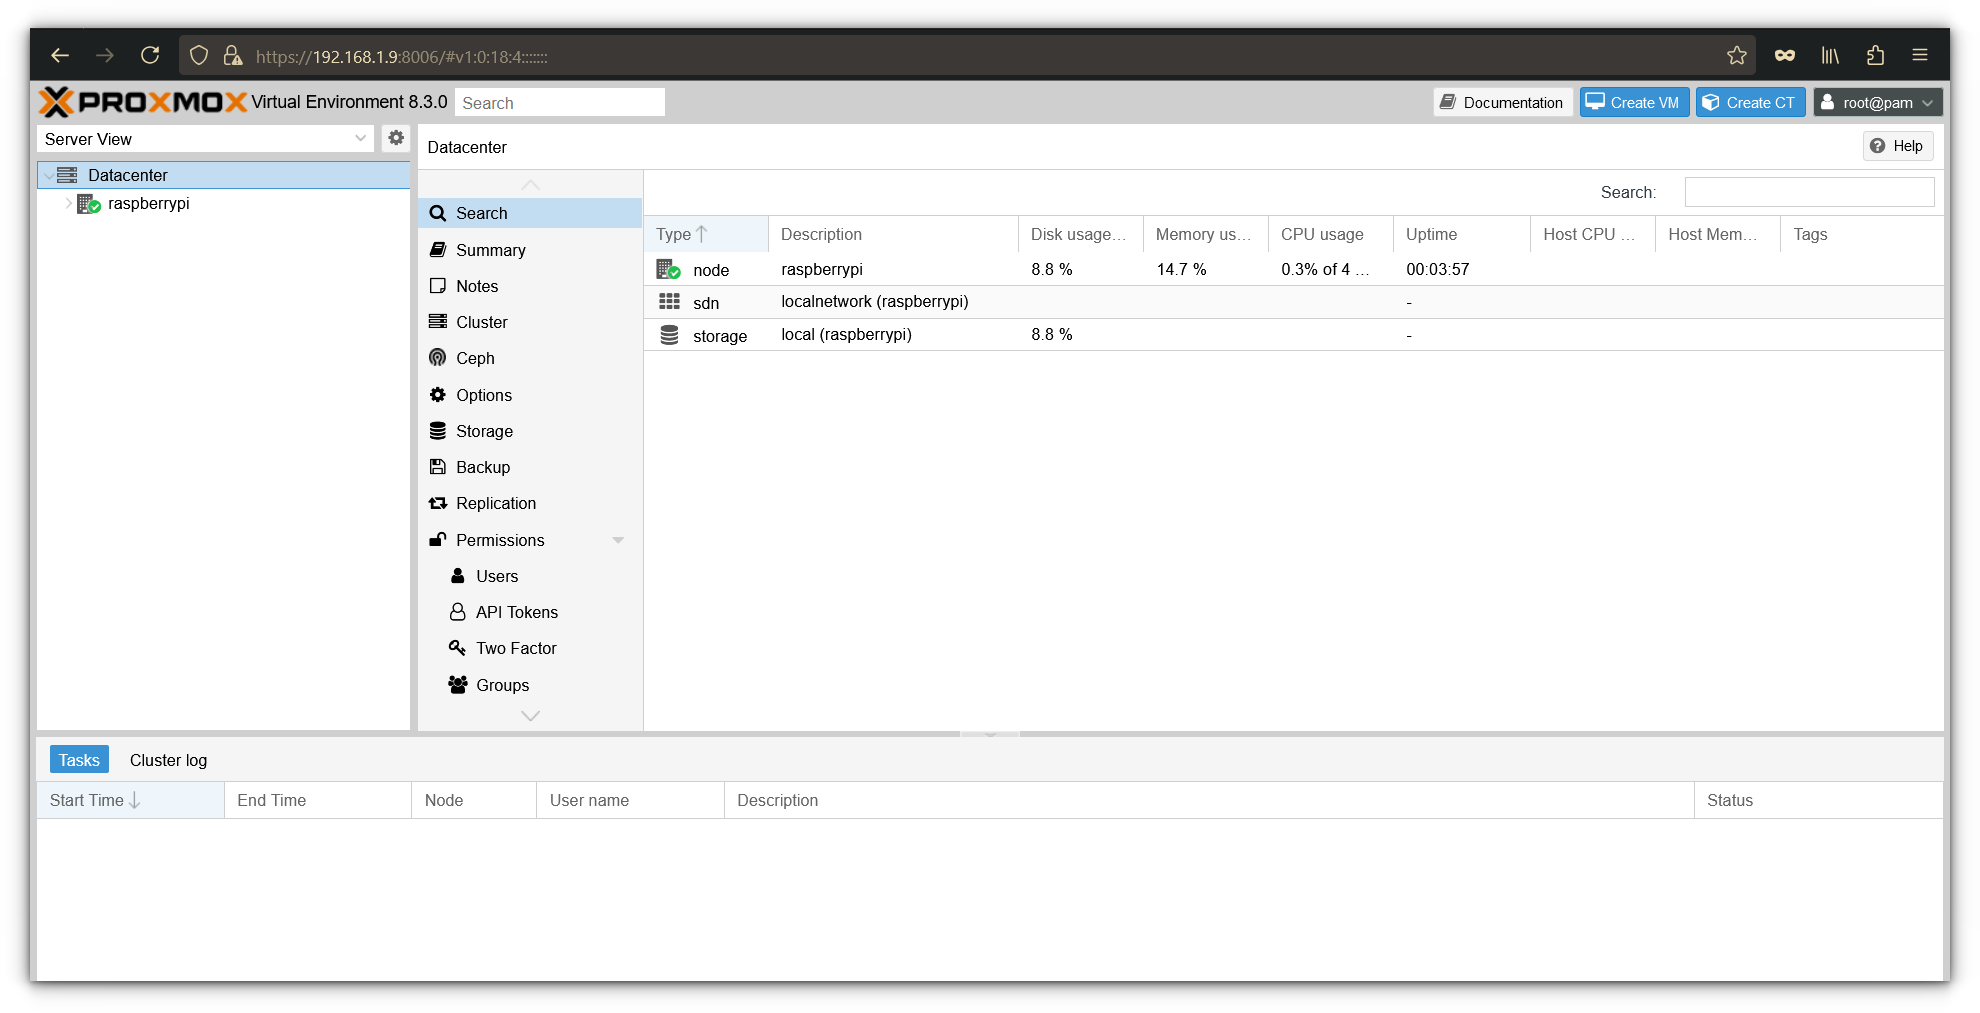
You’ve officially made it into Proxmox VE! The dashboard gives you an overview of your server’s health, including CPU usage, memory, and storage stats.
Installing Proxmox on a Raspberry Pi to run Virtual Machines on it

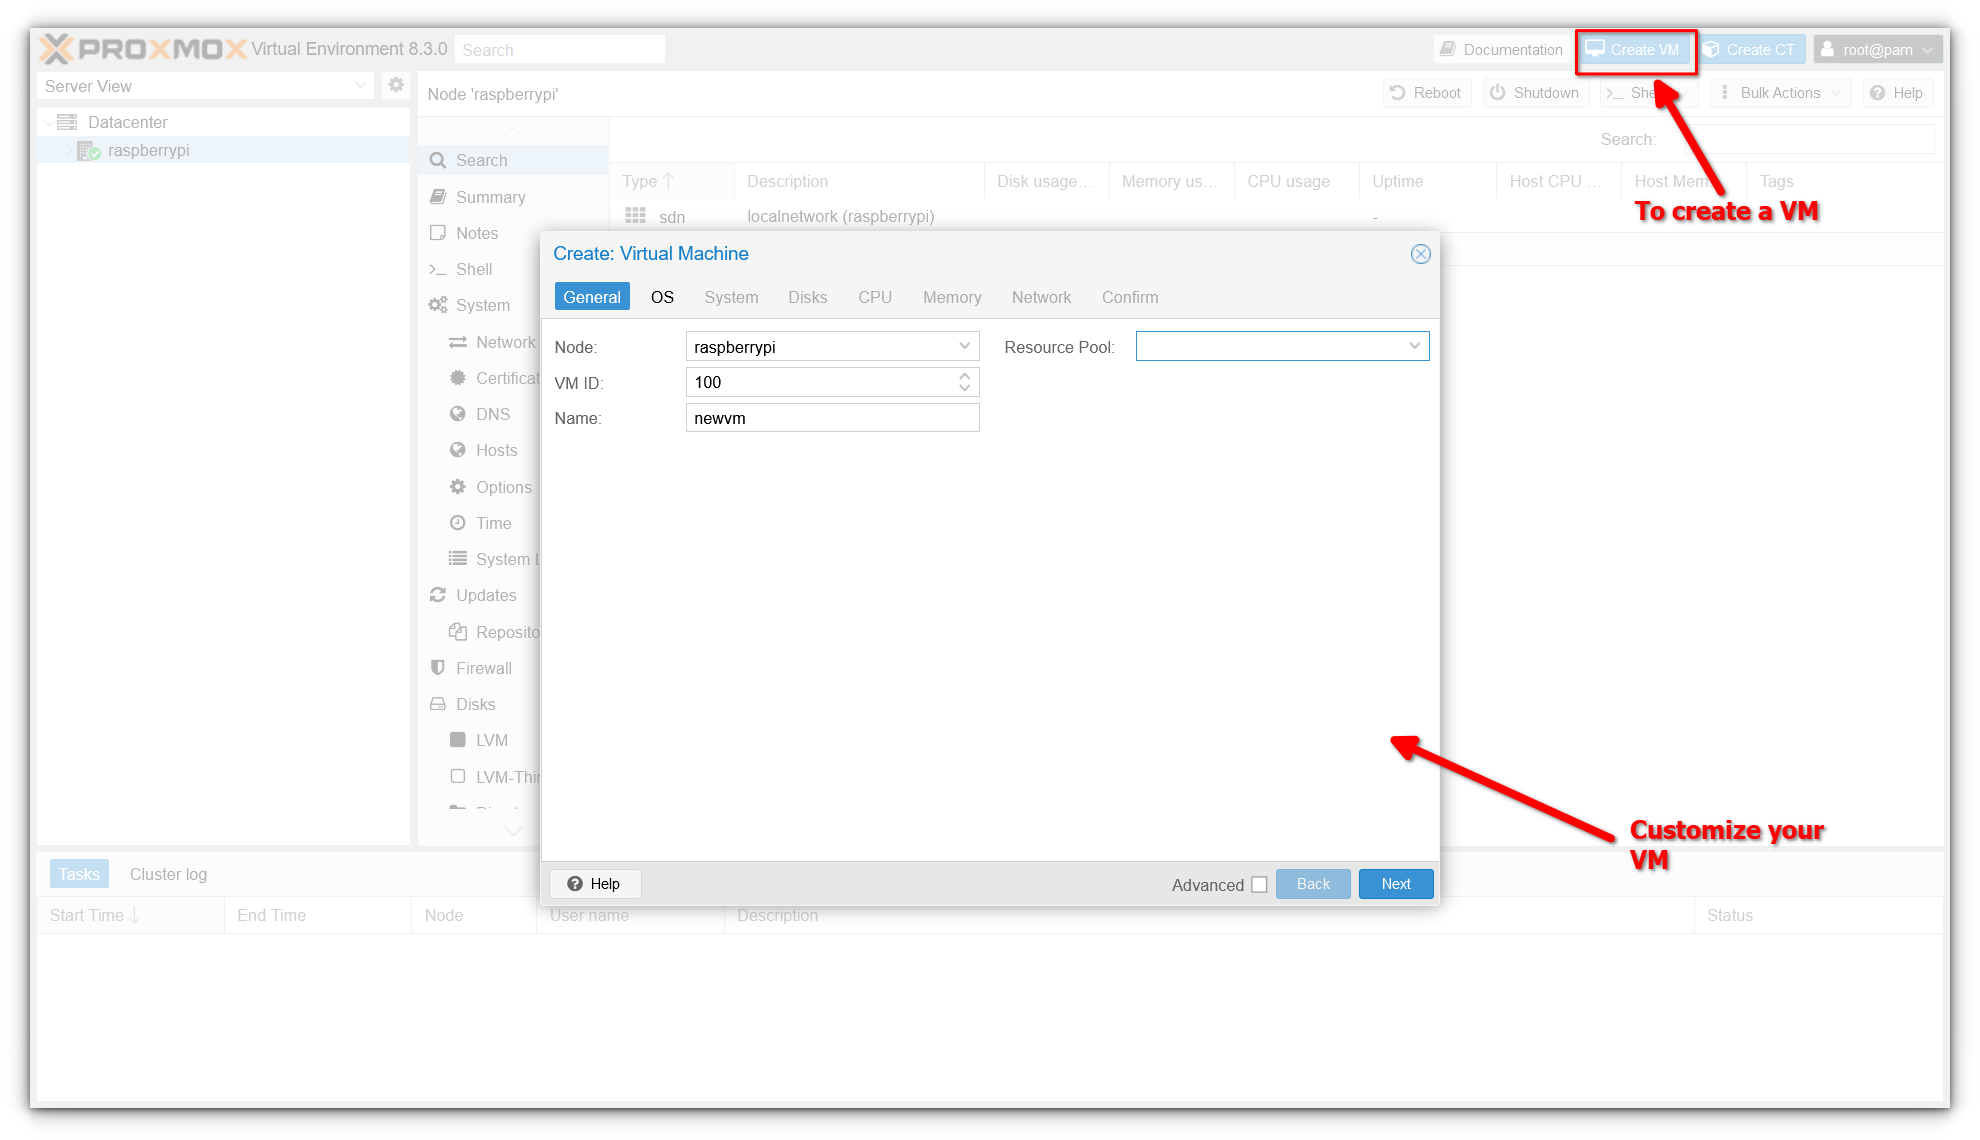
Now, you’re ready to create your first virtual machine (VM). To do this, click the Create VM button in the top-right corner of the interface.

The intuitive wizard will guide you through the process of spinning up a new virtual machine.
Installing Proxmox on a Raspberry Pi to run Virtual Machines on it

While setting up a VM is outside the scope of this article, we’d be happy to cover it in a follow-up. If you'd like a detailed guide on creating and managing VMs in Proxmox, let us know in the comments below!

Conclusion

And that’s it! Seeing Proxmox running on a Raspberry Pi is nothing short of amazing. It’s a testament to how far computing power has come, enabling a tiny device like the Pi to host and manage virtual environments.

That said, there’s still plenty more to explore. What else can this little powerhouse do with Proxmox installed? I’ll be diving deeper into its capabilities and perhaps share some along the way. Meanwhile, here's a good place to start learning Proxmox.

Use Proxmox for Virtual Machines
A mini-course that covers everything from installing and upgrading Proxmox to using it for creating and managing VMs.
Installing Proxmox on a Raspberry Pi to run Virtual Machines on it

If you have any doubts, questions, or find yourself stuck during the installation process, don’t hesitate to ask in the comments. I’d love to help you out!


from It's FOSS https://ift.tt/EYACpwR
via IFTTT

Kamis, 28 Agustus 2025

19 Beautiful Themes to Get a Better Visual Experience With VS Code

19 Beautiful Themes to Get a Better Visual Experience With VS Code

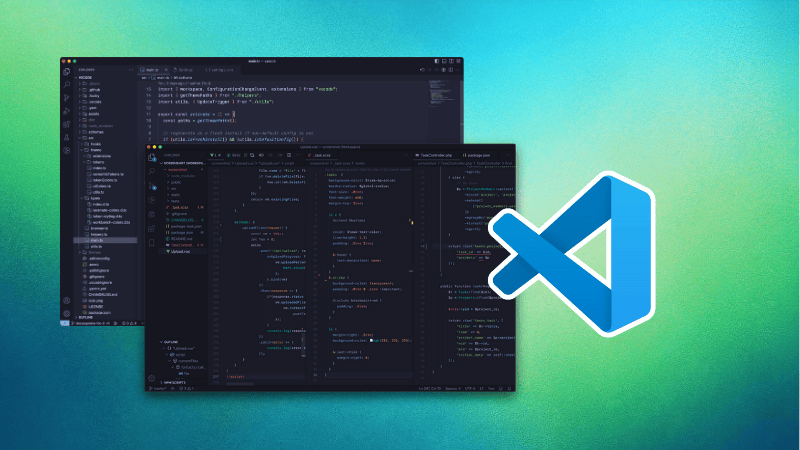
Let’s be honest, there’s nothing wrong with the default Visual Studio Code theme. It’s clean, it works, and I actually used it for quite a while.

That is… until one day I stumbled upon a YouTube tutorial where the developer’s editor looked incredible. Sleek colors, stylish syntax highlighting, suddenly, my good ol’ default theme felt a little boring.

That rabbit hole led me to explore the wonderful world of VS Code themes. Since then, I’ve tried a bunch, curated some favorites, and even picked out a few that are massively popular among developers.

This article is my personal roundup to help you get started. It’s not a definitive list, there are hundreds out there but if you’re new to custom VS Code themes, this is a great place to begin.

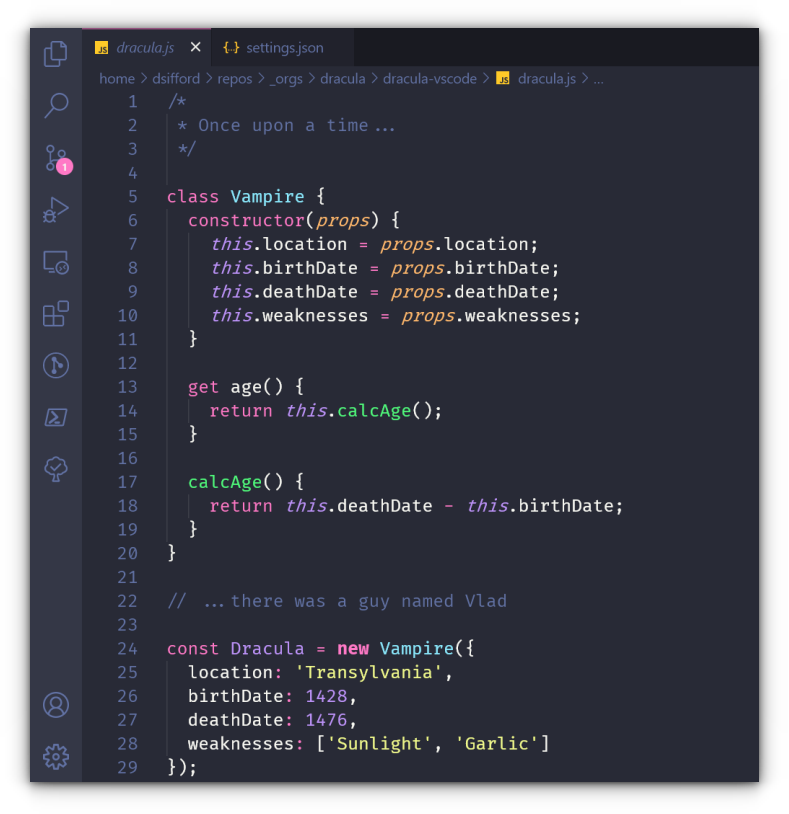
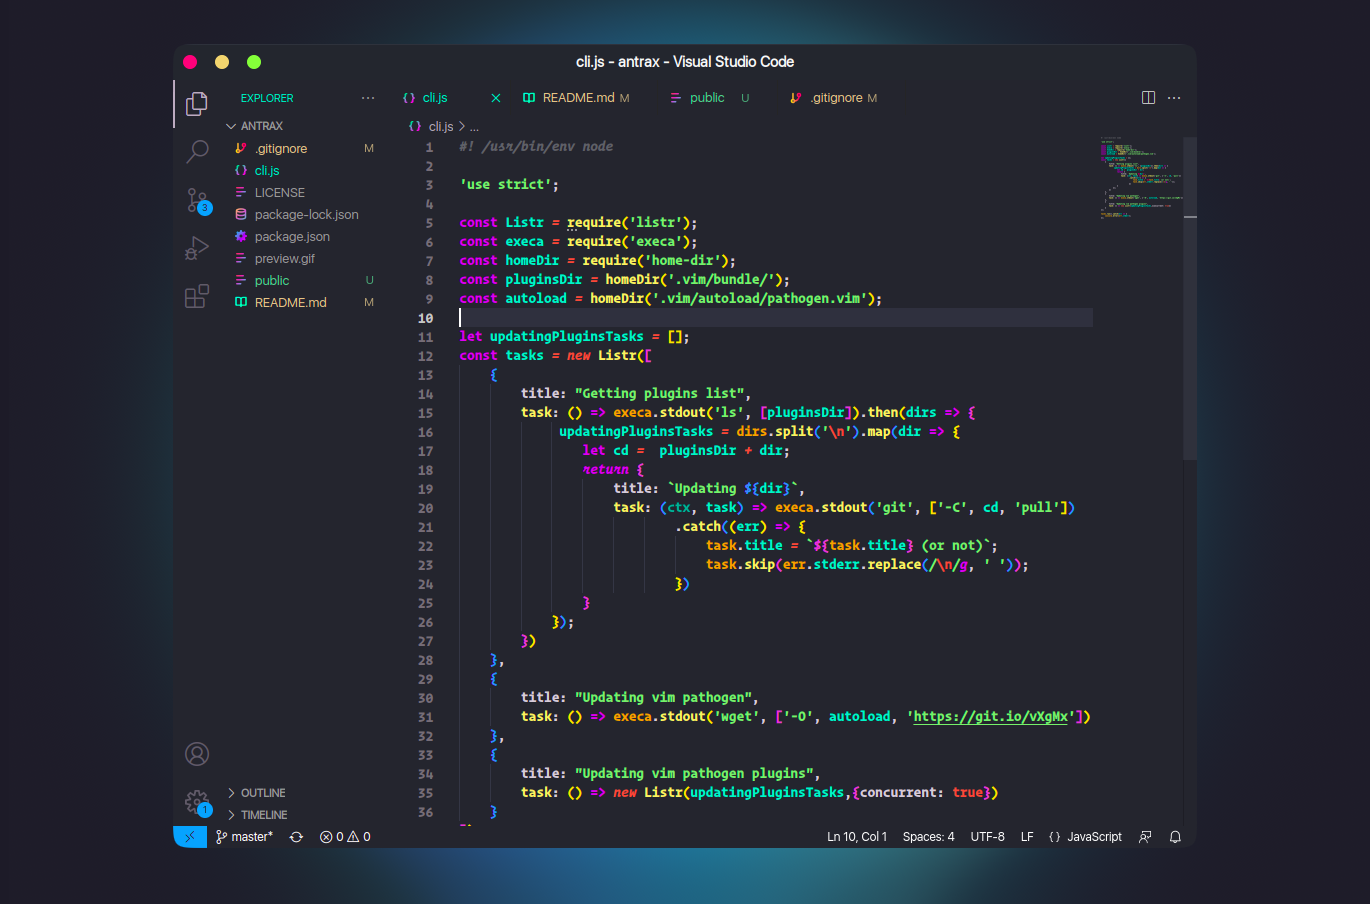
1. Dracula Official

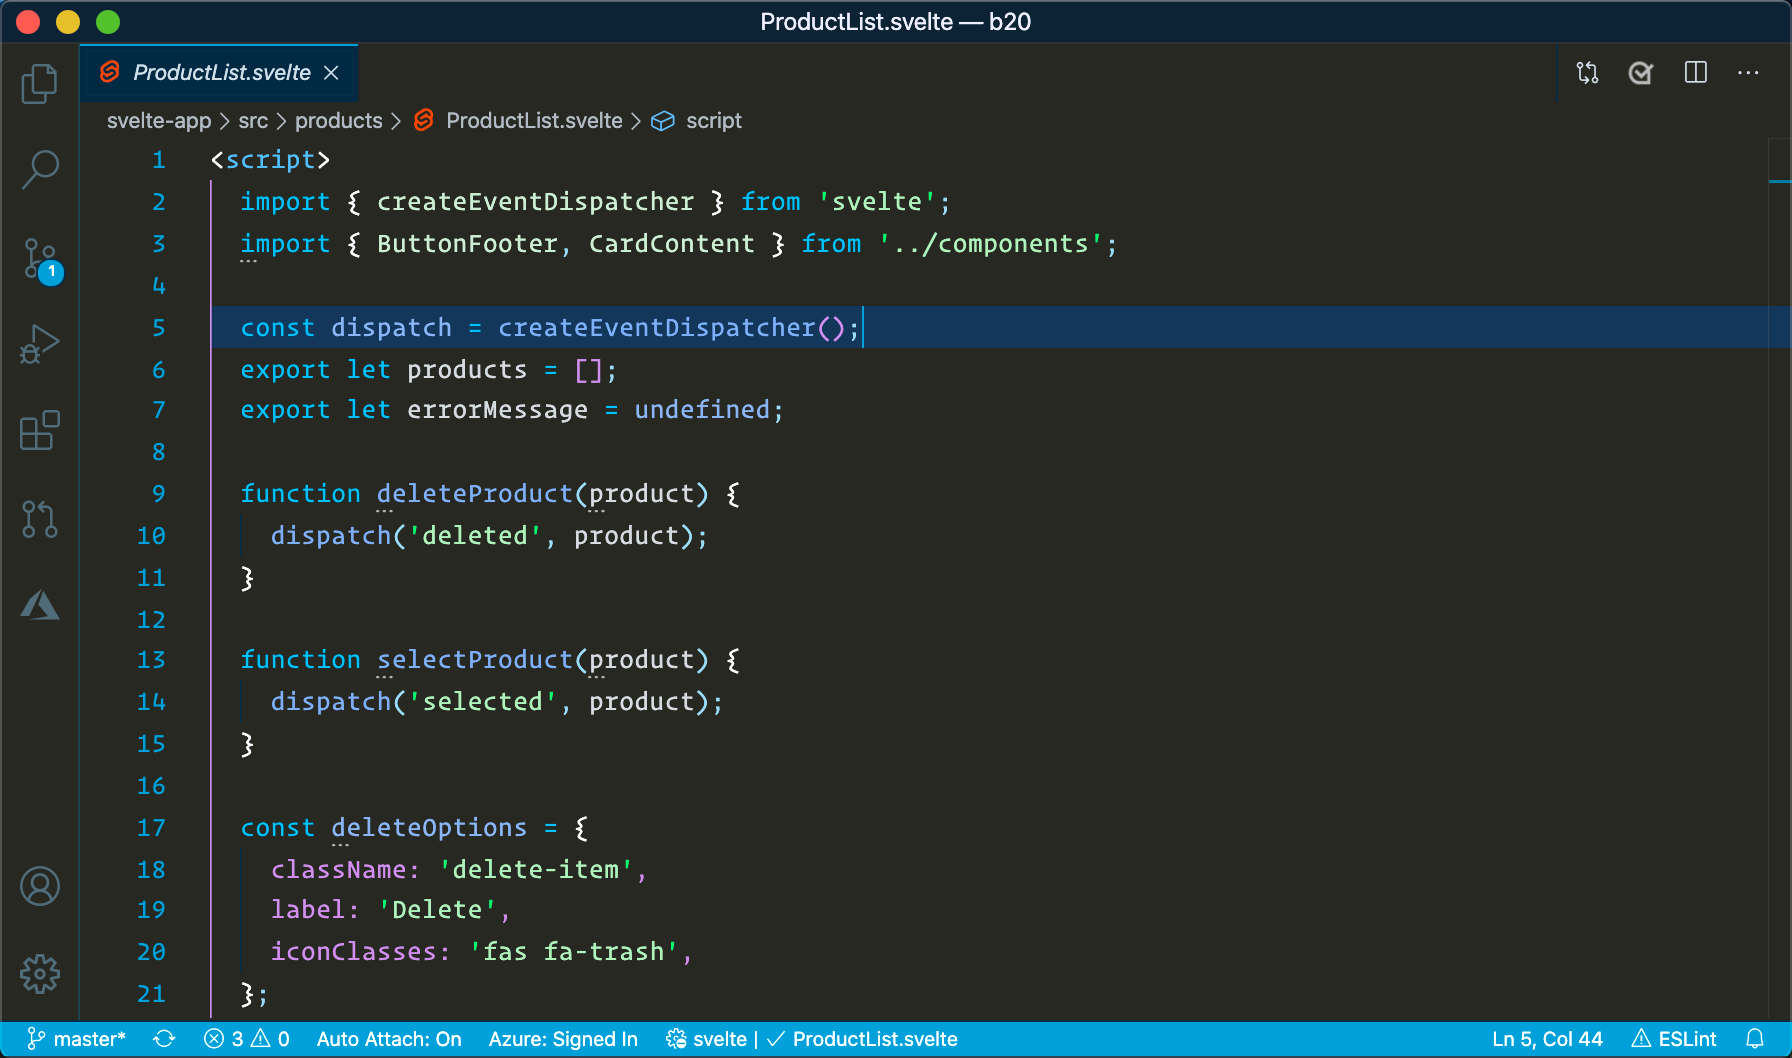
Dracula is a dark, high-contrast theme that has gained a cult following for good reason. It's stylish without being over-the-top, and it helps reduce eye strain during long coding marathons.

19 Beautiful Themes to Get a Better Visual Experience With VS Code

Key Features

✅ Dark, moody aesthetic perfect for low-light environments
✅ Excellent contrast between code elements
✅ Seamless integration across VS Code UI
✅ Used by many developers and YouTubers for its readability

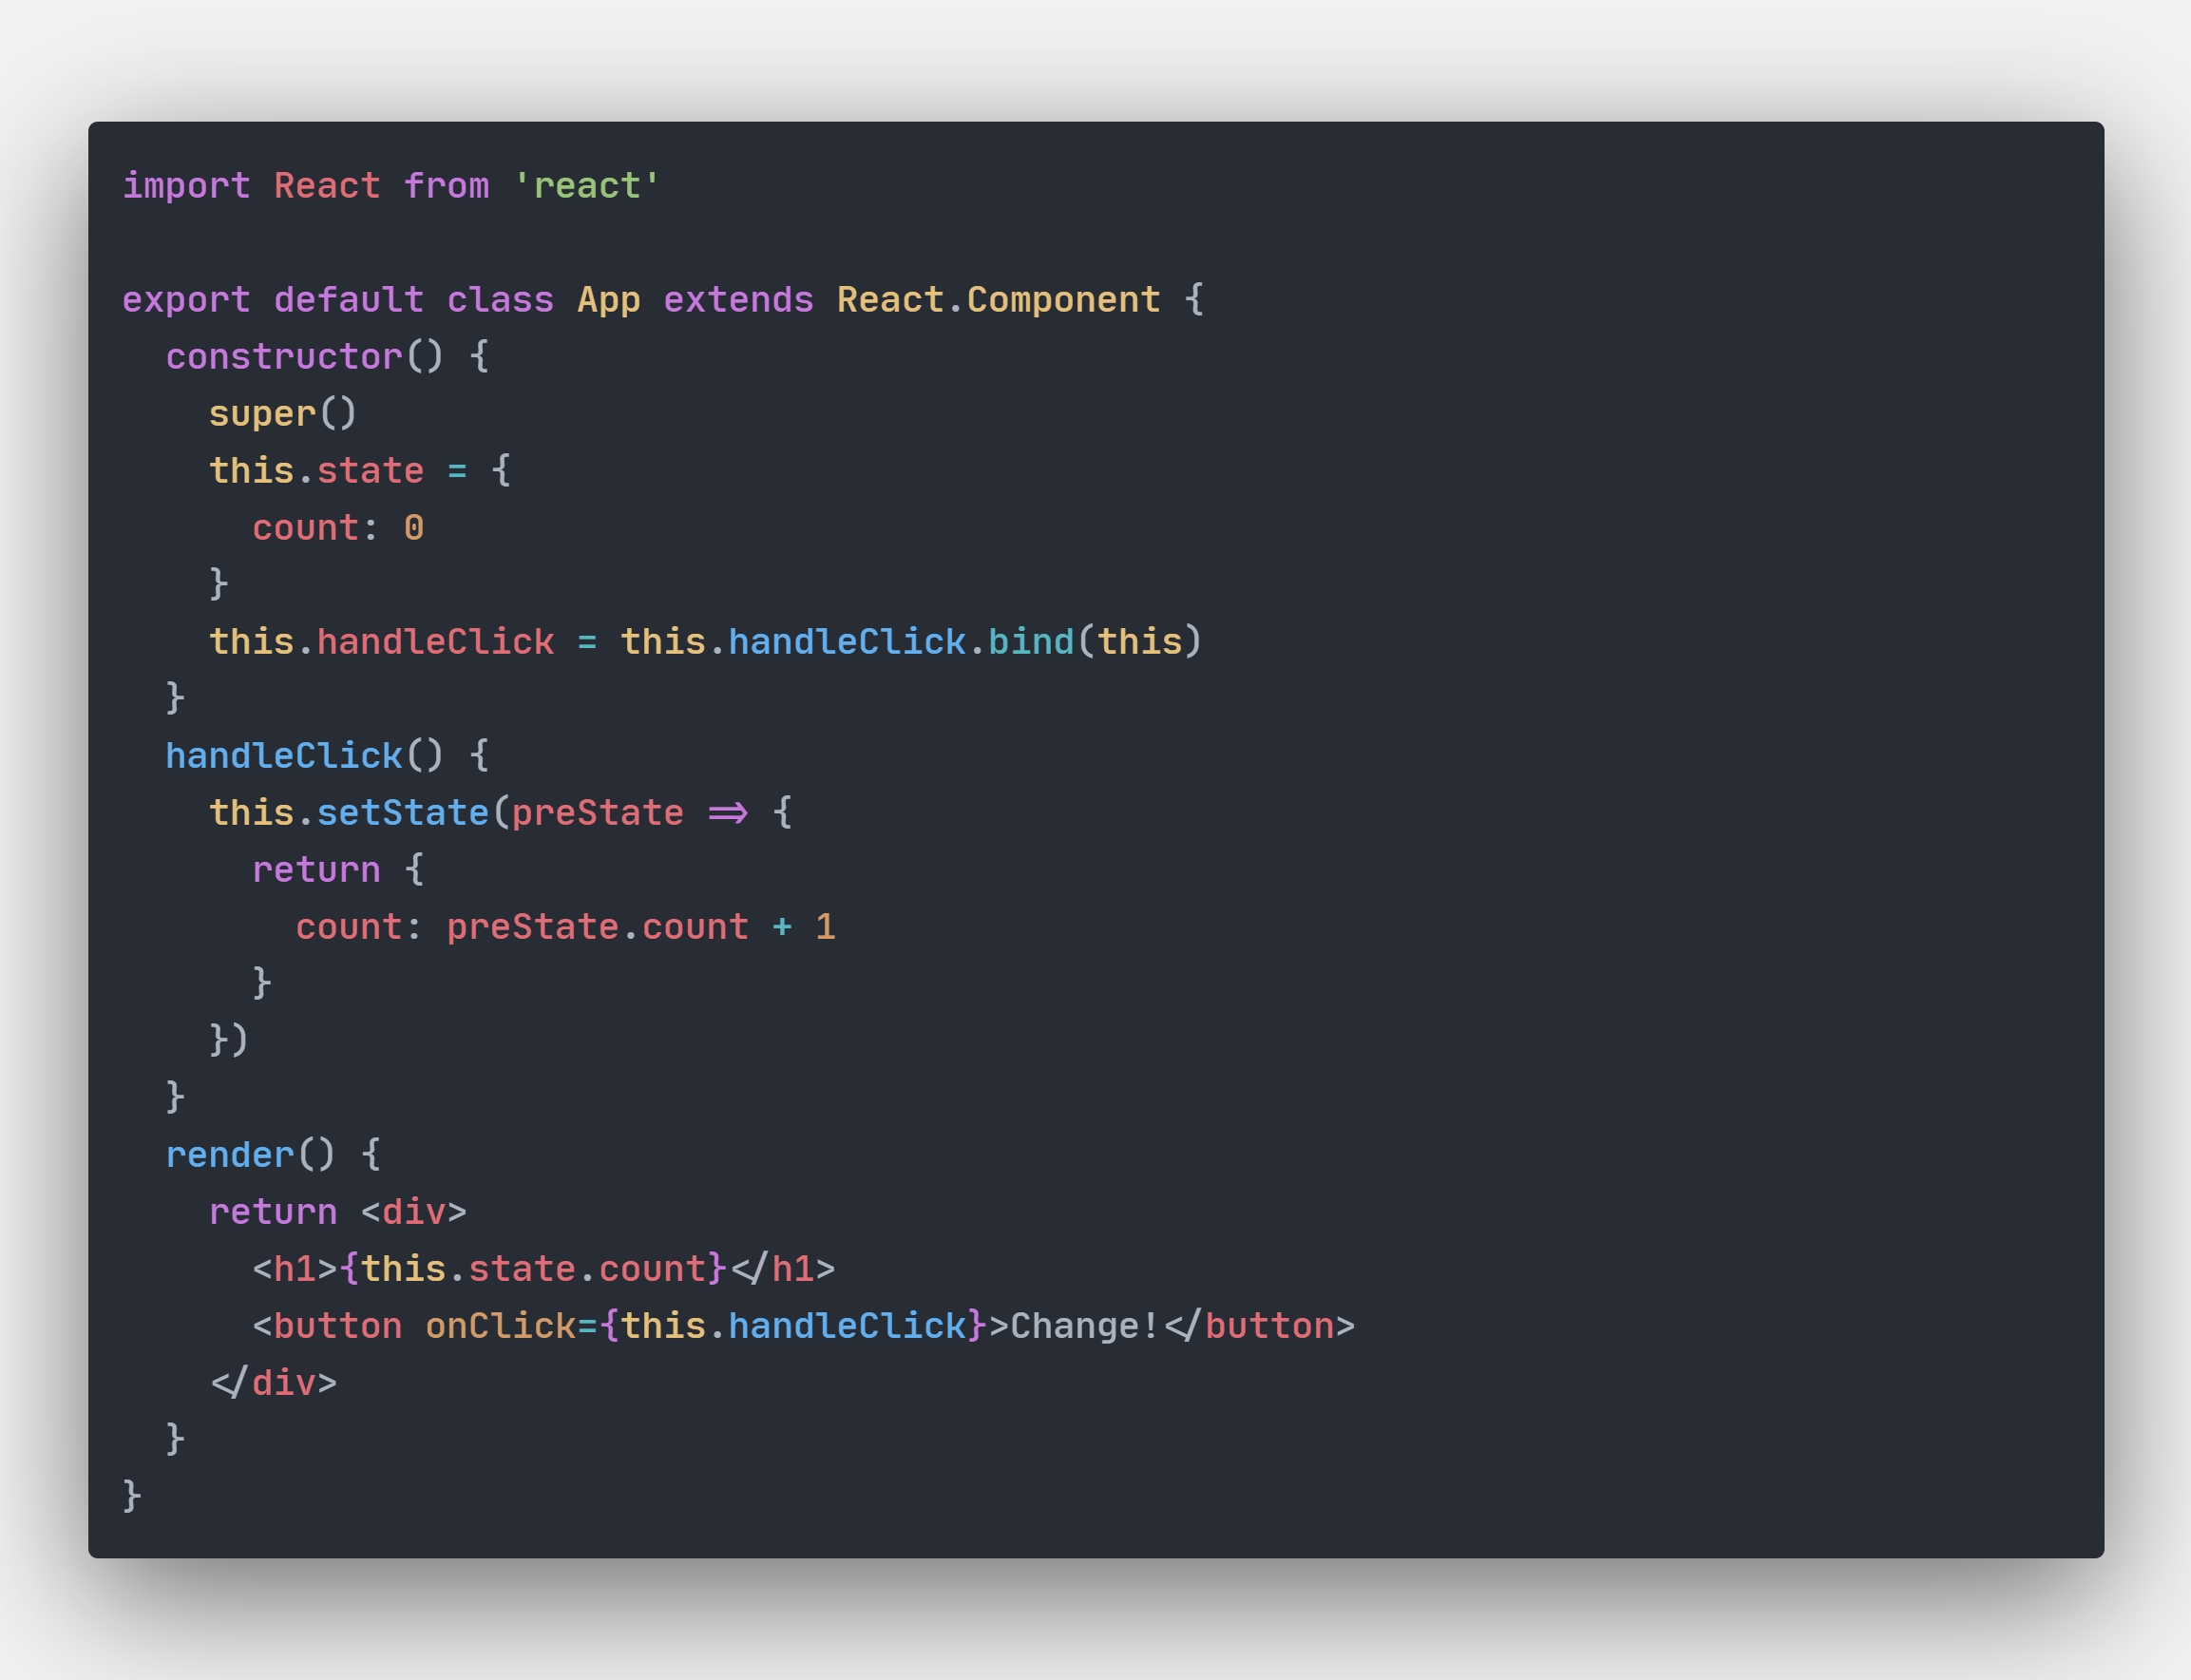
2. One Dark Pro

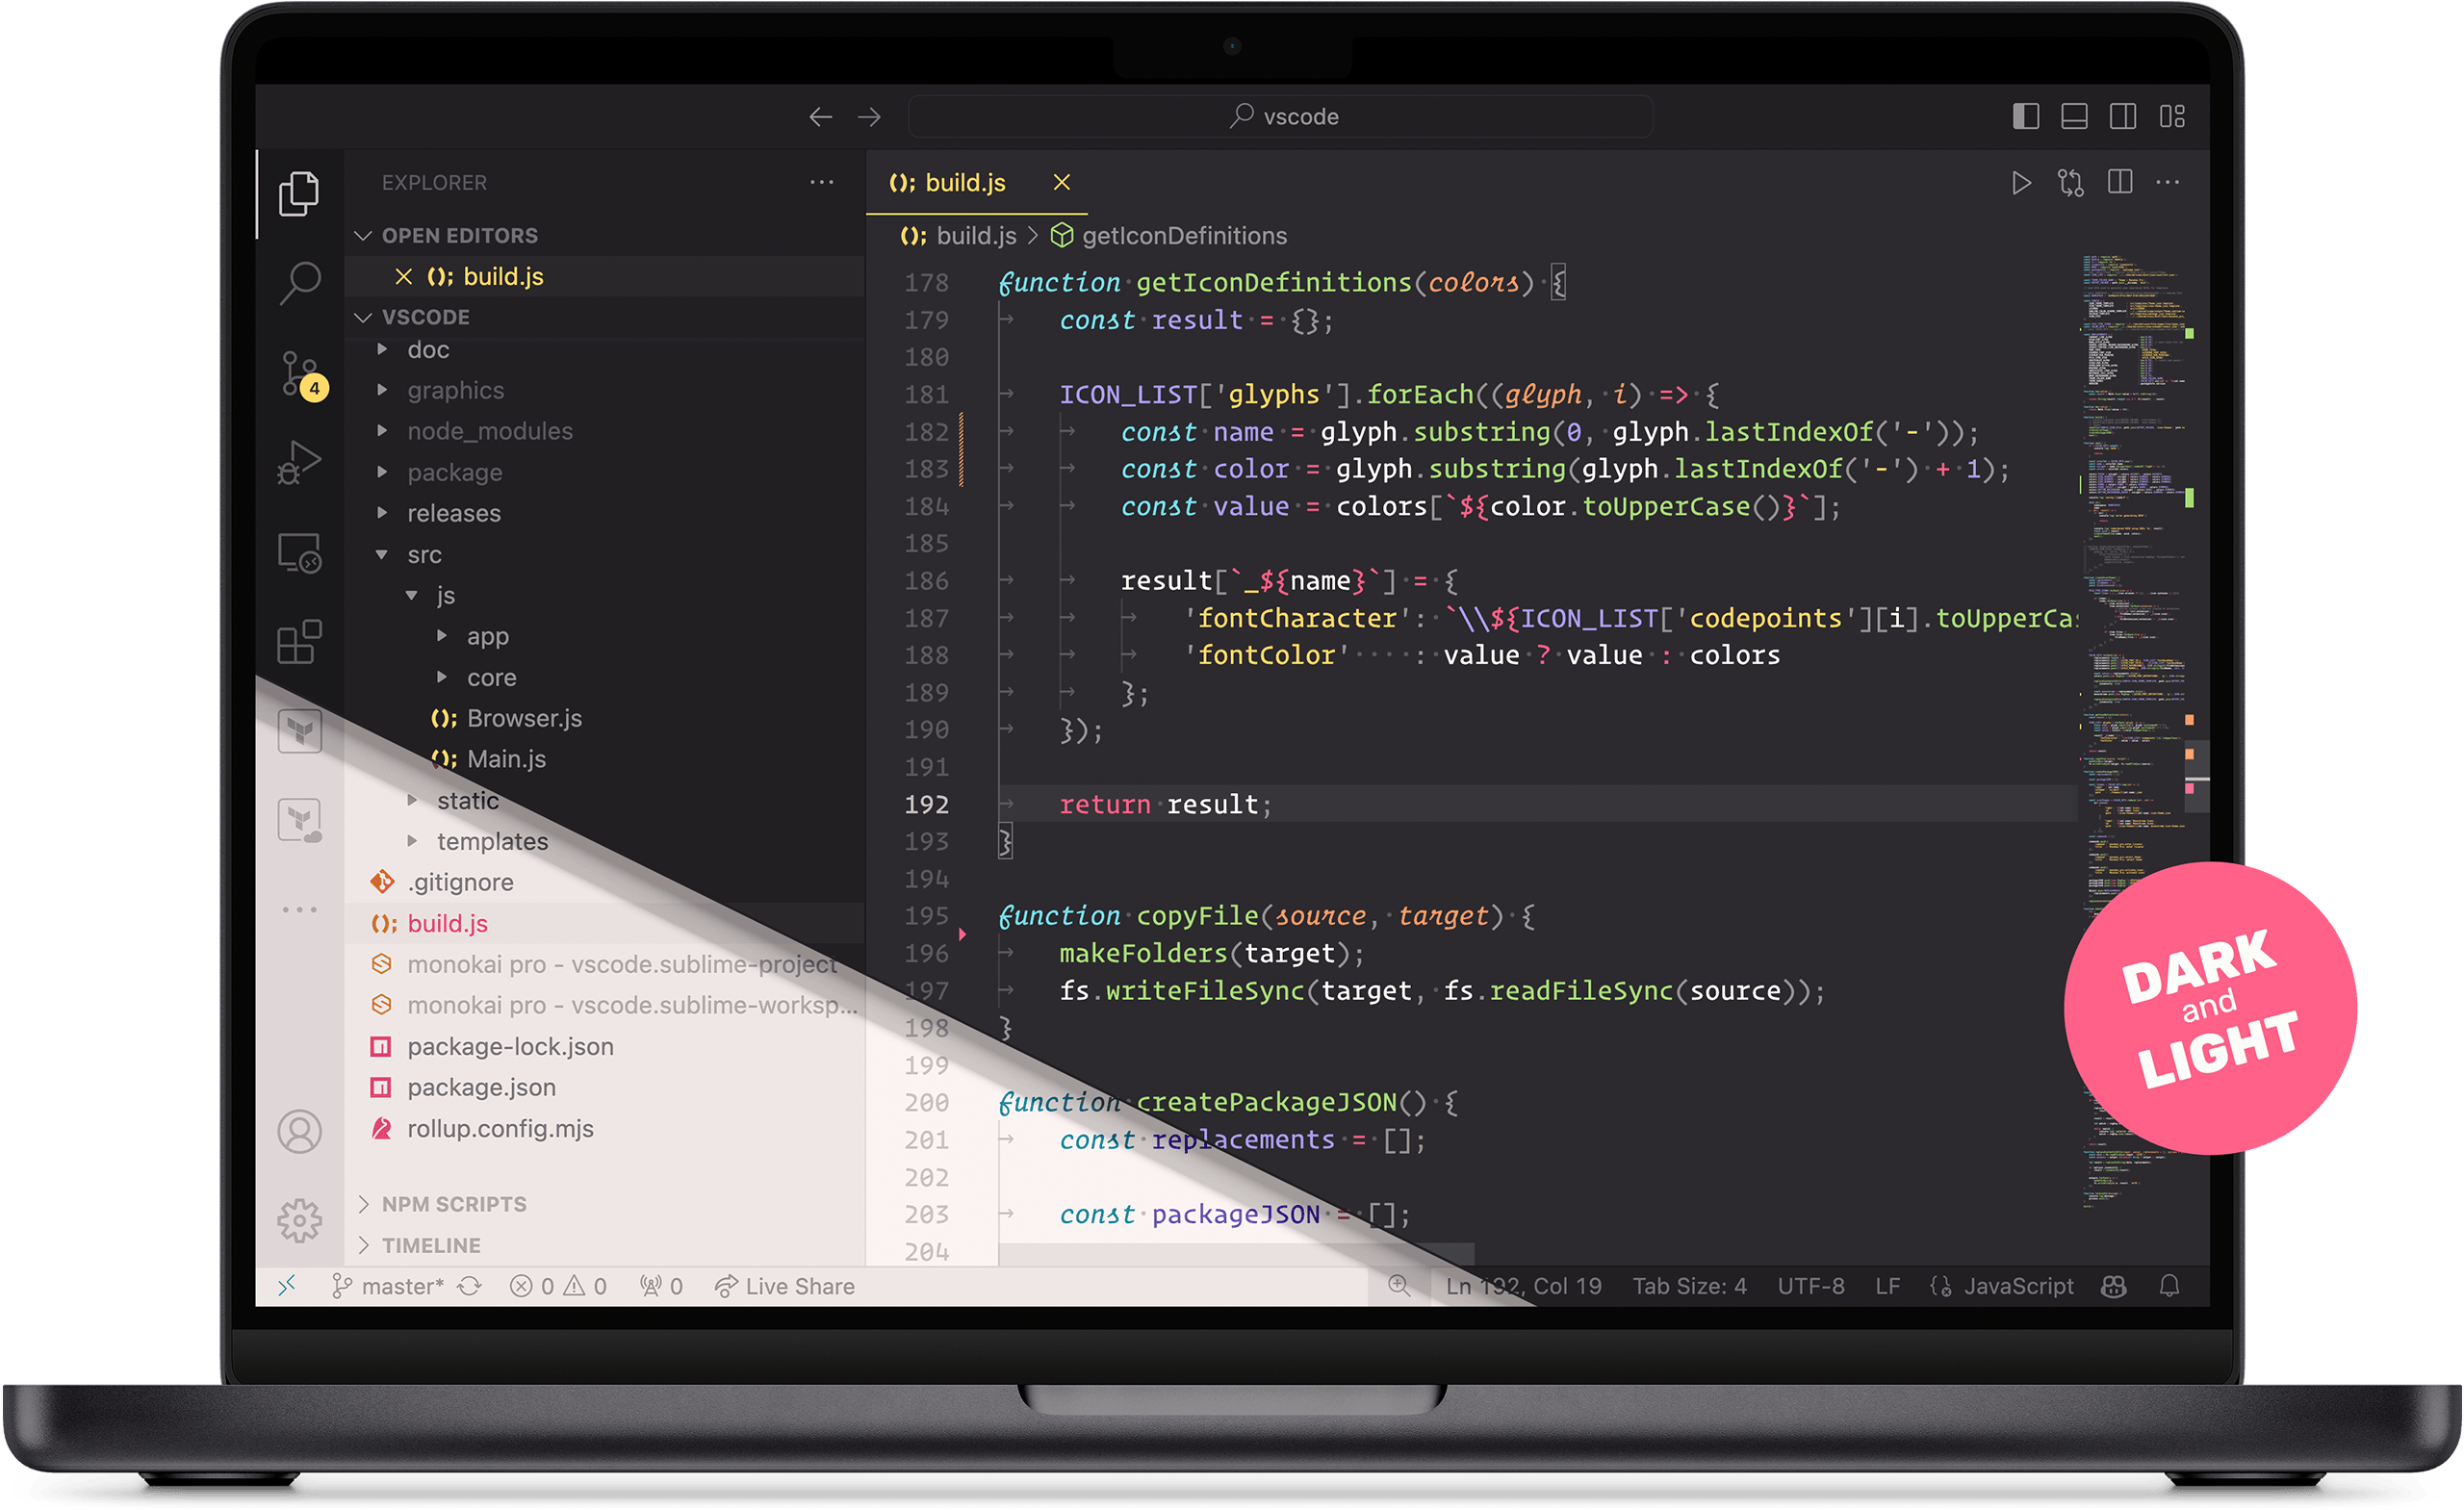
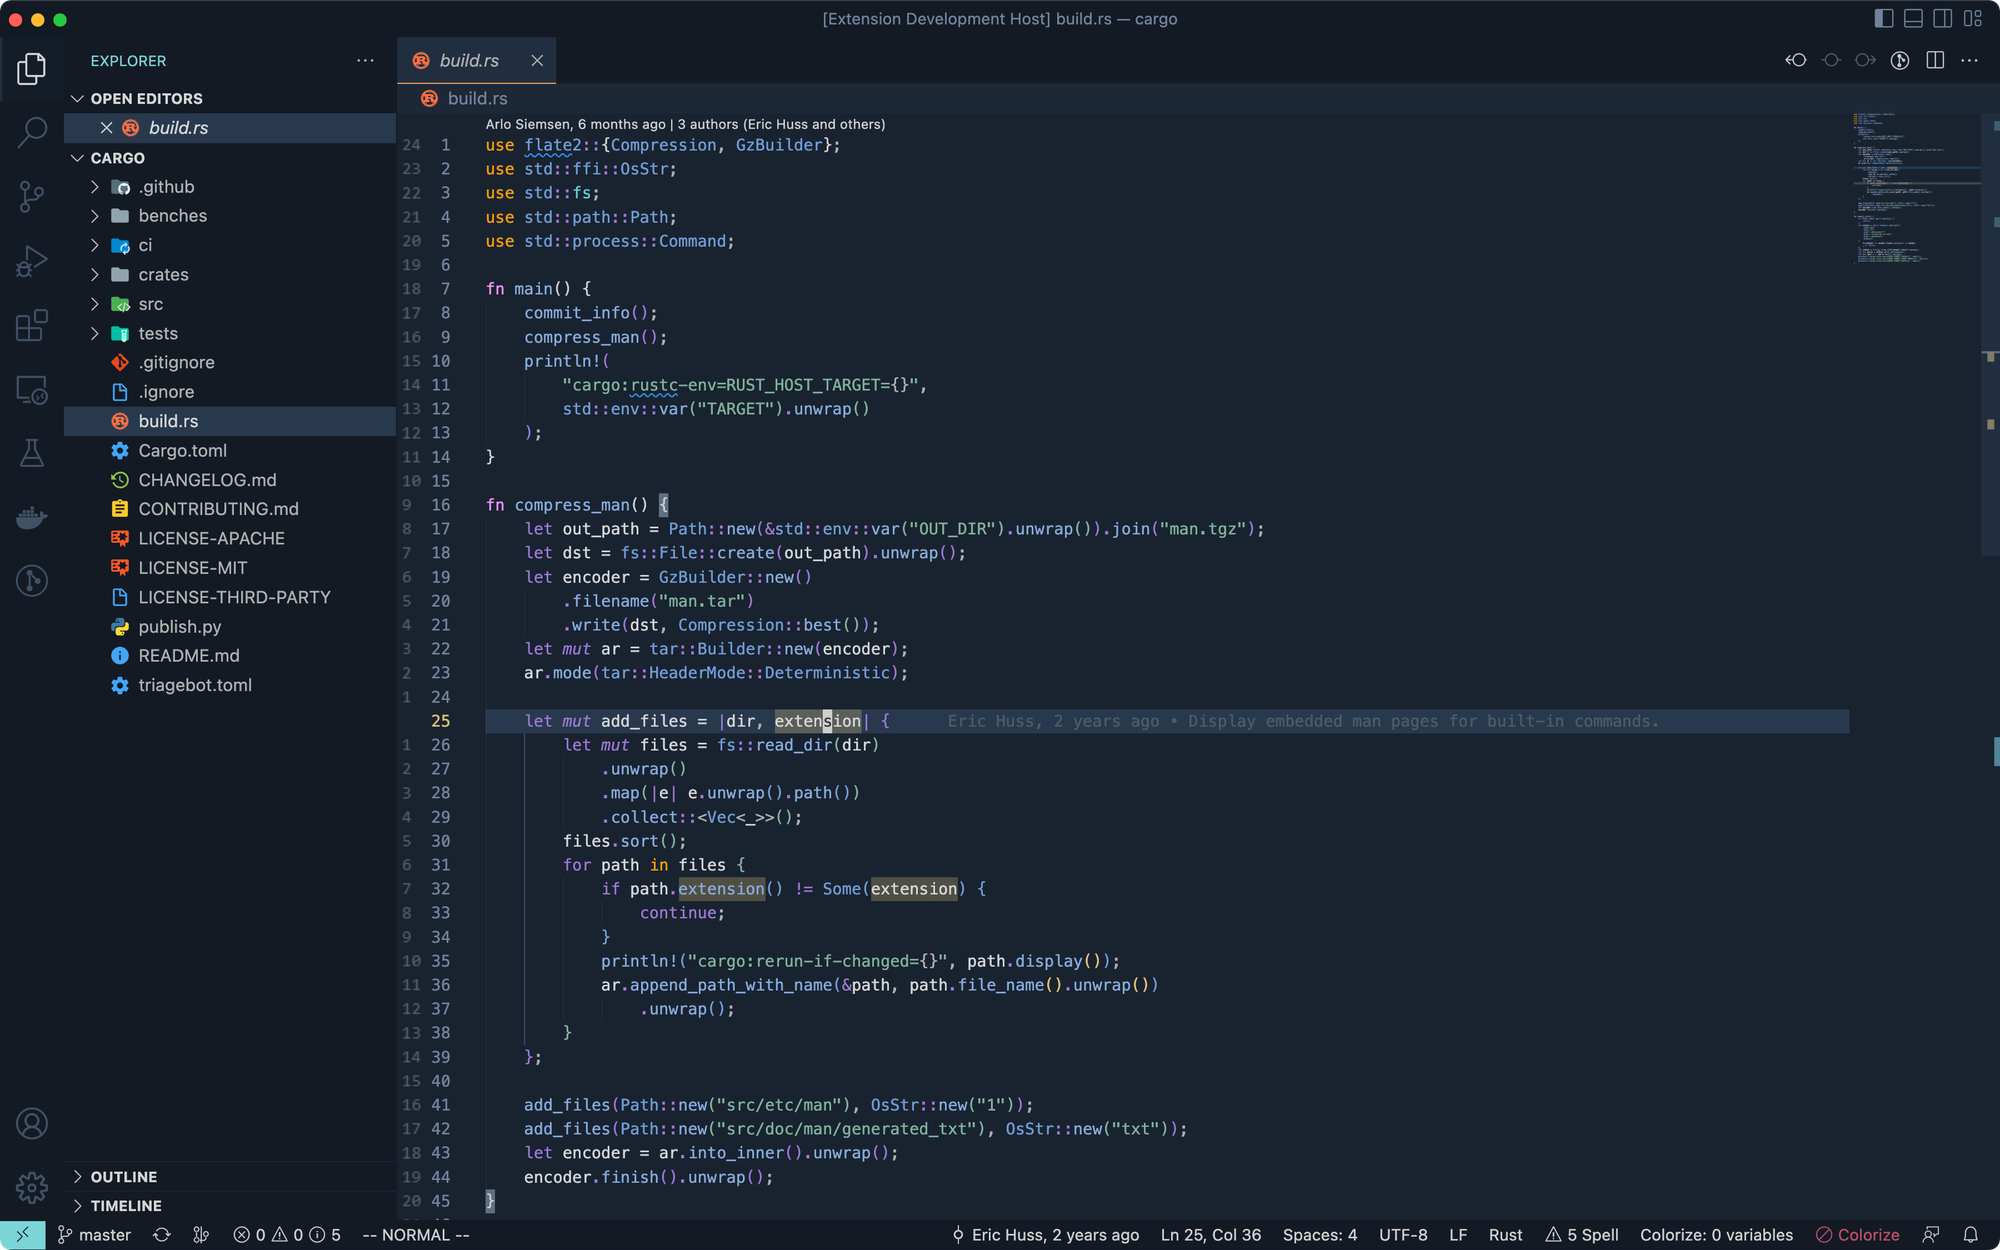
One Dark Pro brings Atom’s beloved “One Dark” theme to VS Code, and it’s just as sharp and modern as ever. If you want a professional and polished look, this is a reliable pick.

19 Beautiful Themes to Get a Better Visual Experience With VS Code

Key Features

✅ Inspired by Atom’s One Dark theme
✅ High readability with strong contrast
✅ Regularly updated and maintained
✅ Works great across many programming languages

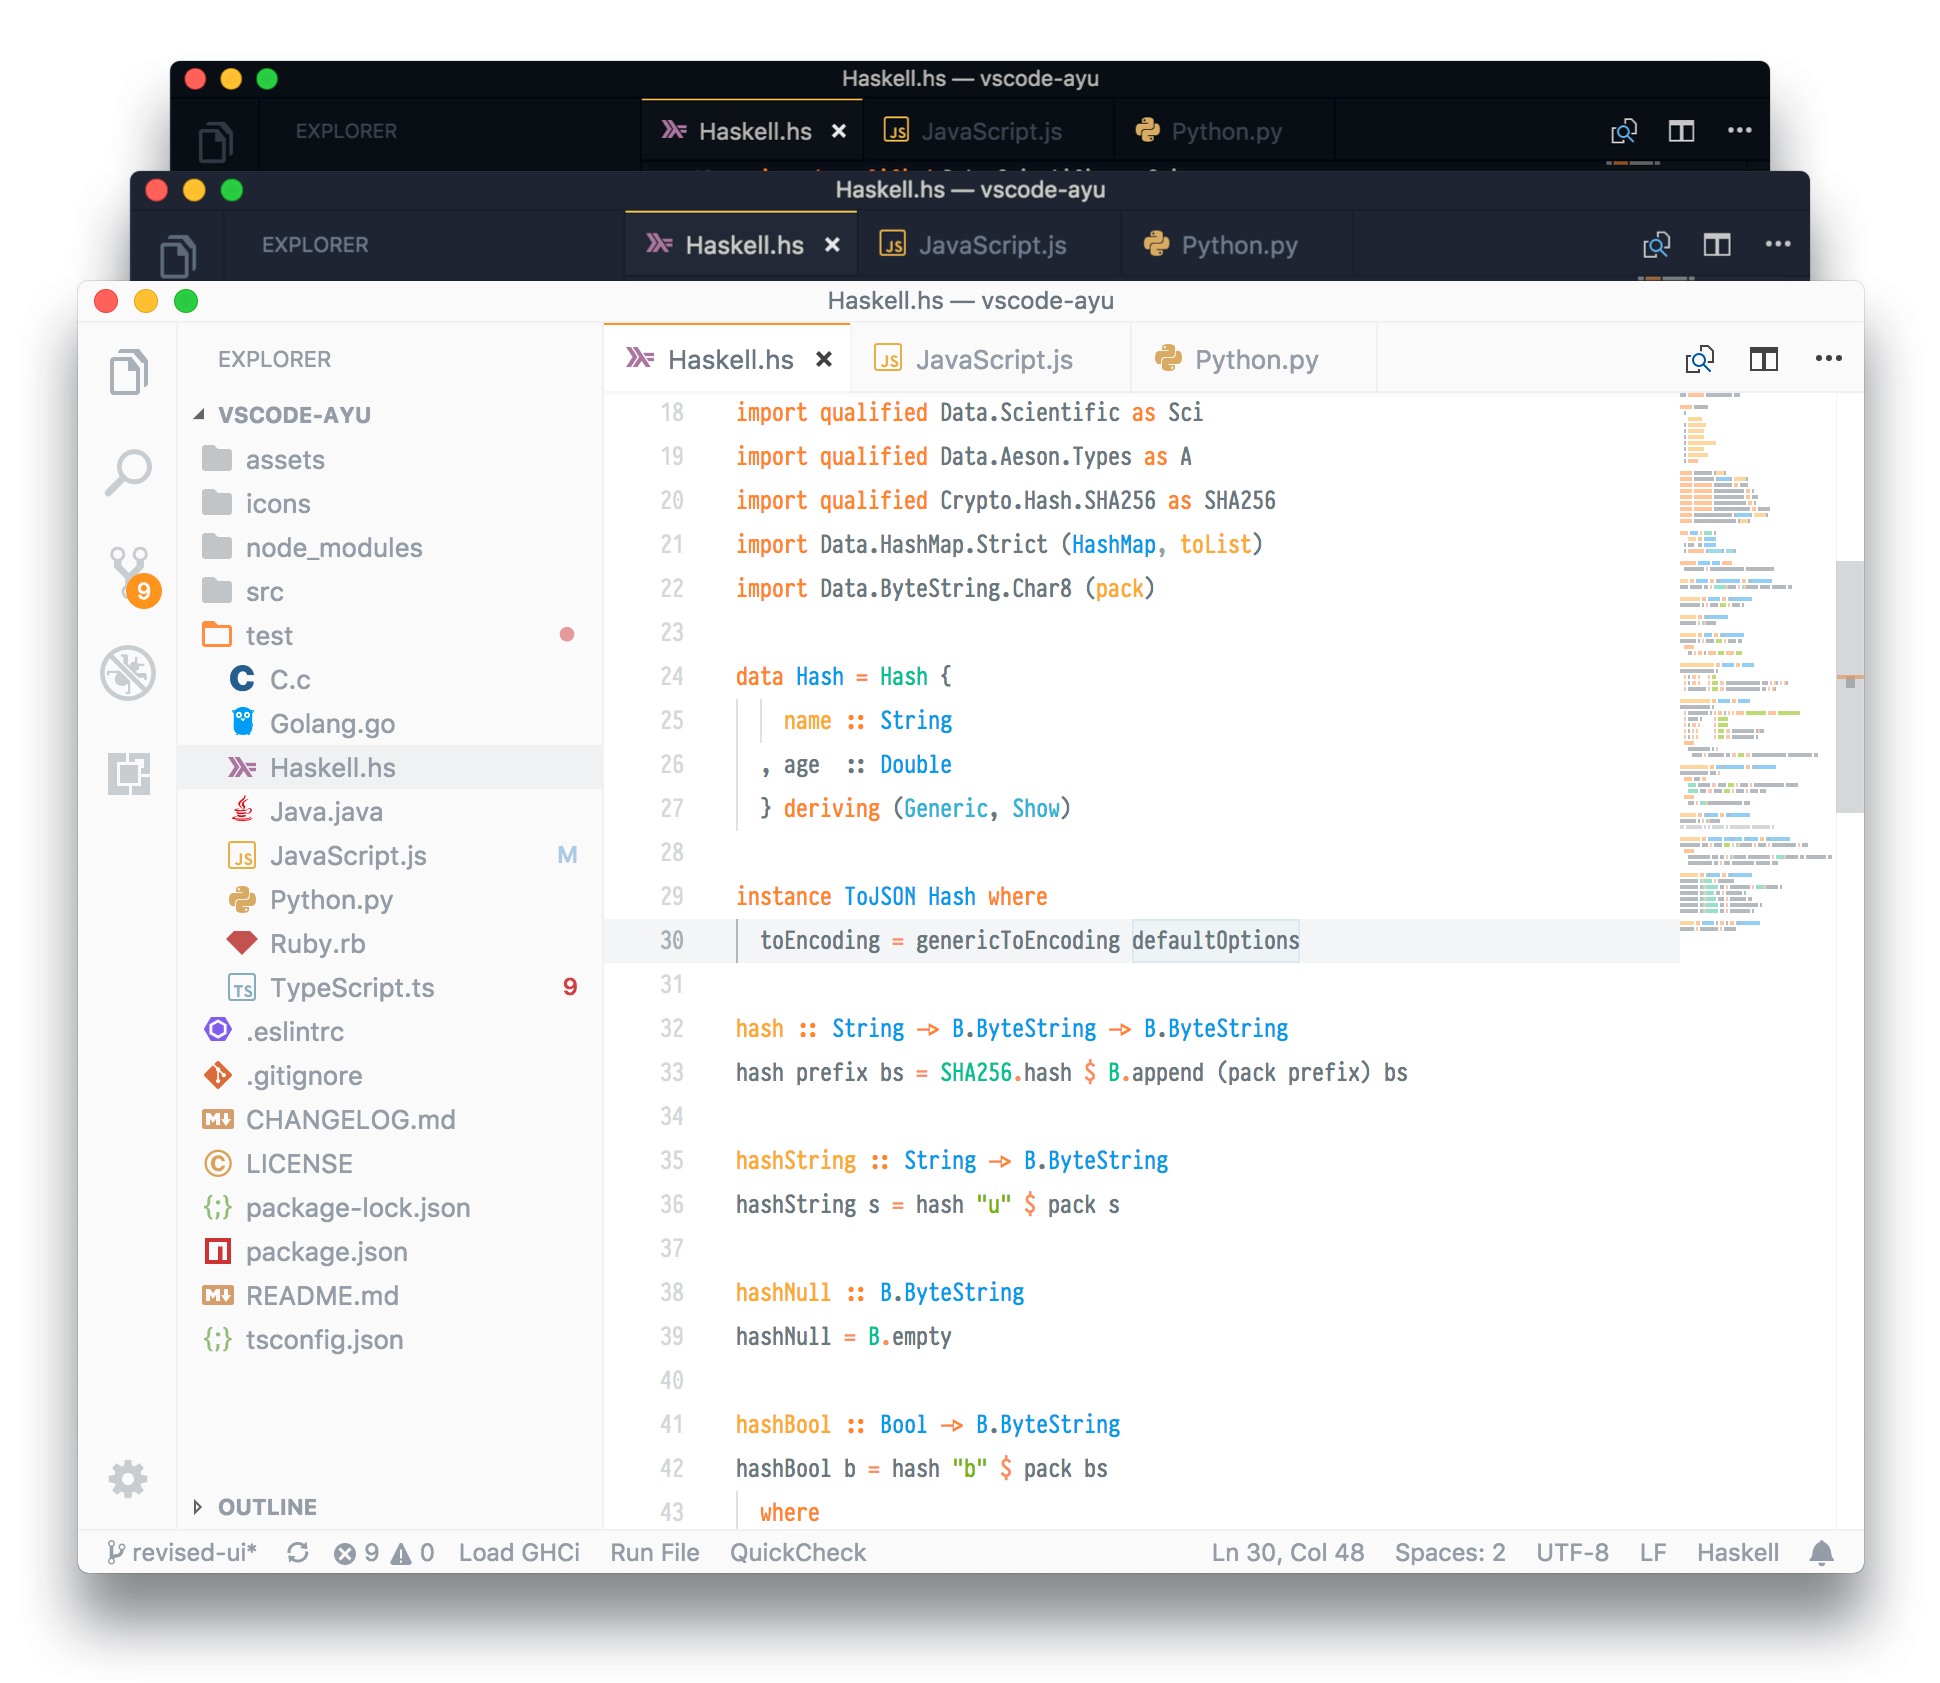
3. Ayu

Ayu is minimal, calm, and pleasing to the eyes. It comes in three flavors - Light, Mirage, and Dark, so you can match your coding mood with your environment.

19 Beautiful Themes to Get a Better Visual Experience With VS Code

Key Features

✅ Minimalist design with soft color tones
✅ Three versions: Ayu Light, Ayu Mirage, and Ayu Dark
✅ Low distraction, easy-to-read syntax coloring
✅ Favored by course creators like CodeWithMosh

4. Tokyo Night

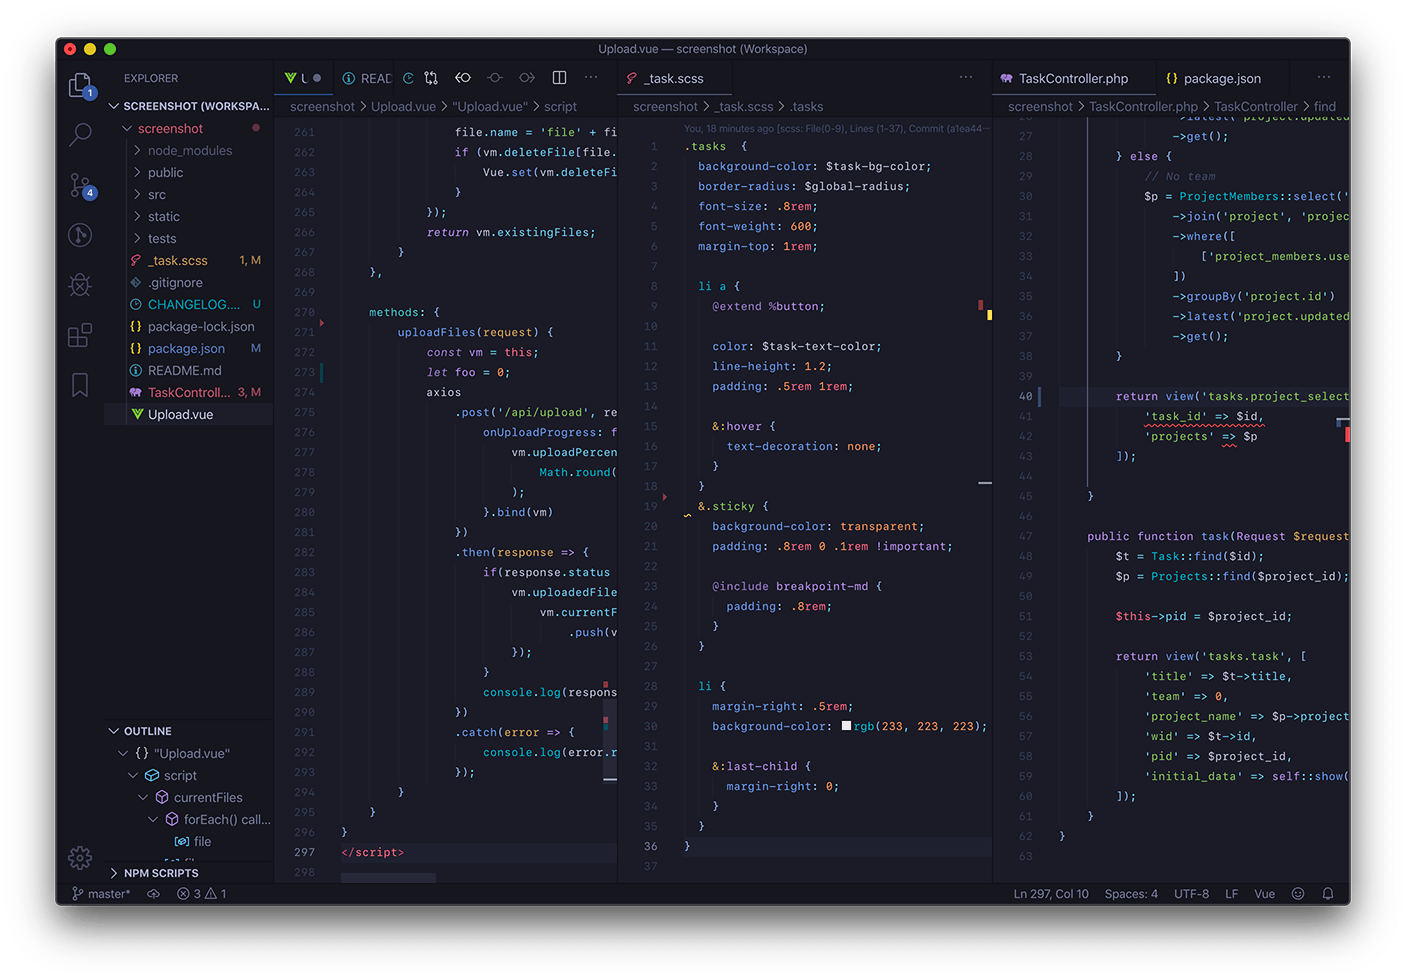
Inspired by the neon lights of Tokyo, this theme is a stylish blend of cool blues and subtle purples. It's perfect if you want something modern yet easy on the eyes.

19 Beautiful Themes to Get a Better Visual Experience With VS Code

Key Features

✅ Visually rich, inspired by Tokyo’s nightscape
✅ Low-contrast UI with clear syntax highlights
✅ Semantic highlighting for better code clarity
✅ Available for other editors like Vim and iTerm

5. GitHub Theme

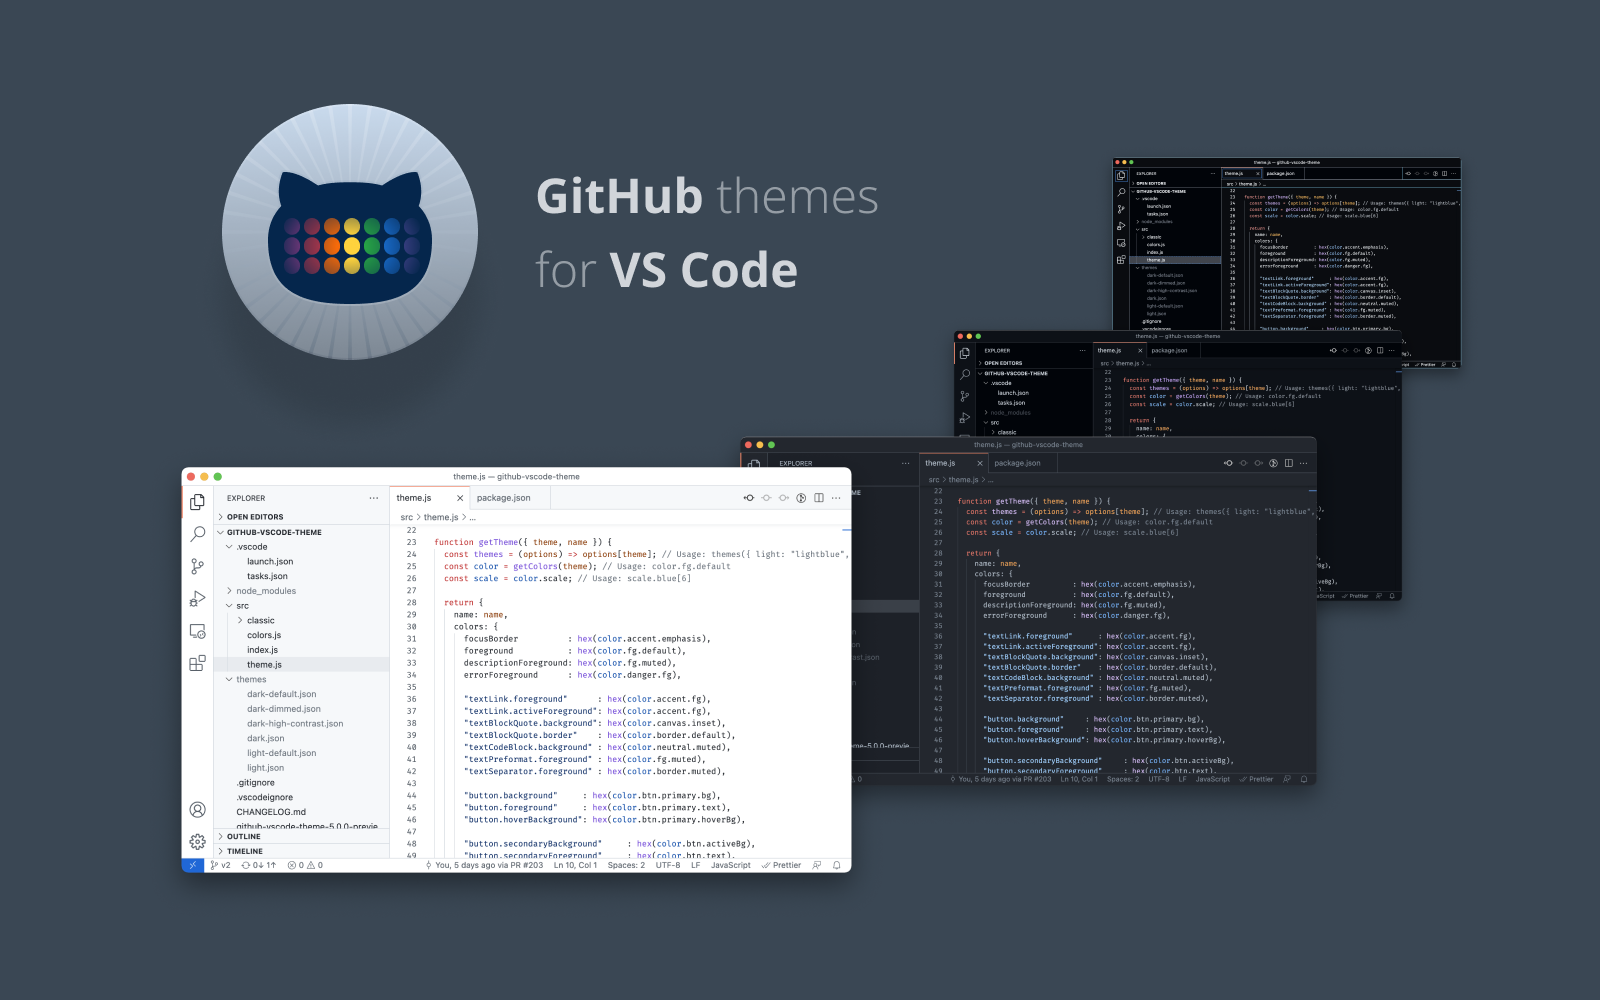
Want your VS Code to look like GitHub? This official theme does exactly that. It’s familiar, balanced, and comes with modes for different lighting preferences.

19 Beautiful Themes to Get a Better Visual Experience With VS Code

Key Features

✅ Light, dark, and colorblind-friendly modes
✅ Clean and familiar GitHub look
✅ Open-source and customizable
✅ Great for developers already using GitHub extensively

6. Noctis

Noctis is a modern theme that comes in multiple variations - light and dark, to suit any mood. It’s especially great if you want a lighter theme without blinding brightness.

19 Beautiful Themes to Get a Better Visual Experience With VS Code

Key Features

✅ Comes in multiple light and dark variations
✅ Elegant design with smart syntax color choices
✅ Clean UI that doesn’t distract from code
✅ Over a million installs and counting

7. Shades of Purple

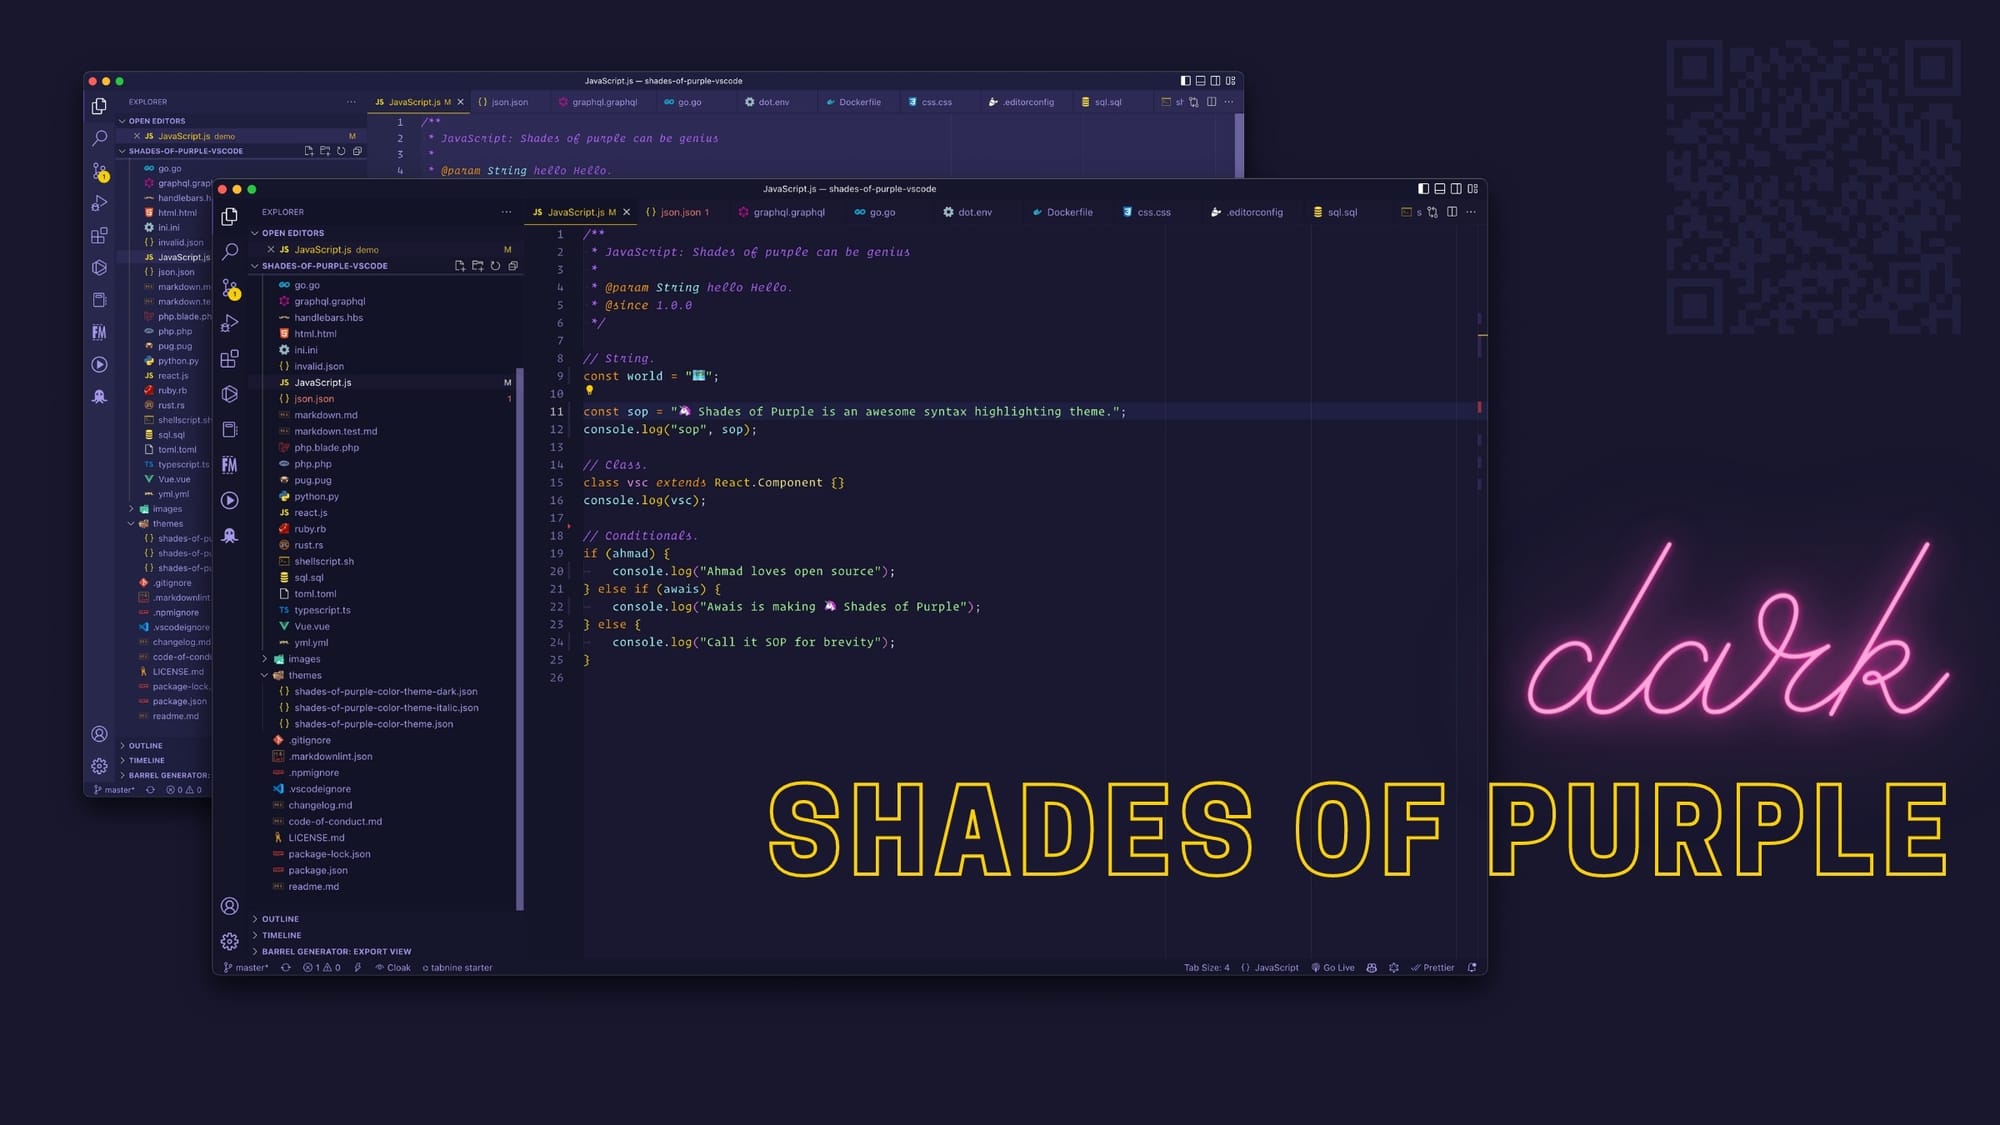
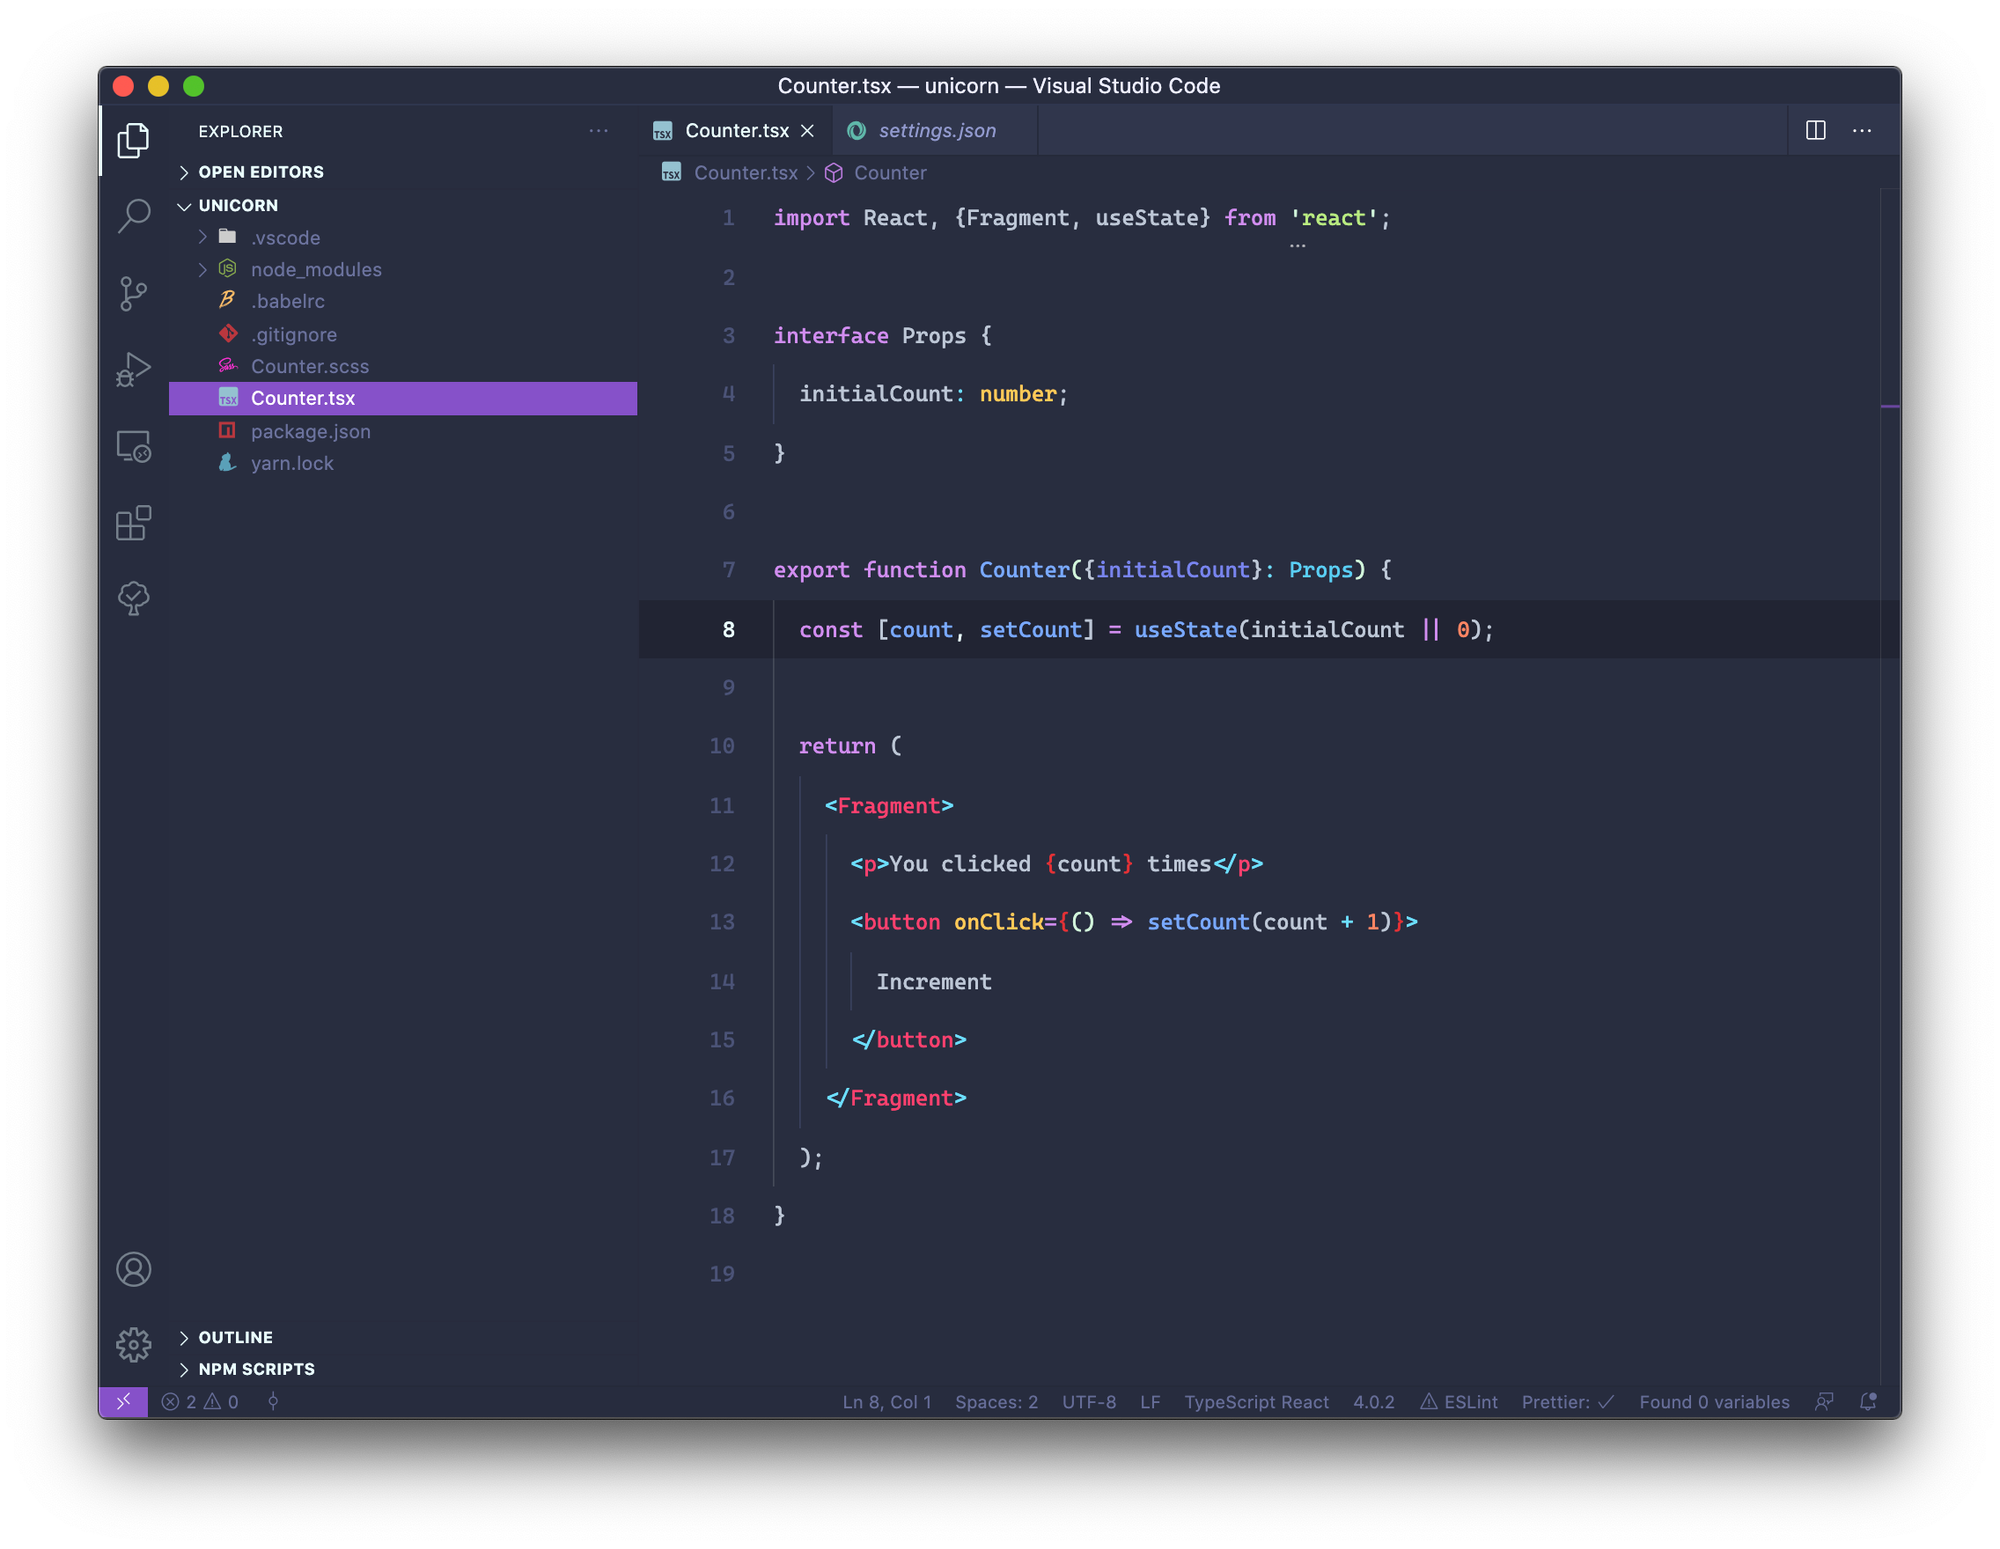
If you’re into vibrant colors and want your editor to stand out, Shades of Purple might be your new favorite. Created by developer Ahmad Awais, it’s bold and beautiful.

19 Beautiful Themes to Get a Better Visual Experience With VS Code

Key Features

✅ Unique purple-toned color palette
✅ Great readability with striking contrast
✅ Open-source and easy to tweak
✅ Adds flair without sacrificing usability

8. Night Owl / Light Owl

Night Owl is designed specifically for night-time coders, with high contrast that’s easy on the eyes. Prefer a brighter option? Light Owl is the lighter counterpart.

19 Beautiful Themes to Get a Better Visual Experience With VS Code

Key Features

✅ Designed for readability in low-light settings
✅ Strong contrast without harsh brightness
✅ Light and dark versions available
✅ Cross-platform availability (Hyper, Vim, etc.)

9. Monokai Pro

Monokai Pro adds a polished twist to the classic Monokai theme. With balanced color filters, beautiful syntax highlighting, and pixel-perfect design, this theme feels professional and productive.

19 Beautiful Themes to Get a Better Visual Experience With VS Code

Key Features

✅ Polished version of the original Monokai
✅ Customizable filters and UI tweaks
✅ Eye-friendly for long sessions
✅ Available as part of a paid package (with free trial)

10. Cobalt2

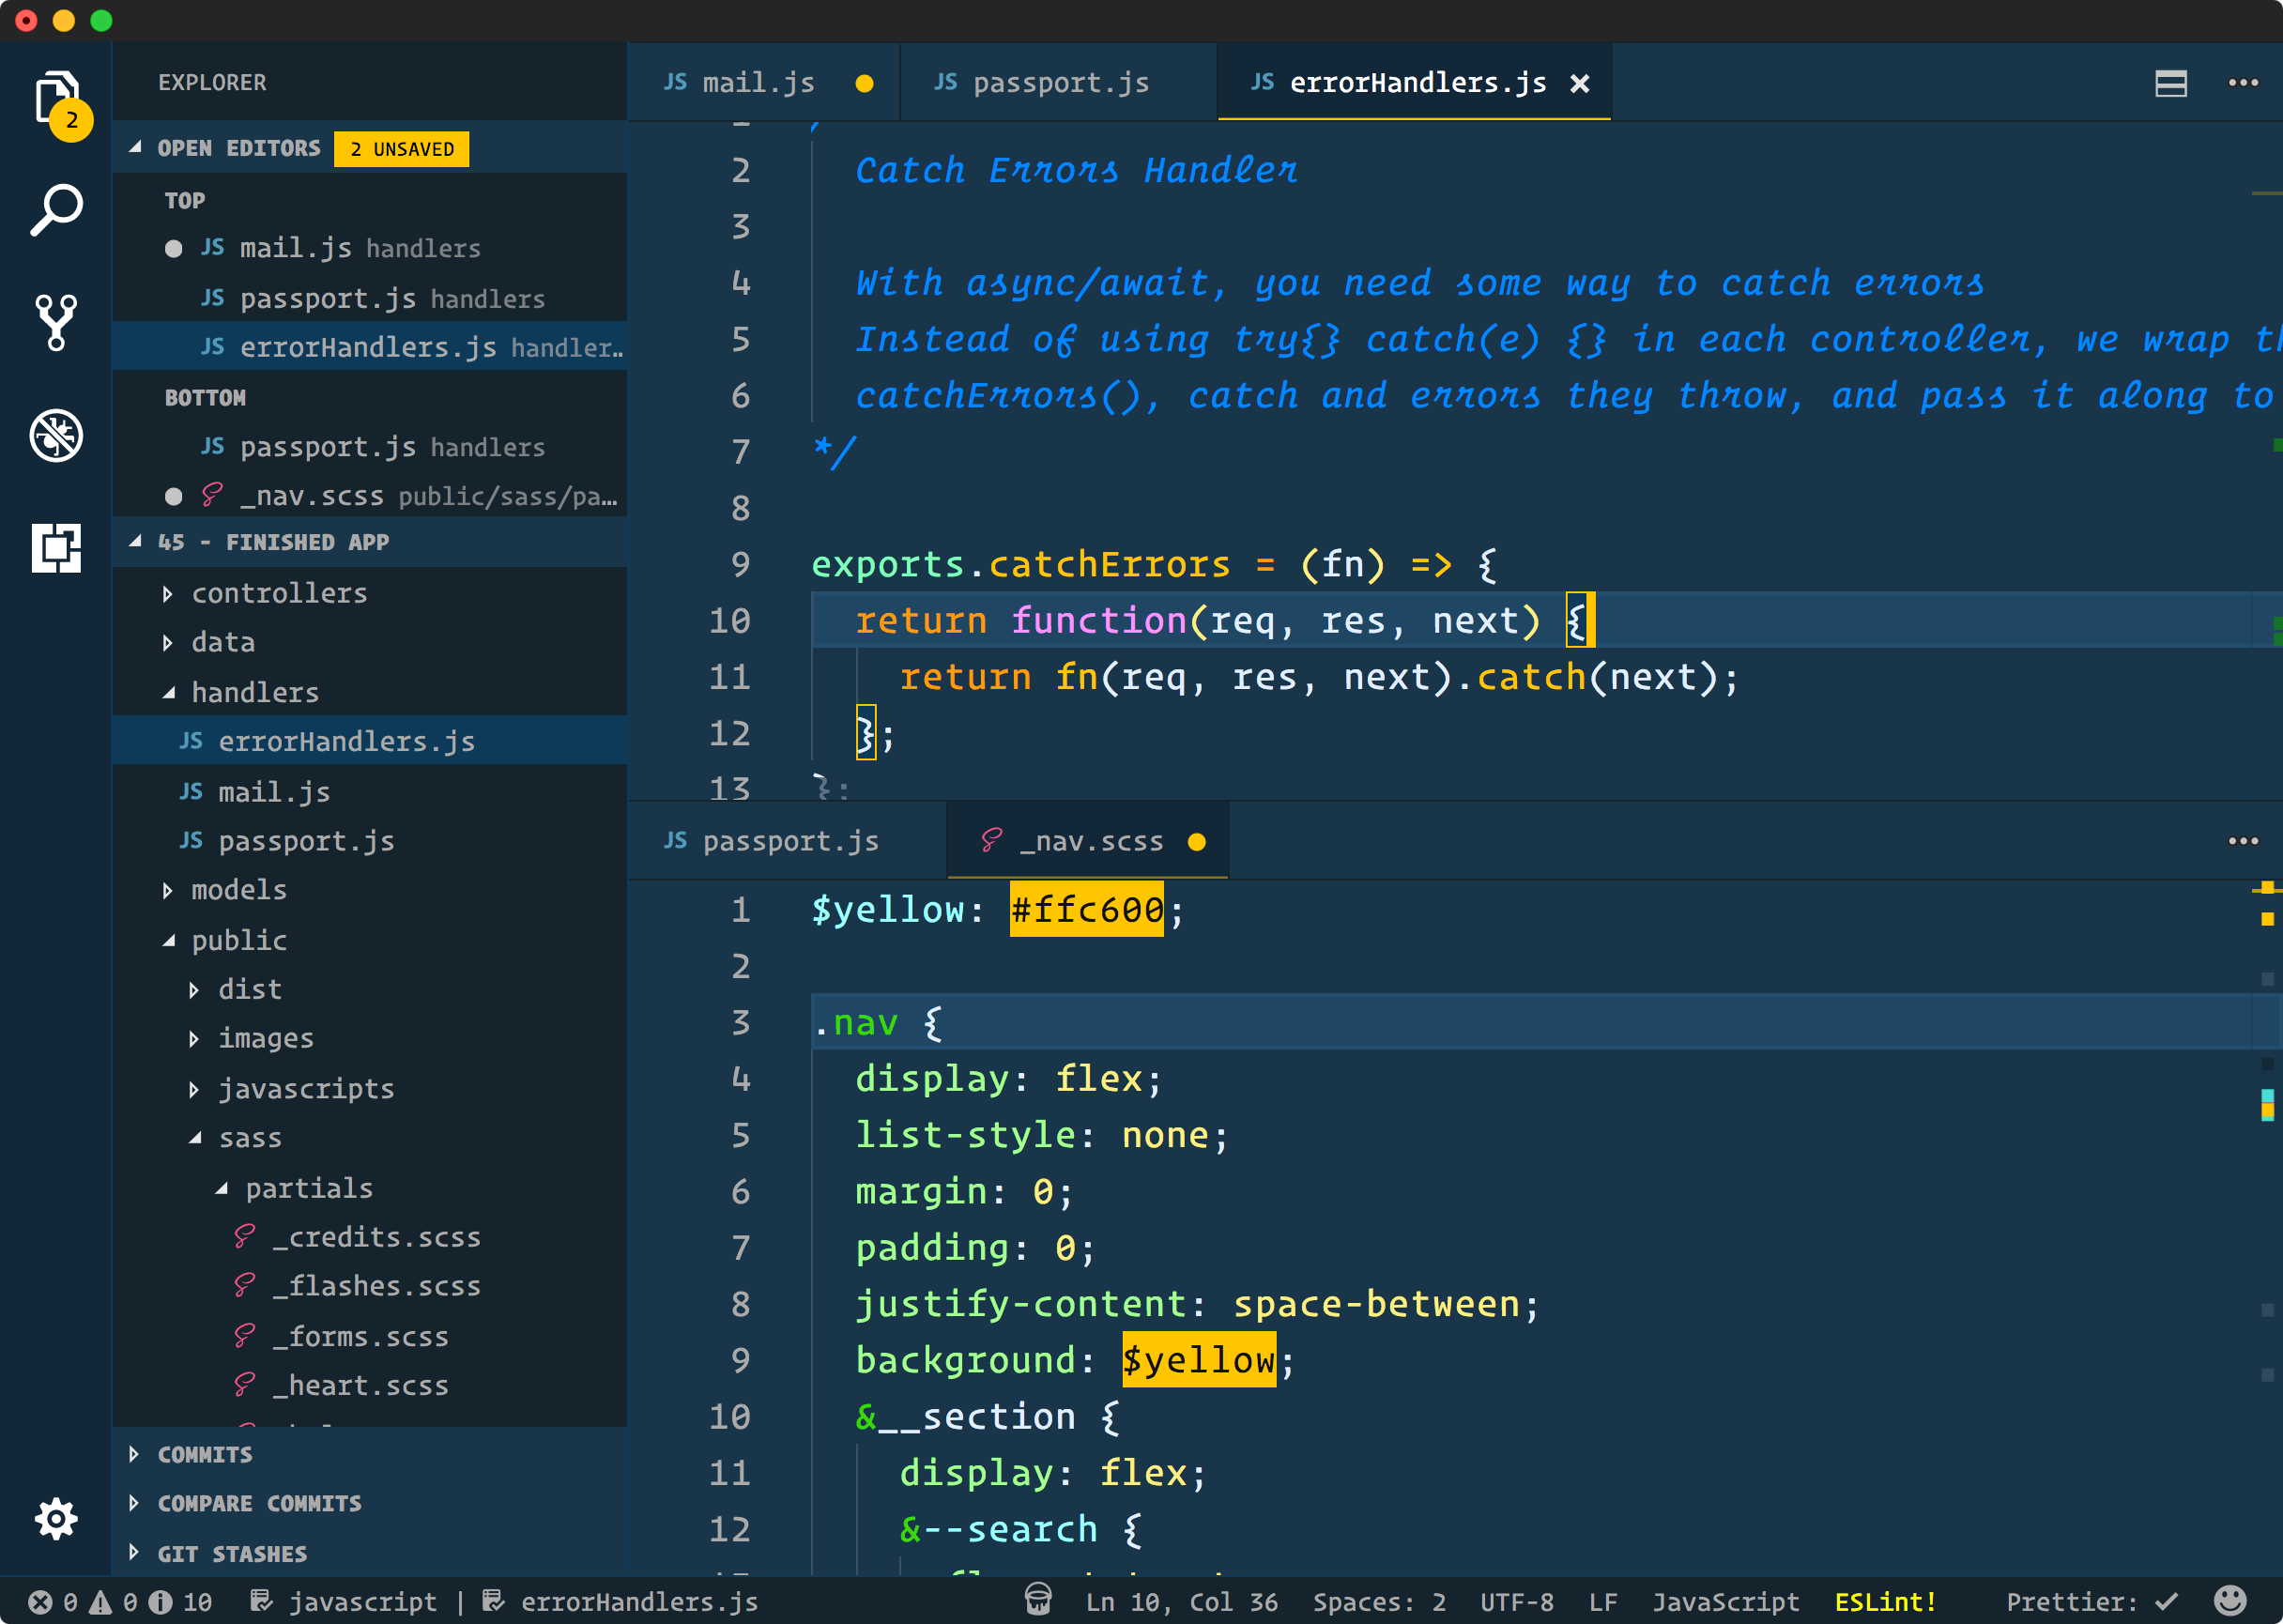
Created by Wes Bos, Cobalt2 is bold and playful without sacrificing usability. Its distinctive blue and yellow color combo stands out and is great if you want something different.

19 Beautiful Themes to Get a Better Visual Experience With VS Code

Key Features

✅ Designed by a popular web developer
✅ Unique color palette with good contrast
✅ Works across editors and terminals
✅ Open-source and customizable

11. Bluloco Light

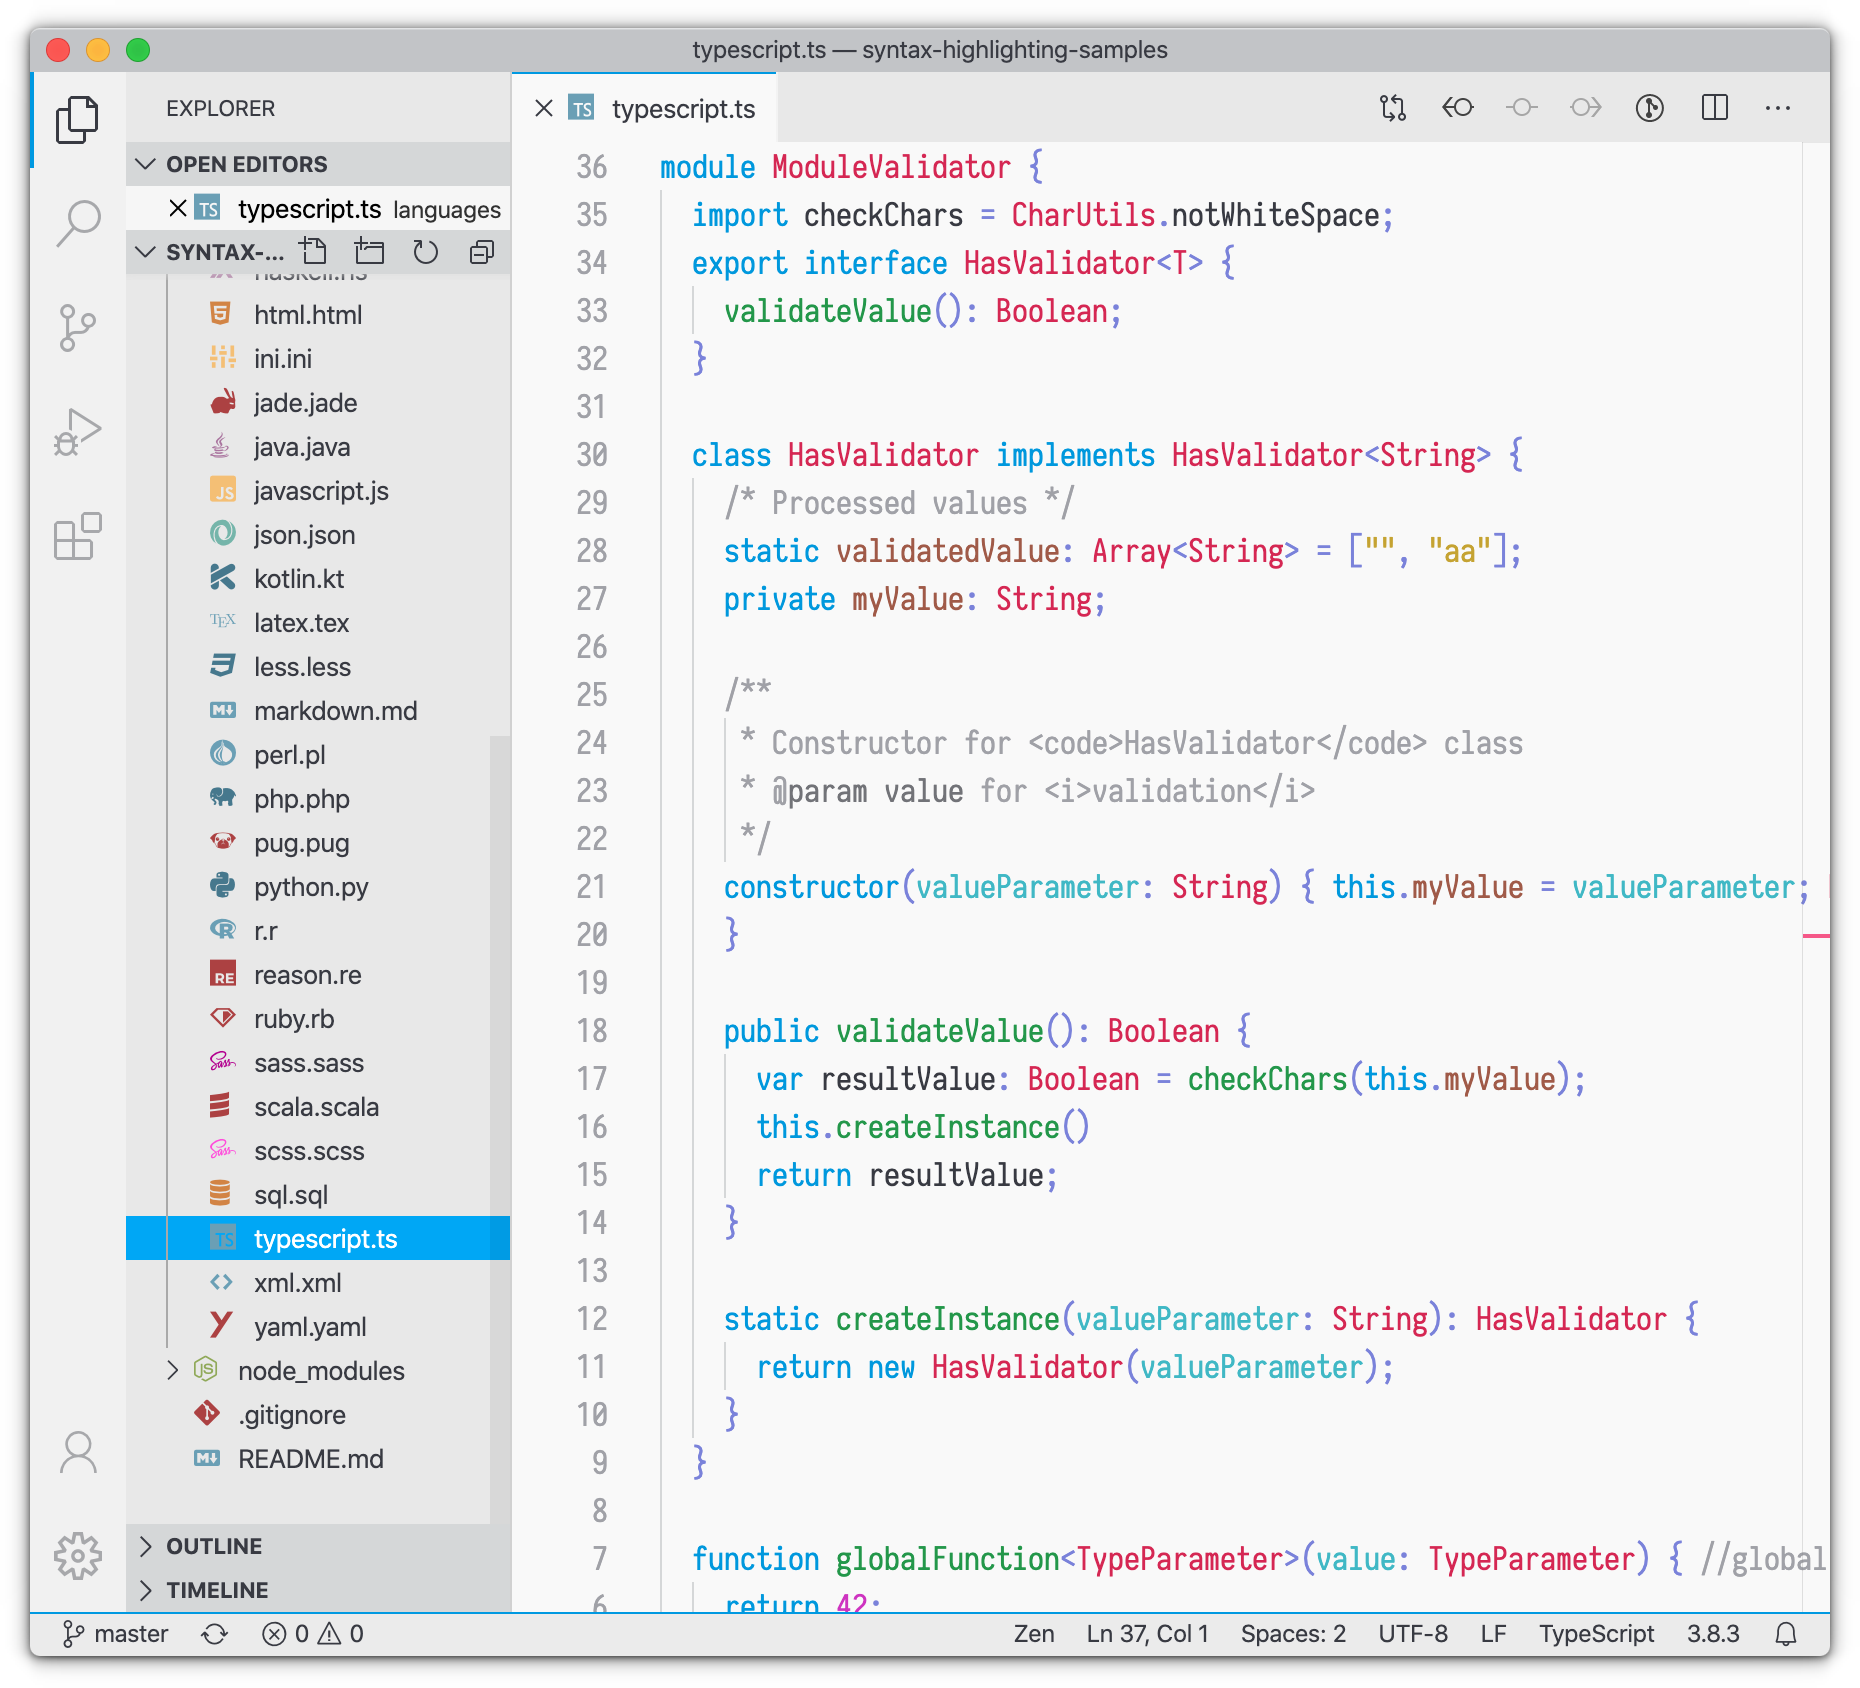
Bluloco Light offers a clean and airy look with thoughtful design choices. It’s ideal for developers who work in bright environments and want a professional, minimal style.

💡
Bluloco is also available in a Dark variant: Bluloco Dark
19 Beautiful Themes to Get a Better Visual Experience With VS Code

Key Features

✅ Light theme with a refined, minimal aesthetic
✅ Consistent syntax coloring
✅ Balanced, readable contrast
✅ A great option if you prefer clean and modern

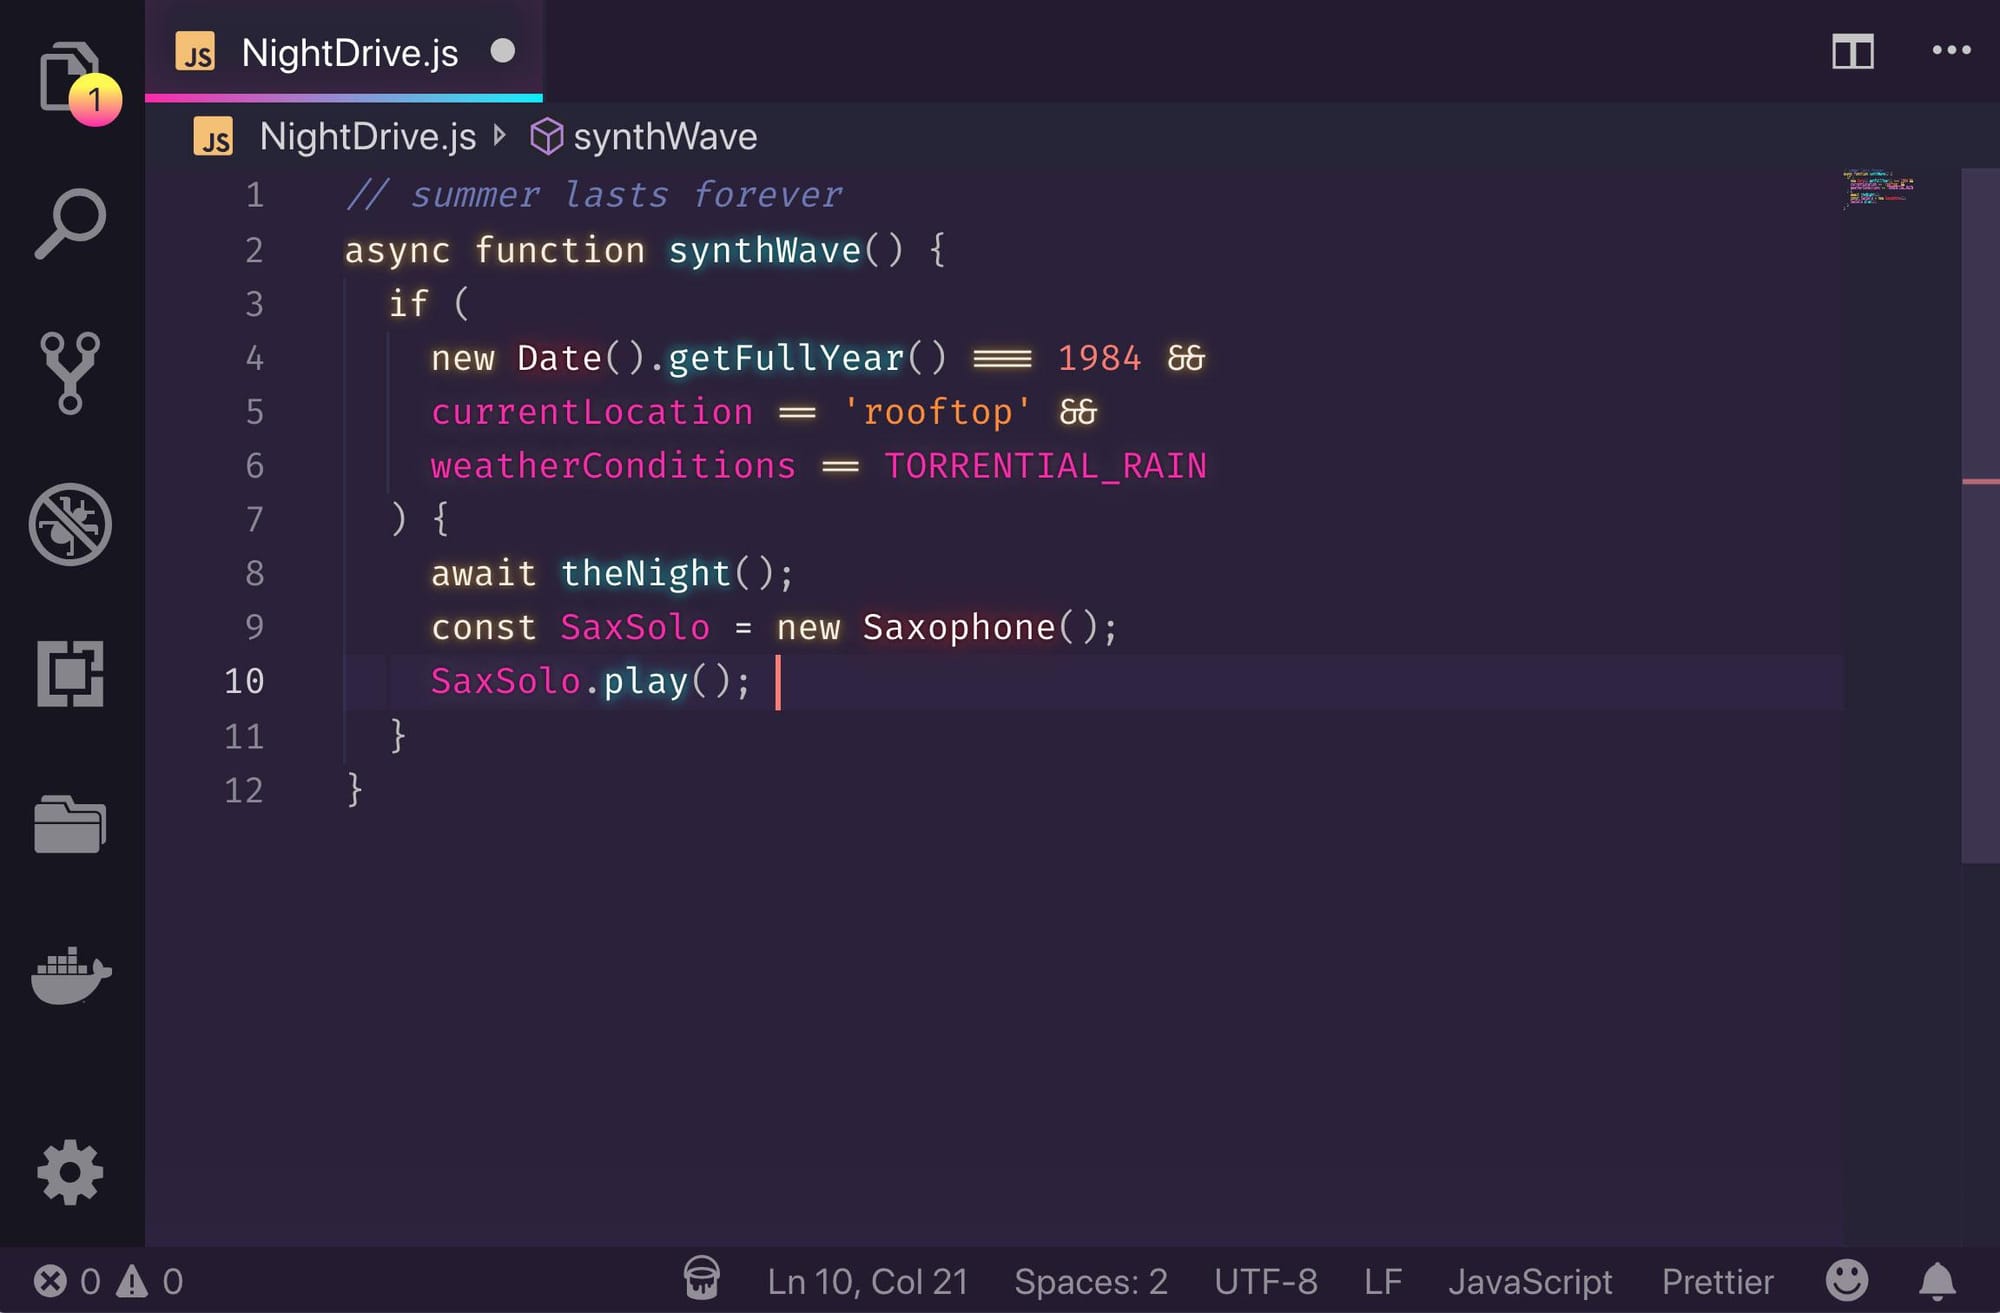
12. SynthWave '84

SynthWave '84 is a retro-futuristic theme inspired by the 1980s, featuring neon colors and even an optional glow effect for extra flair. If you want something bold and eye-catching, this one’s for you.

19 Beautiful Themes to Get a Better Visual Experience With VS Code

Key Features

✅ Neon vibes and cyberpunk aesthetic
✅ Optional glow effect (via extension)
✅ Highly popular among front-end developers
✅ Supports syntax across major languages

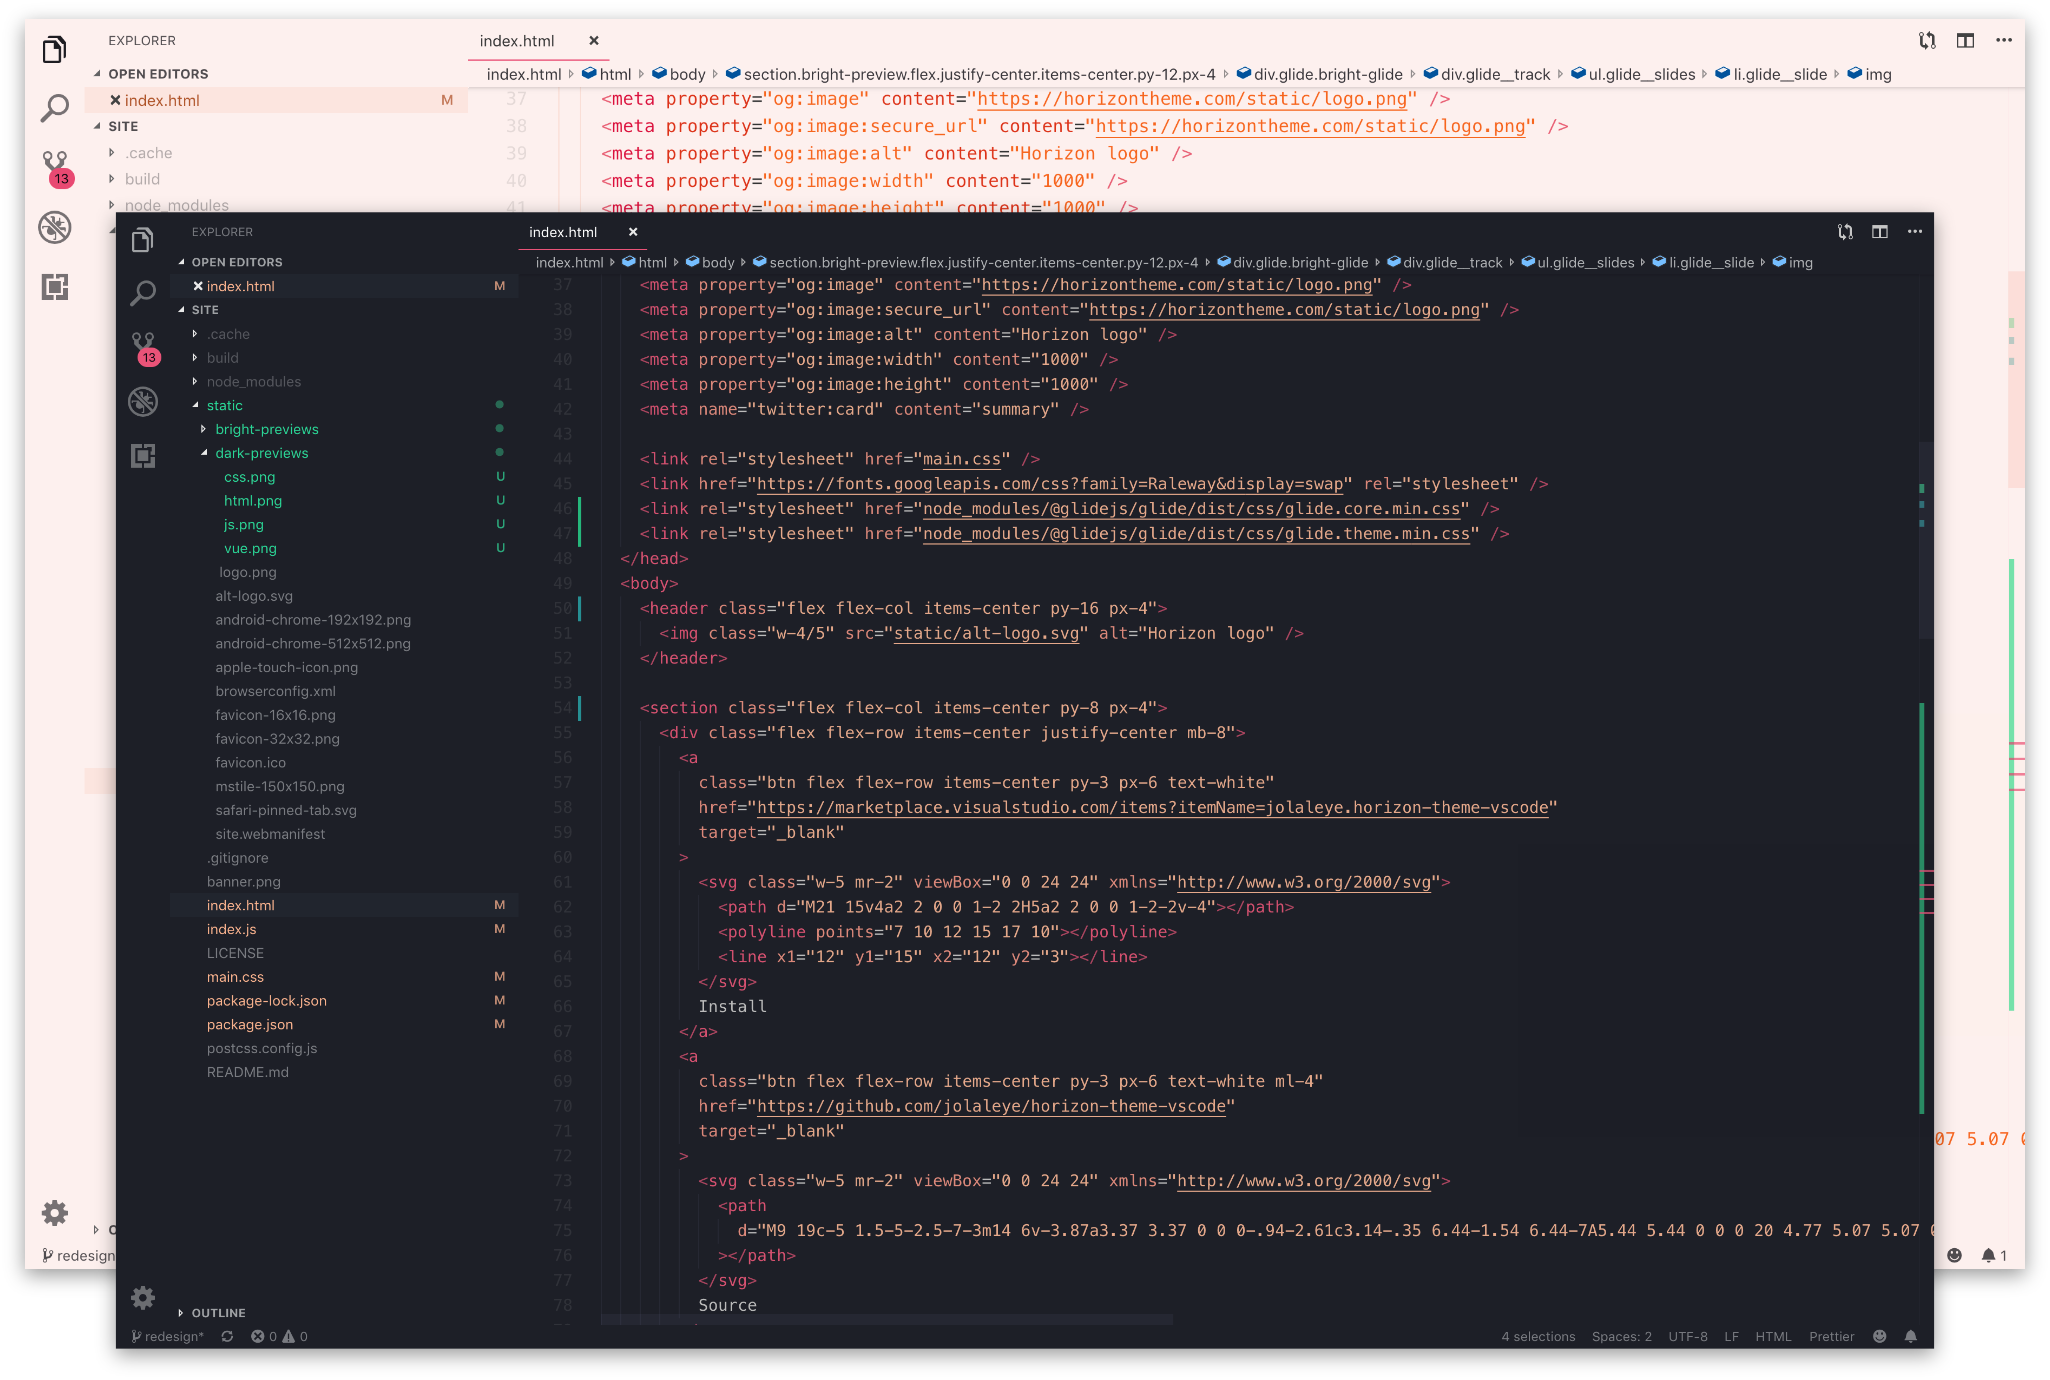
13. Horizon Theme

Horizon is a warm, reddish-orange tinted dark theme. It’s subtle, modern, and carefully designed for comfort over long coding sessions.

19 Beautiful Themes to Get a Better Visual Experience With VS Code

Key Features

✅ Warm, earthy color tones
✅ Balanced contrast for daily use
✅ Available in both dark and bright variants
✅ Great for front-end and full-stack development

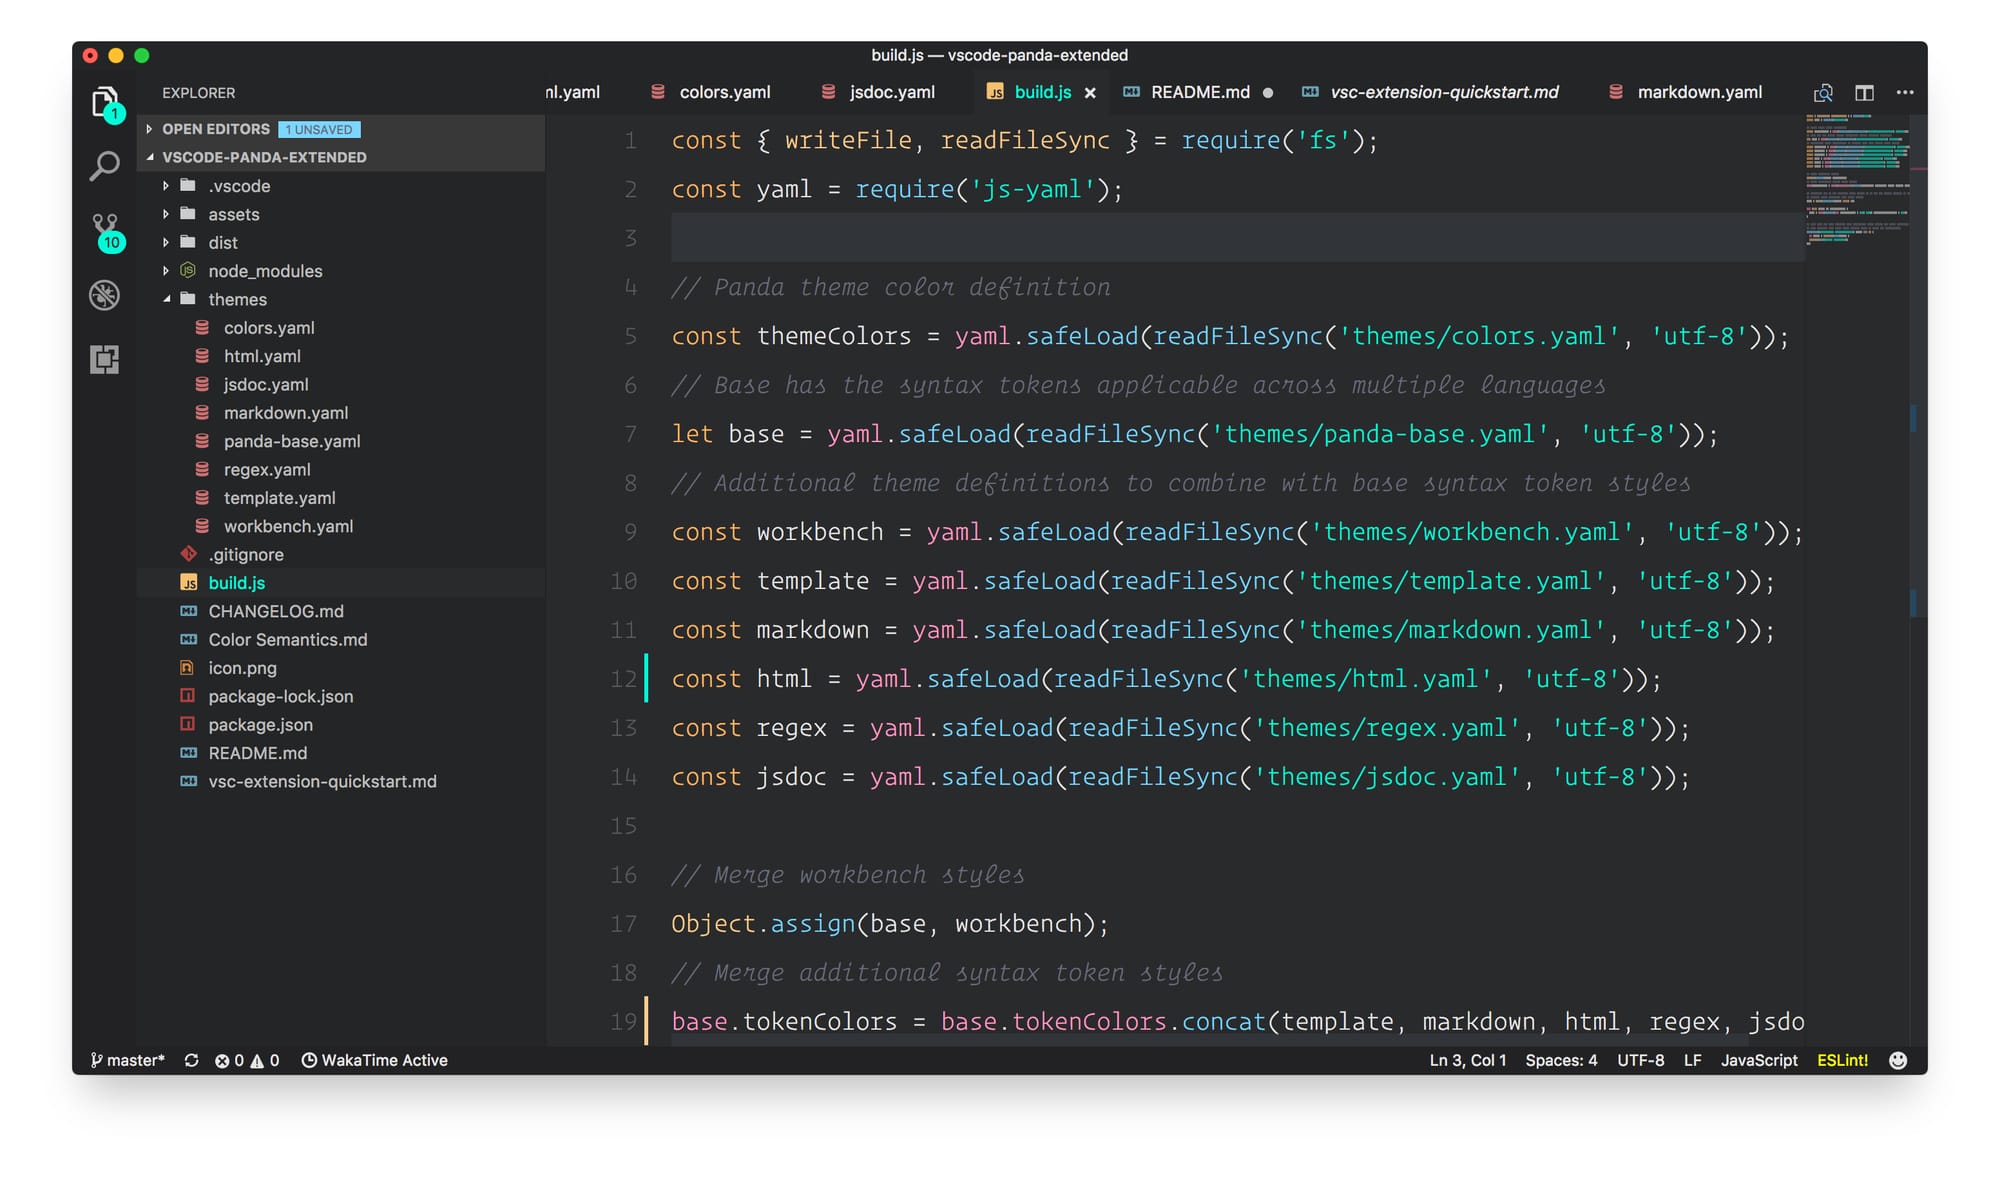
14. Panda Theme

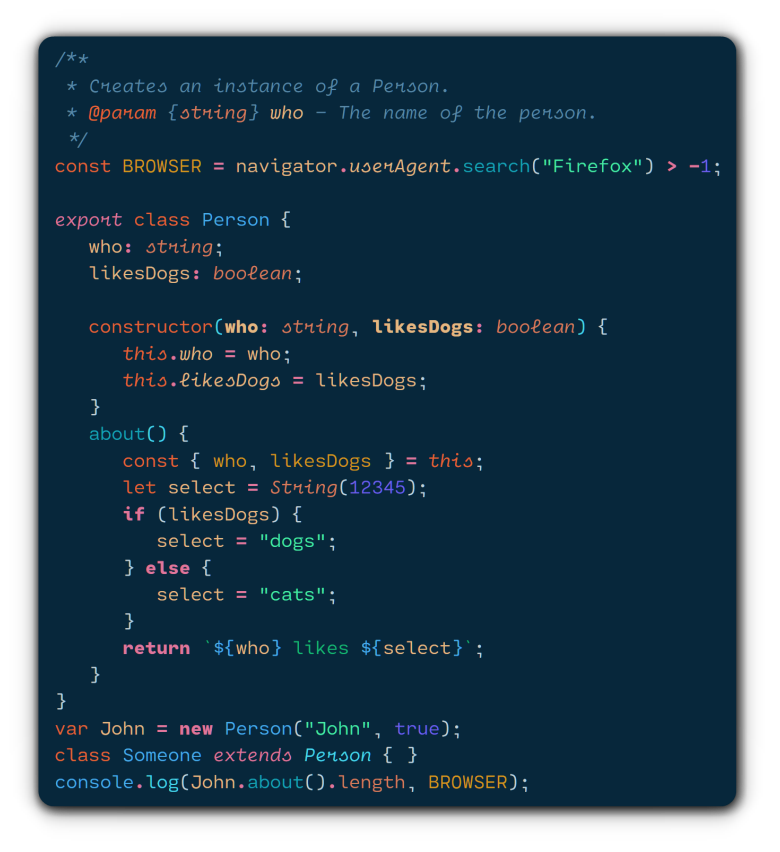
Panda is a soft, minimal dark theme with pastel accents. It's built for readability and calm, avoiding harsh contrasts without sacrificing clarity.

19 Beautiful Themes to Get a Better Visual Experience With VS Code

Key Features

✅ Soft pastel syntax coloring
✅ Minimal and distraction-free
✅ Excellent for late-night coding
✅ Available for terminals and editors

15. Andromeda

Andromeda is a high-contrast dark theme with bold, saturated colors. It’s sharp, vibrant, and particularly suited to developers who like strong visual distinctions in their code.

19 Beautiful Themes to Get a Better Visual Experience With VS Code

Key Features

✅ Vibrant colors with high contrast
✅ Great for distinguishing syntax elements
✅ Maintains a clean, focused interface
✅ Works well with dark desktop environments

16. Winter is Coming

Winter is Coming offers light, dark, and dark with no italics variants. It’s crisp, elegant, and excellent if you want clarity without visual clutter.

19 Beautiful Themes to Get a Better Visual Experience With VS Code

Key Features

✅ Clean, cool-toned color palette
✅ Multiple variants (including no italics)
✅ High readability across languages
✅ Ideal for clean, professional setups

17. NightFox

NightFox is part of the "Fox" theme family (includes NightFox, DayFox, DawnFox, etc.). It's a soothing dark theme with carefully curated contrast for better accessibility.

19 Beautiful Themes to Get a Better Visual Experience With VS Code

Key Features

✅ Carefully calibrated color palette
✅ Designed with accessibility in mind
✅ Multiple variants available
✅ Consistent UI and terminal look

18. Palenight

Palenight is a calm, visually appealing theme with a palette of soft purples, blues, and pinks. It’s stylish without being overwhelming.

19 Beautiful Themes to Get a Better Visual Experience With VS Code

✅ Key Features

✅ Soothing colors and modern aesthetic
✅ Strong readability for long hours
✅ Easy on the eyes with subtle contrast
✅ Works well across many languages

19. Catppuccin

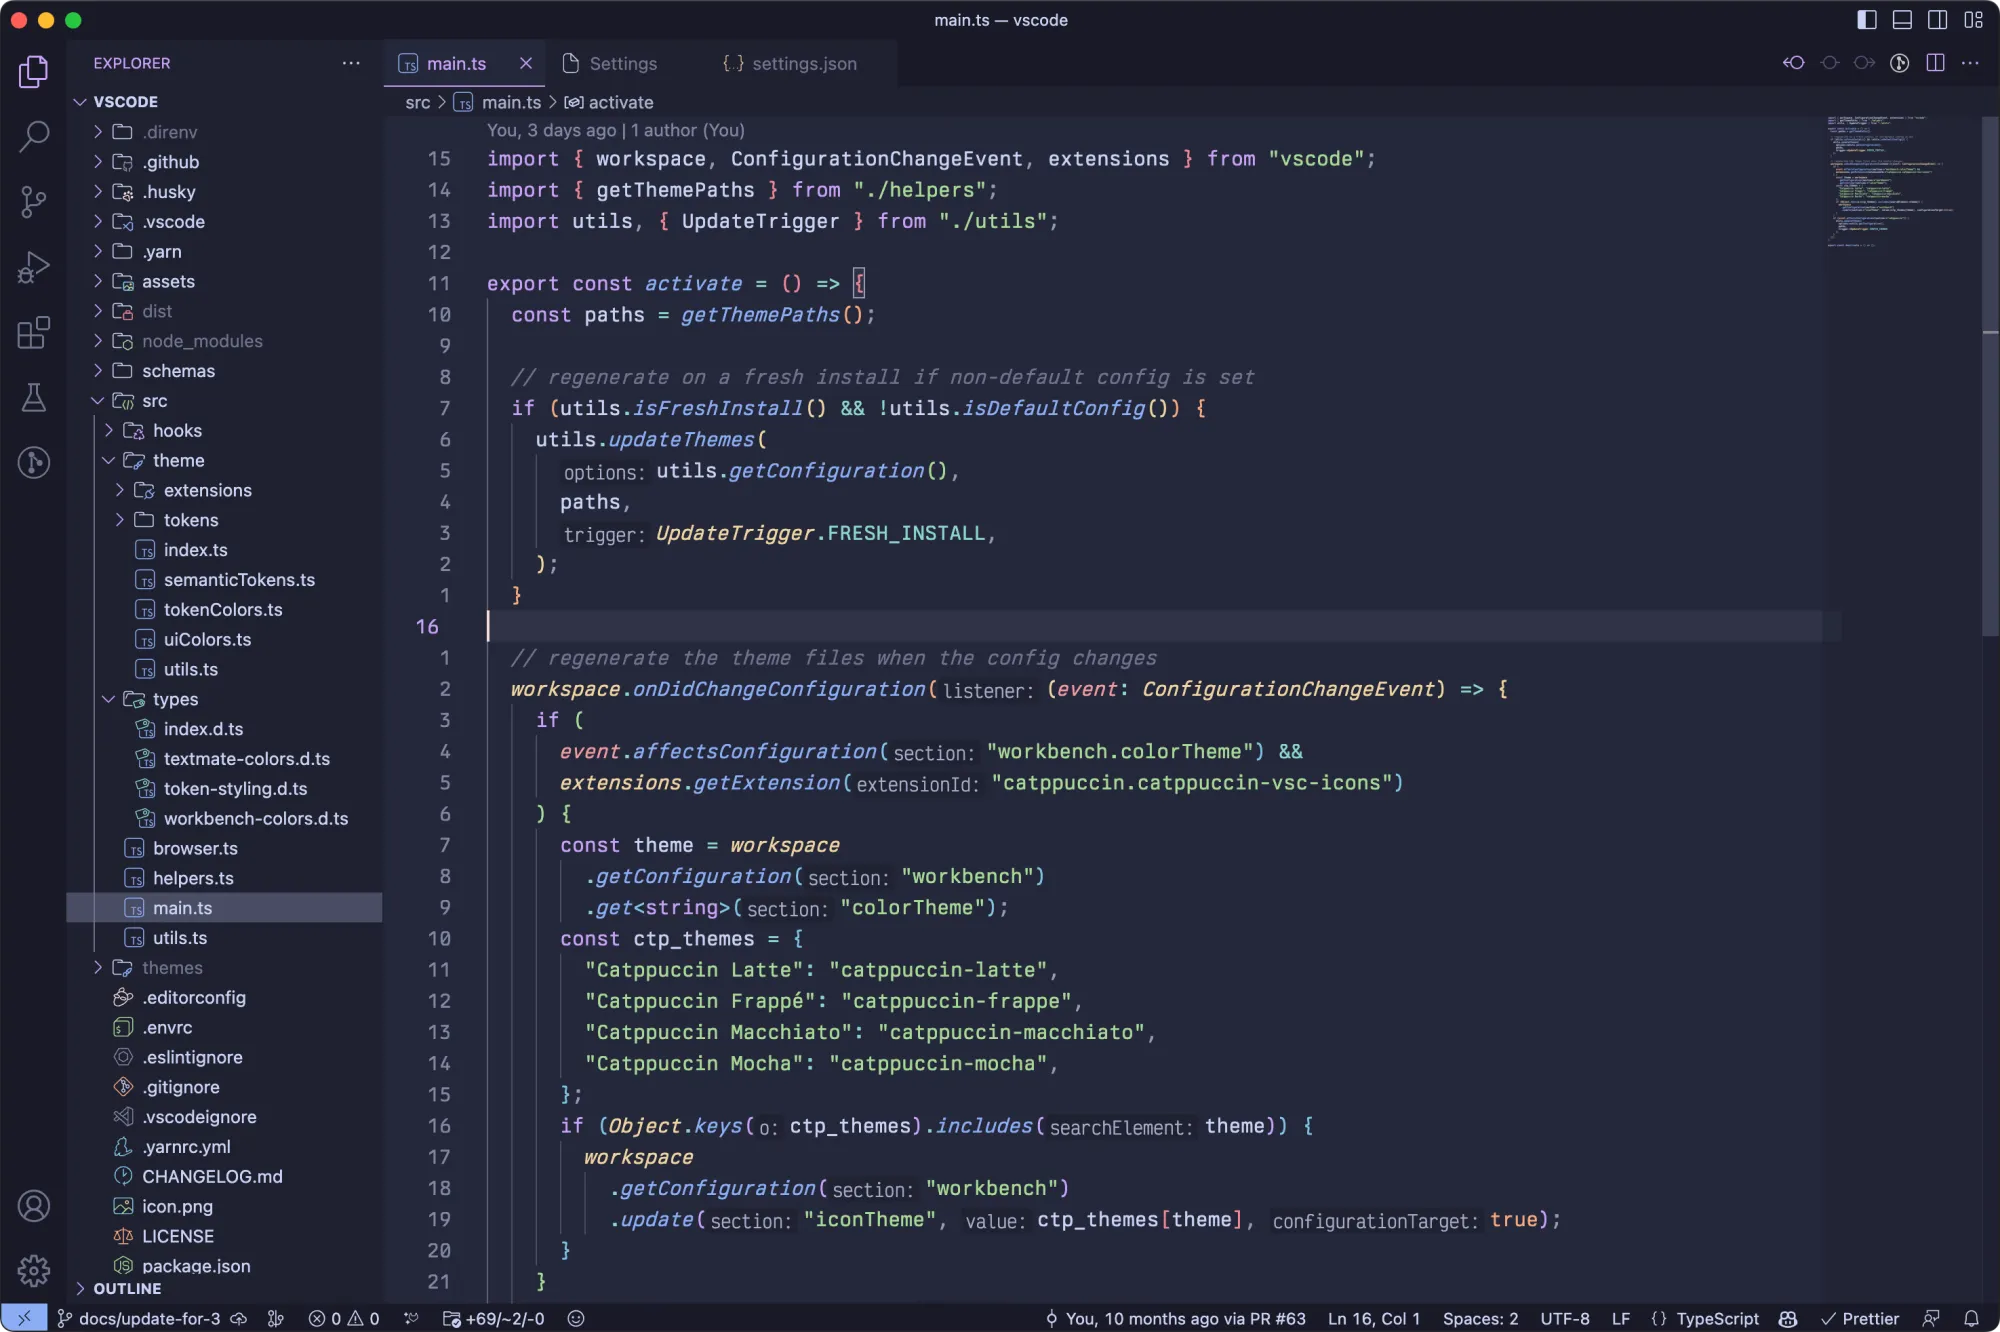
Catppuccin has become the hot favorite among savvy computer users. The soothing, pastel colors have a different charm and it is available for so many applications. From VS Code to Xfce terminal, it is available for more than 300 applications. And that makes it an ideal choice for people who would like the uniform look across various apps.

The Catppuccin theme comes in four variants: Latte, Frappé, Macchiato and Mocha. Except Latte, all of them are dark themed.

19 Beautiful Themes to Get a Better Visual Experience With VS Code

✅ Key Features

✅ Soothing pastel colors
✅ Dark and light shades
✅ Highly popular among developers
✅ Available for a huge number of other applications

Wrapping Up

At the end of the day, themes are a very personal part of your coding experience.

As a web developer, I’ve experimented with a wide range of VS Code themes over the years and while I appreciate a good dark theme like Dracula or One Dark Pro, I’ll admit something that might be a bit controversial: I actually prefer light mode or even high contrast themes!

For me, coding in daylight or bright environments feels more natural with a lighter background. But that’s just my preference, and that’s the beauty of themes: there’s something for everyone.

Have a favorite theme I didn’t mention? Or do you swear by dark mode no matter what? Let me know in the comments. I’d love to hear what themes power your VS Code setup!


from It's FOSS https://ift.tt/0vGnqSF
via IFTTT

Rabu, 27 Agustus 2025

FOSS Weekly #25.35: New Gerhwin DE, grep Command, Nitro init system, KDE Customization and More Linux Stuff

FOSS Weekly #25.35: New Gerhwin DE, grep Command, Nitro init system, KDE Customization and More Linux Stuff

It's FOSS Community Forum is now open for free registration. Earlier, it was tied up with It's FOSS membership and allowed a single click login with It's FOSS. Going back to the old roots is more due to technical limitations. I share the details in the forum post, if you are interested in learning more about it.

I was also expecting Mint 22.2 to release this week but it is not out yet. I'll keep you posted when it releases.

💬 Let's see what else you get in this edition

  • New LibreOffice release brings 30% faster file loading.
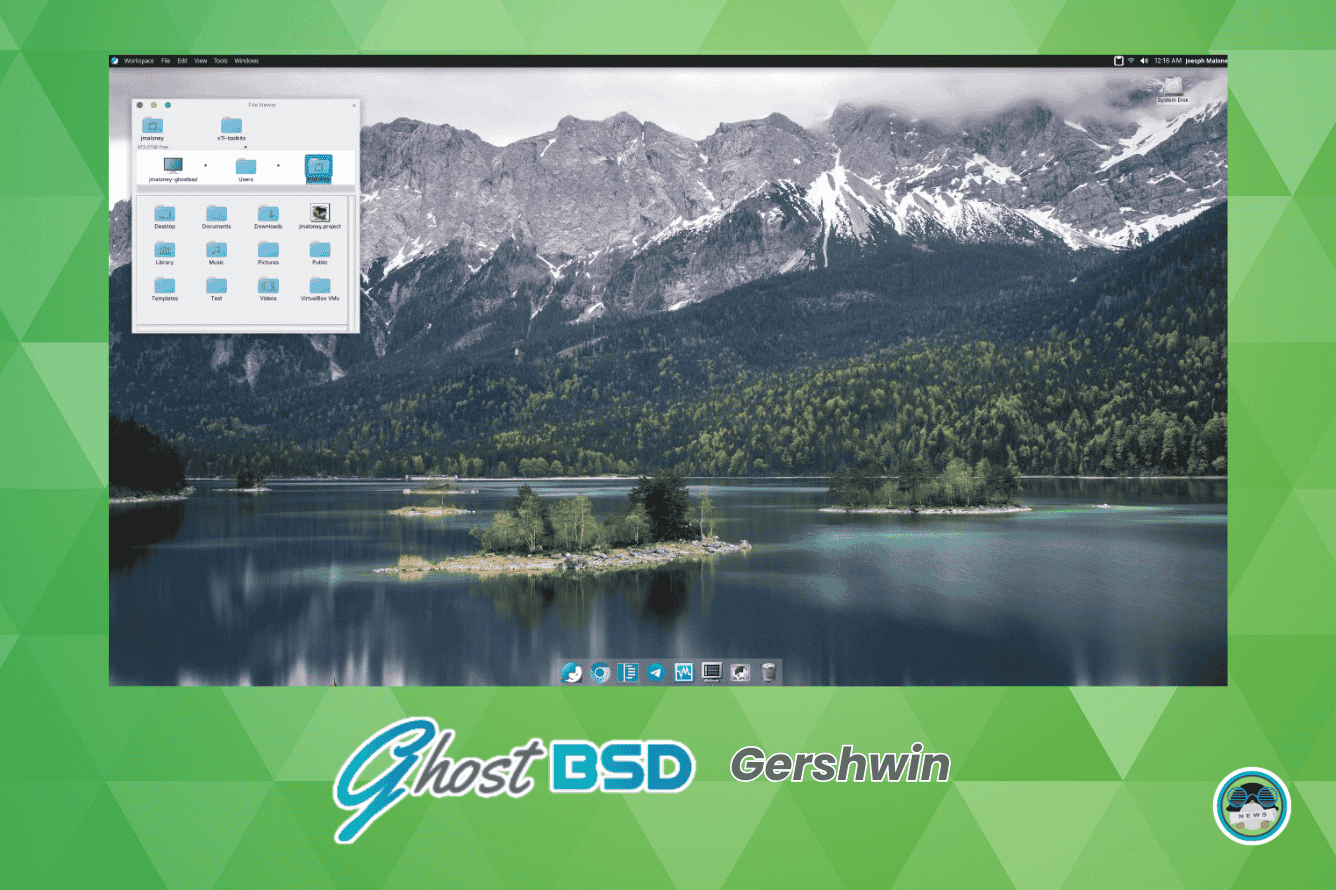
  • GhostBSD introduces the Gershwin desktop environment.
  • New minimalist init system
  • A new, modern e-book reader app for Linux users.
  • And other Linux news, tips, and, of course, memes!
  • This edition of FOSS Weekly is supported by NocFree keyboards.

NocFree&: Ergonomic Split Keyboard — early bird live

FOSS Weekly #25.35: New Gerhwin DE, grep Command, Nitro init system, KDE Customization and More Linux Stuff
Early bird pricing saves you money

NocFree& is an ergonomic split keyboard that keeps shoulders open and wrists aligned for healthier typing. 75% layout you know, so there’s no steep learning curve. Programmable layers and macros for full control. Tri-mode wireless, low-profile switches, and a softer, quieter feel.

Early bird pricing live on Kickstarter.

📰 Linux and Open Source News

GhostBSD has unveiled a new desktop environment inspired by OS X looks.

GhostBSD Comes Up With Gershwin, A New Desktop Environment With OS X Like Looks
GhostBSD with a surprise release.
FOSS Weekly #25.35: New Gerhwin DE, grep Command, Nitro init system, KDE Customization and More Linux Stuff

🧠 What We’re Thinking About

It's not the first time we have wondered what will happen to Linux after Torvalds.

Who will maintain the future? Rethinking open source leadership for a new generation
Open source is aging. We can better support Gen Z contributors through purpose, flexibility, and pathways to leadership.
FOSS Weekly #25.35: New Gerhwin DE, grep Command, Nitro init system, KDE Customization and More Linux Stuff

Chinese AI models are thriving as they adopt open source model. Can the US recapture its AI lead? Project Atom aims for that.

Can America Catch Up? The ATOM Project Takes on China’s AI Lead
U.S. tech leaders rally behind effort to counter Chinese model dominance.
FOSS Weekly #25.35: New Gerhwin DE, grep Command, Nitro init system, KDE Customization and More Linux Stuff

🧮 Linux Tips, Tutorials, and Learnings

Explore the grep command with these examples.

grep Command Examples in Linux
Grep is a useful command to help you quickly search and find through file contents.
FOSS Weekly #25.35: New Gerhwin DE, grep Command, Nitro init system, KDE Customization and More Linux Stuff

👷 AI, Homelab and Hardware Corner

Want to use the services running in your homelab from outside your home? Cloudflare Tunnels can help you out.

Use Cloudflare Tunnels to Access Homelab Outside Local Network
Self hosting various open source software on your local system and now want to use it from anywhere? Cloudflare Tunnel comes to your help.
FOSS Weekly #25.35: New Gerhwin DE, grep Command, Nitro init system, KDE Customization and More Linux Stuff

✨ Project Highlight

There is a new init system in making. Discover Nitro, the minimalist init system.

Despise Systemd? A New Init System Debuts as a Minimalist Process Supervisor for Linux
Nitro is a simple, tiny but flexible init system. It is under heavy development currently.
FOSS Weekly #25.35: New Gerhwin DE, grep Command, Nitro init system, KDE Customization and More Linux Stuff

A reader shared this fork of Foliate that doesn't use Electron framework and has more features for your ebook needs. I will be testing it soon.

Readest — Where You Read, Digest and Get Insight
Readest brings your entire library to your fingertips. Read seamlessly across all your devices with our cross-platform ebook reader.
FOSS Weekly #25.35: New Gerhwin DE, grep Command, Nitro init system, KDE Customization and More Linux Stuff

Midorix is a simple, stateless, lightweight make-like tool written in C powered by Lua.

GitHub - Bimasakti1024/Midorix: A simple, stateless, lightweight make-like tool written in C powered by Lua.
A simple, stateless, lightweight make-like tool written in C powered by Lua. - Bimasakti1024/Midorix
FOSS Weekly #25.35: New Gerhwin DE, grep Command, Nitro init system, KDE Customization and More Linux Stuff

📽️ Videos I am Creating for You

When I shared the Xfce customization video, some people requested a similar video on KDE customization. Took some time, but it is finally here.

🧩 Quiz Time

Your mission, should you choose to accept it, is to match the classic commands with their modern (supposedly) replacements. Can you do it?

Match Classic Linux Commands with Their Modern Alternatives
Match the good old, classic Linux commands with their supposedly modern alternative CLI tools. See, how modern you are!
FOSS Weekly #25.35: New Gerhwin DE, grep Command, Nitro init system, KDE Customization and More Linux Stuff

Desktop Linux is mostly neglected by the industry but loved by the community. For the past 13 years, It's FOSS has been helping people use Linux on their personal computers. And we are now facing the existential threat from AI models stealing our content.

If you like what we do and would love to support our work, please become It's FOSS Plus member. It costs $24 a year (less than the cost of a burger meal each month) and you get an ad-free reading experience with the satisfaction of helping the desktop Linux community. You also get a Linux eBook for free.

Join It's FOSS Plus

💡 Quick Handy Tip

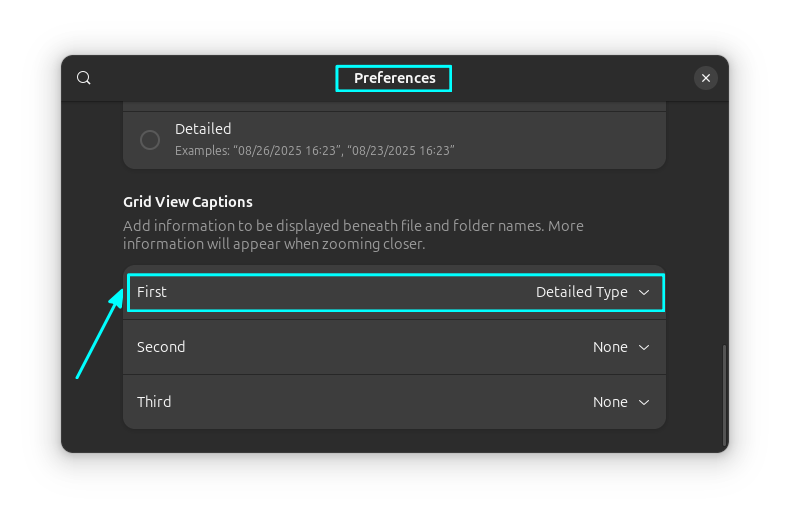
In Nautilus file manager, go to preferences. Scroll down to the bottom and in the Grid View Captions section, set the First as Detailed Type.

FOSS Weekly #25.35: New Gerhwin DE, grep Command, Nitro init system, KDE Customization and More Linux Stuff

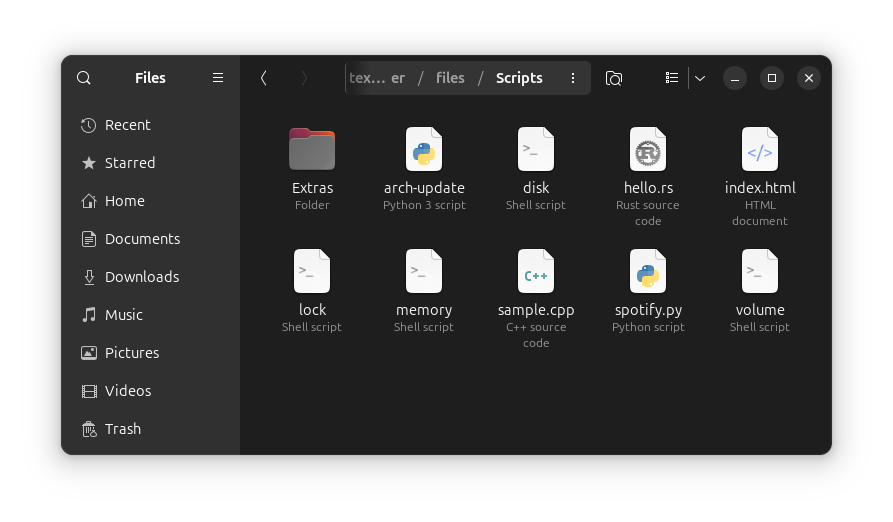
Now, in the icons view, you can get a detailed type of each files, like Python 3 Script, Shell script, Rust source code, etc.

FOSS Weekly #25.35: New Gerhwin DE, grep Command, Nitro init system, KDE Customization and More Linux Stuff

🤣 Meme of the Week

You'll get it if you use Instagram 😄

FOSS Weekly #25.35: New Gerhwin DE, grep Command, Nitro init system, KDE Customization and More Linux Stuff

🗓️ Tech Trivia

Did you know? Linux Mint was first released on 27 August 2006, starting as a simple Ubuntu-based distribution with a handful of tweaks. Over the years, it grew into one of the most popular desktop Linux distros, known for its user-friendly Cinnamon desktop, stability, and the philosophy of “from freedom came elegance.”

🧑‍🤝‍🧑 FOSSverse Corner

Can your office suite monitor you? FOSSers in the community are discussing this topic.

Office suite monitoring you?
I read this from Linux Magazine “Office suites used to be about getting your work done, but the office suites from the big tech giants are getting sinister – monitoring what you do, forcing AI features onto you, and coercing you into buying subscriptions so you can access your data. Fortunately, there are free and open source software options. The versatile LibreOffice office suite gives you everything you need.” What do you think? I this trend real?
FOSS Weekly #25.35: New Gerhwin DE, grep Command, Nitro init system, KDE Customization and More Linux Stuff

Also, since I moved Ghost CMS that powers It's FOSS websites to a Docker based set up, the single sign on (SSO) option is no longer working for forum log in. You can use your older password, if there was one, or use the reset password feature to set a new one.

❤️ With love

Please share it with your Linux-using friends and encourage them to subscribe (hint: it's here).

Share the articles in Linux Subreddits and community forums.

Follow us on Google News and stay updated in your News feed.

Opt for It's FOSS Plus membership and support us 🙏

Enjoy FOSS 😄


from It's FOSS https://ift.tt/K7OjpZx
via IFTTT