In one of my earlier articles, I showed how you can preview HTML files inside Visual Studio Code. That setup worked well for testing static pages, but what if you want to go beyond markup and bring interactivity into the mix?
With JavaScript being the backbone of the modern web and countless developers now diving into frameworks like React, Vue, and Svelte, being able to run JavaScript code directly inside VS Code becomes almost essential.
Running JavaScript in the editor helps you avoid constant context-switching, reduces distractions, and gives you immediate feedback when debugging.
There are two approaches here:
Running JavaScript inside VS Code using Node.js: most efficient and editor-native approach.
Run it in a browser or using extensions: handy for quick tests or visual feedback.
Let's see about using them.
Understanding the role of Node.js
JavaScript was originally designed to run inside browsers, which come with their own JavaScript engines (like V8 in Chrome).
Node.js takes that same V8 engine and brings it to your local machine. This lets you run JavaScript outside the browser, directly from the command line or terminal.
It’s particularly useful for backend work, automation scripts, or just quick testing without the overhead of an HTML shell.
If you're unsure whether Node.js is already installed on your system, open a terminal and type:
node -v
If you see a version number, you’re all set. If not, you’ll need to download Node.js and follow the installation instructions for your operating system.
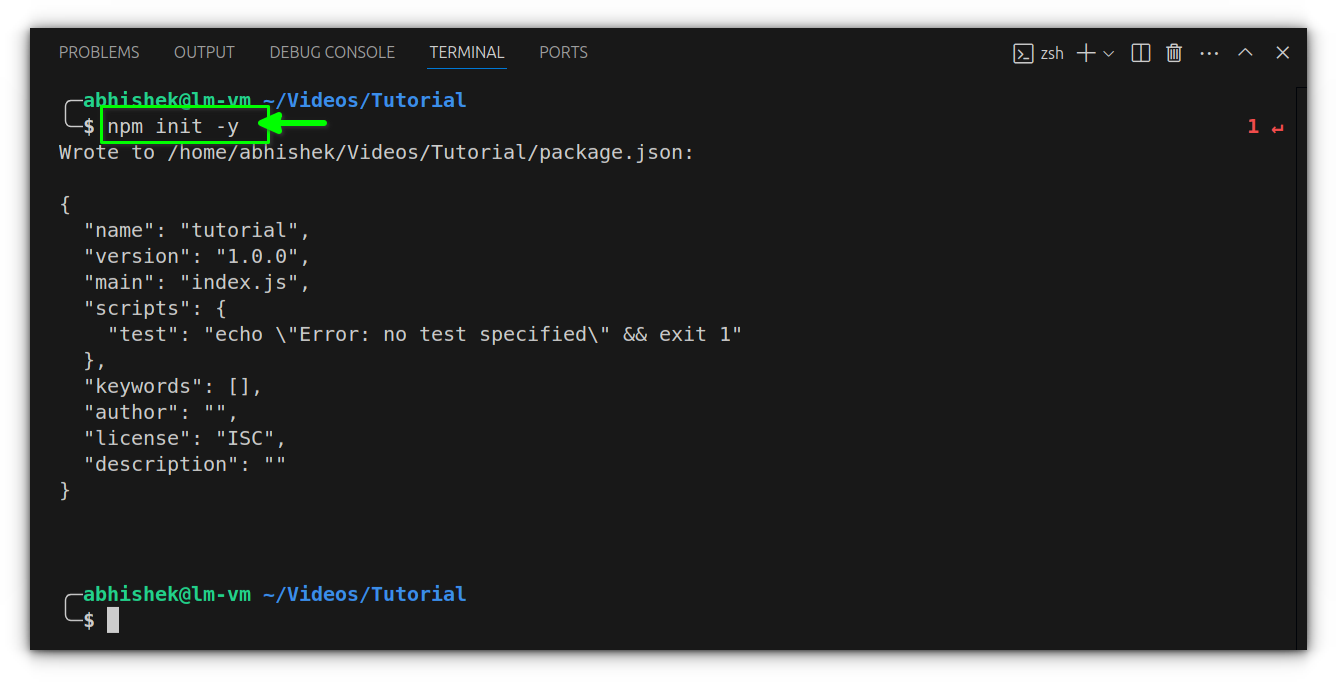
Once everything’s installed, open VS Code and create a new folder for your project. Inside it, launch the terminal (Ctrl + ~ or Terminal > New Terminal) and run npm init -y.
This initializes a basic project and creates a package.json file, which will be useful for managing your scripts and dependencies later.
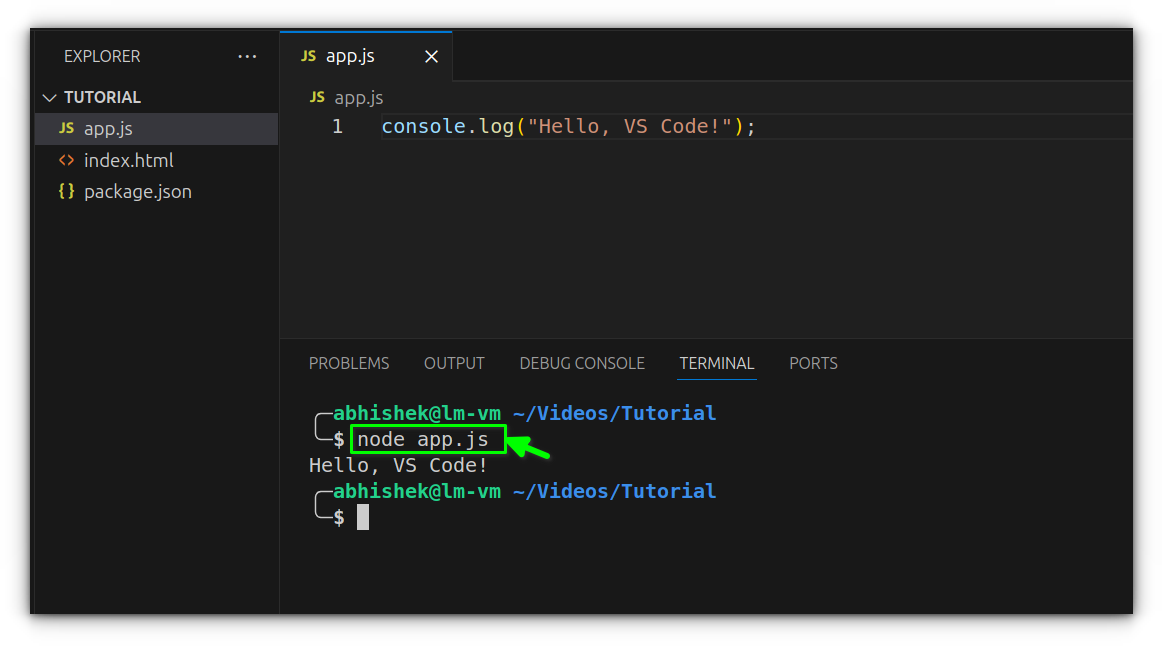
With the environment ready, create a new file named app.js and add a bit of JavaScript, for example:
console.log("Hello, VS Code!");
To run it, simply type node app.js in the terminal.
The output will appear immediately in the console, confirming that Node is executing your file properly.
Add a custom script for simpler runs
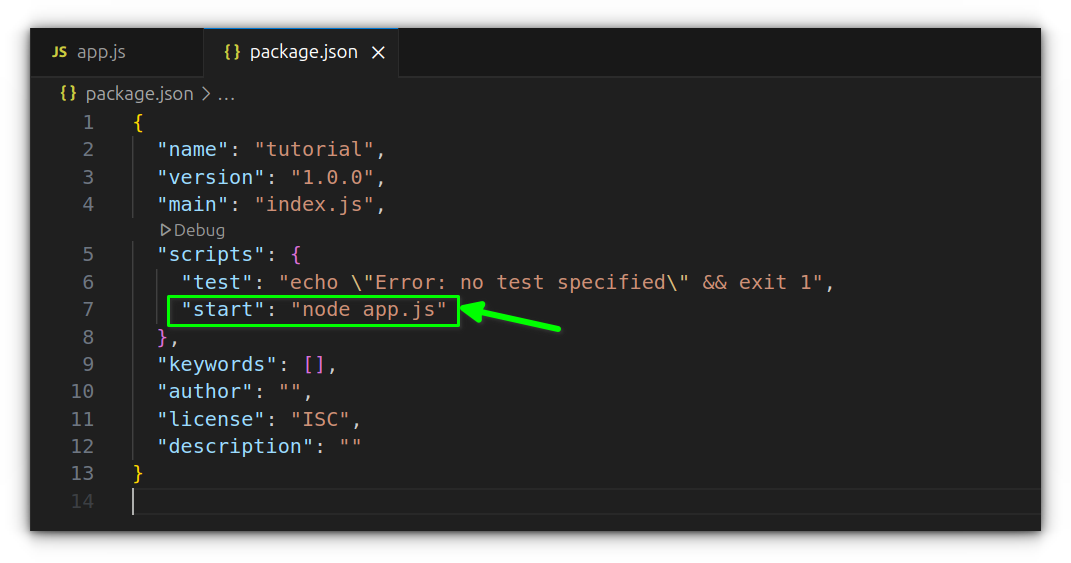
To make things smoother, especially as your project grows, it’s a good idea to define a custom script in your package.json file. Open that file and find the "scripts" section, then add:
"start": "node app.js"
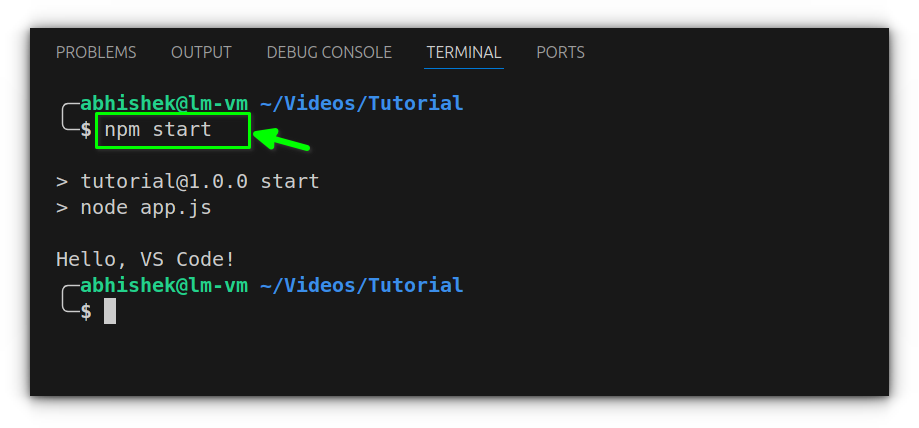
This allows you to run your script just by typing npm start, instead of repeating the filename every time.
Optional: Using the Code Runner extension
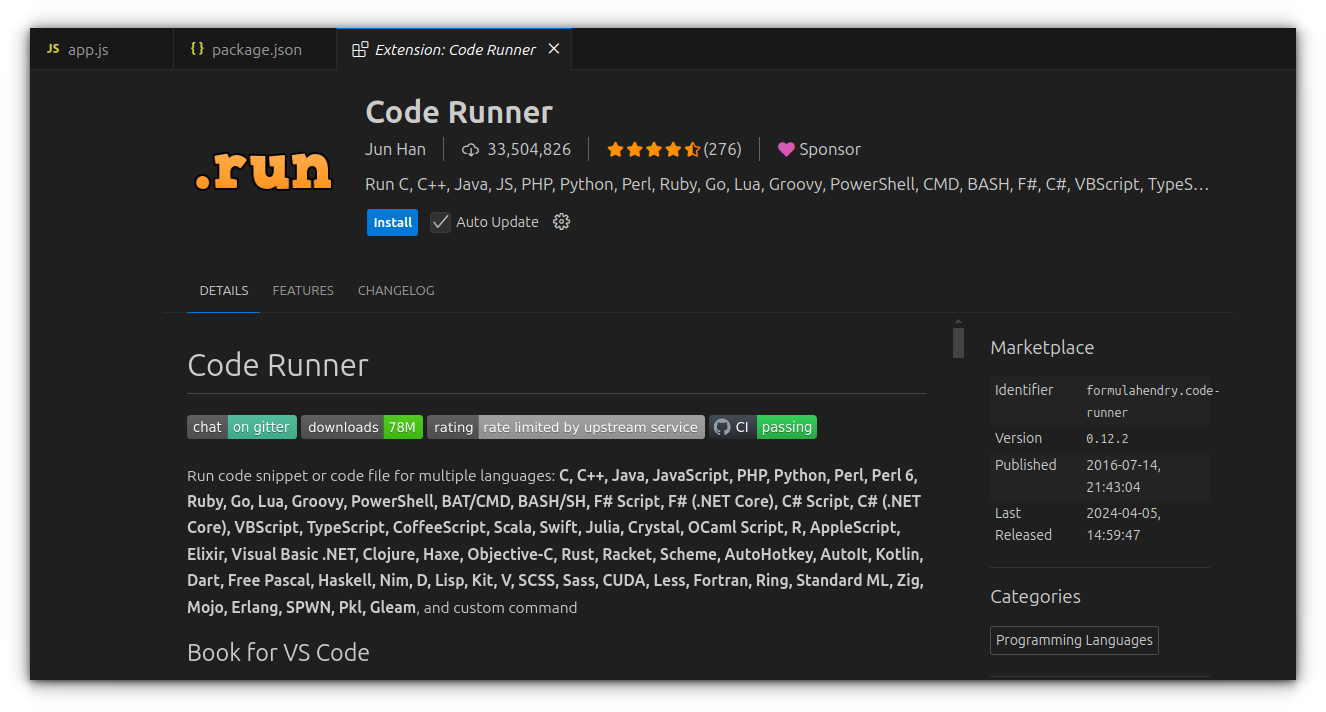
If you prefer a quick way to execute small snippets without setting up a project, Code Runner can help. It’s a lightweight VS Code extension that runs code in a sandboxed output window.
To get started:
Open the Extensions tab in VS Code.
Search for “Code Runner” and install it.
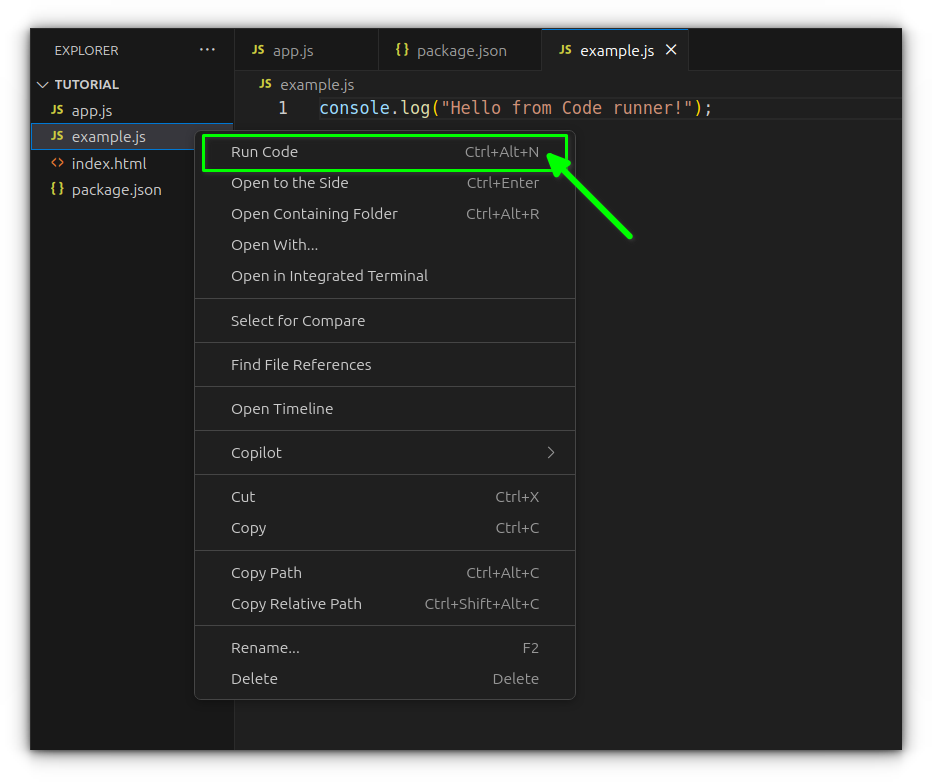
Open a .js file, write some code, right-click, and select “Run Code.”
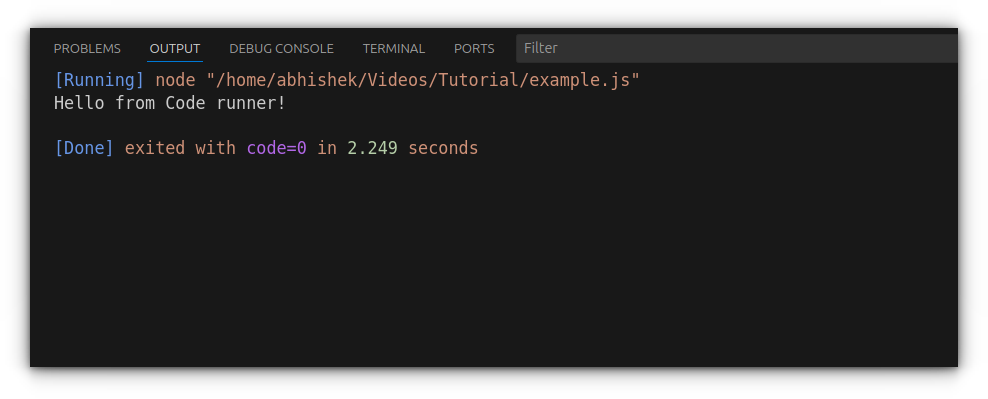
For example, a file like example.js with:
console.log("Hello from Code Runner!");
It will output directly to VS Code’s "Output" tab.
The main limitation here is that it doesn’t use the integrated terminal like we used above, which can restrict input/output behavior for more complex scripts.
Wrapping up
With Node.js set up inside VS Code, running JavaScript becomes a seamless part of your workflow, no browser tabs or external tools required.
Whether you're testing a quick function or building out a larger project, using the terminal and custom npm scripts keeps things fast and distraction-free.
Extensions like Code Runner can help for quick one-off tests, but for anything serious, sticking to the Node-powered method inside VS Code gives you more control, better error output, and a real development feel.
Once this setup becomes second nature, jumping into frameworks like React or Express will feel a lot more natural too.
Now that you’ve got the tools, go ahead, experiment, break stuff, debug, and build.
GNU Taler payment system being approved for Swiss use.
And other Linux news, tips, and, of course, memes!
This edition of FOSS Weekly is supported byPikaPods.
❇️ PikaPods: Enjoy Self-hosting Hassle-free
PikaPods allows you to quickly deploy your favorite open source software. All future updates are handled automatically by PikaPods while you enjoy using the software. PikaPods also share revenue with the original developers of the software.
Carmen from Mission Libre has started a petition to get Qualcomm to release fully-free drivers for their in-production chipsets. If the petition is signed by 5,000 people, a hardcopy of the petition and signatures will be mailed to Qualcomm's head office. We can get 5,000 signatures, can't we?
Also, learn a thing or two about MCP servers, the latest buzzword in the (AI) tech world.
✨ Apps Highlight
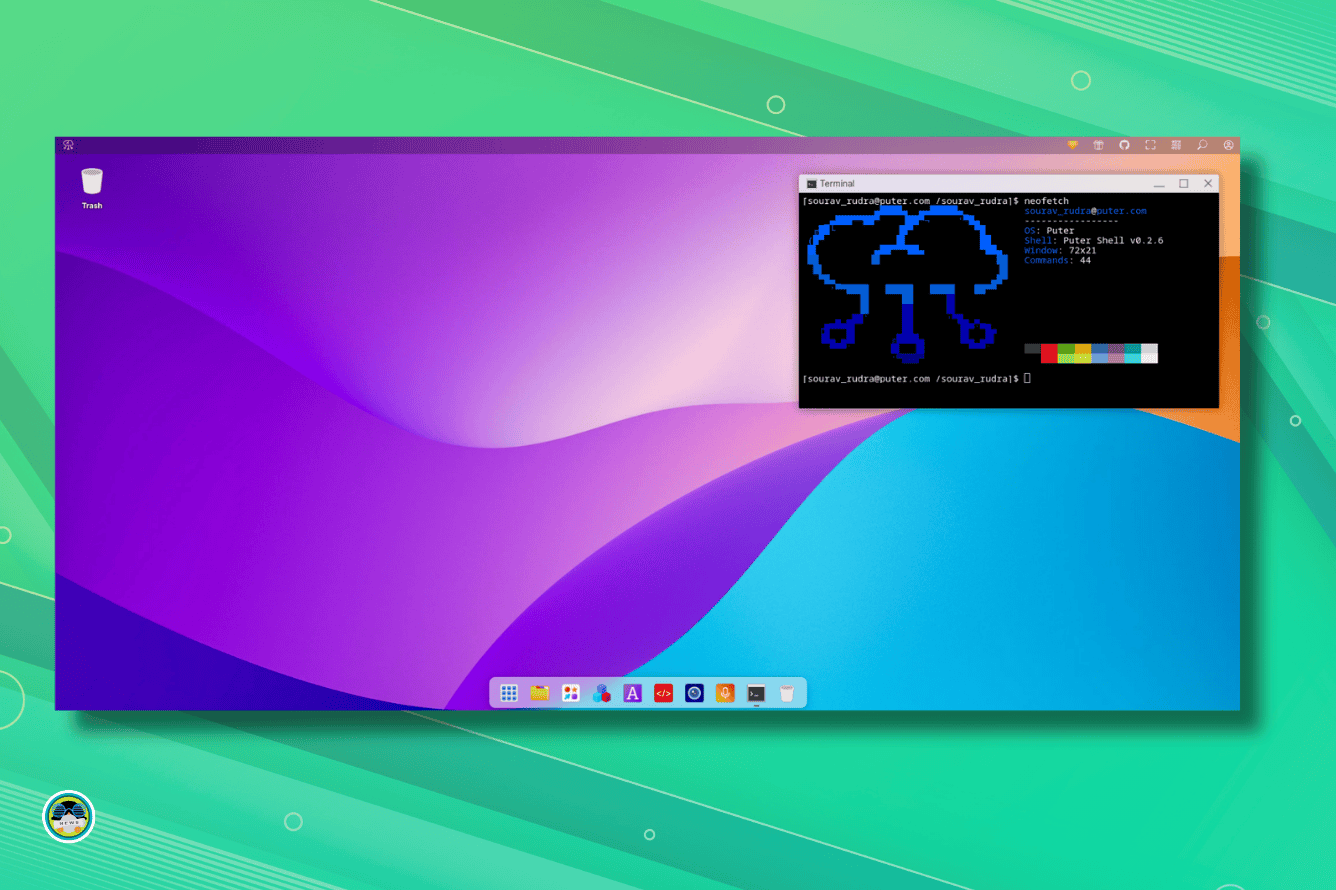
If you ever wanted to run an operating system inside your browser, then Puter is the solution for you. It is open source and can be self-hosted as well.
An It's FOSS reader created an FFmpeg AAC Audio Encoder Plugin for DaVinci Resolve. This will help you get effortless AAC audio encoding on Linux if you use DaVinci Resolve video editor.
📽️ Videos I am Creating for You
I tried Microsoft's new terminal editor on Linux! I hate to admit it but I liked what I saw here. This is an excellent approach. I wonder why Linux didn't have something like this before. See it in action 👇
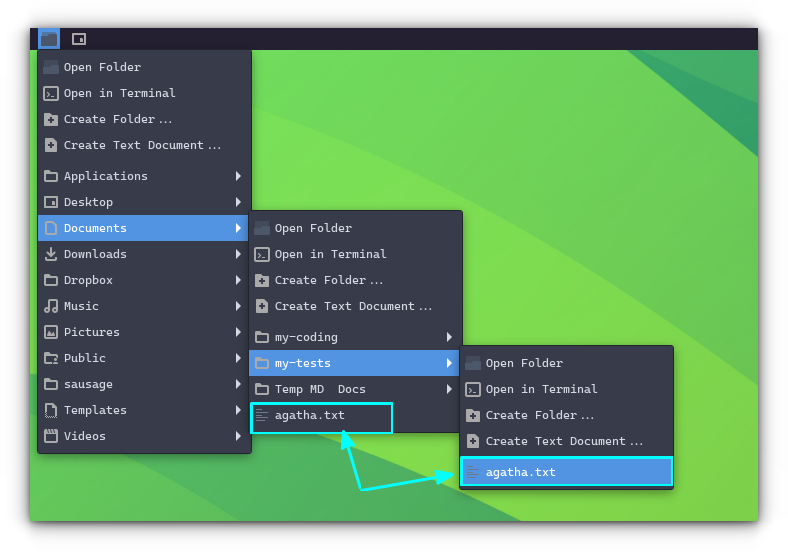
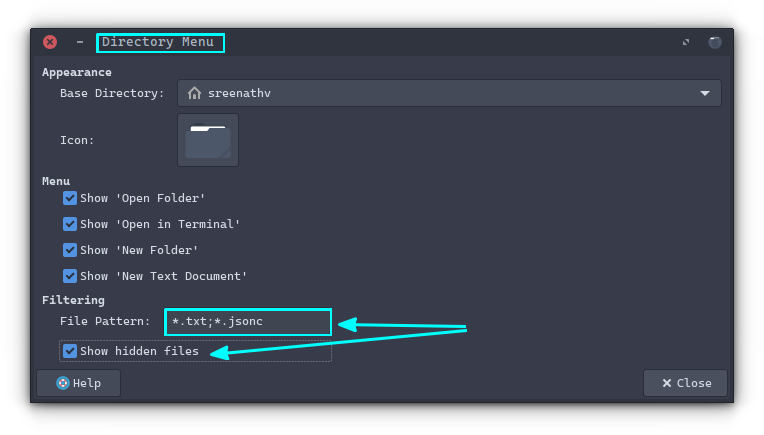
In Xfce, you can use the panel item "Directory Menu" to get quick access to files from anywhere. This is like the Places extension in GNOME, but better.
In the configuration menu for it, provide the file extension in the following format *.txt;*.jsonc as shown in the screenshot above to access the files quickly. Clicking on those files opens it in the default app.
🤣 Meme of the Week
The ricing never stops! 👨💻
🗓️ Tech Trivia
On May 27, 1959, MIT retired the Whirlwind computer, a groundbreaking machine famous for pioneering real-time computing and magnetic core memory.
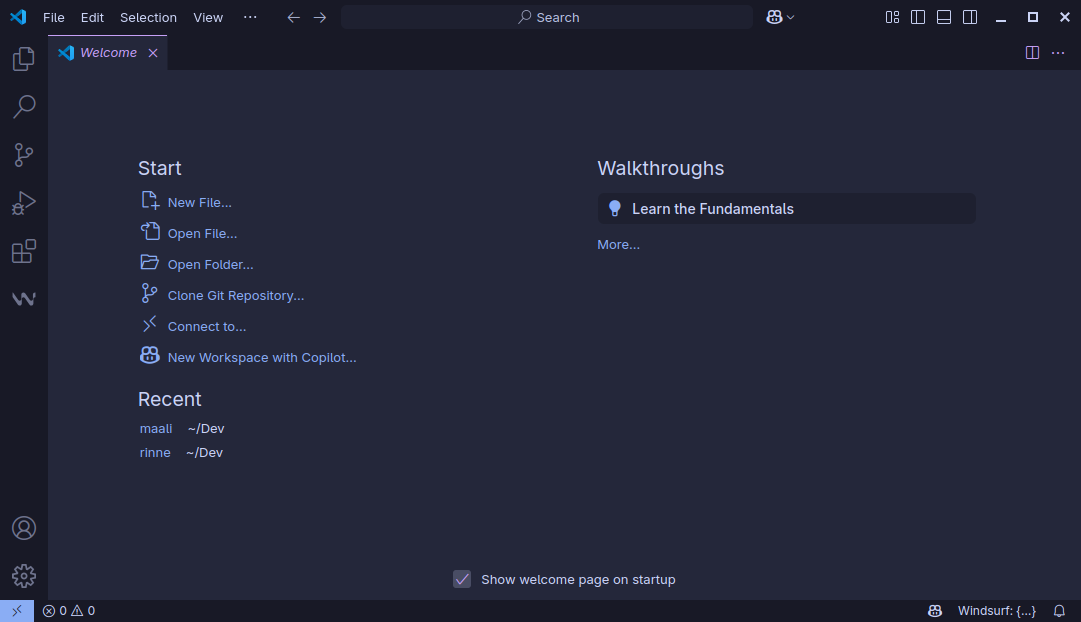
There are two main choices for getting VS Code on Arch Linux:
Install Code - OSS from Arch repositories
Install Microsoft's VS Code from AUR
I know. It's confusing. Let me clear the air for you.
VS Code is an open source project but the binaries Microsoft distributes are not open source. They have telemetry enabled in it.
Code - OSS is the actual open source version of VS Code.
Think of Code - OSS as Chromium browser and VS Code as Google Chrome (which is based on Chromium browser).
Another thing here is that some extensions will only work in VS Code, not in the de-Micorsoft Code - OSS.
This is why you should think it through if you want to use Microsoft's VS Code or its 100% open sourced version.
Let me show you the steps for both installation.
Method 1: Install Code - OSS
✅ Open source version of Microsoft VS Code
✅ Easy to install with a quick pacman command
❌ Some extensions may not work
This is simple. All you have to do is to ensure that your Arch system is updated:
pacman -Syu
And then install Code - OSS with:
pacman -S code
It cannot be simpler than this, can it?
As I mentioned earlier, you may find some extensions that do not work in the open source version of Code.
Also, I had noticed earlier that Ctrl+C - Ctrl+V was not working for copy paste. Instead, it was defaulted to Ctrl+Shift+C and Ctrl+Shift+V for reasons not known to me. I had not made any changes to key bindings or had opted for a Vim plugin.
Removing Code OSS
Removal is equally simple:
sudo pacman -R code
Method 2: Install the actual Microsoft's VS Code
✅ Popular Microsoft VS Code that is used by most people
✅ Access to all proprietary features and extensions in the marketplace
❌ Installation may take effort if you don't have an AUR helper
If you don't care too much about ethics, open source principles and just want to code without thinking it too much, go with VS Code.
There are a couple of VS Code offerings available in the AUR but the official one is this.
Before installing it, you should remove Code OSS
sudo pacman -R code
If you have an AUR helper like yay already installed, use it like this:
yay -S visual-studio-code-bin
Otherwise, install yay first and then use it to install the desired package.
Don't be deceived by the pretty looking screenshot above. I was using a different theme in VS Code.
Removal
You can use your AUR helper or the super reliable pacman command to remove Microsoft VS Code from Arch Linux.
sudo pacman -R visual-studio-code-bin
I let you enjoy your preferred version of VS Code on Arch Linux. Please feel free to use the comment section if you have questions or suggestions.
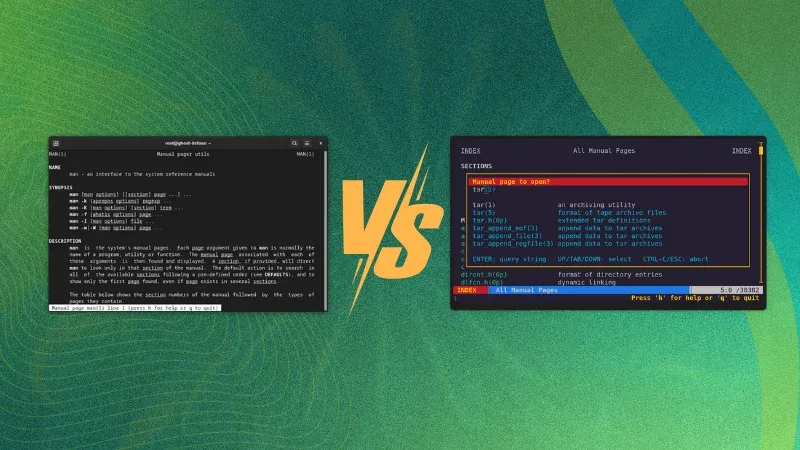
On Linux, there are man pages that come preloaded with any distribution. The man pages are basically help pages which you can access using the terminal.
You get an instruction manual when you purchase a new gadget, right? It is just like that.
If you want to know what a command does, just use the 'man' keyword followed by the command you would like to know about. While it may seem pretty straightforward, the user experience is a bit dull, as it is all a bunch of text without any decorations or any other features.
There are some man page alternatives that have tried to modernize the user experience, or give a specific focus to the man pages for particular users. Let me share my quick experience with them.
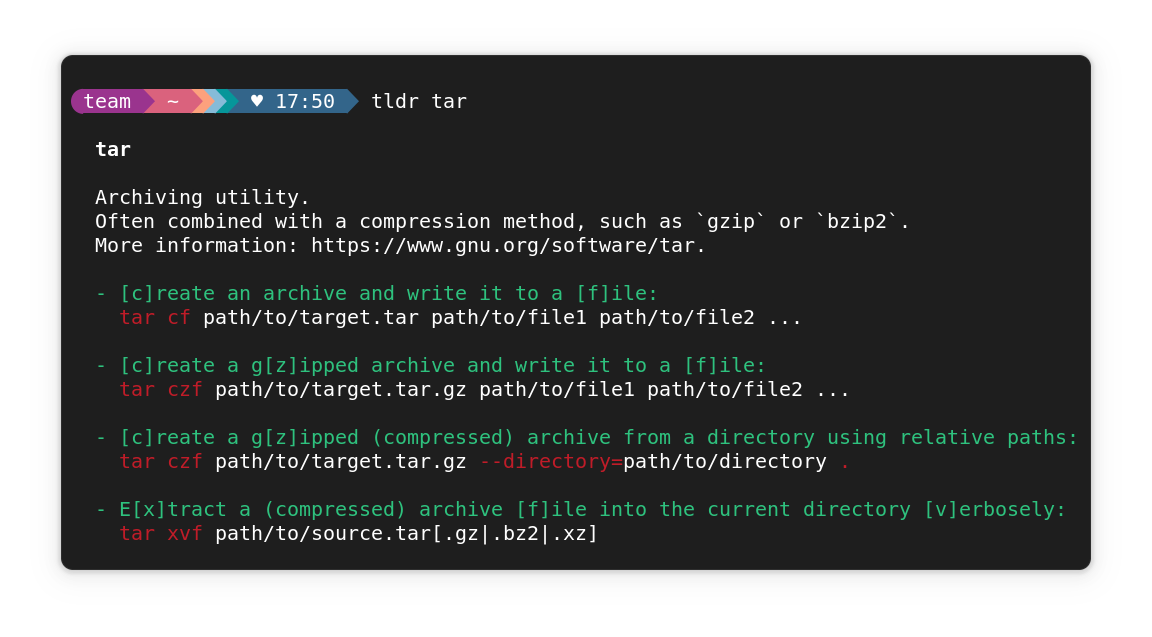
Love cheat sheets? So, you do not have to waste your time scrolling through a barrage of descriptions? That's what TLDR helps you with.
It gives short and actionable information for commands to follow.
TLDR working
Key Features:
Community-maintained help pages.
Simpler, more approachable complement to traditional man pages.
Help pages focused on practical examples
TL;DR stands for "Too Long; Didn't Read". It originated as Internet slang, where it is used to indicate that a long text (or parts of it) has been skipped as too lengthy.
Installation
🚧
You cannot have tldr and tealdeer installed at the same time.
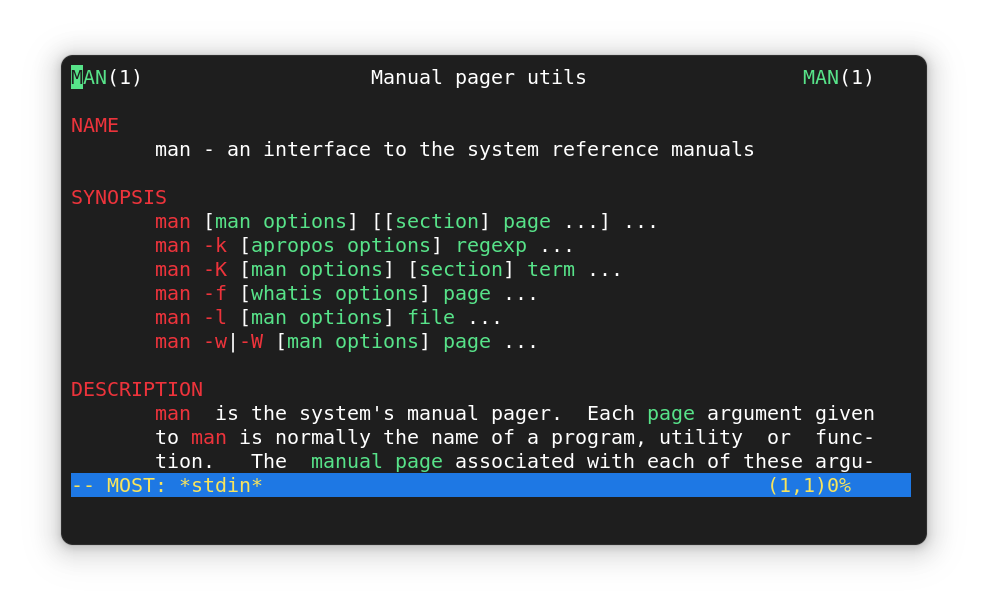
Alright, if you are like me, and probably not looking for anything fancy, but just a colorful man page, you can use the Most pager.
Most as Pager
MOST is a powerful paging program. Supports multiple windows and can scroll left and right. It keeps the same good-old man page look with added colors.
Install
sudo apt install most
sudo dnf install most
sudo pacman -Syu most
Once installed, edit ~/~.bashrc:
nano ~/.bashrc
To add the line:
export PAGER='most'
For the latest most versions, color may not appear by default. In that case, below line to ~/.bashrc.
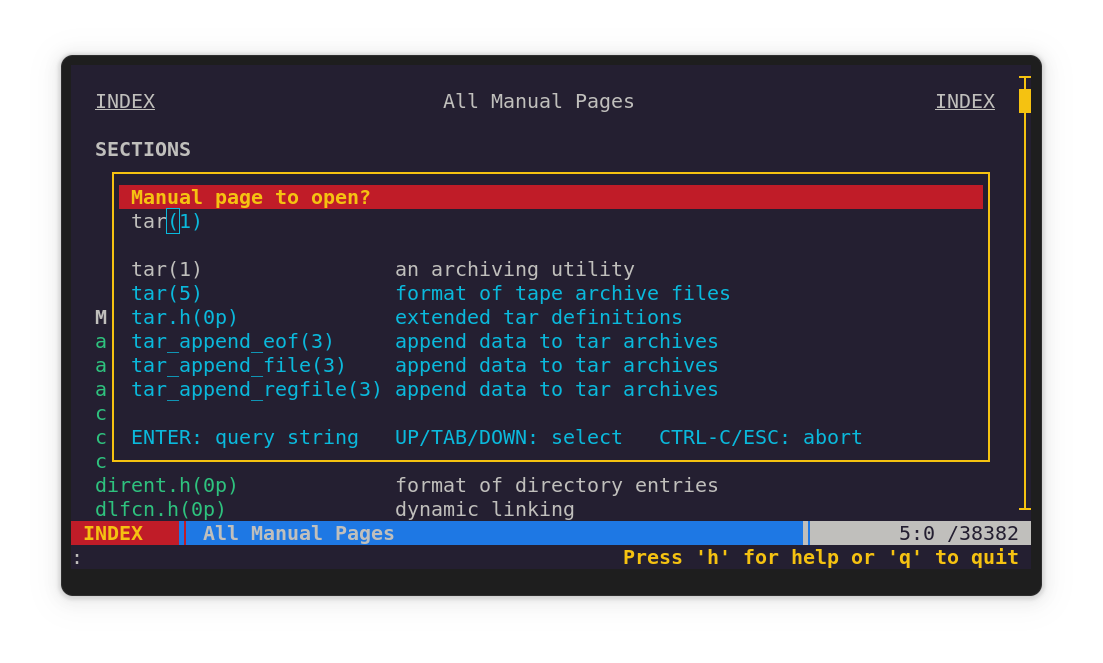
Considering you are using a distribution powered by GNOME desktop, you just need to search for the GNOME Help app from the menu. You can also access the same via the terminal using the command yelp.
Using GNOME Help (Yelp) to view man pages
Press CTRL to open the search bar and type the command that you want when using the terminal interface.
man:<command>
# For example
man:man
Or, if you are in a browser, go to the address bar (CTRL+L). Here, enter man:man. When asked to open the link in help, click on it.
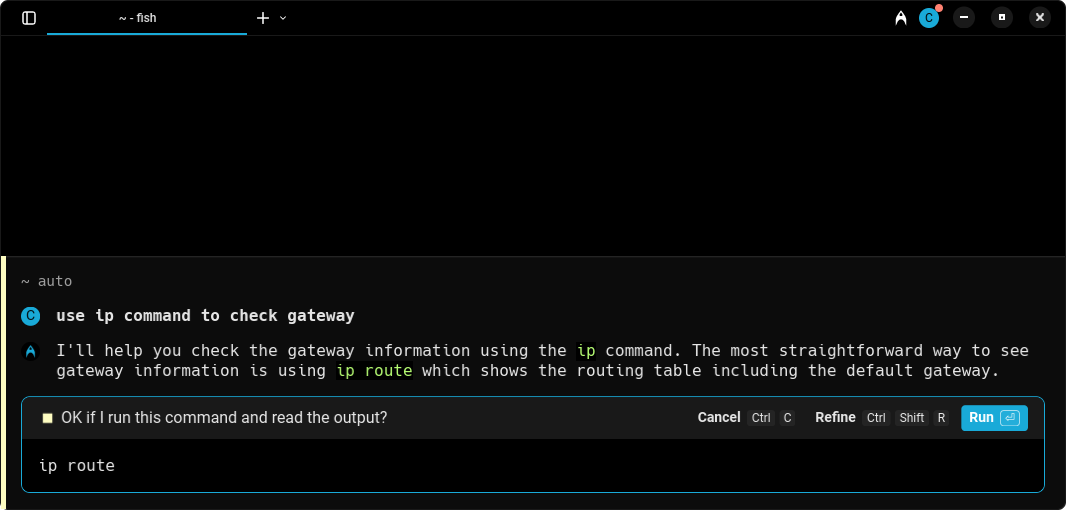
AI is everywhere, even in your terminal. The proximity of AI in the tool lets you quickly use them.
There are a few terminals that come with built-in AI agents to help you get all sorts of help; from simple command suggestion to full-fledged deployment plans.
You may use them too if you are an AI aficionado. Warp is one such terminal which is not open source but hugely popular among modern Linux users.
While you have It's FOSS along with the traditional man pages to learn what most commands do on Linux, there are alternatives to man pages which could enhance your learning experience.
If you prefer a GUI, GNOME Help should be helpful or any similar equivalent pre-installed on your distribution. For terminal-based solutions, there are a couple you can try. Take a look at the feature set they offer, and install what you like the most.
What do you prefer the most? Let me know in the comments below!
However, there is a small catch when it comes to compatibility. If you have used several Obsidian-specific plugins, then your notes may not be fully compatible in other plain markdown editors.
In this article, we will take a look at Plugins in Obsidian, how you can install it, and also some essential plugins that can make your learning more effective.
But first, a quick heads-up: Obsidian offers two types of plugins:
Core Plugins: These are officially developed and maintained by the Obsidian team. While limited in number, they are stable and deeply integrated.
Community Plugins: Created by users in the Obsidian community, these plugins offer a wide variety of features, although they aren’t officially supported by the core team.
🚧
Note that some plugins may make your Markdown notes fully readable only in Obsidian. This can be a vendor lock in. Use plugins only according to your needs.
Using the core plugins
Core plugins are officially built by Obsidian. They will come pre-installed. So, naturally, that is the recommended method of installation when it comes to plugins.
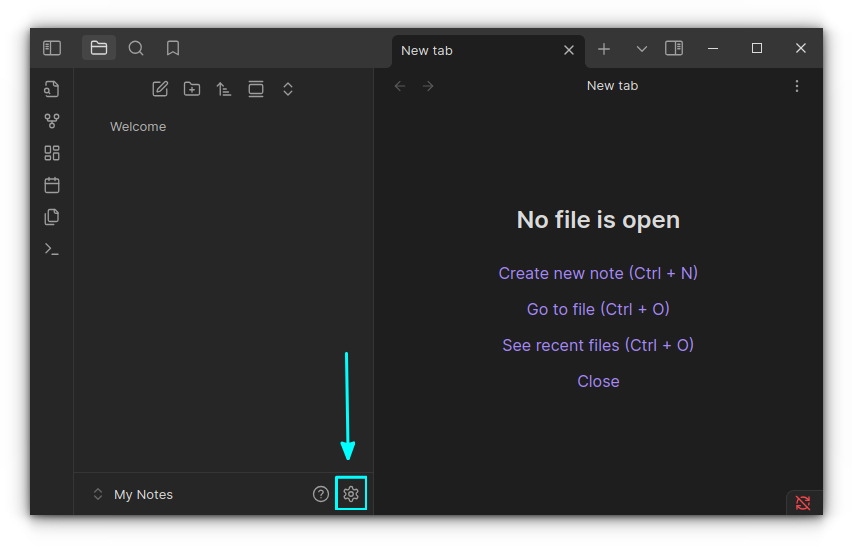
Core plugins are displayed in Obsidian settings page. Click on the settings gear icon at the bottom of the Obsidian app window to go to the settings.
Click on the Settings gear
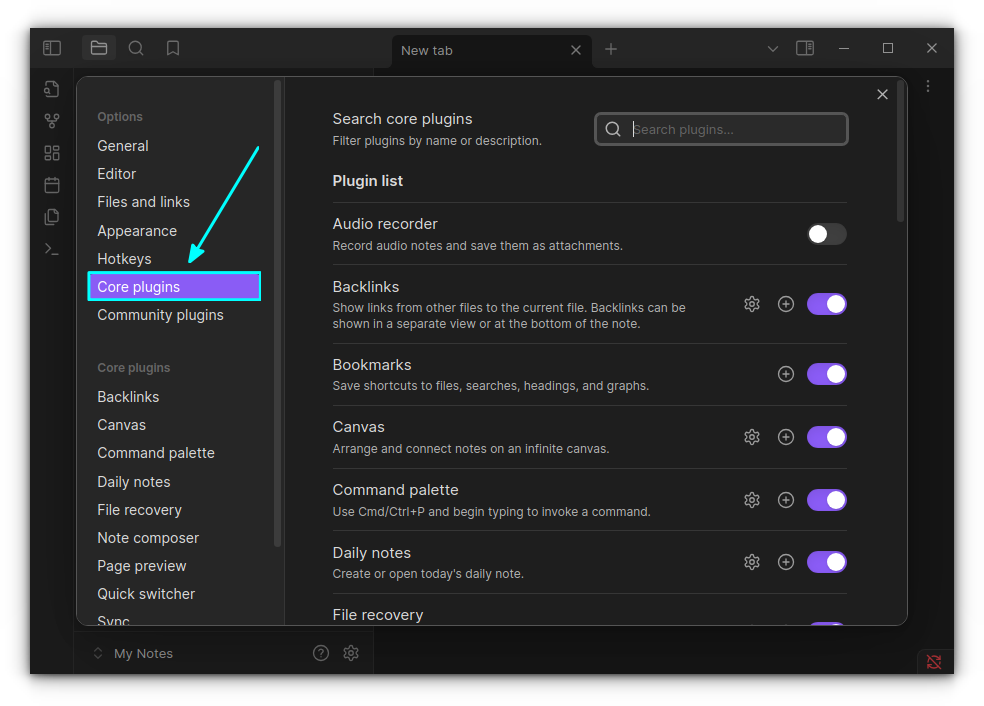
In the settings, select Core Plugins to view the Core plugins.
Select Core Plugins
Most of the core plugins are enabled when you install the Obsidian app. But some plugins will be disabled by default.
I have included a brief description under each plugin to know what the plugin does and enable/disable as needed.
I’ve found that community plugins are one of the best ways to boost Obsidian’s capabilities. There’s a massive collection to choose from, and at the time of writing this, there are 2,430 community plugins available for installation.
These plugins are built by third-party developers and go through an initial review process before being listed.
However, since they have the same level of access as Obsidian itself, it’s important to be cautious. If privacy and security are essential for your work, I suggest doing a bit of homework before installing any plugin, just to be safe.
Disable the restricted mode
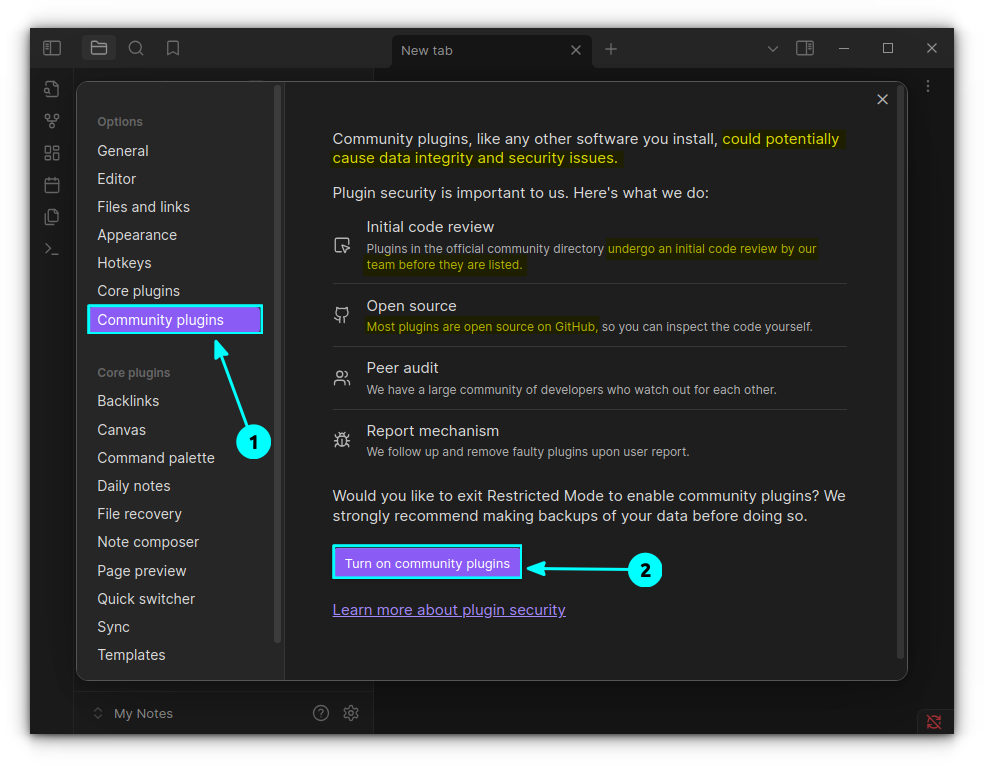
To protect you from unofficial plugins, Obsidian starts with a restricted mode, where the community plugins are disabled. To install community plugins, you need to disable the restricted mode first, just like the auto blocker in some Android phones to block app installations from unauthorized sources.
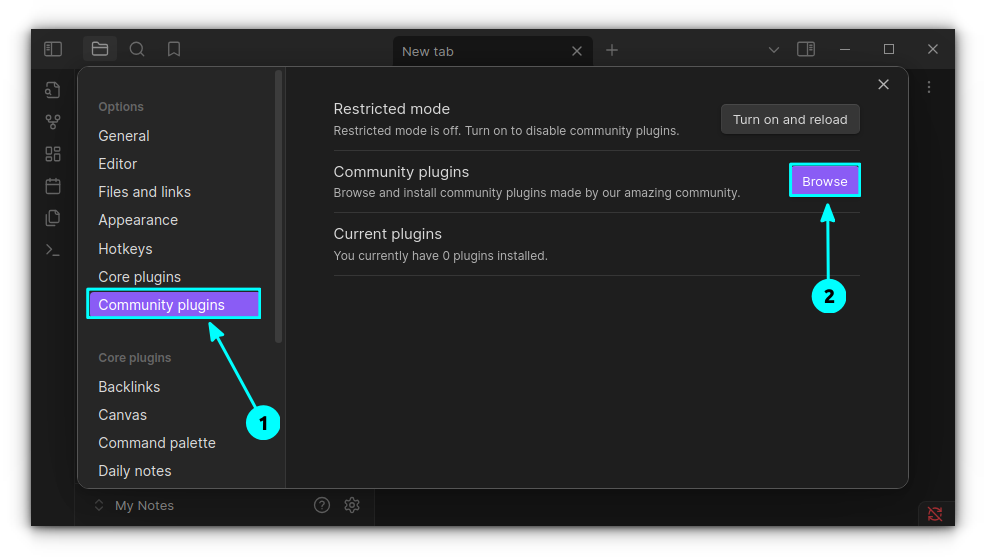
Go to the Obsidian settings and select the Community Plugins option. Here, click on the "Turn on community plugins" button.
Turn on community plugins
This will disable the restricted mode. And, you are all set! 😄
Install community plugins
Once the restricted mode is disabled, you can browse for community plugins and get them installed.
Click on the Browse button
Use the Browse button to go to the plugins page, as shown in the screenshot above. You will reach the plugins store, that lists 2000+ plugins.
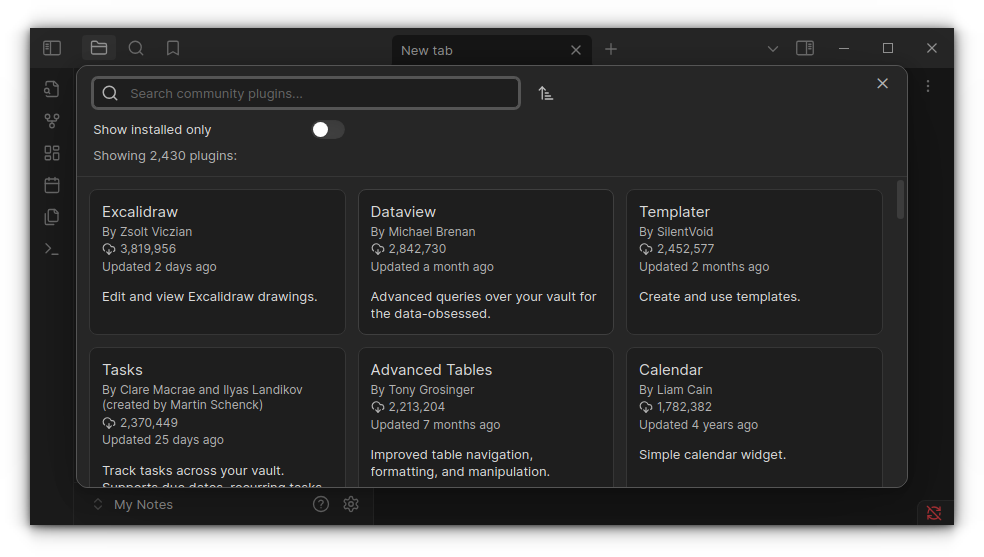
Do not worry about the numbers, just search for what you need, or browse through some suggested options, just like I did.
Plugins Store
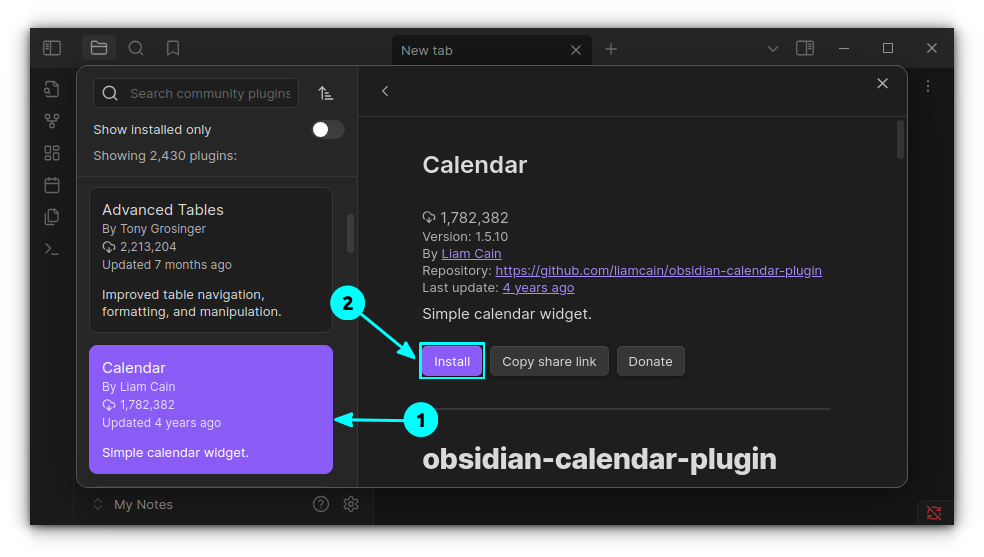
When you have spotted a plugin that matches your need, click on it. Now, to install that plugin, use the Install button.
Click on the Install button
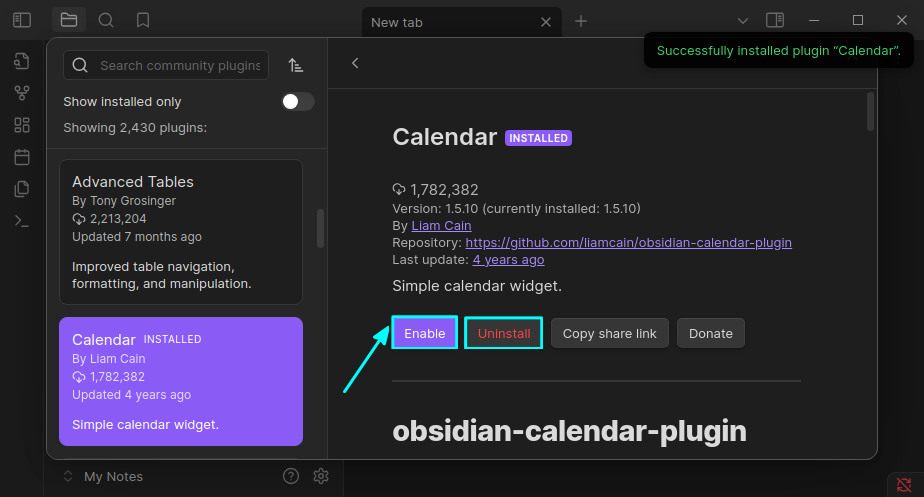
Once installed, you can see two additional buttons called Enable and Uninstall. As the name suggests, they are for enabling a plugin or uninstalling a plugin.
Enable/Uninstall a plugin
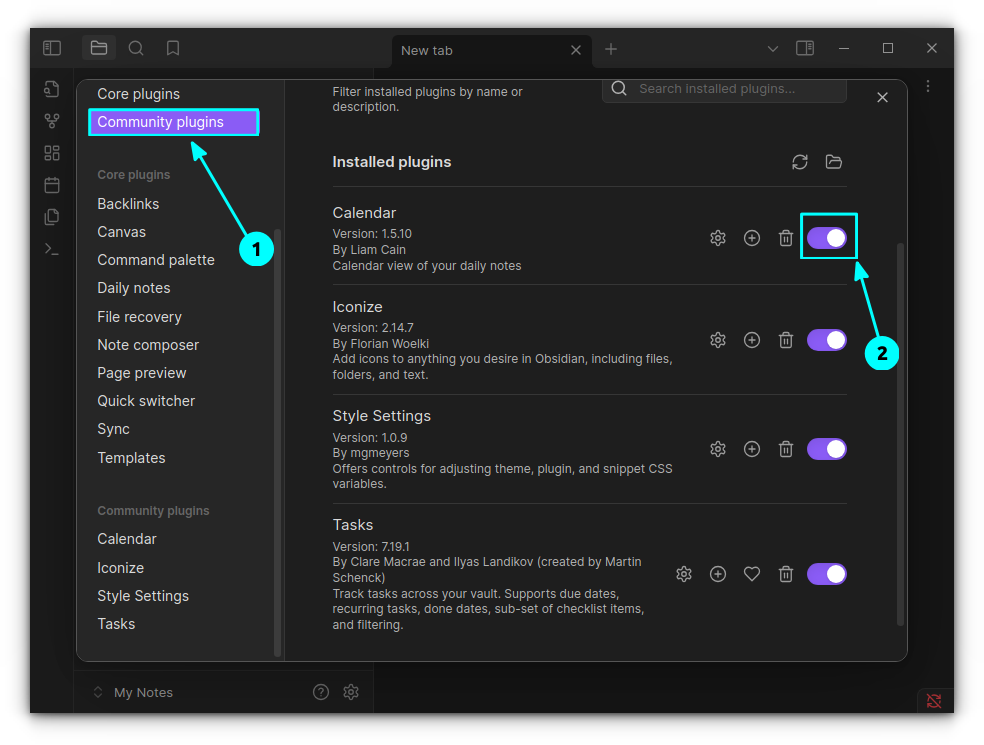
This can be done more efficiently from the Obsidian settings. For this, go to the Settings → Community plugins → Installed plugins. Here, use the toggle button to enable a plugin.
Enable Plugins in Settings
This section lists all the installed community plugins. You can enable/disable, uninstall, access plugin settings, assign a keybinding, or donate to that particular plugin.
Manually install plugins
🚧
I do not recommend this method, since most of the plugins are available in Obsidian store and have gone through an initial review.
Even though not recommended, if you want to install a plugin, manually, for version compatibility or other personal reasons, make sure to source it from the official repositories or websites.
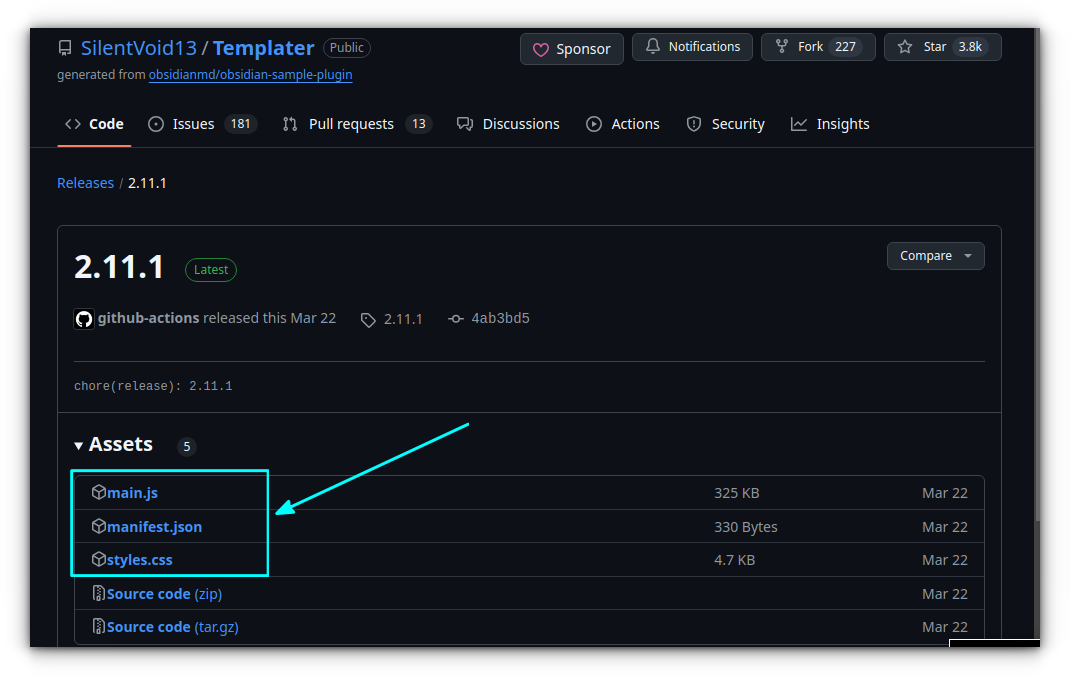
If it is on GitHub, go to the release page of the plugin GitHub repository and download main.js, manifest.json, and style.css files.
Download Plugin files
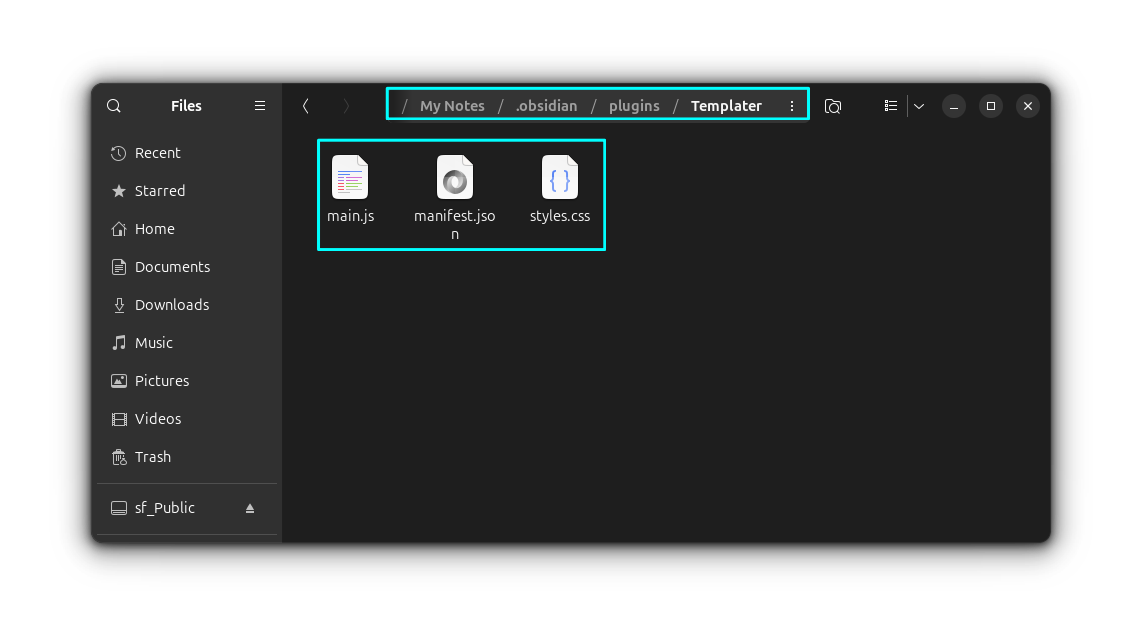
Now, create a directory with the name of the project in the <Your-obsidian-vault>/.obsidian/plugins directory. Press CTRL+H to view hidden files.
Paste plugin contents
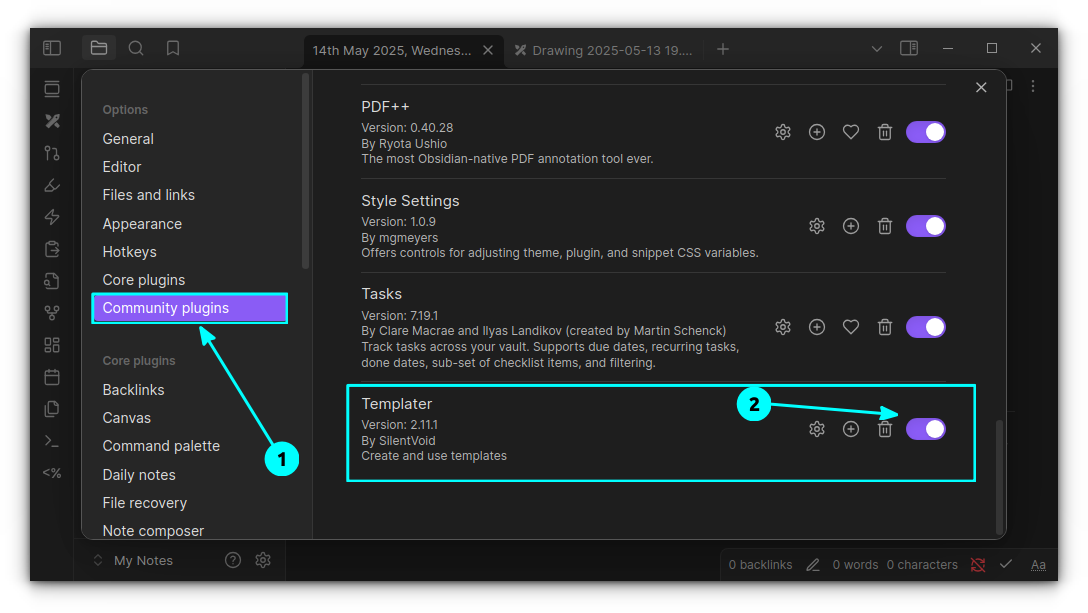
In my case, I tried Templater. Next, I transfer the downloaded files to this project directory. Now, open Obsidian and go to the Settings → Community plugins and enable the new plugin.
Enable manually installed plugin
Install beta version of plugins
This is not for regular users, but for those who want to be testers and reviewers of beta plugins. I usually do this to test interesting things or help with the development of plugins I believe in.
We are using the BRAT (Beta Reviewers Auto-Update Tool) to install and update beta versions of Obsidian plugins.
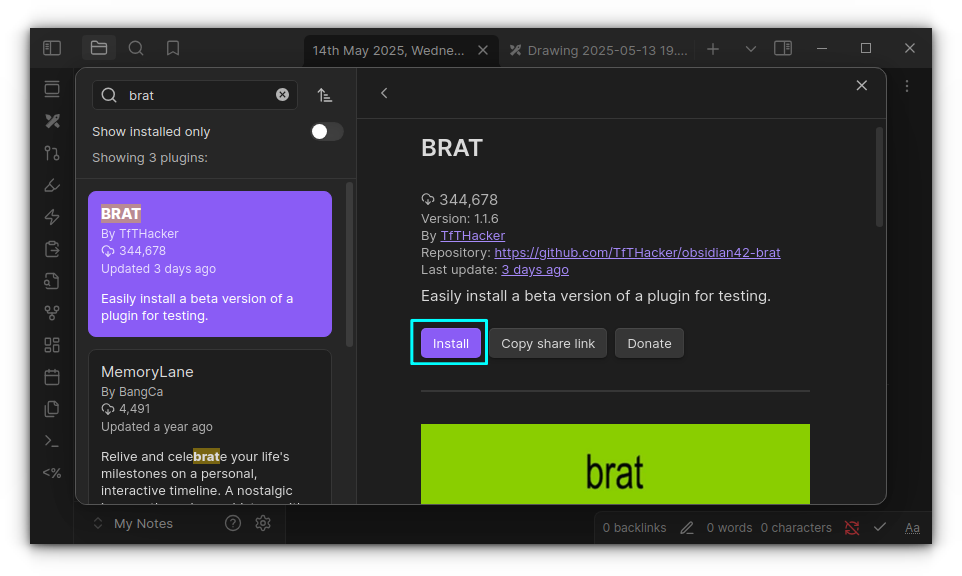
First, install the BRAT plugin from the Obsidian plugins store and enable it.
Install BRAT Plugin
Now, go to the GitHub repository of the plugin you want to install the beta version of. Copy the URL of the repository.
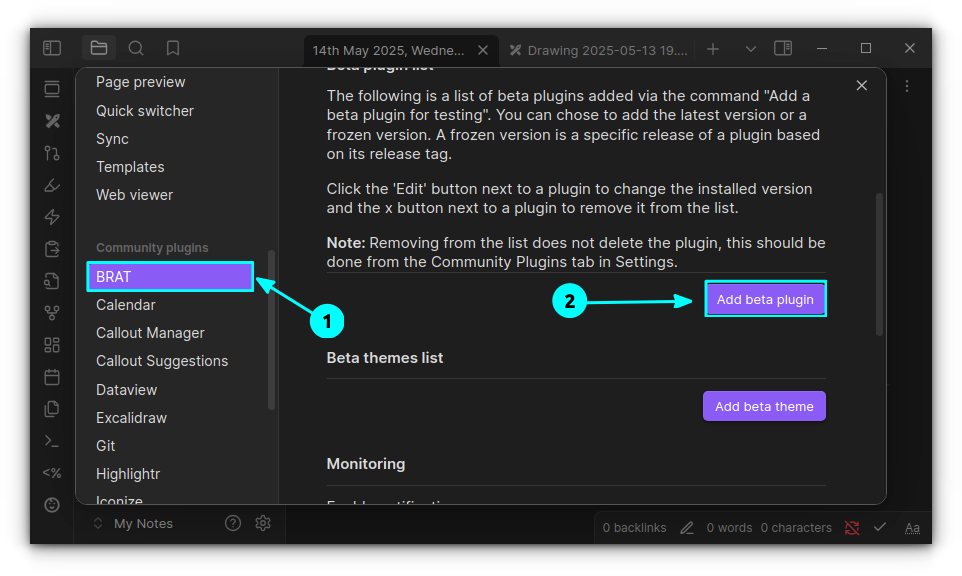
Select the BRAT plugin from Settings → Community plugins and click on the “Add beta plugin” button.
Click on the "Add beta plugin" button
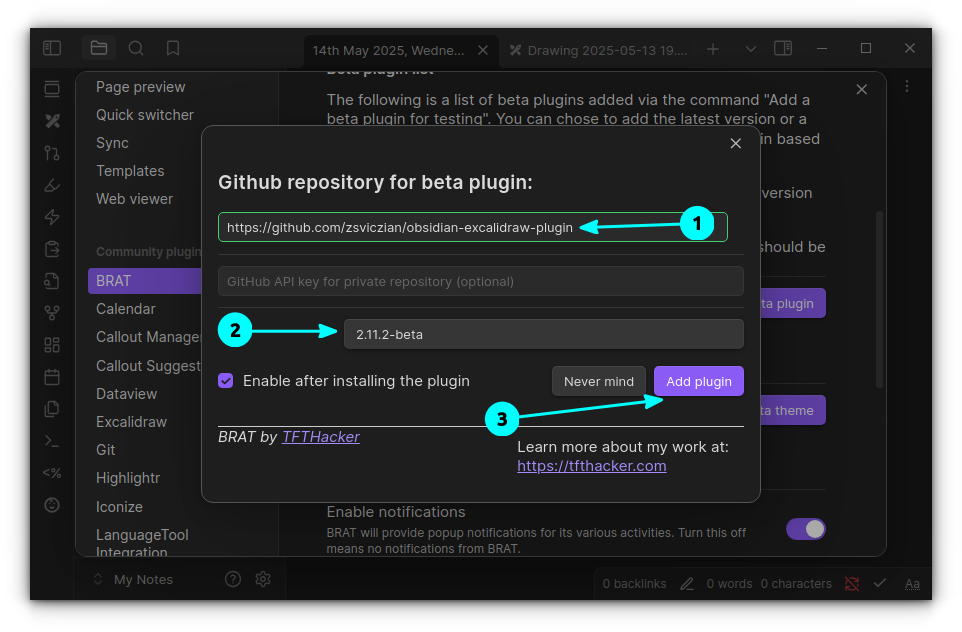
Here, add the GitHub URL, select a version from the list, and click on the Add Plugin button.
Add URL and select version
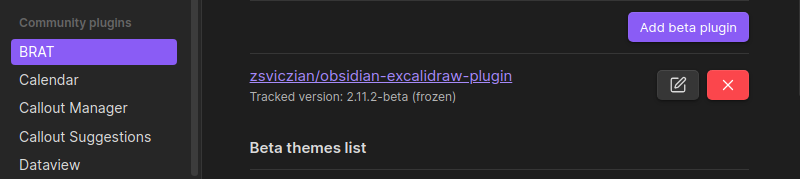
You can see that the plugin has been added with BRAT. Since we selected a specific version, it is shown as frozen and cannot be updated. Select Latest as version to get updates.
Beta plugin added using BRAT
Update plugins
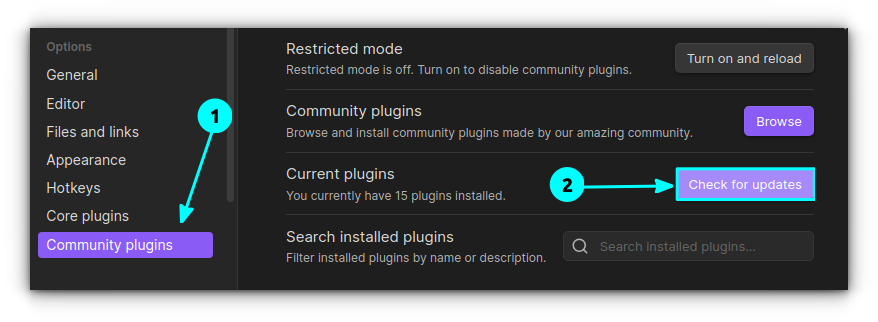
To update community plugins, go to Obsidian settings and select Community plugins.
Here, click on the Check for updates button.
If there is an update available, it will notify you.
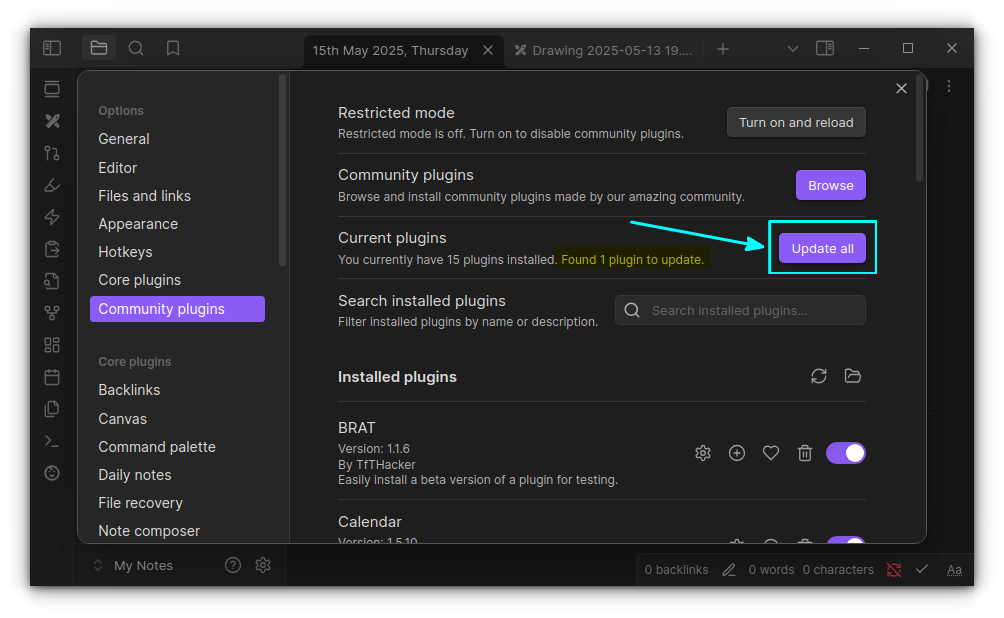
There is an update available for one plugin.
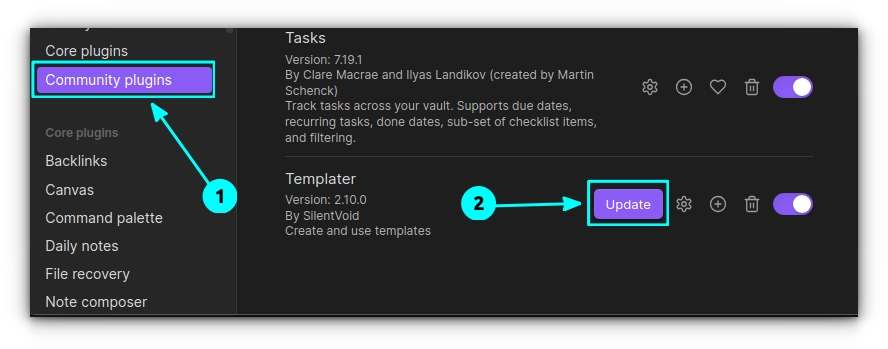
Click on Update All to update all the plugins that have an update available. Or, scroll down and update individual plugins by clicking on the Update button.
Move community plugins
You can copy selected or all plugins from your directory to another vault to avoid installing everything from scratch.
Go to the <your-obsidian-vault>/.obsidian/plugins directory. Now, copy directories of those plugins you want to use in another vault.
Copy those directories to your new plugin directory for your other vault (or the newer vault) <your-new-vault>/.obsidian/plugins directory.
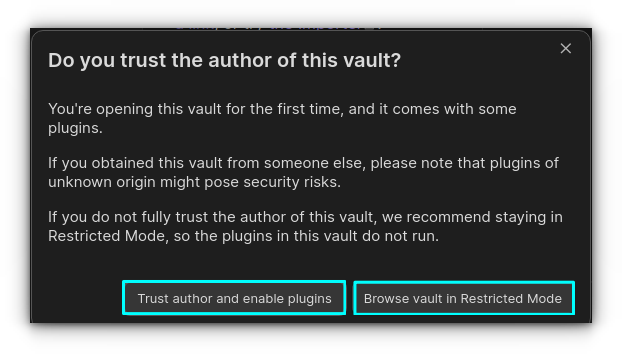
If there is no plugins directory in the new vault, create one. Once you open the new vault, you will be asked to trust the plugins.
If it is you, who copied all the folders and no others are involved, click on the "Trust author and enable plugins" button.
Or you can use the "Browse Vault in restricted mode" and then enable the plugins by going to Settings → Community plugins → Turn on Community plugins → Enable plugins.
Plugin security notification
In both cases, you don't have to install the plugin from scratch.
Don't forget to enable the plugins through Settings → Community plugins to start using them.
Remove a plugin
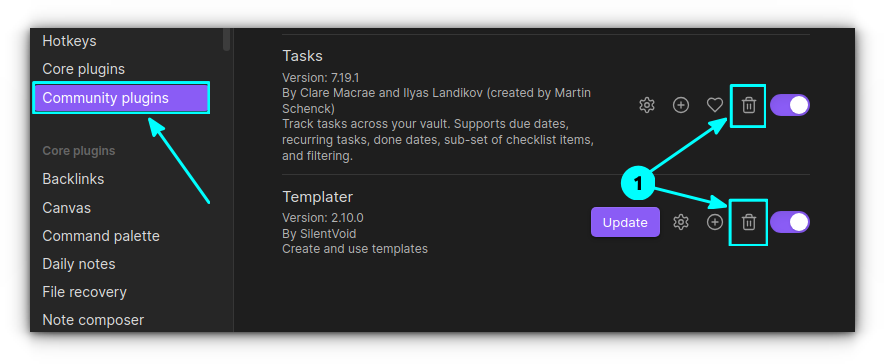
Removing a plugin is easy. Go to the community plugins in settings and click on the delete button (bin icon) adjacent to the plugin you want to remove.
Remove a plugin
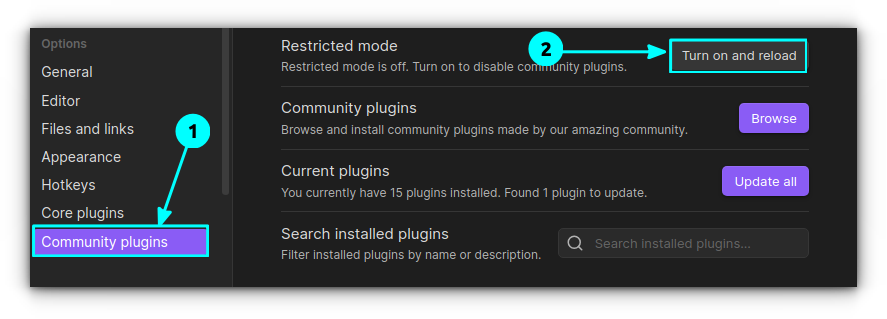
Or, if you just want to disable all community plugins, you can turn on the restricted mode. Click on the Turn on and reload button in community plugins settings.
Turn on restricted mode
So, if you turn off the restricted mode, all the installed plugins will be enabled. Pretty easy, I know, right?
Another way to remove plugins is to delete specific folders in the plugins directory, but it is unnecessary unless you are testing something specific.
🚧
Don't use this method for everything since it is safer to do so from within Obsidian.
Go to the <your-obsiidian-vault>/.obsidian/plugins directory and remove the directory that has the name of the plugin you want to remove.
Now open Obsidian and you won't see that plugin. Voila!
Enjoy using Obsidian
I have shared many more Obsidian tips to improve your experience with this wonderful too.