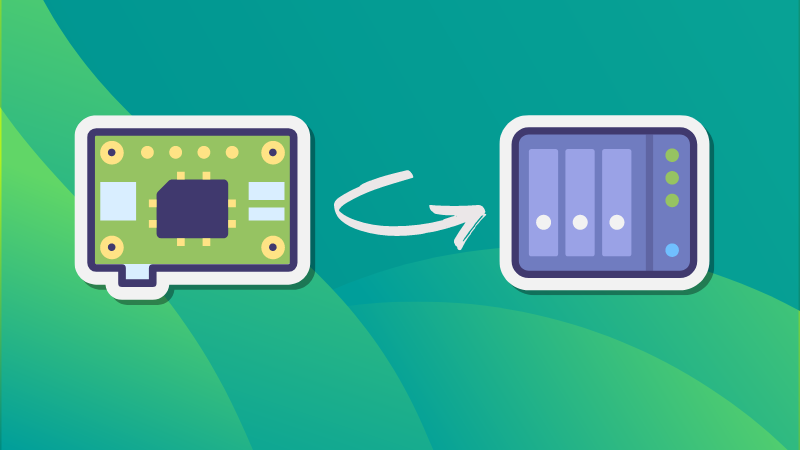
Are you tired of the challenge posed by a crowded local storage, making file retrieval feel like a scavenger hunt?
Worry not! Today, we embark on the transformation of your Raspberry Pi into a Network-Attached Storage (NAS) solution.
Say farewell to the complexities of an overloaded local storage. Instead, envision your Raspberry Pi, equipped with a Samba Server, seamlessly organizing files for efficient collaboration, simultaneous access, and reliable backups.
What is Samba?
Samba is a software suite that enables seamless file and print services interoperability using Server Message Block (SMB) / Common Internet File System (CIFS) file sharing standard which is widely supported by various operating systems like Windows, MacOS, Linux and even Android.
There are other NAS oriented solutions available for Raspberry Pi like Open Media Vault. I find SMB share to be the easiest to set up and if you are new to network storage, I think you should try this hassle-free method.
Requirements
Raspberry Pi
SD Card (8 GB+)
Raspbian OS installed (commands mentioned here work on that)
Ethernet Cable (Optional)
Keyboard & Mouse (Optional)
External HDD/ SSD
✋
The USB ports on Raspberry Pi may not be sufficient enough to power up an External Hard Drive. So, I would suggest you to use an external power supply or buy a HDD docking station.
The first order of business when start working on Linux is to ensure that you have all the latest packages installed.
sudo apt update && sudo apt upgrade -y
To install the Samba packages you just need to apt-get as they are available in the repository.
sudo apt-get install samba samba-common-bin
The work is not done here since you need to create a folder which will be shared. This folder can be located even on external drive mounted to Pi.
Creating a shared folder
For this tutorial, I am mounting an external drive and creating a new folder inside /media directory.
I am going to give this folder all the permission i.e. read/write/execute (rwx) so that anyone on my sub-network with the access to my server can share files easily.
sudo mkdir -m 1777 /media/hdd/shared
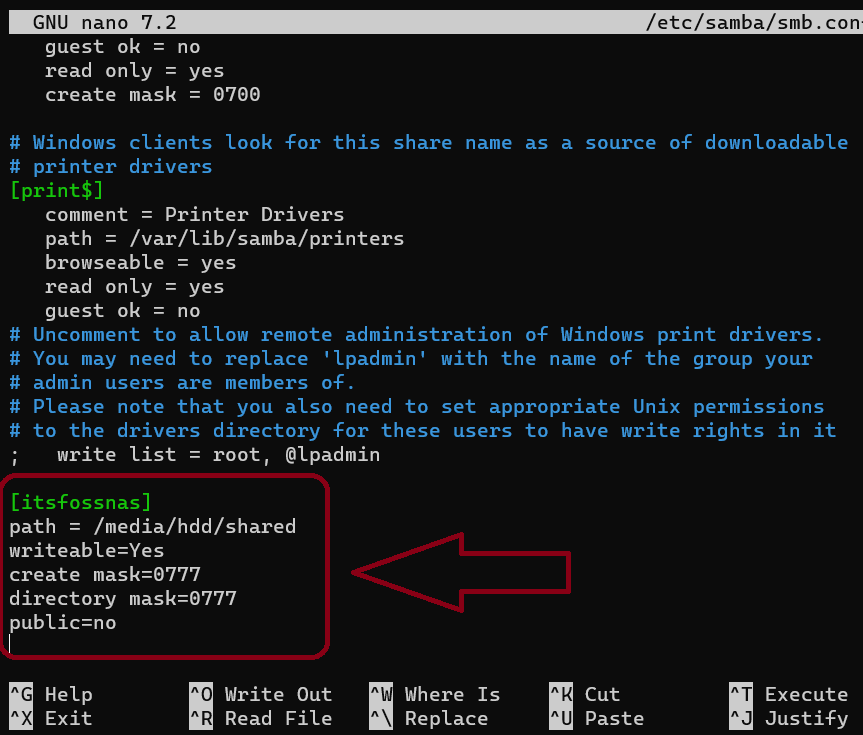
Editing the SMB Config file
Once you have created the folder, it's time to configure your SMB share. You need to do is edit smb.conf file to make your share visible on the network.
sudo nano /etc/samba/smb.conf
Inside this config file, you need to add the following code at the bottom:
Then save and exit out of Nano using CTRL + X then press Y .
Here, [itsfossnas] is the name of my share and it'll be used to connect to the network share with the address like \\localhost\itsfossnas.
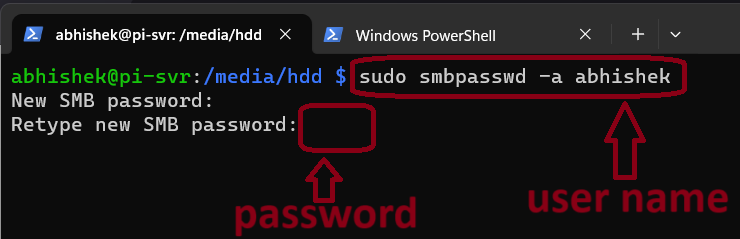
Creating a User for Samba share
Creating a user for Samba share is crucial for access control, security, and personalized settings.
I am going to create a user called abhishek in this example.
sudo smbpasswd -a abhishek
Once you press Enter, it will prompt you to create a password for this user.
Finally, you need to restart the samba service:
sudo systemctl restart smbd
Samba will restart automatically when every time you boot up your Pi.
Now it's time to connect to your Samba share and to do that, you need to locate the Pi on the network.
The easiest method is to type hostname -I on the terminal or you can check the DHCP record of your router which will show the IP address assigned to your Pi.
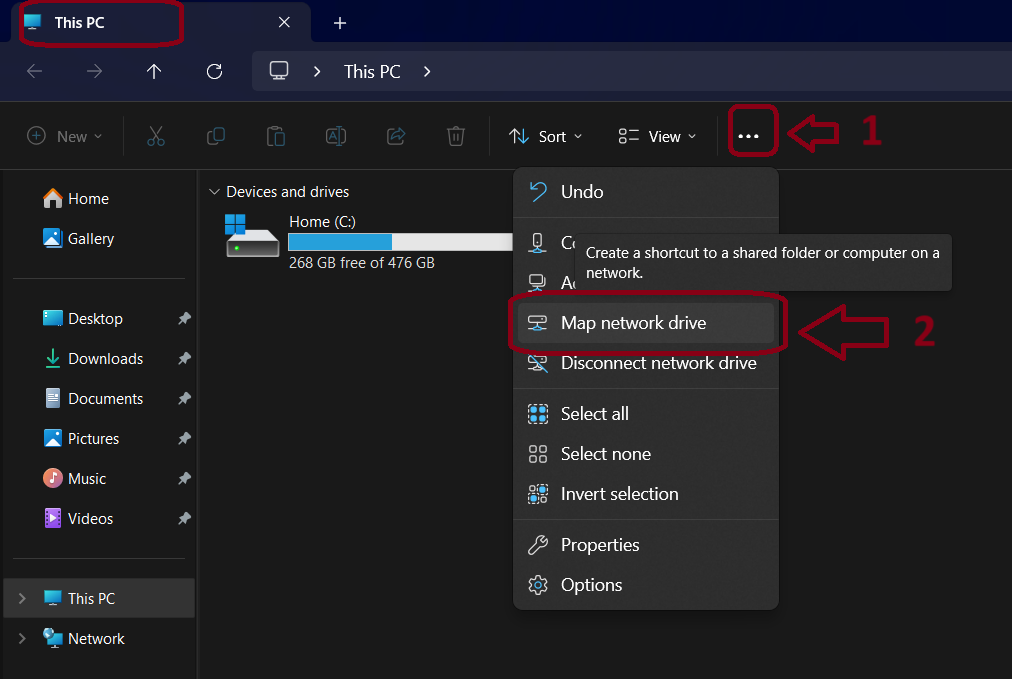
Mounting your Samba Server on Windows
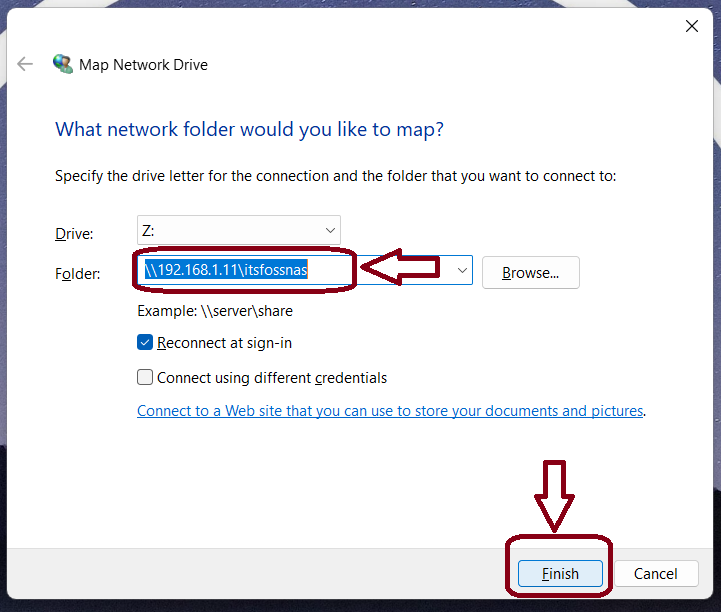
To mount your server in Windows is quite simple. Inside the file explorer app, at the top you will need to click the menu icon ... and a list of options will pop up on your screen from which, You have to select Map Network drive .
I am using Windows 11 in this tutorial.
After that, it will ask you to set the drive letter for your share and the address of your Server. In my case, it is \\192.168.1.11\itsfossnas .
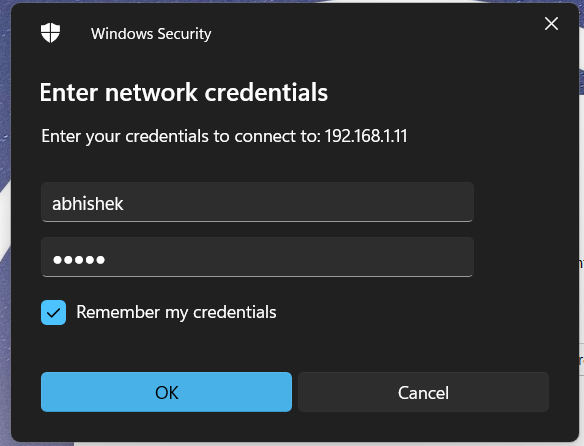
Finally, it will prompt you to enter you Login credentials i.e. the Username and the Password we set at the above step and once you are done, just press Ok.
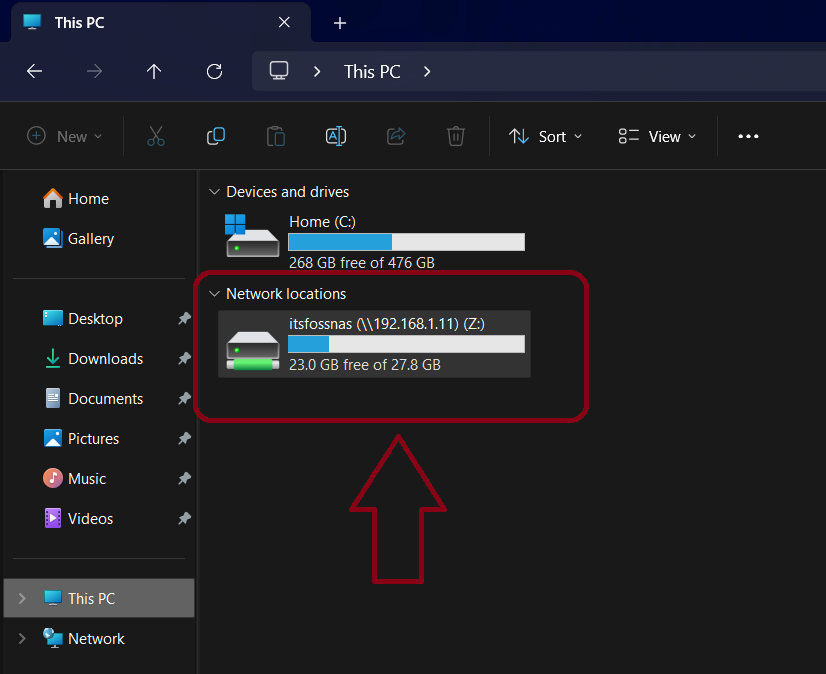
Your drive is now mounted successfully.
The speeds will vary based on whether you are on WiFi or connected via Ethernet cable.
Conclusion:
I won't say that this will be your permanent storage and backup solution but it is quite impressive that how such a small device can do so much.
I think it's great for learning about Network Storage options before you go all in and buy an expensive NAS.
Hope you have learned something new. Feel free to share your experience or your DIY storage solutions with us in the comments.
Reading logs could be tiresome, specially if you are new to it. It all looks black and white and you have to look for the desired details in it. Not a pretty scene, right?
While I cannot change the logs for you, I can show you a way to make them look better and easier to read.
How you may ask. tailspin is my answer. It is a log file highlighter and it highlights details like dates, numbers, severity keywords (warning, info, error) etc.
And yes, it is written in Rust 🦀
In this tutorial, I will walk you through how you can install and use the tailspin utility to enrich your experience for reading logs and even text files.
"Let me color your logs" - Tailspin
Tailspin on different log files
Unlike other modern Linux commands that utilize a different syntax, you do not need to relearn the whole thing from scratch with tailspin.
It simply adds colors to your log/text files so can spot crucial elements immediately.
The best part is you don't require any additional configuration and it works out of the box.
Key features of Tailspin
Colored output to read logs
Search for keywords
Monitor folders in real-time
Ability to configure colors
Uses less as a pager, so expect most features of the less command
Now, let's take a look at how to install the Tailspin utility.
How to install Tailspin in Linux
Tailspin is available in the default repository of Arch Linux and NixOS. But if it is not available for your distribution, I will also be sharing a way to install it through universal package managers.
For Arch Linux:
sudo pacman -S tailspin
For Nix:
nix-shell -p tailspin
If you are not using Arch or Nix package manager, then you can use the homebrew or cargo package manager.
As per my personal experience, I recommend using cargo Package Manager over Homebrew but it's totally up to you.
Once you are done with the installation, let's take a look at how to use the Tailspin.
How to use the Tailspin utility
In this section, I will walk you through various examples of using the Tailspin utility. Let's start with the most prominent one.
1. Use Tailspin to get colored logs
To use the Tailspin utility to get a colored output of a text/log file, all you have to do is append the filename to the tspin command (tspin is a binary name for tailspin):
tspin <Filename>
2. Monitor directory/files in real-time
The Tailspin utility lets you monitor directories/files in real-time to know what lines are being written to the files.
In my opinion, monitoring a specific file is more helpful than monitoring the entire directory and there's a reason why.
When you monitor a folder, it shows the changes are being made to the folder but it won't specify which file is being modified.
But still, I'll walk you through both ways: monitoring directories and files.
Monitoring directories
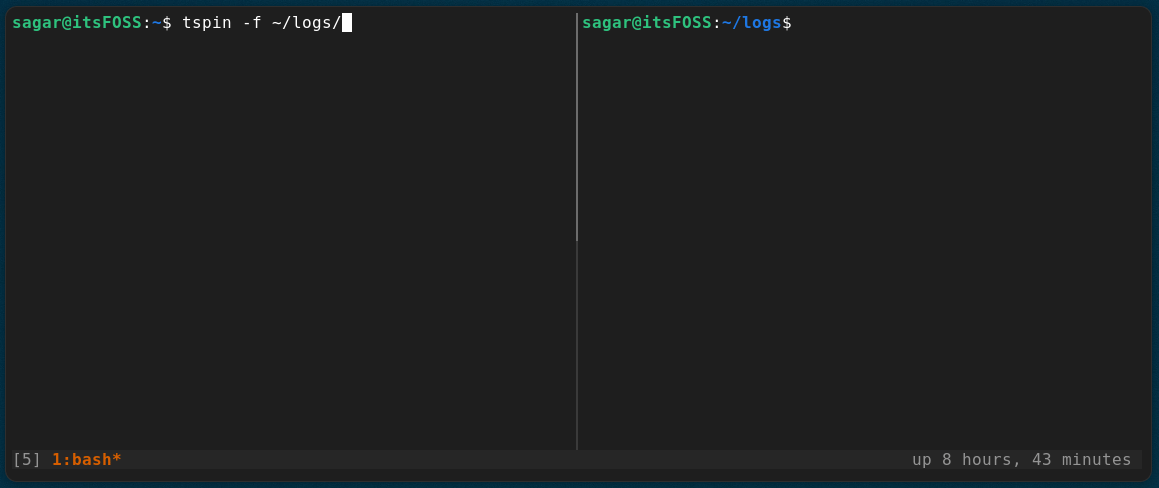
To monitor directories, append the name of the directory to the tspin command:
tspin <directory>
On the left side, I've used the tspin command over the logs directory, and on the right side, I edited the File1.txt file two times to let you know what you should expect while monitoring the directory.
As you can see, it didn't show the name of the file and that's why I prefer monitoring the file itself than the entire directory.
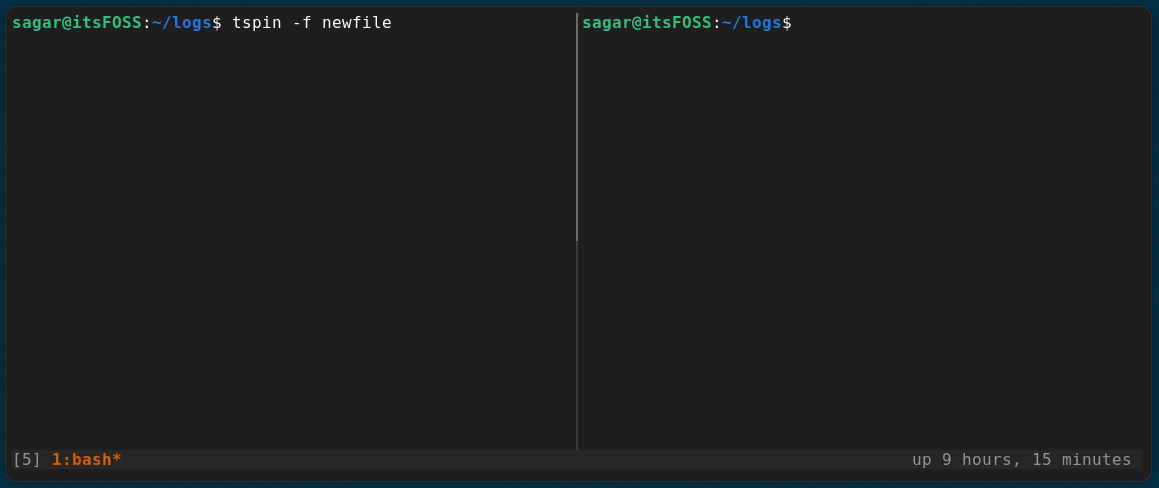
Monitoring a file
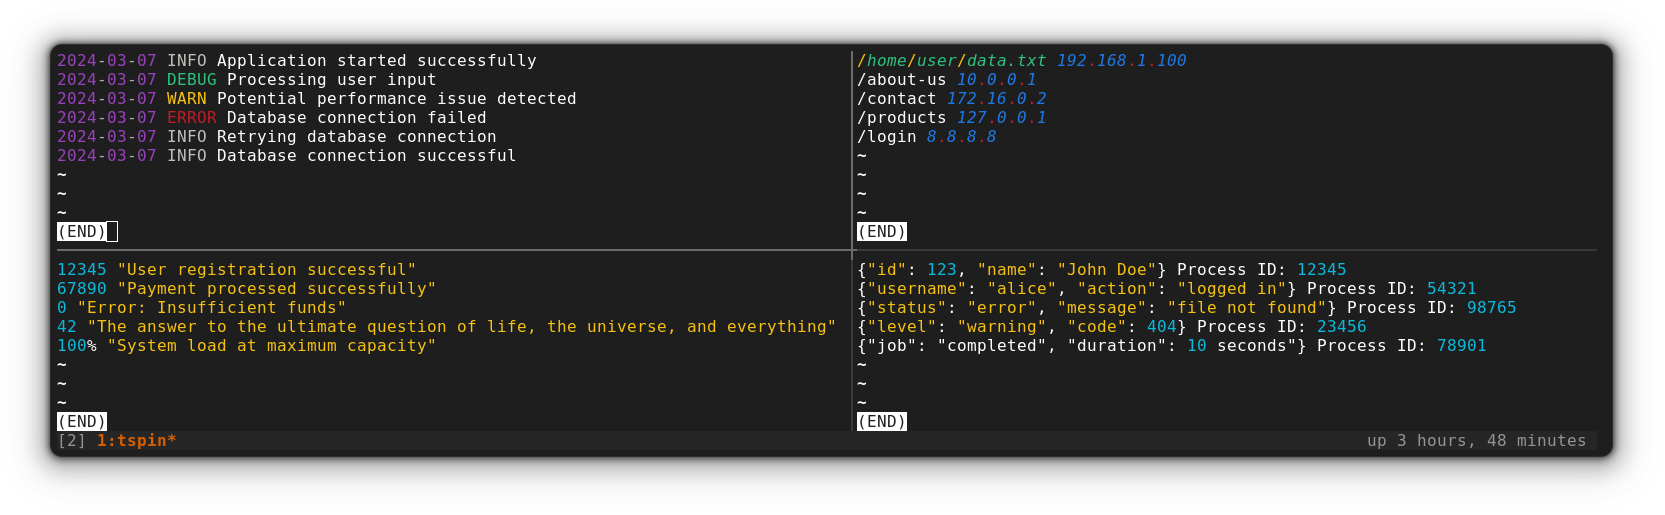
To monitor a file, append the filename to the tspin command and it will wait for the data to be written over the specified file. Once you write any changes, it will immediately show the lines written to that file:
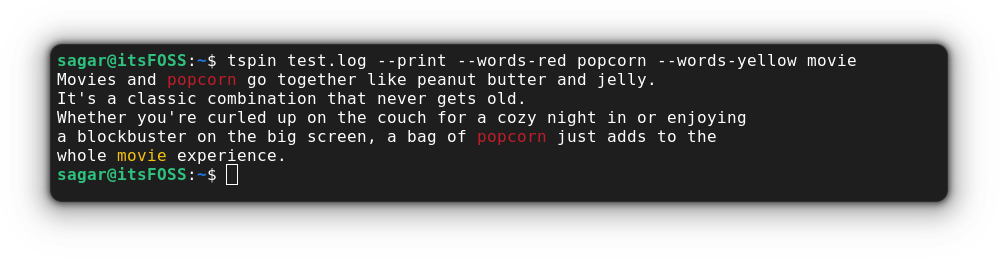
For example, here, I used the red color to highlight the term popcord and the yellow color for the term movie:
tspin test.log --print --words-red popcorn --words-yellow movie
Wrapping Up...
I use the Tailspin utility to find a keyword by highlighting it with a bright color. Sure, writing such a long command is not a feasible option and that's why I created an alias for efficiency.
I hope you like this utility as much as I do. If you require any further assistance related to this utility, then feel free to leave us a comment.
The concept of homelab is getting popular among tinkerers and hobbyists. From personal cloud to media server to home automation, homelab gives you the freedom of owning your data by self-hosting open source software on your hardware.
Some people use new hardware, while some build their homelab with older computers and servers. Reddit's homelab subreddit is full of such examples.
Now, building a homelab could be fun but it could also be time taking or frustrating.
And this is whereZimaBoardcomes into the picture. It aims to give you an out-of-the-box homelab experience and it succeeds in that purpose.
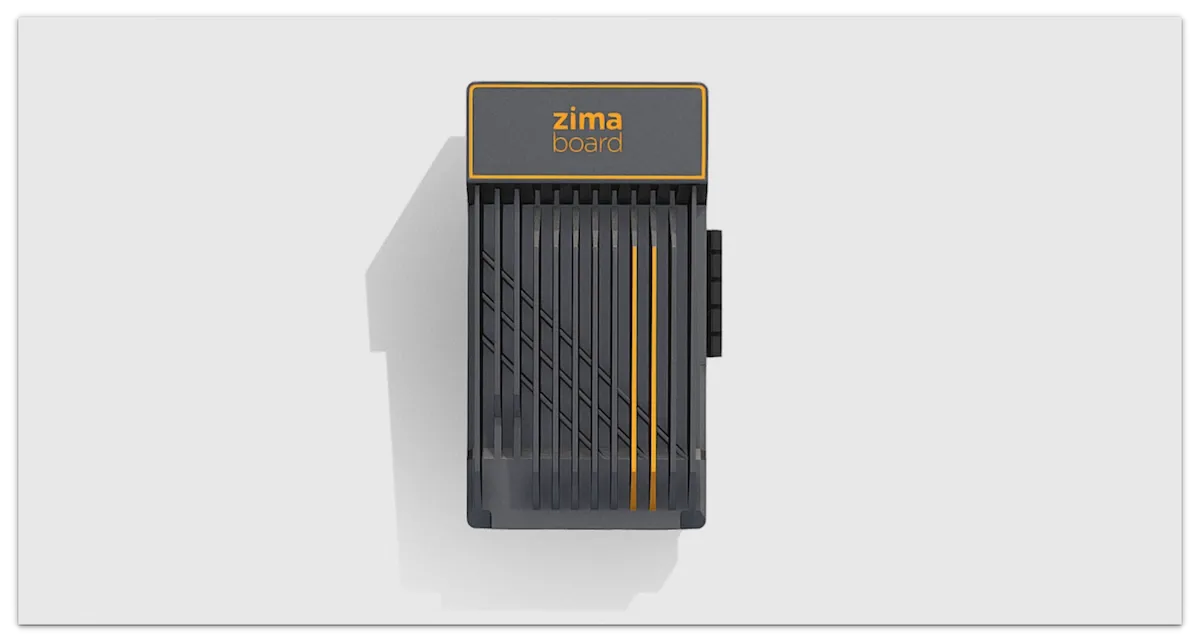
ZimaBoard
💡
To summarize, here are my thoughts on ZimaBoard
✅ Out of the box homelab experience
✅ Easy deployment of various applications through CasaOS web interface
✅ Great looking device in a small form factor
✅ Does not heat up even under heavy load
✅ Intel x86 processor instead of ARM (allows running most distros)
✅ Reasonably priced
❎ The documentation could be improved
If that sounds exciting, read on to learn my experience and views in detail.
ZimaBoard specifications
There are three variants of ZimaBoard; ZimaBoard 232/432/832. They are primarily categorized based on RAM configuration and the processor used.
There are two Gigabit Ethernet ports to allow you to use ZimaBoard as a router or firewall.
There are also two dedicated SATA ports to connect your HDDs for backups, NAS and more. The PCle port gives you the option to add additional hardware.
There is no WiFi adapter in-built here. It is supposed to be connected via Ethernet. Moreover, it has Intel N3450 processor which was released some years ago, although it works superb.
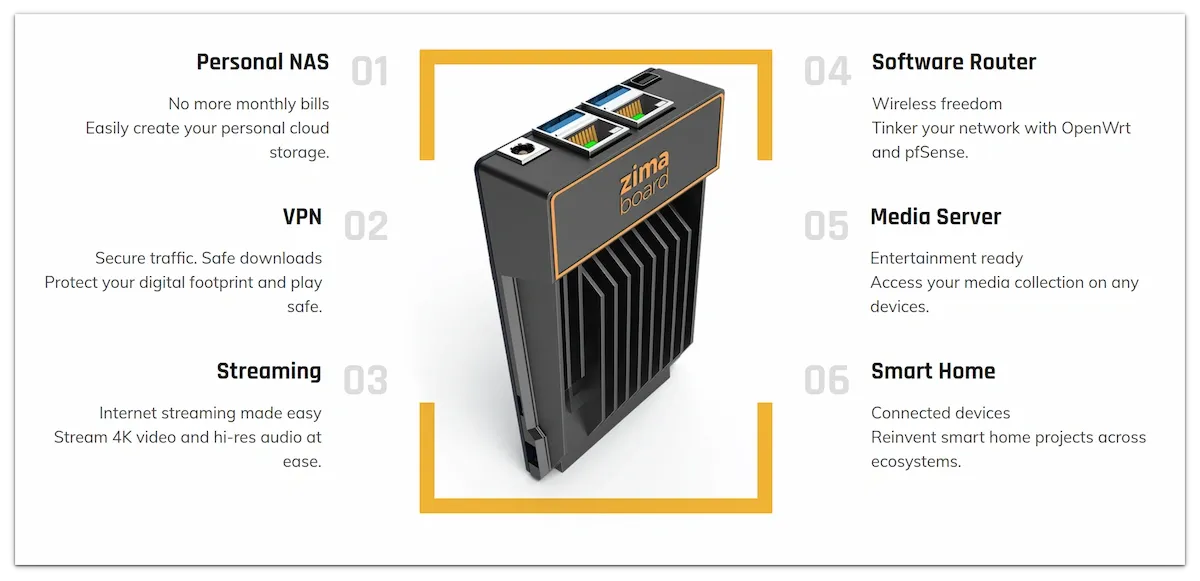
What can you do with ZimaBoard?
A lot but in small form factor and ideally in a home setup.
You can use it as a media server with software like Jellyfin, Plex and Emby. You can even connect it your TV for media streaming.
You can also use it as a router with openWrt or as a firewall with pfSense or secure your network with VPN. It can also be used for build a smart home system with Home Assistant.
You can attach up to 32 TB of storage thanks to its two SATA ports and a PCle port. Did someone say NAS? Yes, that's possible too.
Use it for your personal cloud storage thanks to tools like PhotoPrism and Nextcloud.
The device consumed only 6W of power and it hardly heats up. Making it ideal for 24x7 operation.
The open source software deployment and managing your ZimaBoard is done through its Debian-based distro CasaOS. Which I am going to discuss in the next section.
CasaOS makes ZimaBoard a Plug and Play Homelab device
ZimaBoard comes with its own operating system CasaOS preinstalled.
The thing about CasaOS is that you can access it via a web browser from your regular computer. Yes, you don't need to connect ZimaBoard to a dedicated screen or SSH into it to use it (you can do that, though).
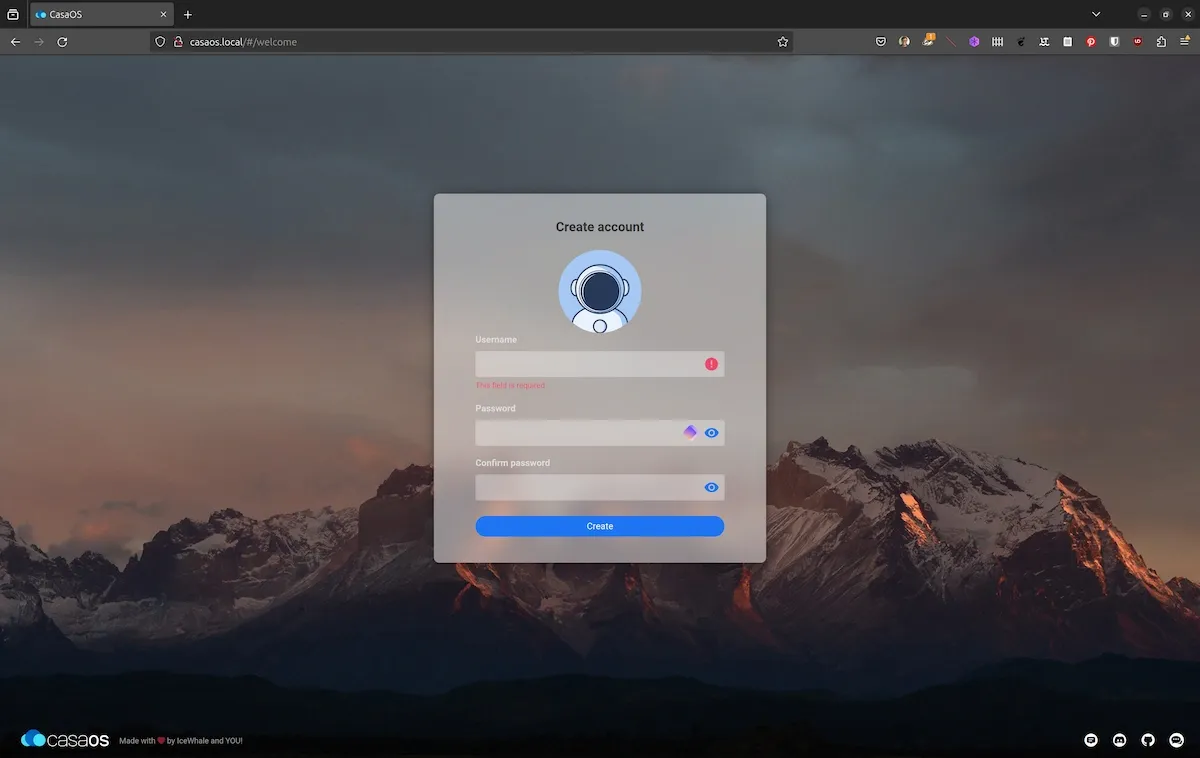
So, the first time you use ZimaBoard, you connect it to the Ethernet port of your router and turn it on. After a minute or so, you can access the CasaOS interface in your web browser by typing http://casaos.local.
At the first run, it asks you to create a user account and password. This adds a security layer otherwise anyone on your sub network could access CasaOS and modify its configuration.
You have to create user account on first run of CasaOs
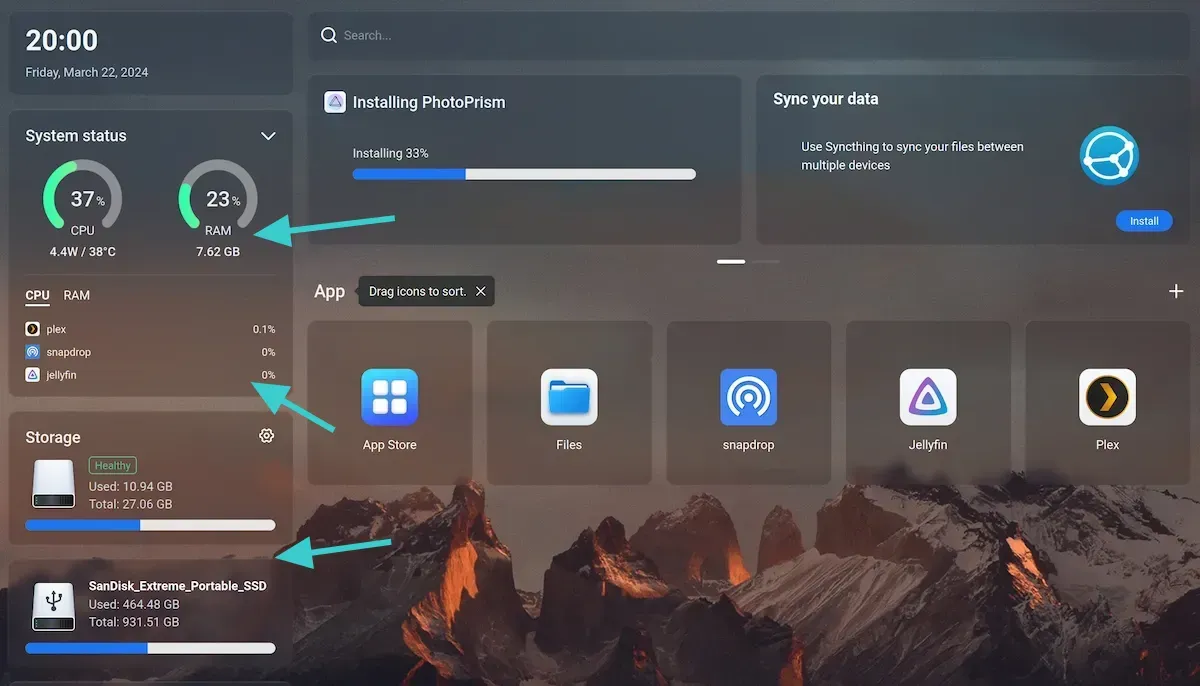
The CasaOS web interface is quite simple. It shows the current system usage, disk storage and currently installed applications. Not only that, you can also see the current CPU temperature and power usage.
CasaOS dashboard
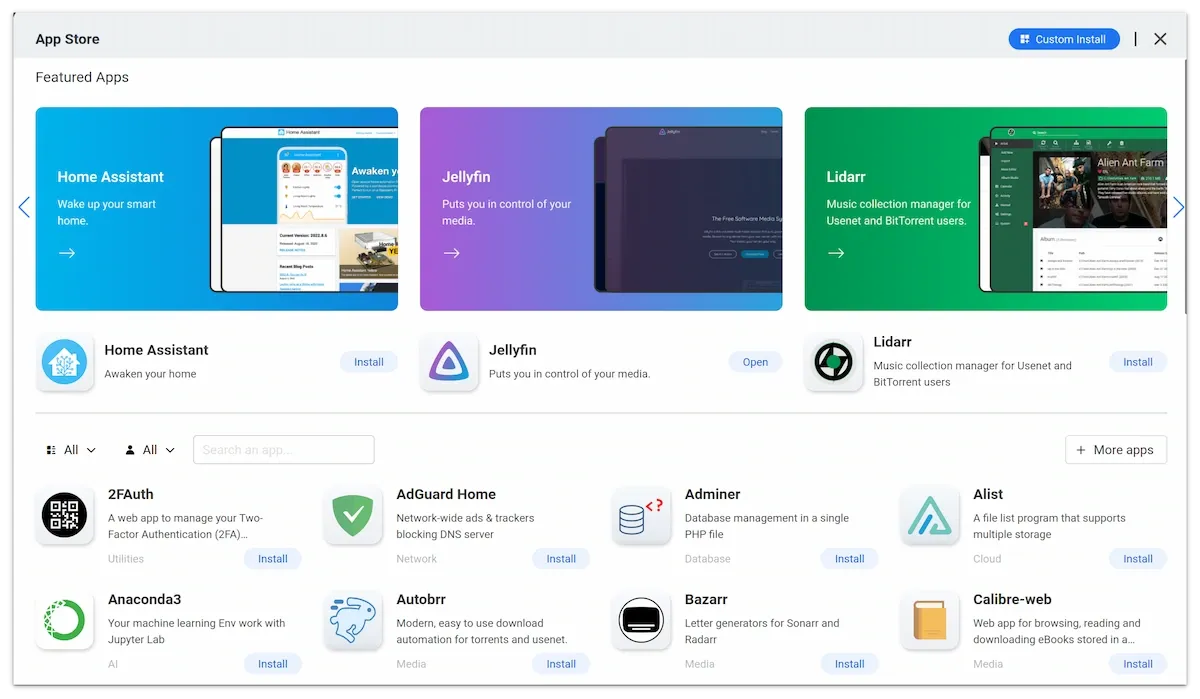
It also lets you access an App store and deploy new open source software easily within minutes.
CasaOS App Store
How does that happen? Well, the applications actually run in Docker containers. When you install a software from this App Store, you are fetching a preconfigured docker image and run a container.
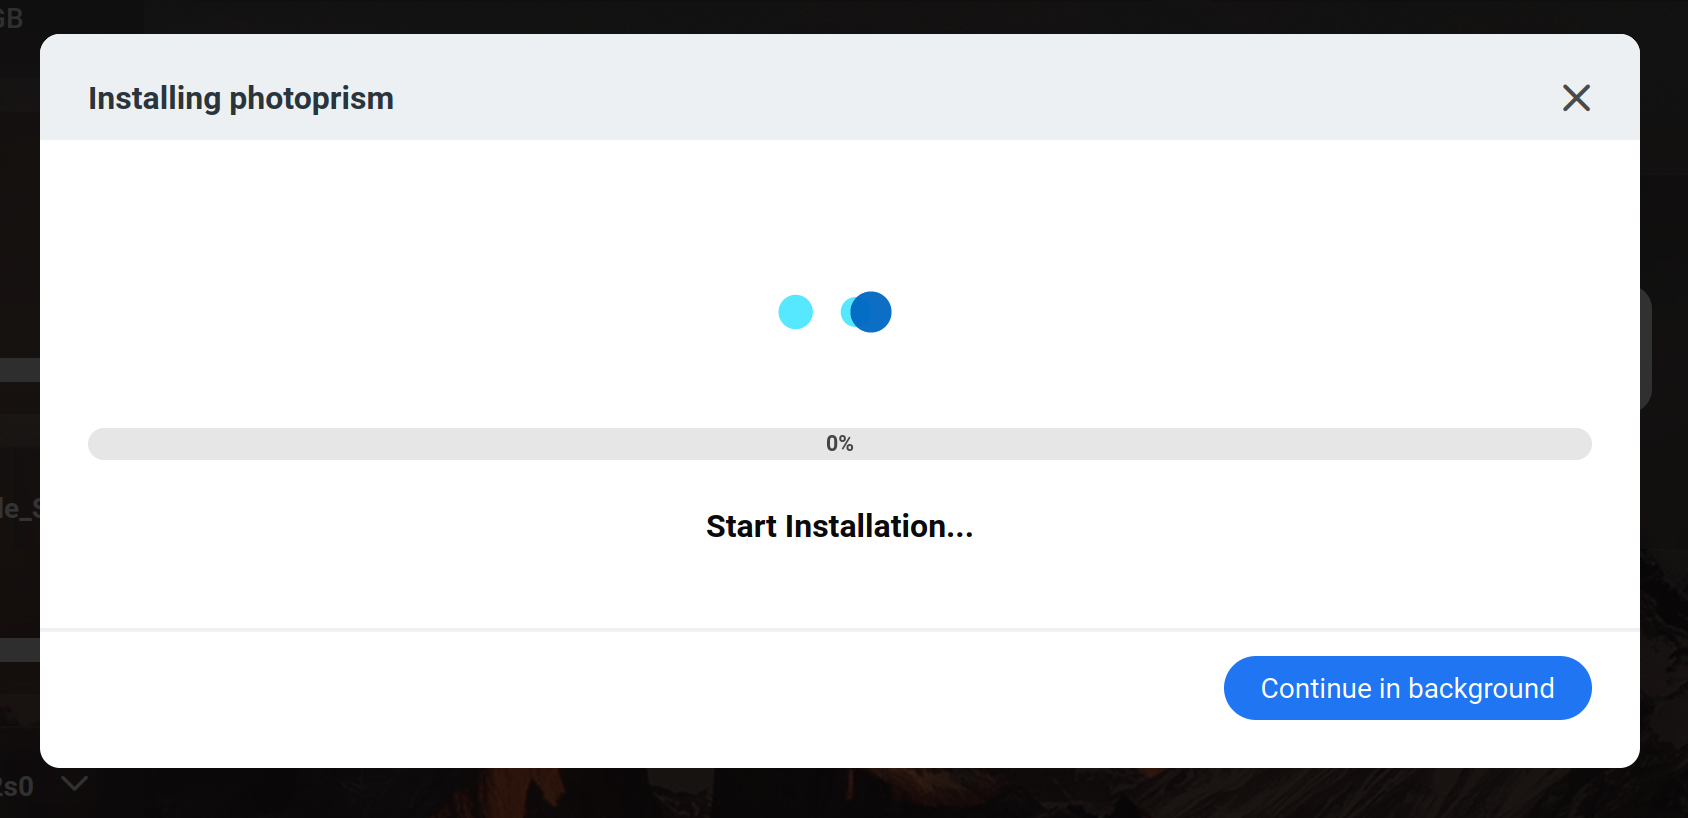
Installing PhotoPrism on ZimaBoard's CasaOS
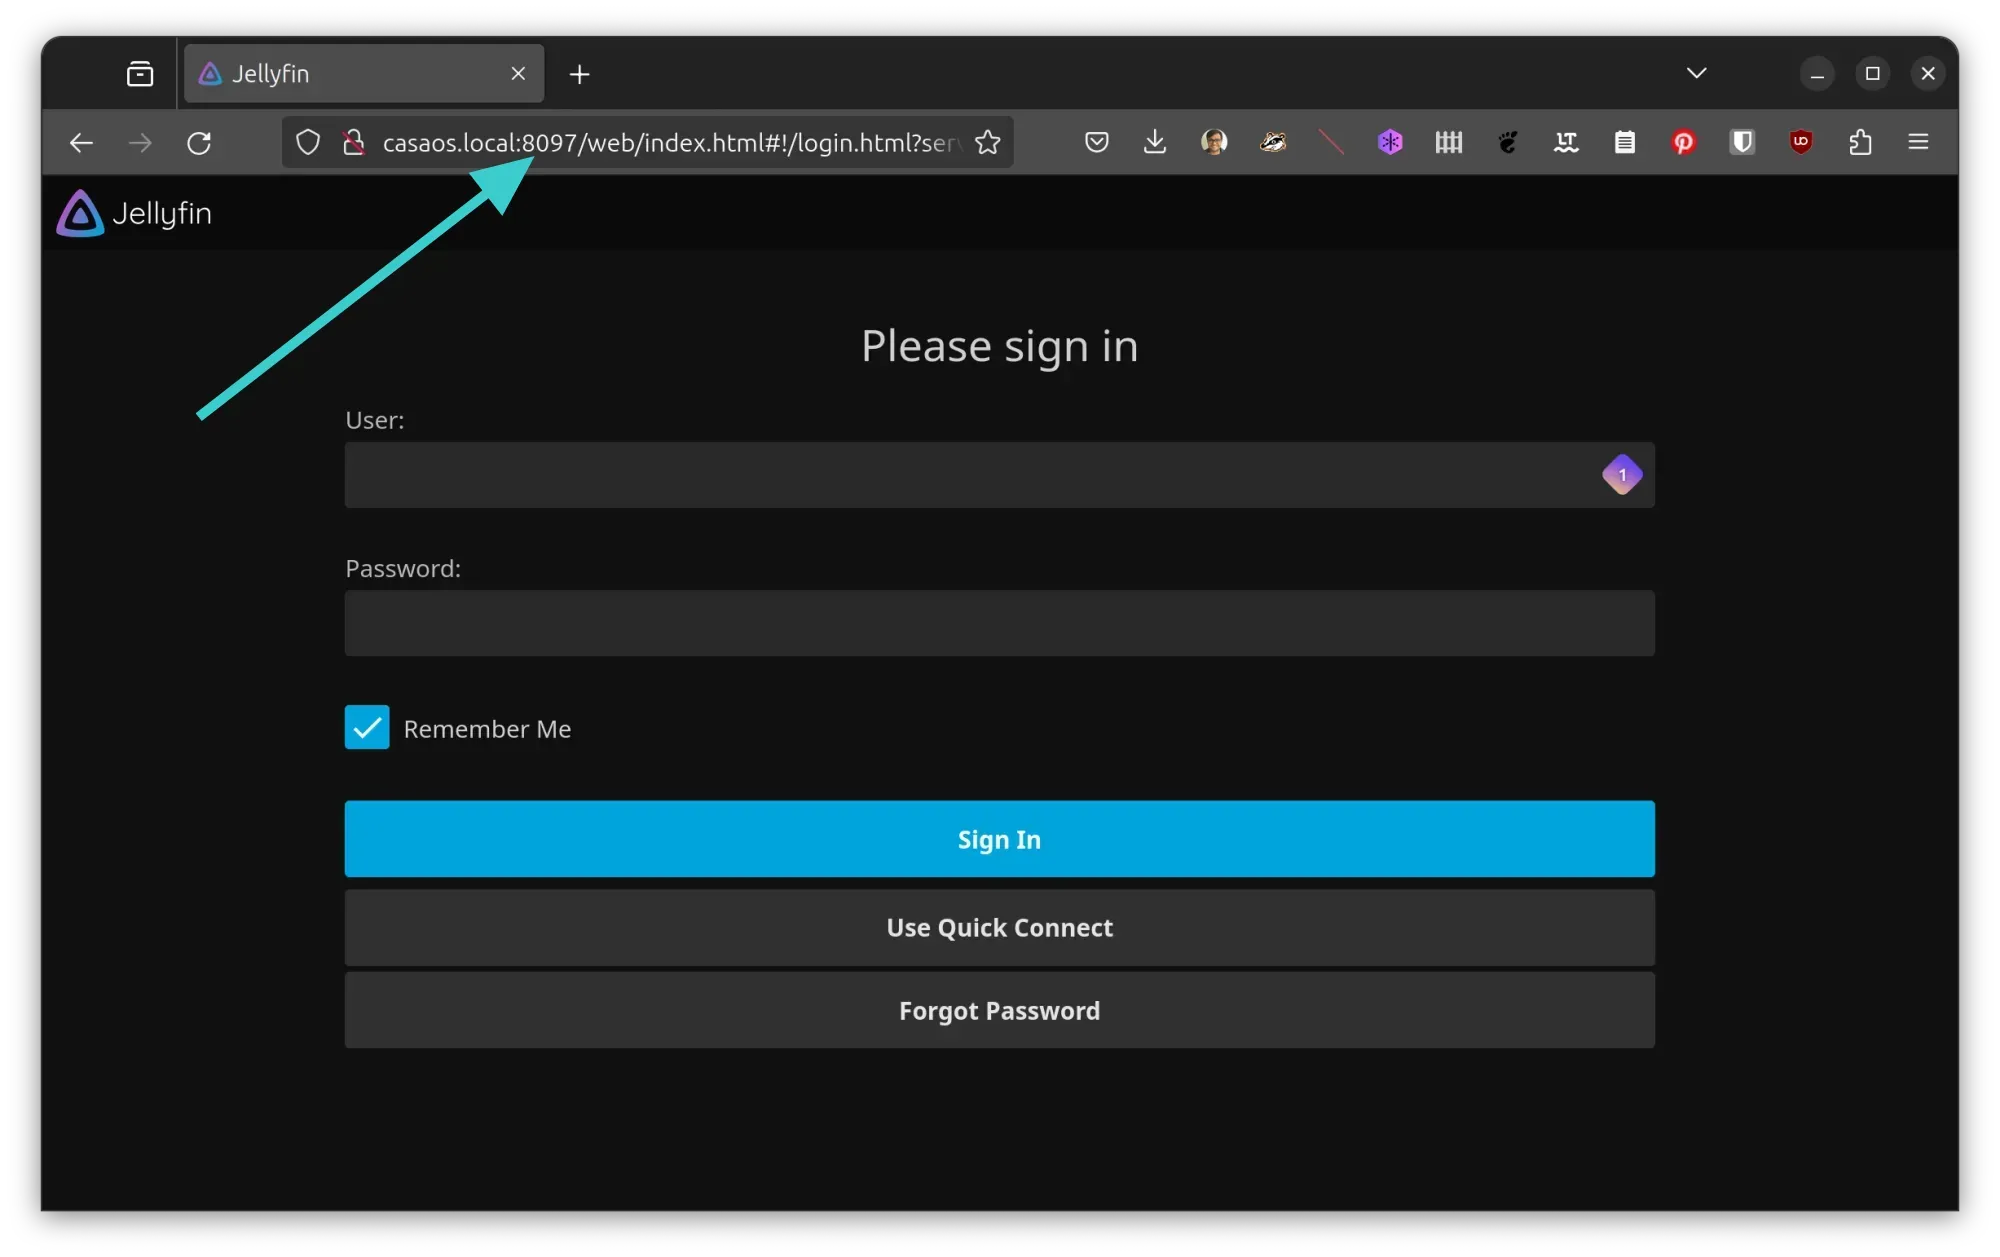
You can access the running software on the same IP as your ZimaBoard but on different ports. For example, the Jellyfin server runs on port 8097 and PhotoPrism runs on port 2342 in my case.
Jellyfin server running on port 8097
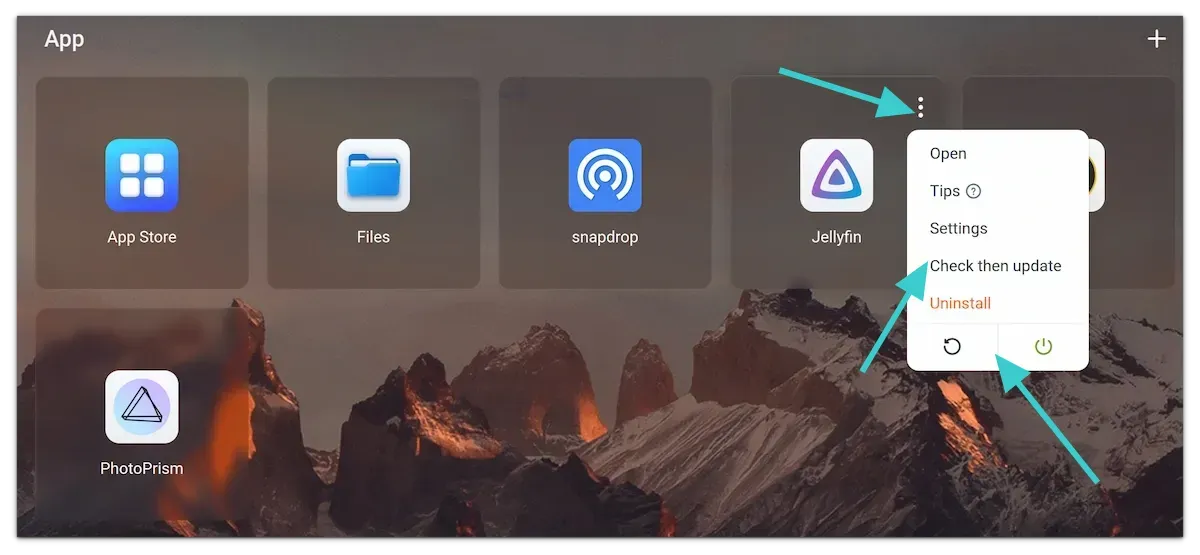
Updating and removing applications is also quite easy. On the dashboard, click the three dots on the installed application and it presents you with the option to check and update, remove it, restart it or just stop the application. Of course, you also get the option to access the settings of the docker container running the application.
Overall, this is an easy-to-use interface for any kind of user. It makes using ZimaBoard an ease. Install the available open source software from the store, set it up a little for the first run and access it from the devices on your sub-network.
💡
I discovered a cool feature in CasaOS. The 'Tips' option you see for an installed app often displays the default username and password. Not only this, you can also edit this field to add your own notes to it.
It's not all smooth ride, though. I did noticed a few things that should be improved. Let me share them.
Hiccups I encountered
The issues I came across were not dealbreakers but I wanted to let you know that like any gadget and operating system, you may stumble upon a few problems.
For example, I feel that it takes 2 minutes or so after powering on to access ZimaBoard via casaos.local in the browser.
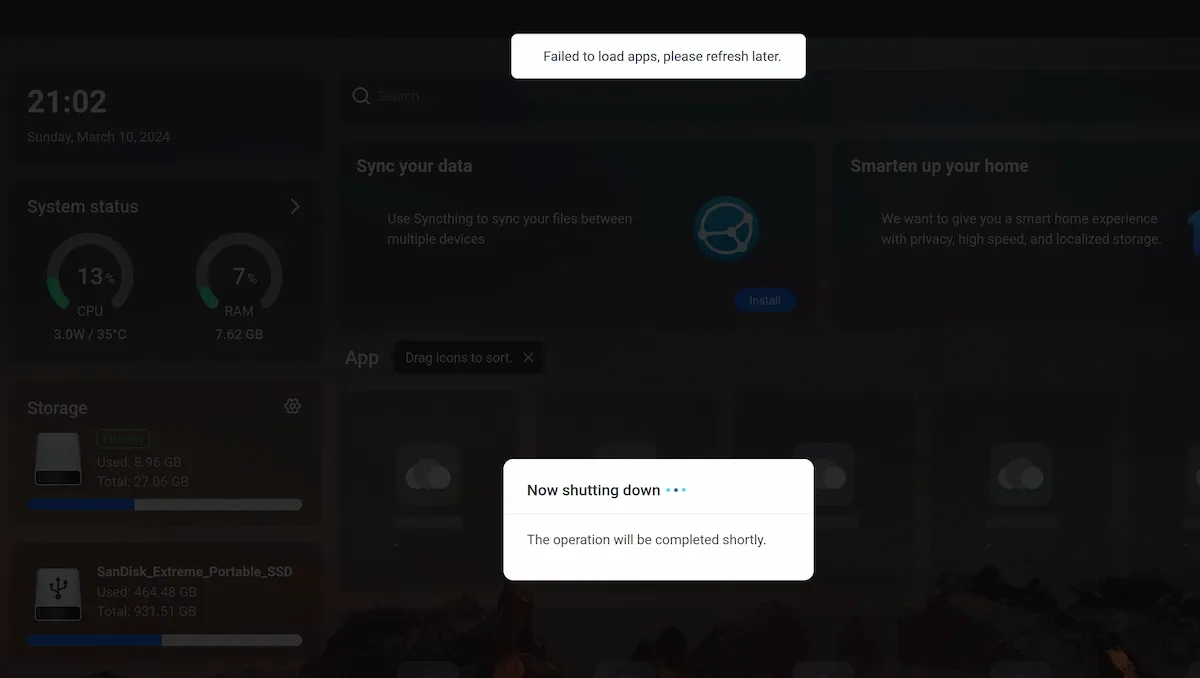
I discovered kind of a bug in the UI while shutting down the OS from the web browser. It showed 'Now shutting down' message and it just kept on going like that. It was unclear if CasaOS was shutdown or not so I refreshed the browser and it shows 'failed to load apps, please refresh later'.
It's a tiny thing but I think this could have been handled a little better so that a user would know if the shutdown is complete.
Even restarting apps (running in Docker containers) takes a lot more time than what it would be if it was forced stopped via docker commands. Restarting or stopping apps shows action in progress but needs a manual refresh of the CasaOS in the browser.
Another hiccup was accessing CasaOS via SSH. Remember, I told you that I had to create a user account on the first run? I thought the same details will be used for SSH access. But no, CasaOS has SSH access enabled with username casaos and password casaos. I don't like default username and passwords for SSH. It's a security risk. SSH should be accessed via the user account created at first login.
Achilles heel: documentation and support platform
It's there but it's not obvious to find it.
ZimaBoard should improve the documentation for the apps a bit for new users. For example, I had trouble adding the USB to my Jellyfin server. Every app runs in a container and so it needed to be added to the Jellyfin setting at container level. This kind of information could be added through the tooltip that takes the documentation of the app.
Currently, things are scattered and not properly communicated to the end user. IceWhale is the parent company of ZimaBoard and CasaOS is the open source operating system created for ZimaBoard but can be used on other devices.
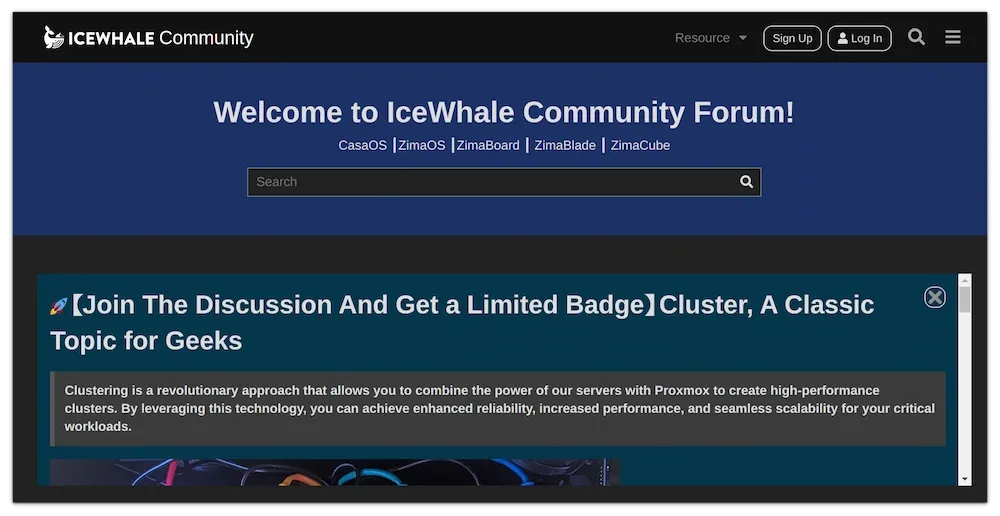
Now, there is a wiki for CasaOS but it is incomplete and has not been updated recently. The wiki mentions a Discord channel for support but I prefer a forum for community led support. This way, instead of asking, the end users can search for the problems that might have been faced by others in the past. Saves the redundancy.
There is a community forum under IceWhale brand and it supposedly serves ZimaBoard, CasaOS, ZimaBlade and other Zima devices. Why it is not highlighted via ZimaBoard or CasaOS website or interface is beyond my understanding.
That's not it. CasaOS has a YouTube channel that has good instructional videos. But this YouTube channel is also not promoted to the end user.
There is also a dedicated subreddit but not sure if the ZimaBoard support answers here.
You see, there are various documentation and support channels available but not properly promoted to the end user. It may leave some end users frustrated owing to a lack of support when there is plenty.
What I like in ZimaBoard
Pretty much all of it.
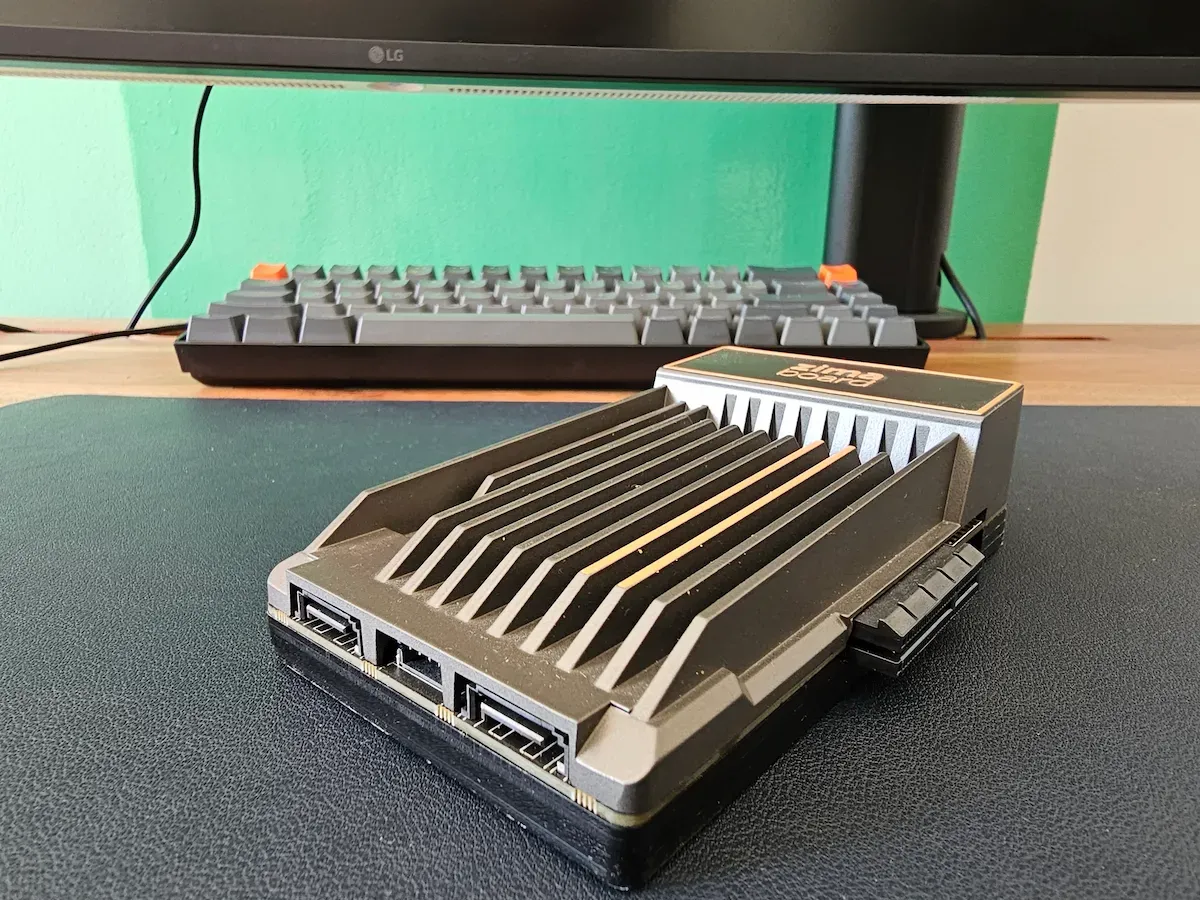
It's a good-looking device. Unlike most single board computers out there, ZimaBoard doesn't show the naked board. It's covered in a well-designed case which looks super cool with that big heatsink and the gray, orange and black color combinations enhances its looks.
Perhaps it's the heatsink or the device capability but it doesn't heat up easily, certainly not like Raspberry Pi. I kept it powered on for a few days continuously and the device was still not heating. I ran a few applications with Jellyfin server streaming on the TV and the device temperature stayed in the 40s.
Another thing I like it that it doesn't consume much power, just 6W at the most. This is important if you plan to keep the device plugged in 24×7.
ZimaBoard running media server which is connected to Android TV
The docker based approach makes it easier to install and use open source software. Just a few clicks and you have the software running on your home server without worrying about configuration and networking etc.
There is a good collection of officially provided applications. If you need more, there are third party app stores that can be utilized.
Since it's an Intel board, you can also run Windows on it. Not that you and I are going to do that.
Conclusion
I have been thinking of building my homelab for more than a year. I own a Raspberry Pi and a couple of more single board computers. But being a father to a toddler means I don't get enough spare time for these hobbies anymore.
Thanks to ZimaBoard, the desire to own a homelab is fulfilled. It's a plug and play device that lets you set things up pretty easily.
Of course, if you have free time and some technical skill, you can achieve the same by installing CasaOS on a spare computer.
But not everyone would want that. If you can afford to spend $150-$200, you get a dedicated Homelab device with a lot less effort. It's somewhat like owning a device like Apple TV or Roku.
For now, I am using ZimaBoard for Jellyfin media server, Snapdrop for wireless file transfer and PhotoPrism for photo library and I am loving it.
Jellyfin media server running on ZimaBoard while client running on my TV
It's an excellent device that would surely benefit from better documentation and support forum.
It's FOSS has around 2000 articles and it is difficult to find the interesting ones just from browsing the website.
This is what prompted me to consolidate articles based on topics. So, you get pages like Fedora guides, Rust series etc. I am also putting up 'collection pages' that could let you access a particular topic more easily. The Linux application suggestion collection is one of the many more to be published in the coming weeks.
Question for you. Would you like to see some coverage on open source Android apps on It's FOSS?
💬 Let's see what else you get in this edition:
KDE global themes causing data deletion.
A modern, Rust-based alternative to NVIDIA Nouveau driver.
Fedora 40 features.
And other Linux news, videos and, of course, memes!
This edition of FOSS Weekly is supported byMailfence.
📥 Mailfence: Secure Mail Service
Privacy is a right, not a feature. That's why Mailfence provides an integrated suite of tools including encrypted email, calendar, contacts and more. No ads, no spams, no trackers. State-of-the-art security features and strong Belgian privacy protection law.
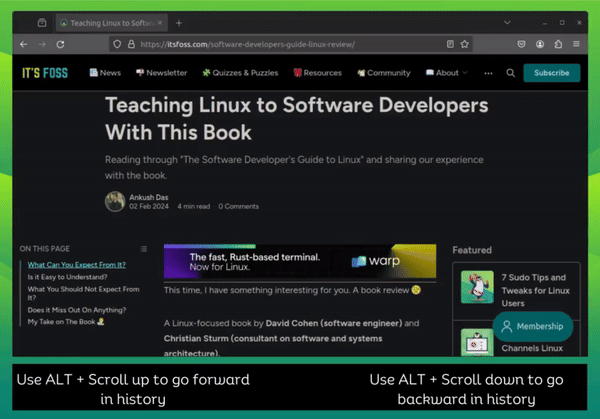
In Firefox, you can go back and forth the history on current tab using the ALT+Scroll shortcut on your keyboard.
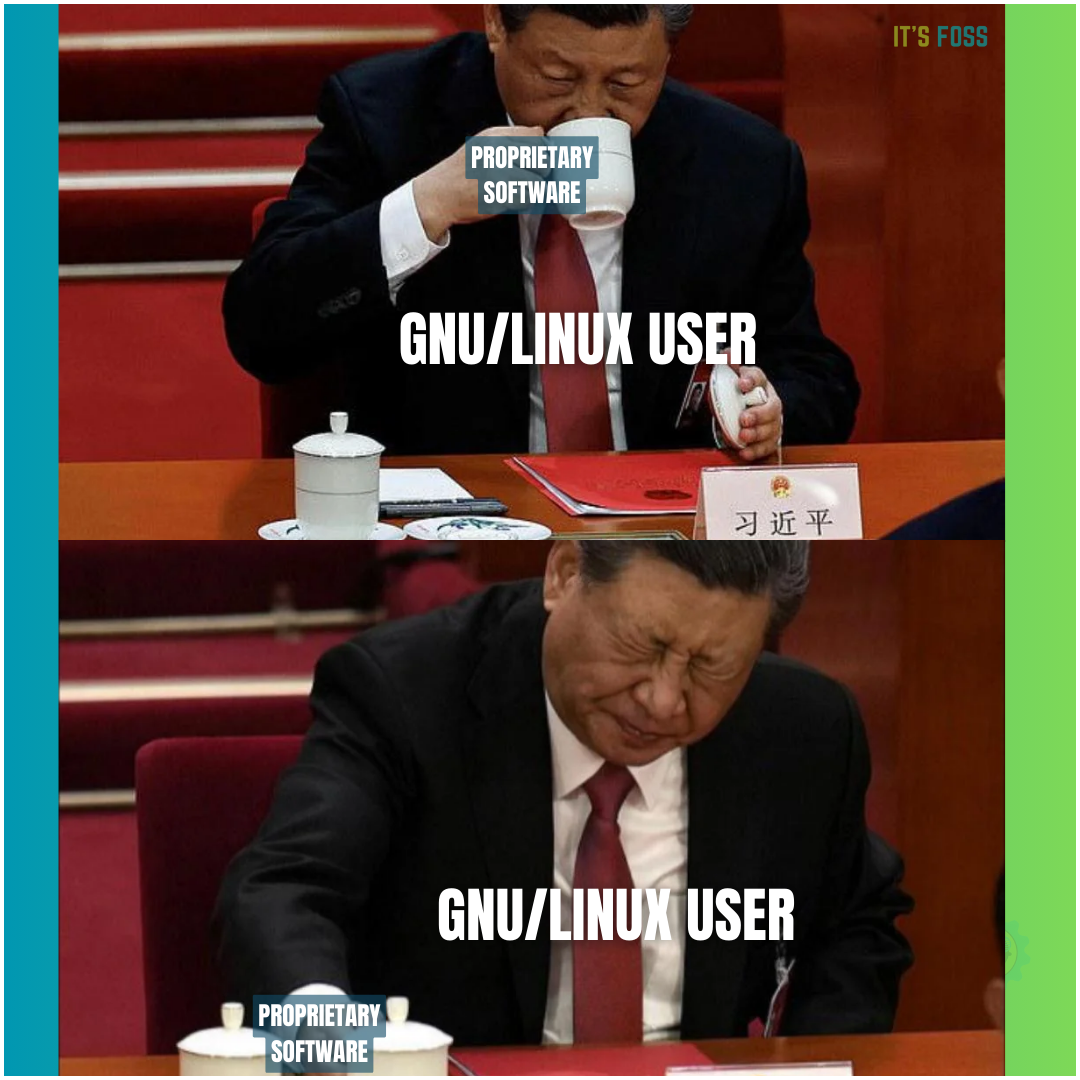
🤣 Meme of the week
Proprietary software is a big no!
🗓️ Tech Trivia
On 22 March 1993, Intel introduced the first Pentium microprocessor.
🧑🤝🧑 FOSSverse corner
I always considered It's FOSS to be focused on desktop Linux users but it was overwhelming to get this message from Martin Nyagah, a reader based in Kenya.
I recently landed a DevOps job with a digital health platform! I am writing to express my gratitude for the resources you have shared with me. Your help was instrumental in my job search and I truly appreciate it.I am looking forward to continuing to learn from you in the future.
Got something interesting to say? You may share your views through this form and I'll feature them on the upcoming It's FOSS testimonials page.
❤️ With love
Share it with your Linux-using friends and encourage them to subscribe (hint: it's here).
Share the articles in Linux Subreddits and community forums.