Kitty is a popular terminal emulator that supports many modern features. Focused on power users, it offers a wide range of customization that other terminals often lack.
For example, it includes a functional image display protocol and smooth cursor animations.
I have shown Kitty tweaking in the past, and in the regards, I would like to discuss Kittens today.
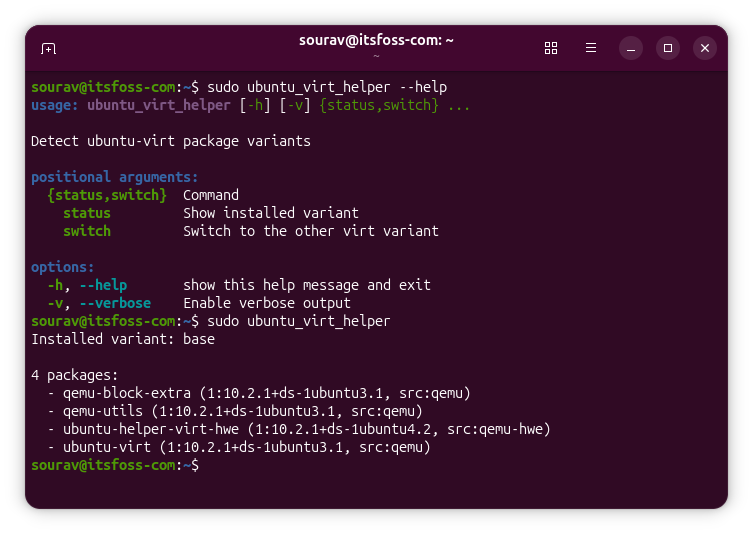
Kittens are functional units that extend the features of the Kitty terminal or work as standalone programs. They have direct access to the running Kitty instance.
Kitty comes bundled with several of these kittens, written in Go, which we will explore in detail later. You even have the option to create your own custom Kittens in Python, if you find a specific need that hasn't been solved yet.
Some Cool Default Kittens
Themes
Let's start with the most popular tool first. If you use Kitty daily, you have likely come across this utility at some point.
Themes is a kitten that allows you to change your terminal color scheme interactively without editing any configuration files. Kitty includes a wide variety of preset themes that you can access by running a simple command:
kitten themesApply themes in Kitty
In the overlay window, you can easily scroll through both dark and light themes to see a live preview. Once you find one you like, just press Enter and follow the prompts to set it as your preferred theme.
In my opinion, this is a feature I really miss when using Ghostty. While Ghostty has a similar interface, you still have to manually edit your configuration file to apply the theme name after you pick one.
Fonts
If you have found a new font and want to set it as your terminal choice, this kitten has you covered. You can launch the interactive interface directly in your terminal using a simple command:
kitten choose-fontsChoose Fonts
This tool allows you to perform several actions within a single interface. You can select new fonts, preview how they look, and even fine-tune specific font faces.
The utility makes it much easier to manage your typography without guessing how a font will appear in your workspace. It handles the complex parts of the setup so you can focus on finding the perfect look.
Choose files
Choose files is a comprehensive file picker designed for Kitty and other GUI applications on your system. It functions similarly to fzf but is specifically optimized for finding and managing files.
Choose Files
This tool offers several powerful features, including the ability to select multiple files at once. It intelligently respects .gitignore rules in your git directories to keep your workflow clean.
To use it, run:
kitten choose-filesYou can also select non-existent files to trigger a "save file" option or choose entire directories. In my opinion, this file picker will completely change the way you interact with files in your terminal.
Quick access terminal
If you remember Yakuake in KDE, you are already familiar with the concept of a drop down terminal for quick tasks. Kitty offers similar functionality through the Quick Access Terminal Kitten.
You can launch this feature at any time using a simple command in your terminal:
kitten quick-access-terminalQuick Access Terminal
If you want to personalize the experience, you can customize the tool using a specific configuration file. Simply create or edit quick-access-terminal.conf inside your ~/.config/kitty/ directory to adjust its behavior.
GPU accelerated dock panel
The Panel kitten is something truly special. It creates a desktop panel for you that functions much like i3bar.
Kitten Panel
While some might feel this is a bit overpowered for a terminal application, the panel is quite interesting for minimal use cases. It even allows you to set tools like btop as your actual desktop wallpaper.
In my opinion, this is an incredible feature for anyone who loves a unique workspace. You heard that right, and here is a great example of how it looks in action.
A diff tool
The diff kitten is an excellent tool available directly within Kitty. It offers several advanced features like side-by-side comparisons, syntax highlighting, and even image diffs or recursive directory comparisons.
To use it, you simply pass the file names as shown in the command below:
kitten diff file1 file2Diff Files
Other interesting Kittens
I use the terminal daily for standard update tasks and editing text files. If you are deeply involved in terminal usage, there are many kittens available for very niche use cases.
For example, the Broadcast kitten allows you to type text simultaneously across multiple Kitty windows. There are also SSH related kittens designed for editing files and even a specialized SSH supported clipboard.
In my opinion, these specific tools are essential for power users who manage remote servers regularly. Feel free to experiment with these options to make your terminal life significantly more productive.
Assign keybindings/alias for quick access
All these kittens can be bound to keyboard shortcuts or aliases so you don't have to manually run the command every time. This makes your workflow much faster by giving you instant access to your favorite actions.
I will show you how I mapped the kittens in my own configuration file. It is a straightforward process that keeps everything organized and easy to access.
The most important step is to make sure your chosen keys are uniquely assigned. You want to avoid any conflicts with existing terminal options or system-wide shortcuts.
In the below code, I mapped the F1 key to get the file chooser kitten in multiple file select mode.
map f1 kitten choose-files --mode=filesAdding the following line to your shell configuration file (~/.bashrc) to add an alias to the diff tool:
alias d="kitten diff"Now, you can run:
d file1 file2To get the difference between them.
Another example, let's map the F2 key to get a quick access terminal:
map f2 kitten quick-access-terminalWrapping up
So, we have seen how kittens can improve your terminal productivity. While most of these have separate alternatives like fzf for file selection or difftastic for diffs, integrating them directly into your terminal with a clean UI is commendable.
Kitty also offers a desktop-ui kitten that lets you integrate the file picker into all your GUI apps. Since this can cause issues with some applications and is something I use rarely, it remains out of scope for this guide.
In my opinion, the seamless integration of these tools makes Kitty feel much more cohesive than a standard terminal emulator.
Did you find any of these kittens useful enough to replace your existing tools?
from It's FOSS https://ift.tt/e81aK6U
via IFTTT