Recently, NVMe, short for Non-Volatile Memory Express drives, has become the go-to storage option for modern desktops. Unlike traditional hard drives, NVMe drives are significantly faster, allowing for quicker boot times, faster file transfers, and smoother overall performance.
Like all other functional devices, NVMe devices also heat upon usage. If they heat too much, it will degrade the performance of your system.
Let me show how you can monitor the temperature of SSDs in Linux-based operating systems.
nvme-cli: The go-to tool to check NVMe stats
The nvme-cli is a simple tool that lets you control and manage your NVMe SSD drive right-from the terminal. It gives you more control over its performance and behavior.
With this nifty tool, you can optimize your drive for better performance, troubleshoot issues, and do much more.
In this quick tutorial, I will use this tool to measure the temperature of NVMe SSDs.
Install nvme-cli
If you are using Ubuntu or any other Debian-based Linux distribution, nvme-cli is available in the official repositories. To install, just run:
sudo apt install nvme-cli
The nvme-cli tool is available in the official repositories of all major Linux distributions. You can use the respective package managers to install the package.
Listing the NVMe drives in the system
In order to check the temperature, you need the NVMe device name. This is not the manufacturing name, instead the NVMe block device location on Linux.
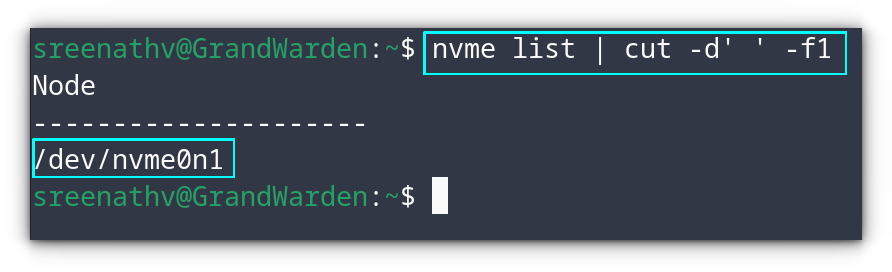
To find the drives in the system, use the nvme command.
nvme list | cut -d' ' -f1
This will list all the NVMe device names.
List NVMe Drives
As you can see, we got the name of the NVMe device. Also, you can use the lsblk command to list all the drives attached and then find the name of NVMe from there.
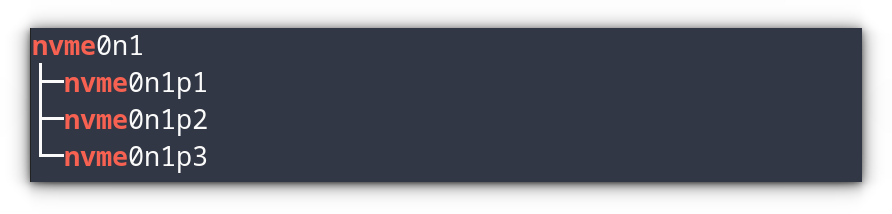
lsblk | grep "nvme"
Listing Drives using lsblk command.
🚧
You should note that nvme0 should be used as /dev/nvme0. If the /dev is omitted, nvme-cli won't show output, and results in a syntax error.
Checking the temperature of SSDs
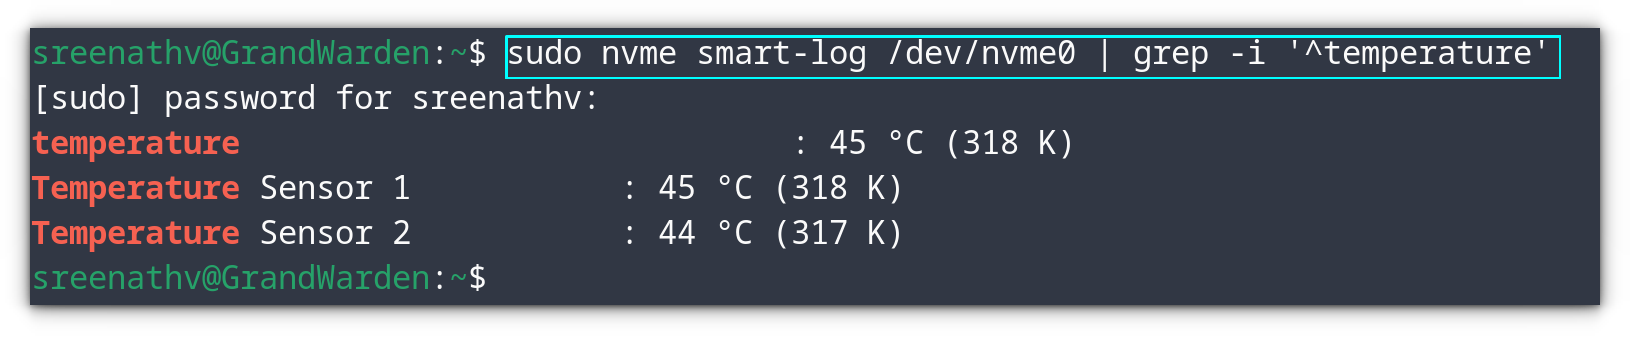
Now you know the name of the drive you want to check, let's check the temperature.
The nvme0 is the top-level device file. The nvme0n1, nvme0n2, etc. are name spaces. Since temperature is a physical property of the drive, to check the temperature of a drive, you can use the top-level device file.
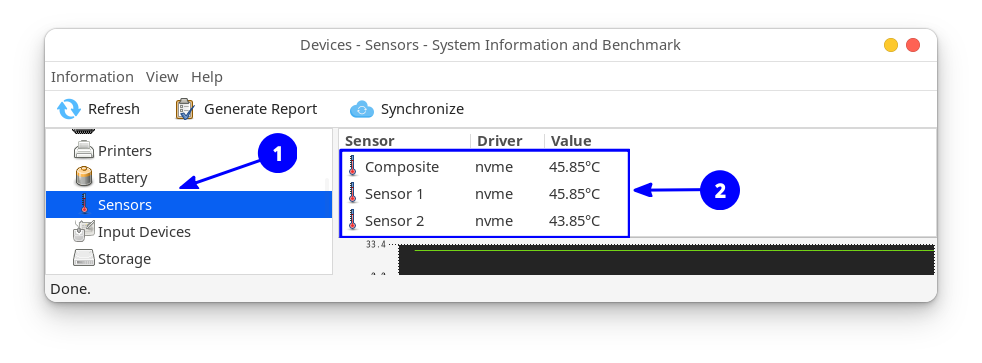
NVMe temperature monitor (Click to enlarge the image)
Other tools to check SSD temperature
While nvme-cli is the comprehensive tool to check the temperature, a few alternative solutions offer a more convenient GUI. Let's see them.
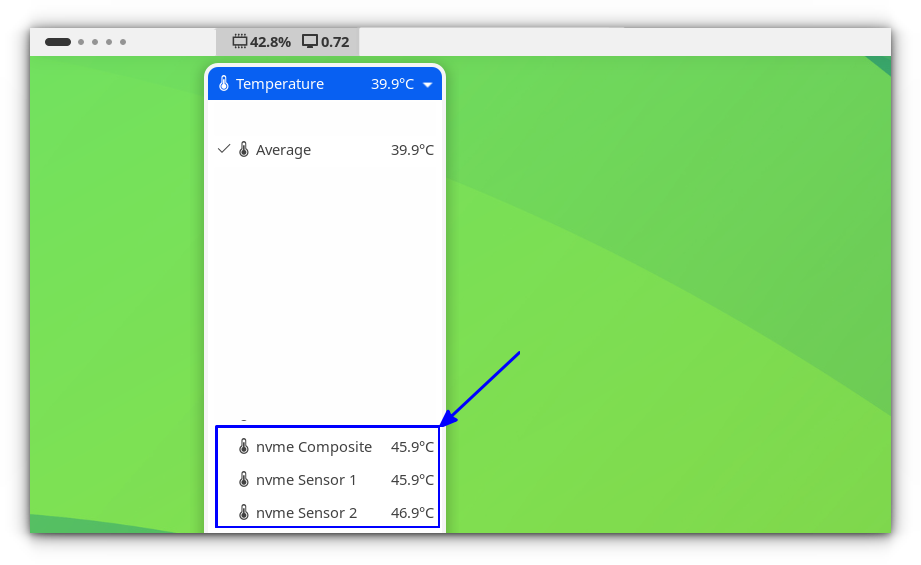
Vitals, the GNOME extension
If you are a GNOME user, Vitals is a must extension. It is not limited to temperature, instead it offers a whole lot of other system monitors.
On the panel, click on the temperature option to expand the temperature monitors. From there, you can monitor the NVMe temperature in real time.
The nvmi-cli tool is an awesome tool for your NVMe SSDs on Linux. I prefer it for its simplicity. Not everyone would be comfortable with a CLI tool and hence I added a couple of GUI options.
Tired of wrestling with LLM installations? Llamafiles offer a refreshingly simple way to run large language models on your own machine. Here's what you need to know.
Llamafile, is a cutting-edge solution from Mozilla that promises to revolutionize how we handle LLMs.
This innovative tool transforms LLM weights into executable files that can run seamlessly across multiple platforms with minimal hassle. Here's an in-depth look at what Llamafile is all about and why it matters.
What is Llamafile?
Llamafile is Mozilla's latest project aimed at simplifying the distribution and execution of large language models.
It combines the power of llama.cpp, an open-source LLM chatbot framework, with Cosmopolitan Libc, a versatile C library that ensures compatibility across a wide array of platforms.
The result? A tool that can transform complex model weights into easily executable files that run on various operating systems without any need for installation.
Key features include
Cross-Platform Compatibility: Runs on macOS, Windows, Linux, FreeBSD, OpenBSD, and NetBSD, supporting multiple CPU architectures and GPU acceleration.
Efficiency and Performance: Utilizes tinyBLAS for seamless GPU acceleration and recent optimizations for efficient CPU performance, making local AI more accessible.
Ease of Use: Converts model weights into executable files with a single command, simplifying deployment.
Open Source and Community-Driven: Licensed under Apache 2.0, encouraging community contributions and continuous improvements.
Integration with Other Platforms: Supports external weights, adaptable to various use cases, and compatible with AI projects on platforms like Hugging Face.
Installing Llamafile
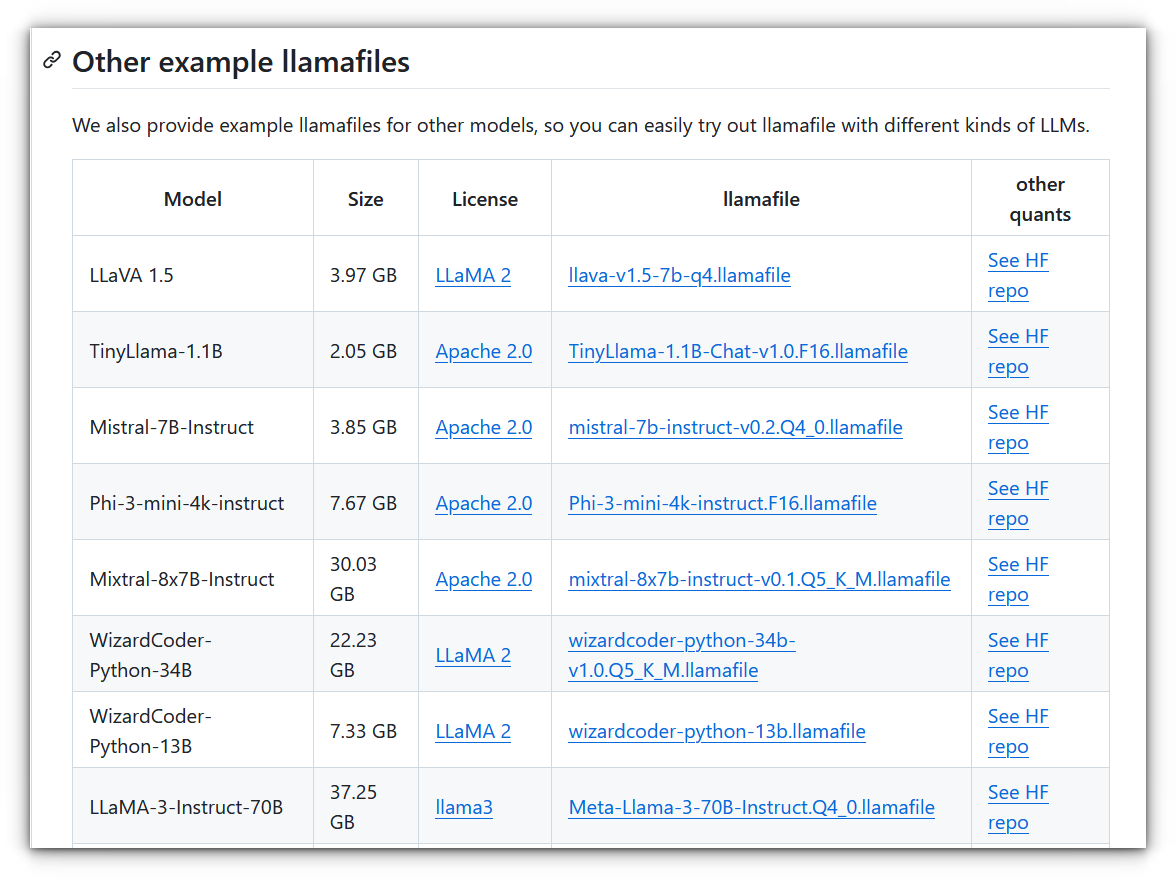
Head over to the GitHub releases page for llamafile. Choose the version you want, I will be using Mistral AI 7B model:
Make it executable (on Linux/macOS) and run
If you're using Linux or macOS, open a terminal window and navigate to the downloaded file.
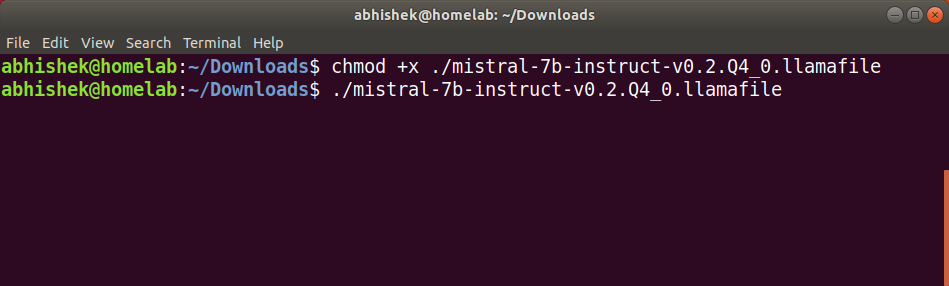
Use the following command to grant executable permissions:
chmod +x mistral-7b-instruct-v0.2.Q4_0.llamafile
Once you make it executable, simply run the following command to start the llamafile server:
./mistral-7b-instruct-v0.2.Q4_0.llamafile
Once the server starts, it will display some information and a new browser window will open. You can interact with the LLM using text prompts, which we'll see in the next section.
💡
On Windows, you might need to rename the downloaded file to "llamafile.exe" for it to run properly. Double-clicking the file should be enough to execute it.
Usage & Performance
I am testing this on an Intel 11th Gen CPU with 16 GB RAM and no discrete GPU and the performance seems okayish. The video below shows it in action:
GPU Acceleration (Optional): For faster processing, you can leverage your computer's GPU. This requires installing the appropriate drivers (NVIDIA CUDA for NVIDIA GPUs) and adding a flag during runtime (refer to the llamafile documentation for details).
Final Thoughts
Mozilla's Llamafile makes using large language models (LLMs) a lot simpler and more accessible.
Instead of dealing with the usual complicated setup, Llamafile lets you run powerful AI models with just a single executable file, making it easy for anyone, whether you're a developer or just curious to dive into AI experimentation.
However, the experience you get can vary based on your hardware; those with discrete GPUs will likely see better performance than those using integrated graphics.
Even so, Llamafile’s ability to run LLMs directly on your device means you don’t have to rely on expansive cloud services.
This not only keeps your data private and secure but also cuts down on response time, making AI interactions faster and more flexible.
As a kid, I used to be amazed by those movie scenes where someone would tap a few keys on their computer and say, "I'm in!".
That fascination is what got me into wireless network security, back when WPA2 was the standard, and things were much easier to bypass.
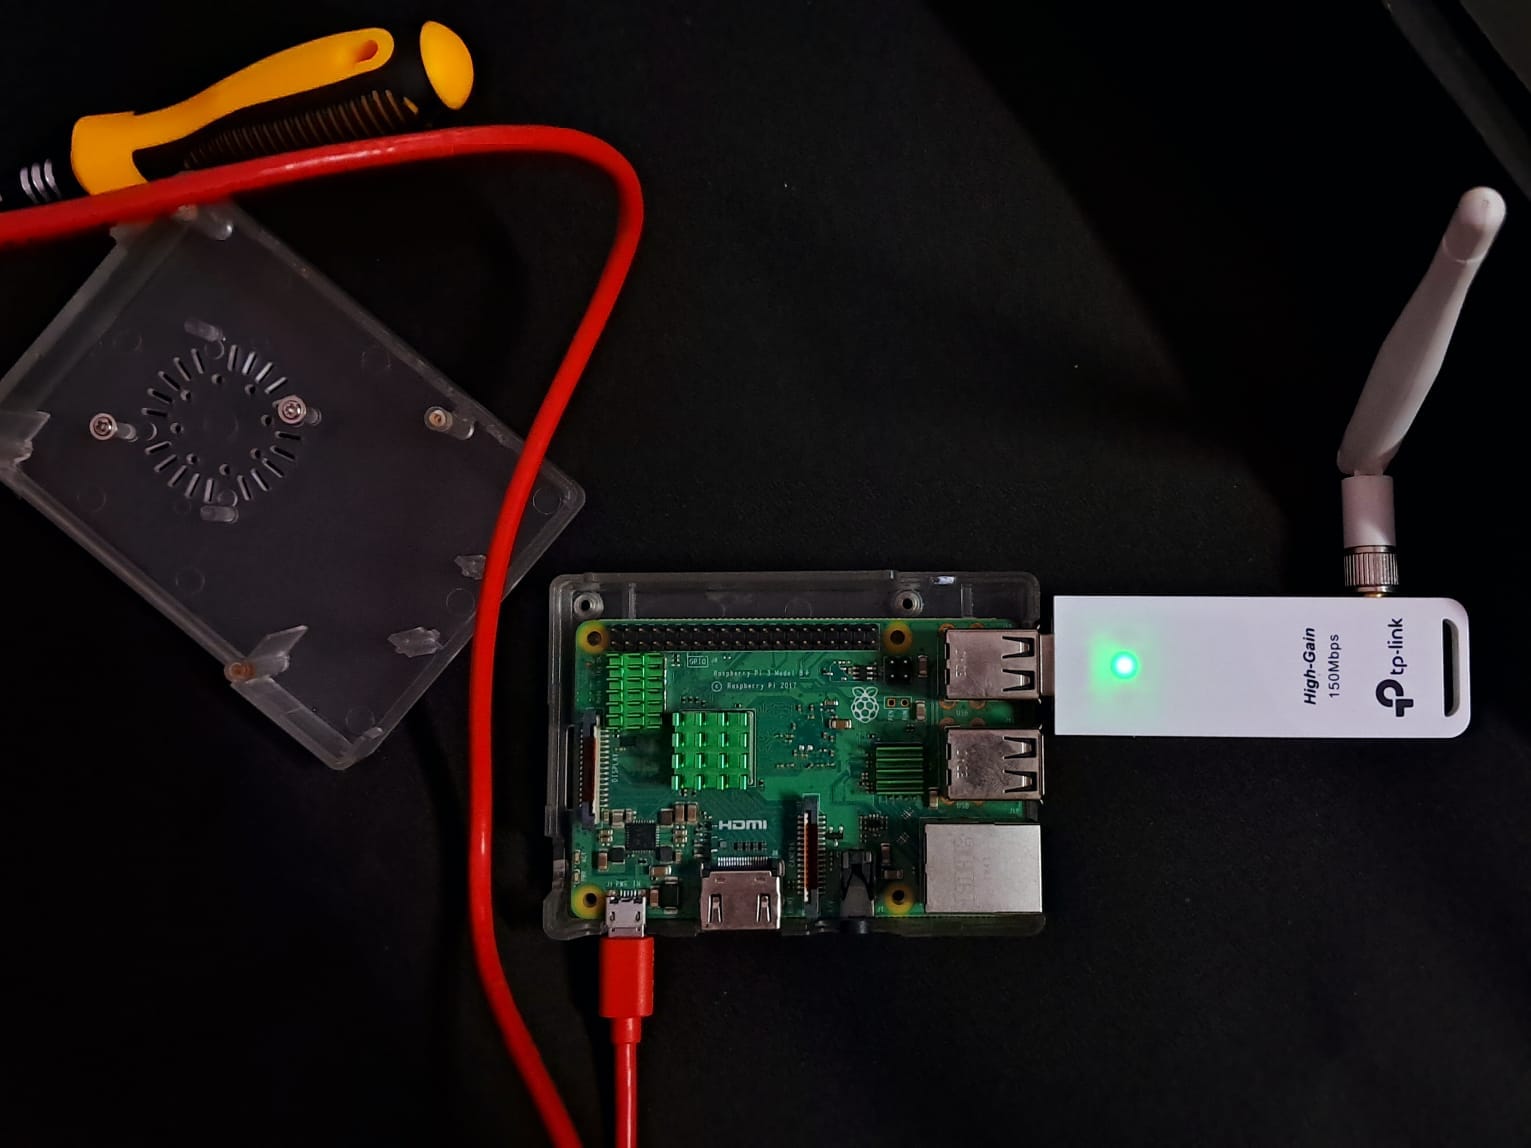
I remember looking up Wi-Fi adapters, and the Alfa models were way out of my budget, especially as a student.
After some research, I went for the TP-Link WN722N V1, hoping for the Atheros chipset, only to end up with the V2/V3 version using the Realtek RTL8188EUS chipset.
The good news? You can still enablemonitor modeon it!
📋
Monitor mode allows the device to monitor all traffic received on a wireless channel. You don't need to be connected to the access point. This can be used to get data from unsecured channels (that's why we should use https) and attempt to crack router password (I'll demo it later).
In this guide, I'll show you how to get the right driver and start monitoring wireless networks ;)
Driver Installation
🚧
I used Raspberry Pi in this setup. And I did all this for fun to experiment with monitor mode and wifi signals. Don't try it on your main Linux system as it involves driver changes and manual installations. If things don't go your way, you may end up with broken system. And certainly don't try it for illegally snooping on your neighbor's WiFi.
To enable monitor mode, the correct drivers are needed. And the installation needs an updated system.
sudo apt update && sudo apt upgrade -y
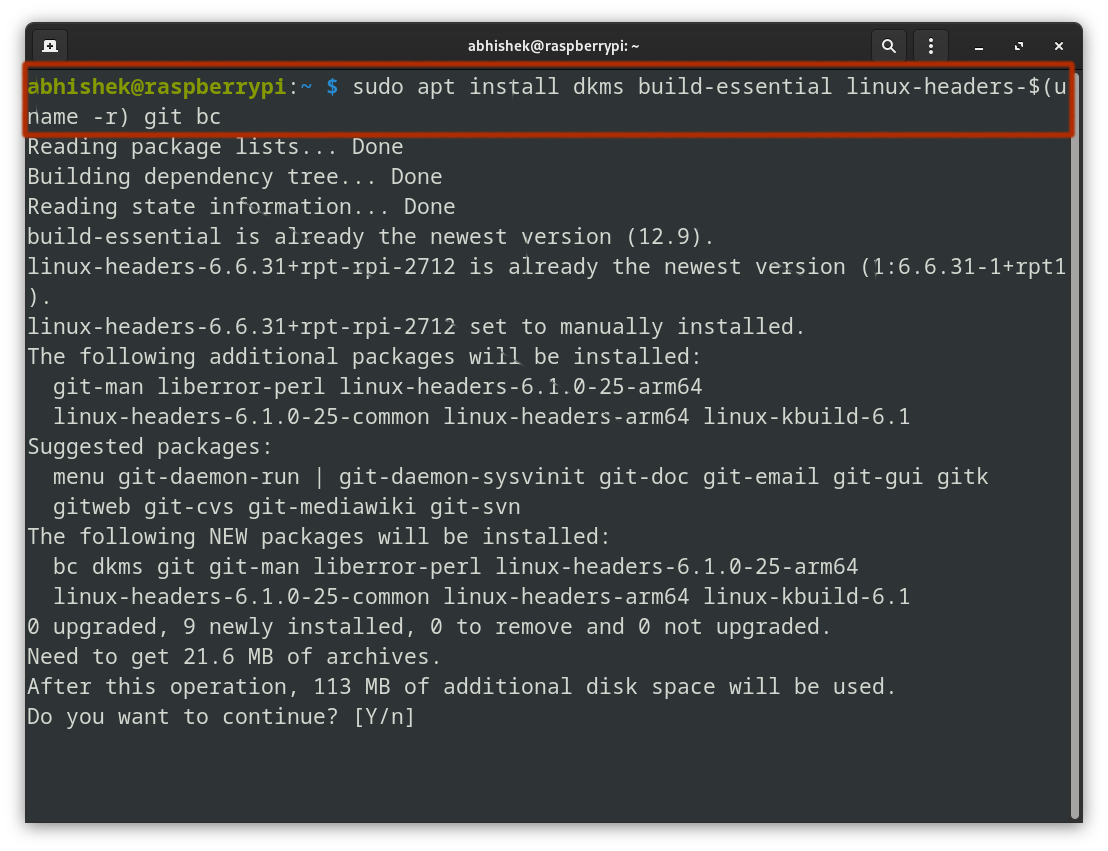
Next, I installed the build essential tools for building and compiling the driver from source:
sudo apt install dkms build-essential linux-headers-$(uname -r) git bc
Here's the breakdown of the command:
dkms: Manages kernel modules.
build-essential: Includes compilation tools like gcc and make.
linux-headers-$(uname -r): Installs the headers matching your current kernel version.
git: Used to clone repositories, essential for downloading the driver source code.
bc: A calculator language, sometimes required during driver compilation for mathematical operations.
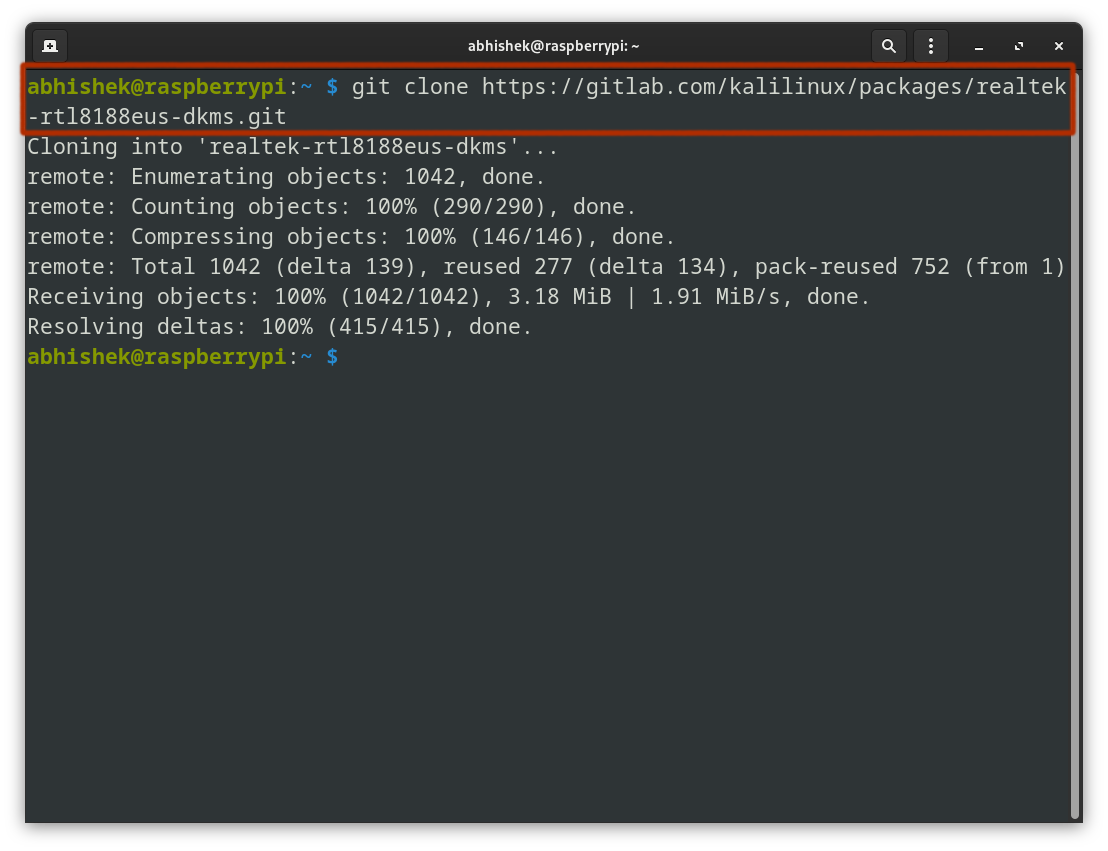
Now comes the important part and it is to download the 'Realtek RTL8188EUS' driver. Thankfully, Kali Linux's official repository has it:
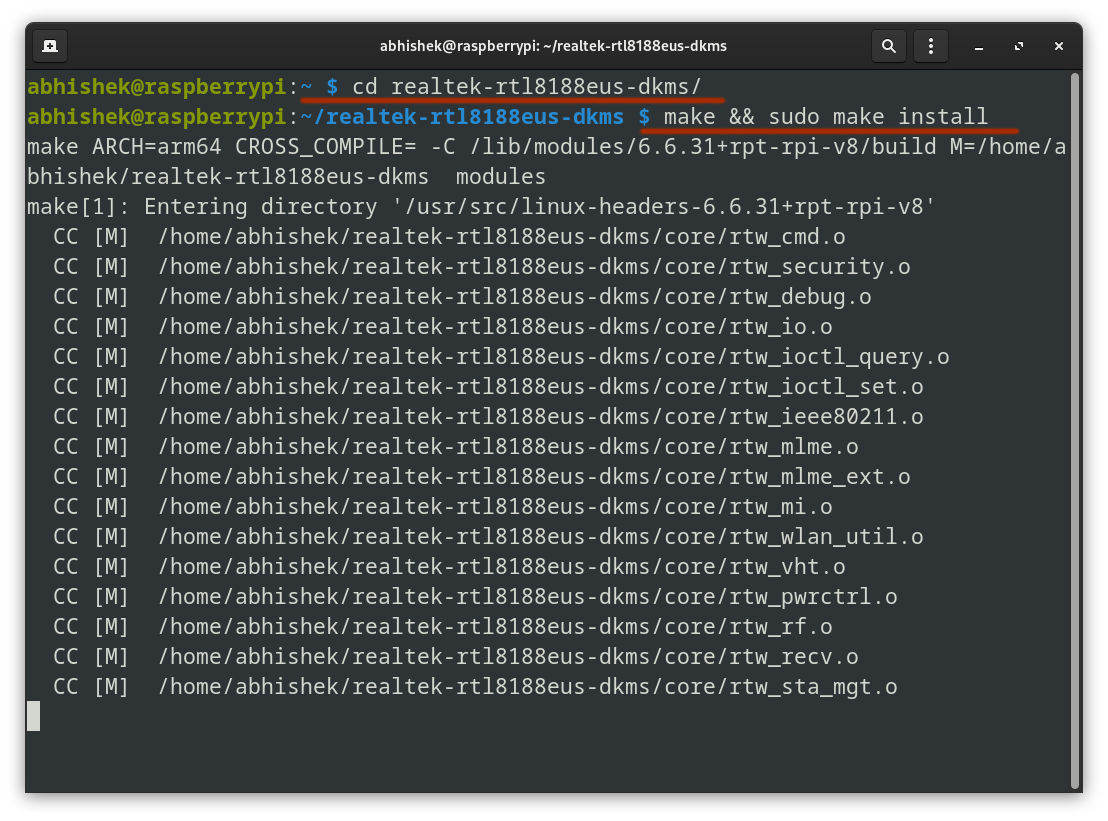
Navigate into the cloned directory and run the following command to build the driver:
cd realtek-rtl8188eus-dkms
make && sudo make install
The build process will take a few seconds depending on your CPU.
Disabling Conflicting Drivers
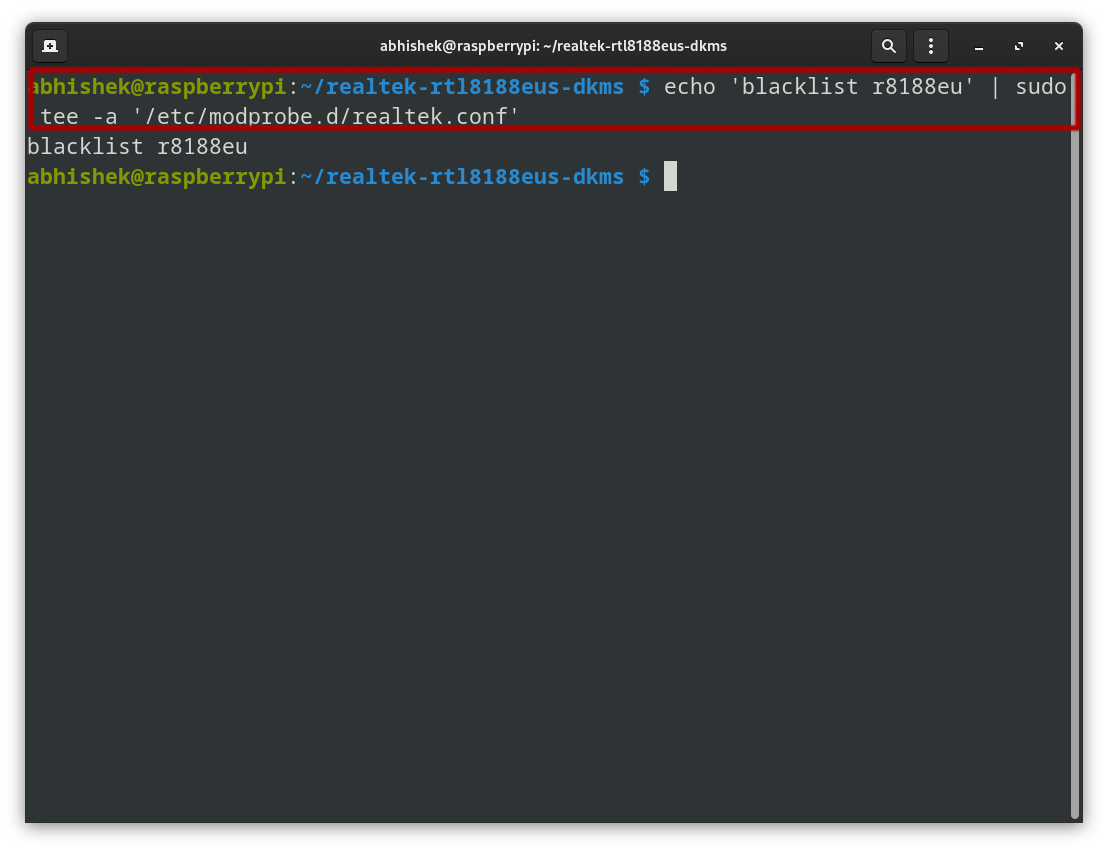
Now that the driver is installed, I blocked any previously running drivers that might have interfered.
echo 'blacklist r8188eu' | sudo tee -a '/etc/modprobe.d/realtek.conf'
echo 'blacklist r8188eu': Creates a line of text to block the r8188eu driver.
| sudo tee -a '/etc/modprobe.d/realtek.conf': Appends that text to the file /etc/modprobe.d/realtek.conf with superuser privileges, ensuring the driver is blacklisted.
A reboot is required to apply the changes. After restarting the Linux system, the new adapter should come online and be ready for use.
Enabling Monitor Mode
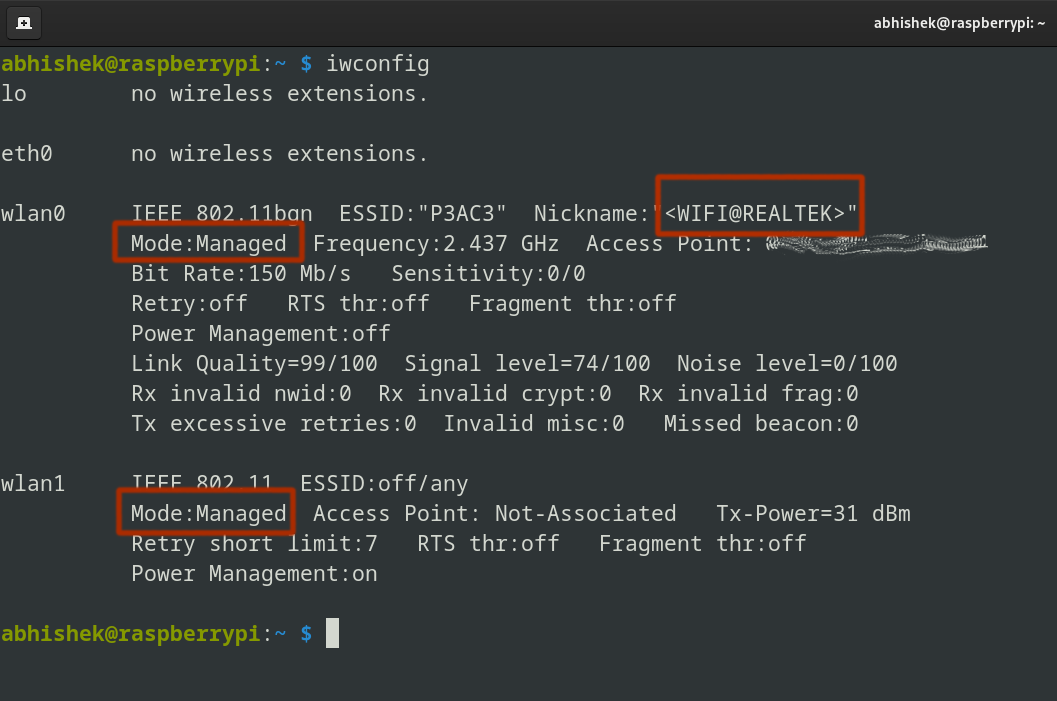
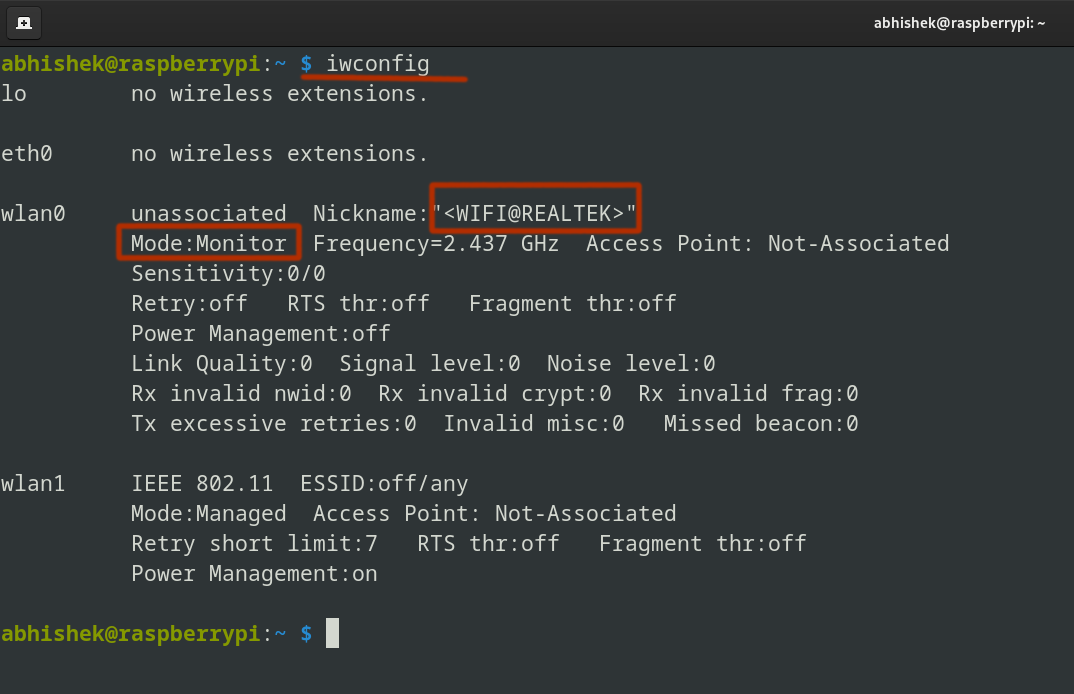
At this stage, the adapter is still in managed mode (the default for typical Wi-Fi use).
sudo iwconfig
I will use aircrack-ng tool to enable monitor mode. It allows capturing packets from nearby networks.
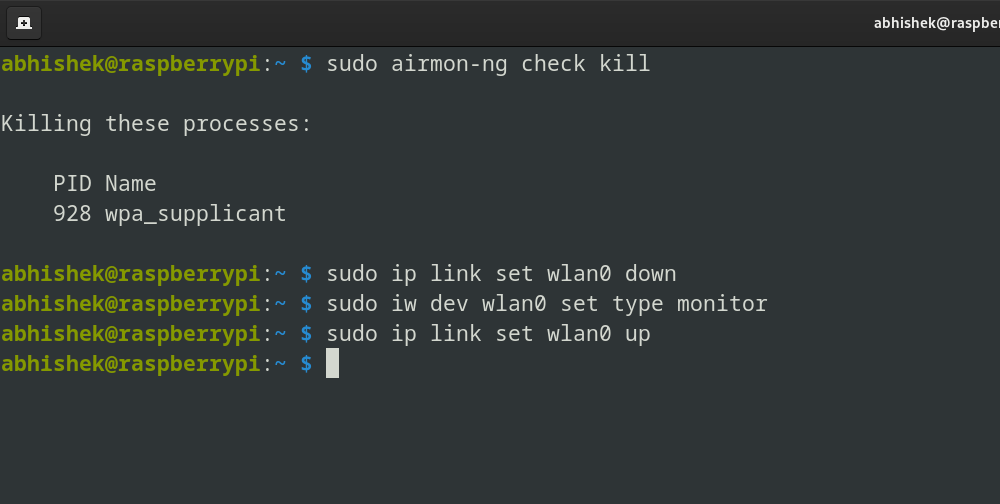
Run the following command to kill any processes that might interfere:
sudo airmon-ng check kill
Bring the interface down:
sudo ip link set <interface> down
Set the adapter to monitor mode:
sudo iw dev <interface> set type monitor
Bring the interface back up:
sudo ip link set <interface> up
Now it is in 'monitor' mode:
Great! The adapter is now in monitor mode!
But what's the fun in stopping here? Let’s test it on a live network and really see what it can do!
Using monitor mode for to recover forgotten WiFi password
Let me share a good usecase of this monitor mode where I recovered the forgotten WiFi password.
So, here's my setup: I’m using a Raspberry Pi 3B+ and accessing it via SSH.
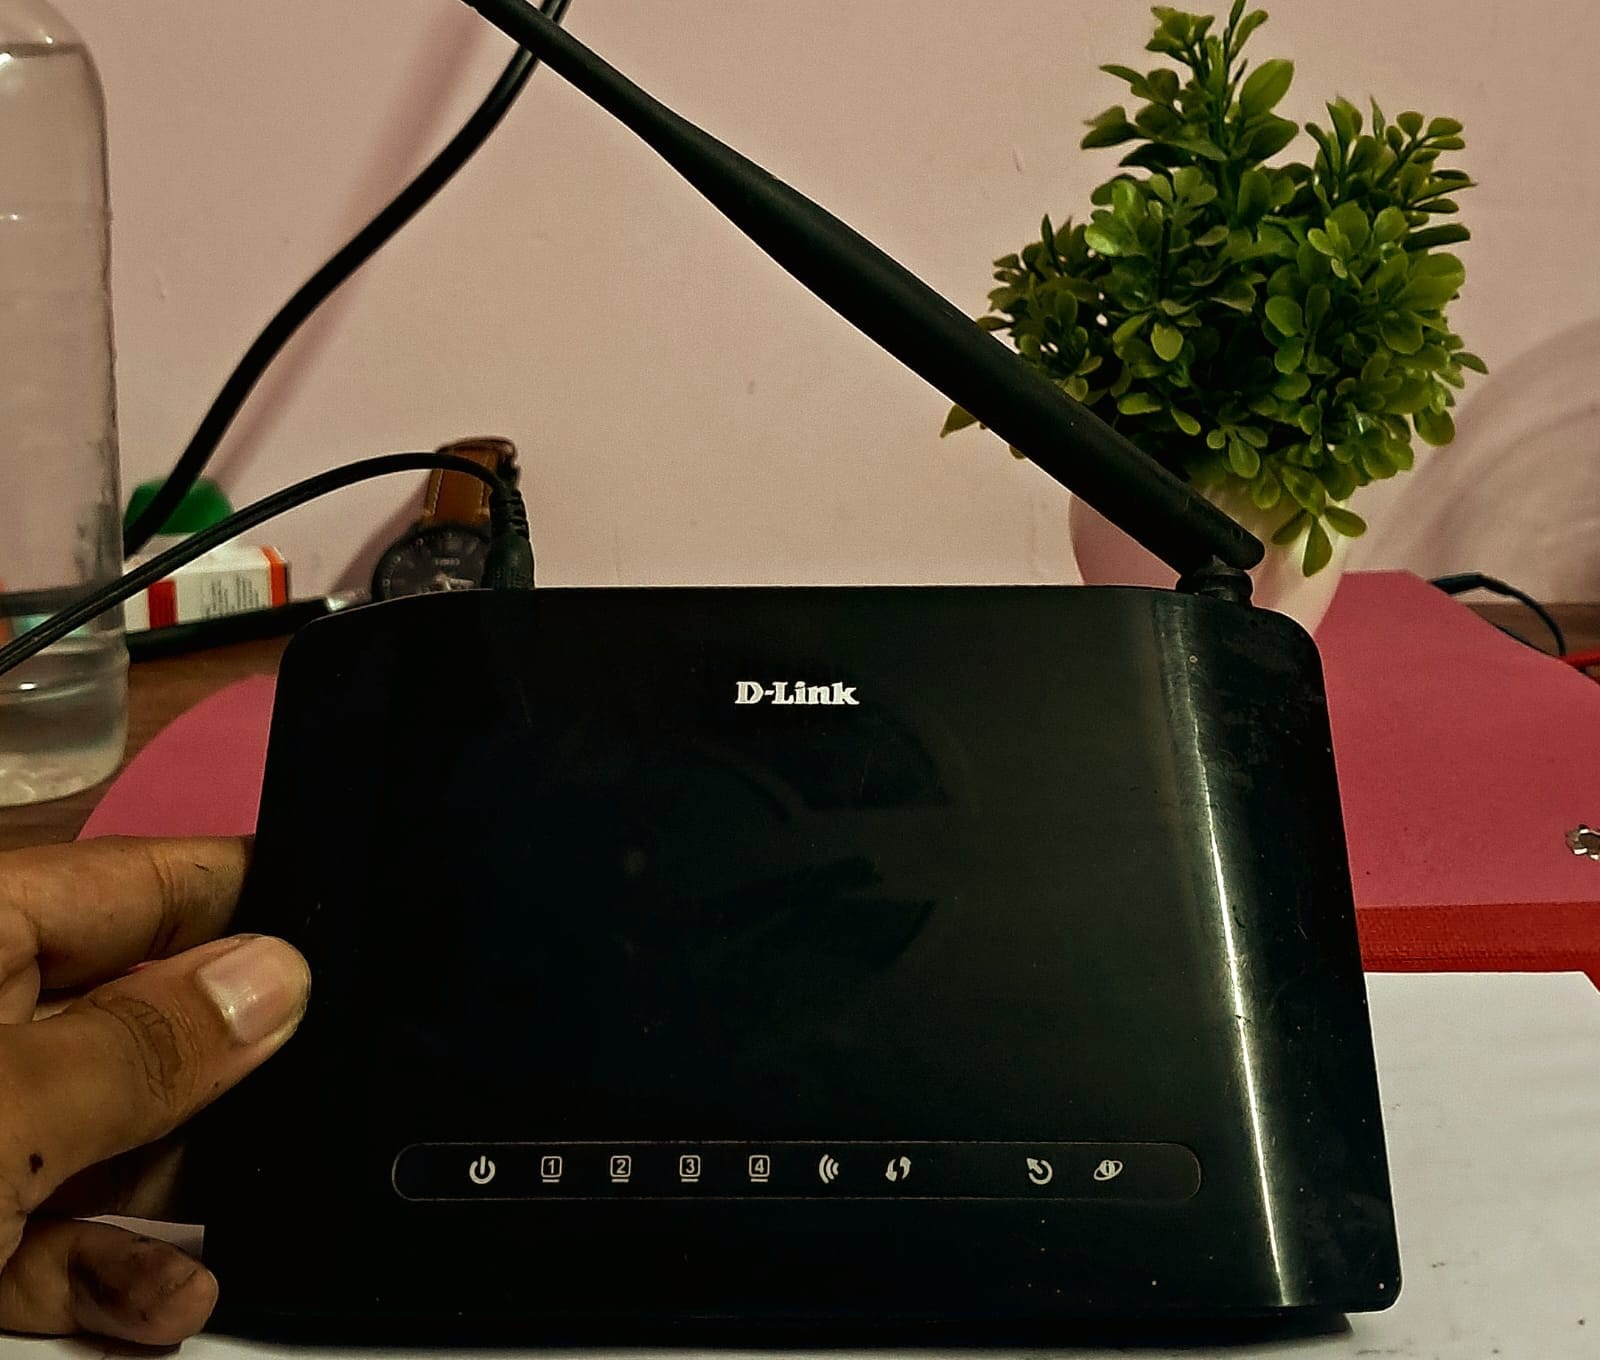
And the target - my classic old DSL router (not connected to the Internet):
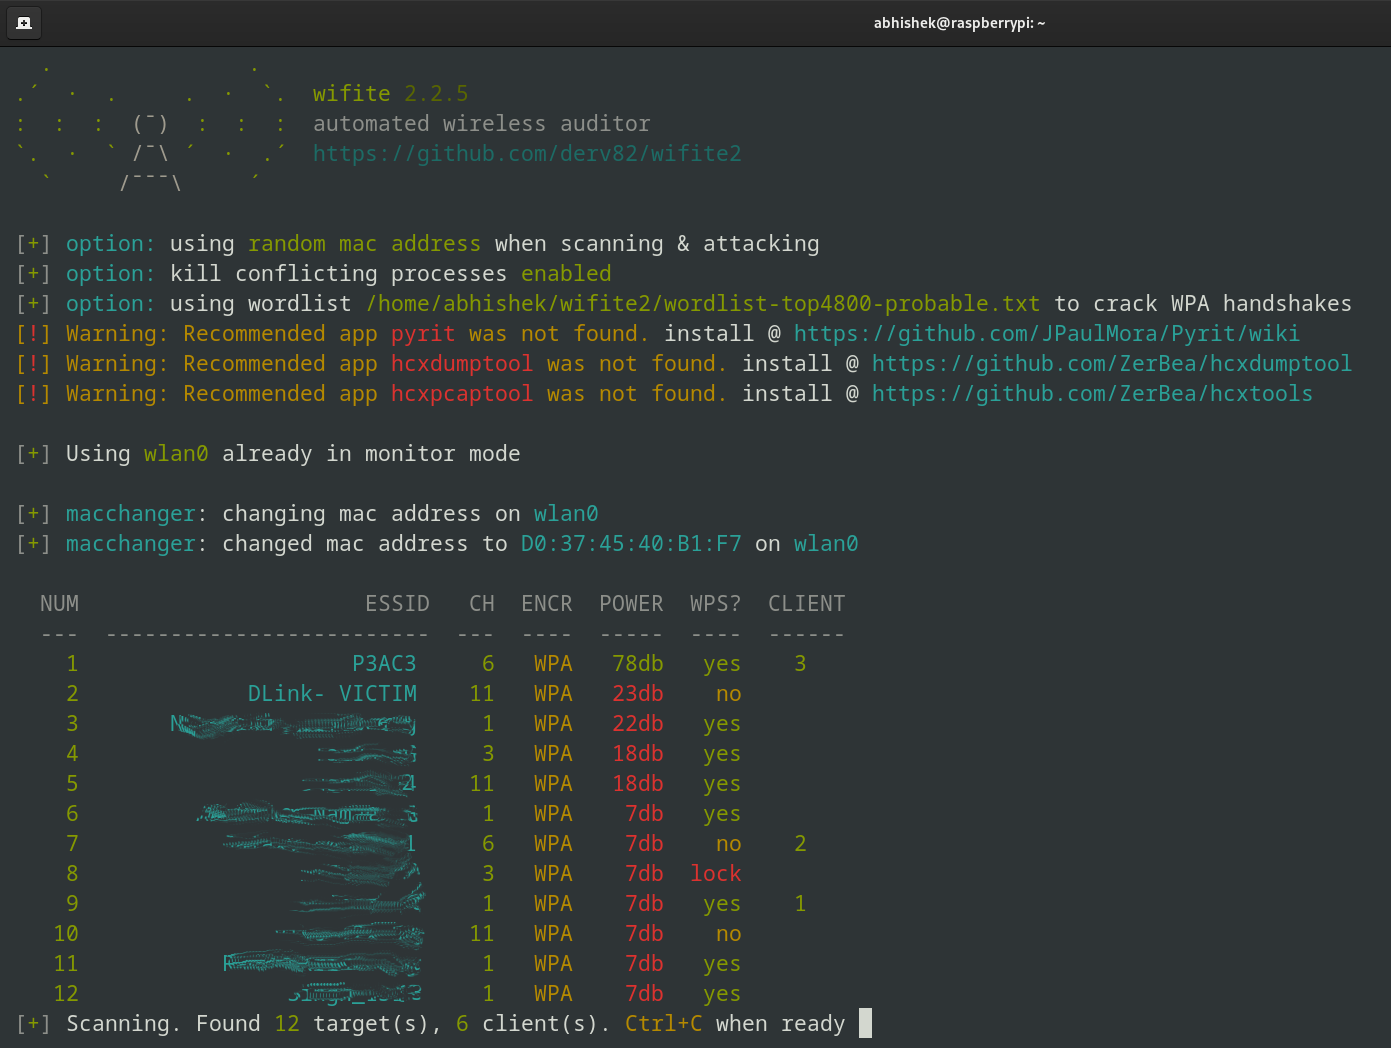
Now, in a stroke of sheer bad luck, I’ve forgotten the Wi-Fi password, which we’ll try to recover today using wifite2, one of the popular Kali Linux tools.
It's a tool that automates the process of capturing WPA/WPA2 handshakes and cracking password keys.
I prefer wifite2 over aircrack-ng because of its user-friendly interface and automated features, which simplify the process significantly.
Quest: Finding Lost Password
I’m not covering the installation process for wifite2 here.
🚧
Warning: This content is for educational purposes only. Unauthorized use of these techniques may violate laws and ethical guidelines. Please respect the privacy and security of others and follow the cyber security law of your country.
--random-mac: Randomizes your MAC address for anonymity.
--dict /wifite2/wordlist-top4800-probable.txt: Specifies a custom wordlist for password cracking.
You can see our VICTIM router here.
Once you’ve entered the target, wifite2 will automatically start performing a series of attacks.
Since I only have one attack installed (WPA handshake capture), wifite2 will handle everything from here.
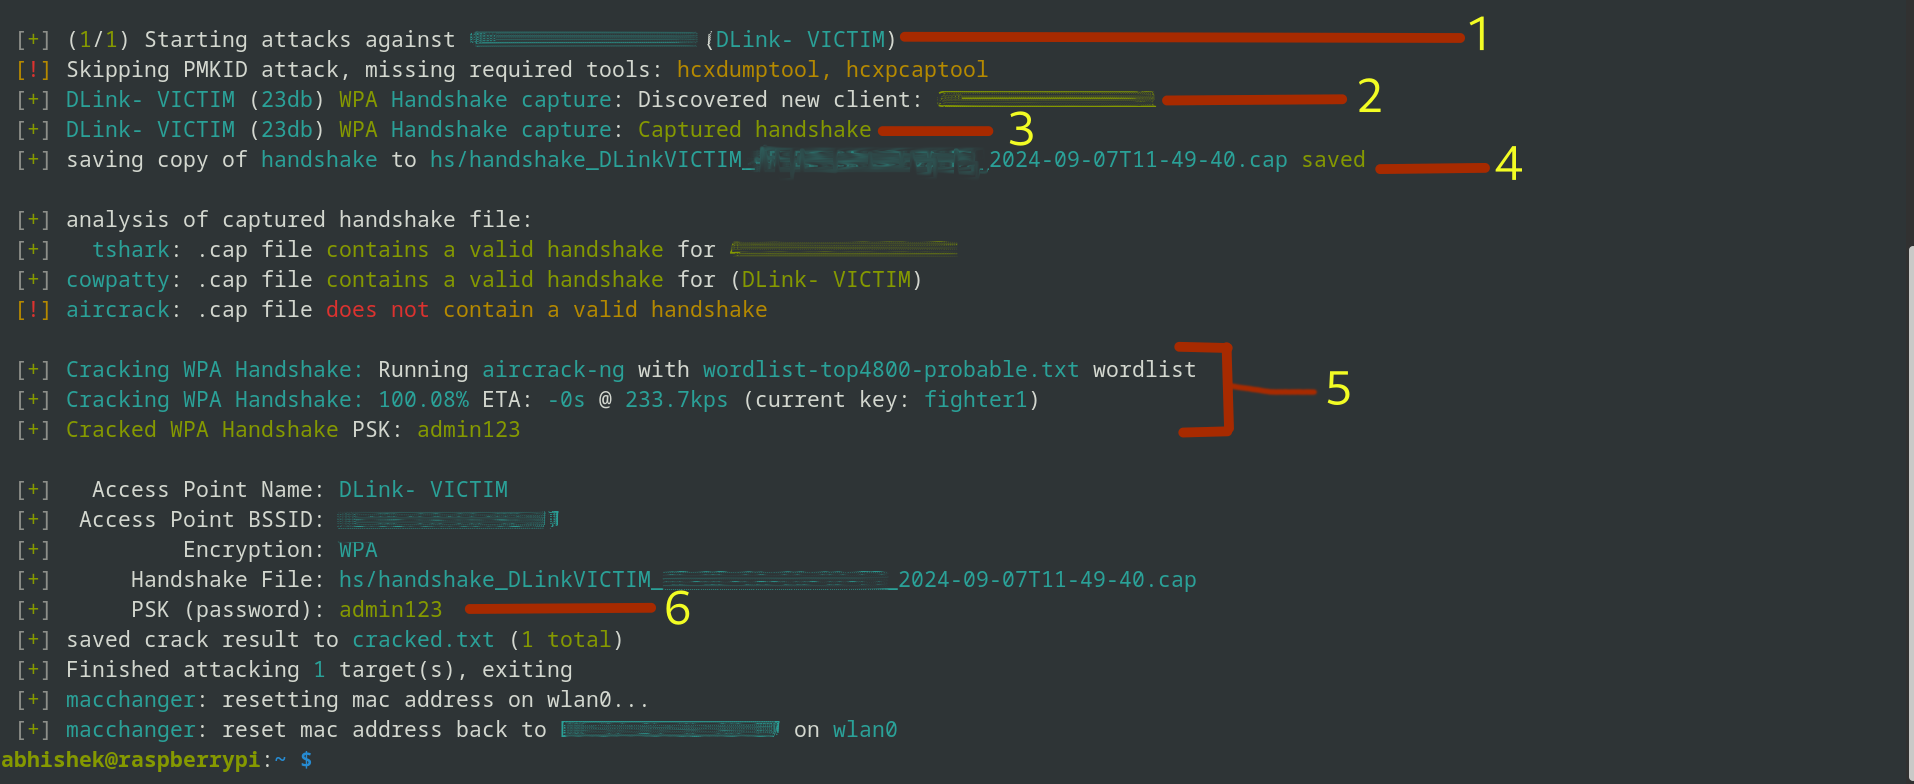
The image above might look a little confusing; let me explain what's happening up there:
Send Deauth Signals: Wifite2 disconnects clients from the network to force a reconnect.
Capture Handshake: It tries to captures the WPA handshake, which is a verification process between the router and client.
Handshake Captured: Confirmation that the handshake data has been successfully collected.
Save Handshake: The handshake is saved in a file named something like handshake_DLinkVICTIM_00-00-00-00-2024.cap.
Crack Password: Wifite2 uses the wordlist you provided to crack the password.
Password Revealed: The cracked Wi-Fi password admin123.
📋
Since this was for a demo purpose, I used word list feature and had a simple password on the router. Unsurprisingly, in a real world scenario, that is likely not to be the case.
Conclusion
So, I shared how I enabled monitor mode on a budget TP-Link adapter and a thing or two about wireless networks and their vulnerabilities.
Remember, while this knowledge is powerful, it's crucial to use it responsibly. Always respect the privacy of others and only test networks that you have explicit permission to access.
These little experiments are a fun way to improve your knowledge. At least, that's what I think. What do you say?
If you are a regular user of Spotify, you can customize the look, feel and behavior of Spotify application on Linux.
The open source project Spicetify lets you add a 'marketplace' feature to your Spotify app from where you can install extensions and themes.
For example, you can autoskip videos, hide podcasts entirely, compare playlists and much more. With themes, you can have a different looking interface.
It is primarily a CLI tool but apart from installation and activation, you don't really have to do much in CLI. You can enjoy the extensions directly from Spotify app.
In this tutorial, I'll show the steps for installing Spotify on Ubuntu and Debian-based distributions.
📋
Please refer to Spicetify documentation for installation instructions for other Linux distributions and Fltapaks.
Installing Spicetify on Ubuntu
The entire Spicetify installation comprises of:
Ensuring Spotify deb version installation
Giving correct permission on Spotify folders
Using a script to install Spicetify
Let's see the steps in detail.
Step 0: Remove Snap version of Spotify and get the debian version
Spicetify does not work with the Snap application. Check if you have snap version of Spotify installed on your Ubuntu system with:
Next, add the Spotify repository details. This way, you'll be getting the Spotify package as well as future updates on it along with regular system updates.
echo "deb http://repository.spotify.com stable non-free" | sudo tee /etc/apt/sources.list.d/spotify.list
Since Spicetify adds extensions and themes, it needs to access the directories where Spotify files are stored. Spicetify documentation recommends changing permissions for those directories.
Next, run the Spotify app and make sure that you are logged in.
If you don't do that, you'll see the "Could not detect "prefs" file location" error later on.
error Could not detect "prefs" file location.
success Default config-xpui.ini generated.
error Cannot detect Spotify "prefs" file location. Please manually set "prefs_path" in config-xpui.ini
Step 2: Start Spicetify installation
✋
Again, ensure that you have Spotfiy app running and you are logged into it.
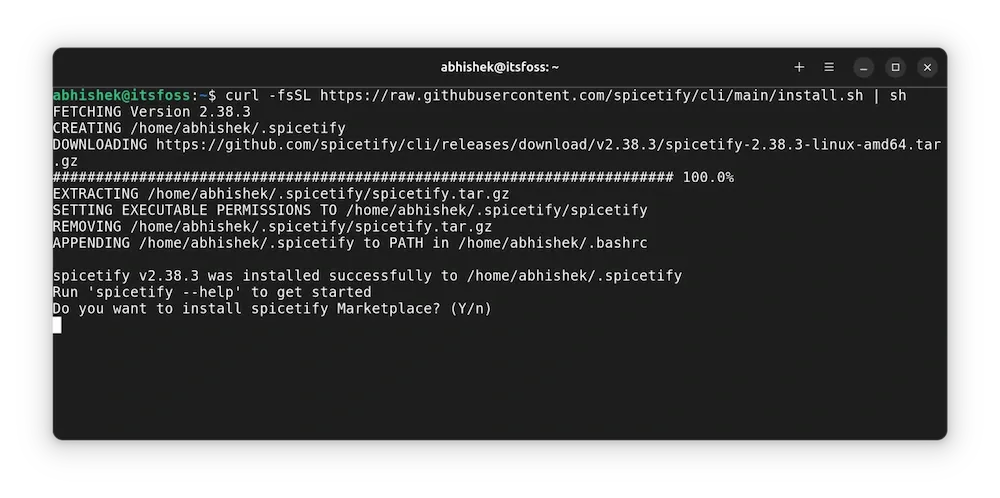
Now, all you have to do is fetch the official installation script and run it:
curl -fsSL https://raw.githubusercontent.com/spicetify/cli/main/install.sh | sh
It starts downloading the file and running it. At one point, it will ask if you want to install spicetify marketplace. Press enter to confirm it.
Press enter to install spicetify marketplace and the process continues.
At the end of the entire thing, you'll see an "error message" that "You haven't backed up. Run "spicetify backup apply".
It's not really an error and you should not just run 'backup apply' immediately. If you try to do that, it will show an error that "spicetify command not found". That's because spicetify is only recognized after the terminal session starts.
That's okay. We handle it in the next step.
Step 3: Finishing up the installation
🚧
Restart your terminal.
Once you have restarted the terminal, run the following command:
spicetify backup apply
After this, Spotify restarts automatically. You can now see the marketplace option on the Spotify interface.
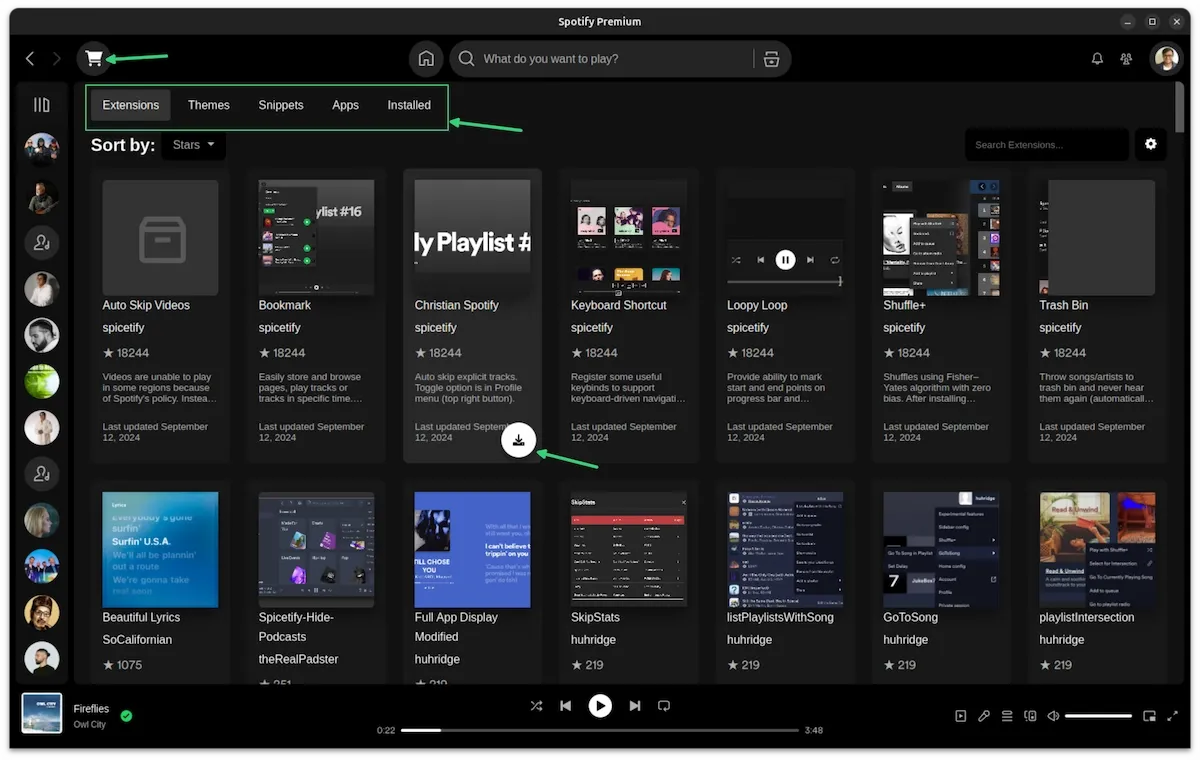
Click on it and you shall see the option to install extensions, themes, snippets etc. Hover over an item and you'll see the "install button".
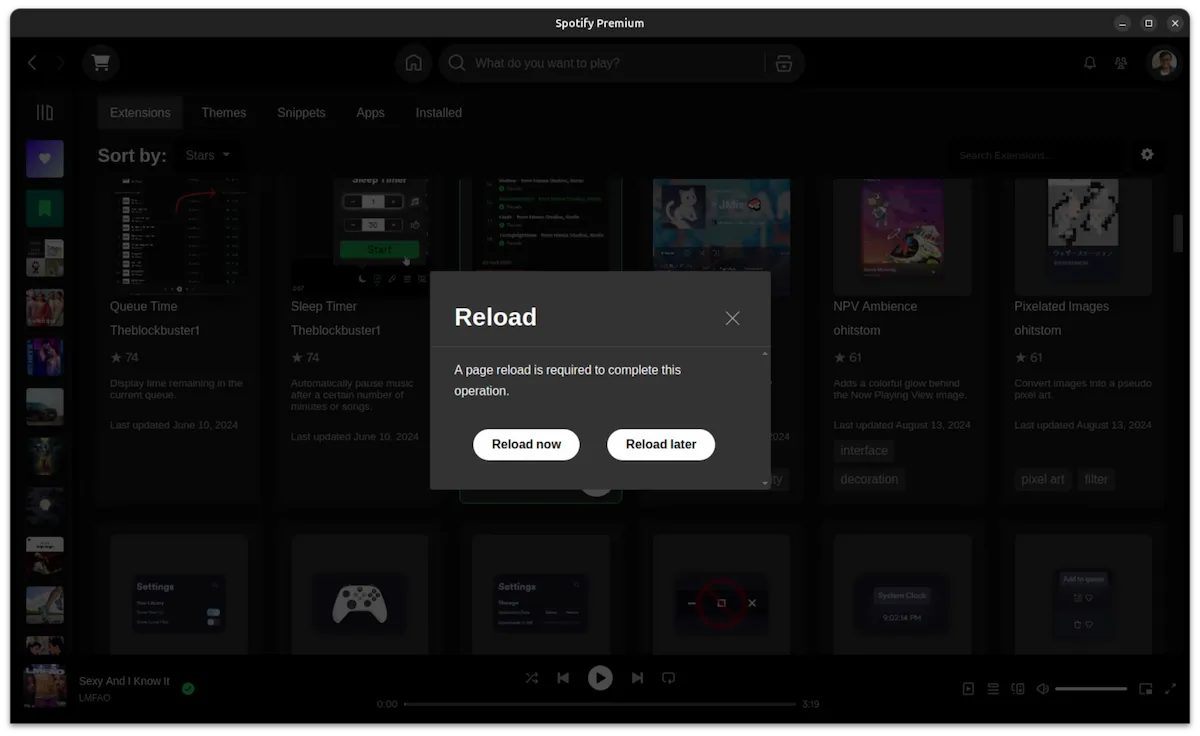
When you click the install button, it is installed immediately and you'll be asked to reload Spotify:
Congratulations! You can start enjoying Spicetify and customize your Spotify experience now.
Few tips on using the Spicetify marketplace
Let me share a few tips from my Spicetify experience that should also help you.
Choose your extensions wisely
By default, the extensions are displayed based on number of stars they have. This is already a good thing as it indicates that the extension should work properly.
Not all extensions will work flawlessly, some might impact the Spotify app performance and user experience. For example, I installed a theme and it changed the interface and header menu was gone and I could not even access the market place or any other option. It can be reset which I discuss in later section.
You should use extensions that have been recently updated and have good number of stars.
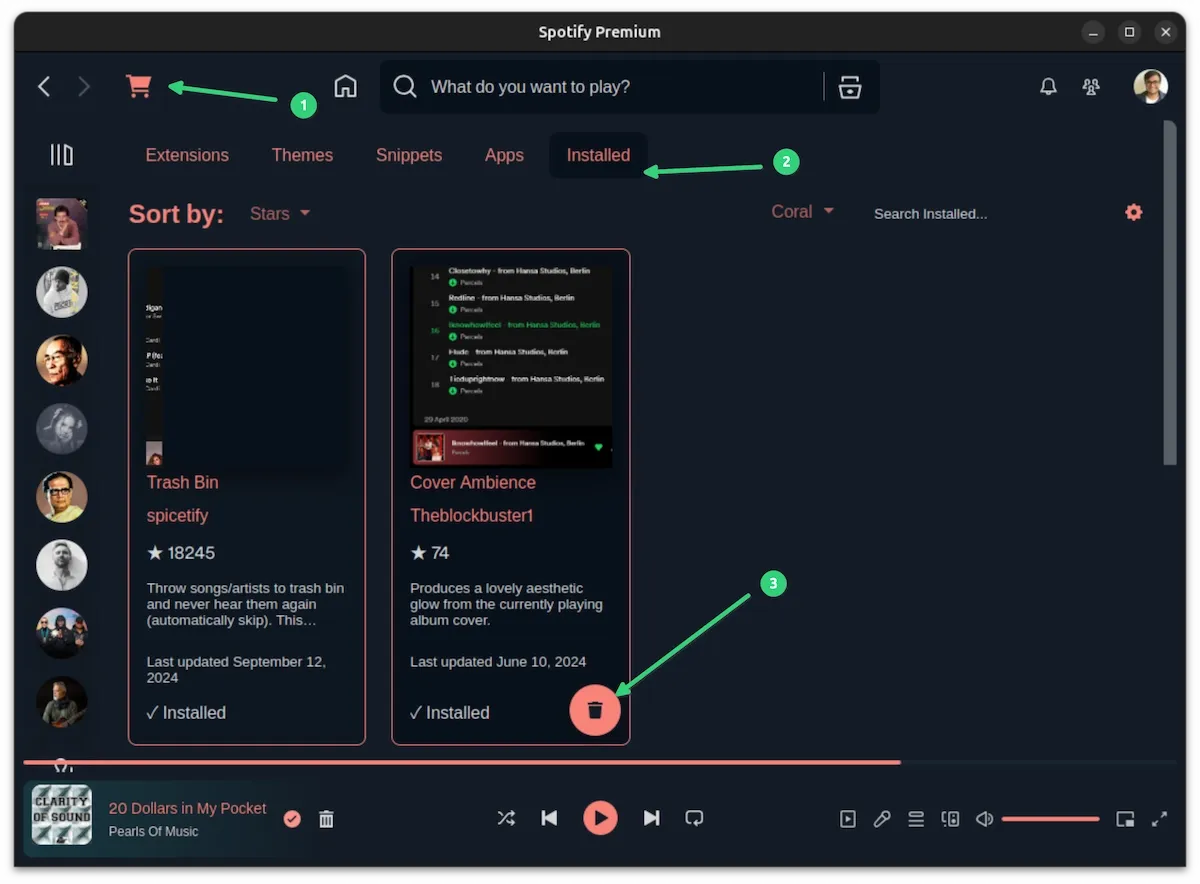
Don't install too many extensions unnecessarily. Remove the ones you don't need.
Theme it right, theme it once
Only one theme can be installed and used at a time. And as soon as you install a theme, the previous one is no longer in installed state. Some themes have several color variants, though.
Messed it up? Restore it
It is not impossible to mess things up. The good thing is that you can restore the default Spotify looks with:
spicetify restore
If you want to reuse Spiectify, apply it again:
spicetify apply
Update Spicetify
It is a good idea to keep Spiectify updated, especially when you are updating Spotify. You can do this with:
spicetify update
spicetify upgrade
Removing Spicetify
To uninstall Spicetify, you should first restore the default looks:
spicetify restore
And then remove the Spicetify files:
rm -rf ~/.spicetify
rm -rf ~/.config/spicetify
Conclusion
Spicetify is something good to have if you want greater control over your music experience. Don't like songs with vulgar lyrics, block them all with an extension. Hate an artist, block them from any automated playlist.
Compatibility can always be a concern and the restore feature helps a great deal.
As far as the security concern, I cannot give a 100% yes or no. Spicetify is open source and so are all the extensions and themes. Of course, it is not possible to have a security check on all of them all the time.
Spicetify is installed without sudo permission and it has limited permission with read-write permissions to Spotify folders only. In theory, it should not impact anything other than Spotify on your system.
Also, Spicetify works on client-side. Meaning, everything happens on your computer, not in your Spotify account. If you install Spotify on any other device, Spiectify changes won't be there.
A HiDPI (High Dots Per Inch) monitor has a high pixel density, meaning it packs more pixels into the same physical screen size compared to a standard monitor. This results in sharper images, crisper text, and finer details, an advantage seen in many newer displays out in the market.
With these advanced displays come issues like tiny text and icons that are hard to read and identify. This is where fractional scaling comes into the scene.
Fractional scaling on computers allows you to fine-tune the size of text, icons, and windows on your screen by scaling them in precise increments like 125%, 150%, etc.
Let's see how to apply fractional scaling on Linux Mint to make it the best fit for all your needs!
Using fractional scaling in Linux Mint
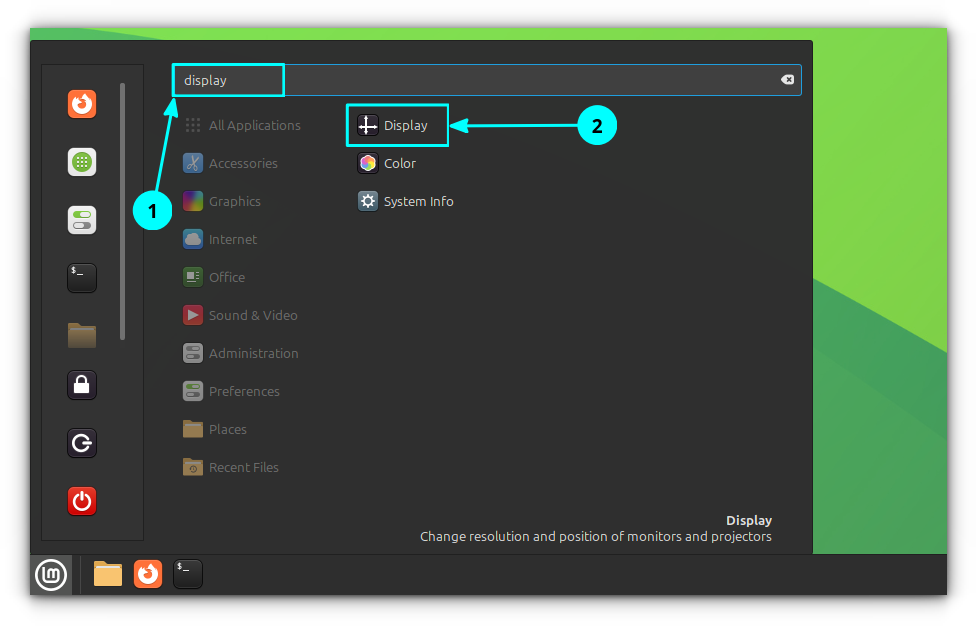
First, search for Display in the Linux Mint system menu. Press enter to open the display settings.
Open Display Settings
💡
You can also open the display settings window by right-clicking on the desktop and then selecting “Display settings”.
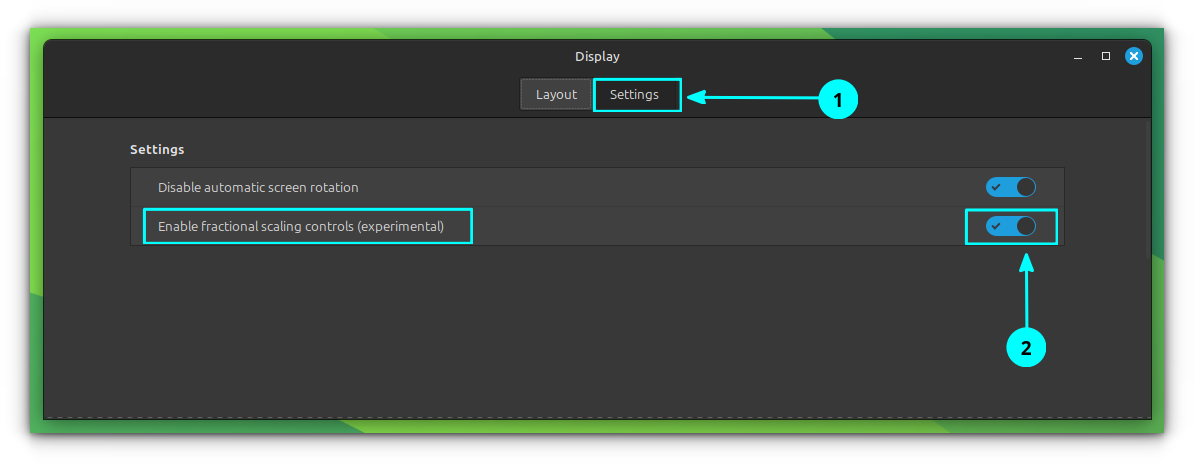
In the display settings window, go to the Settings tab and enable Fractional Scaling.
🚧
Fractional Scaling in Linux Mint is still experimental, so you should be cautious about unexpected results. If you encounter issues with small icons, text, etc., font scaling is recommended (discussed later).
Go to the Settings Tab
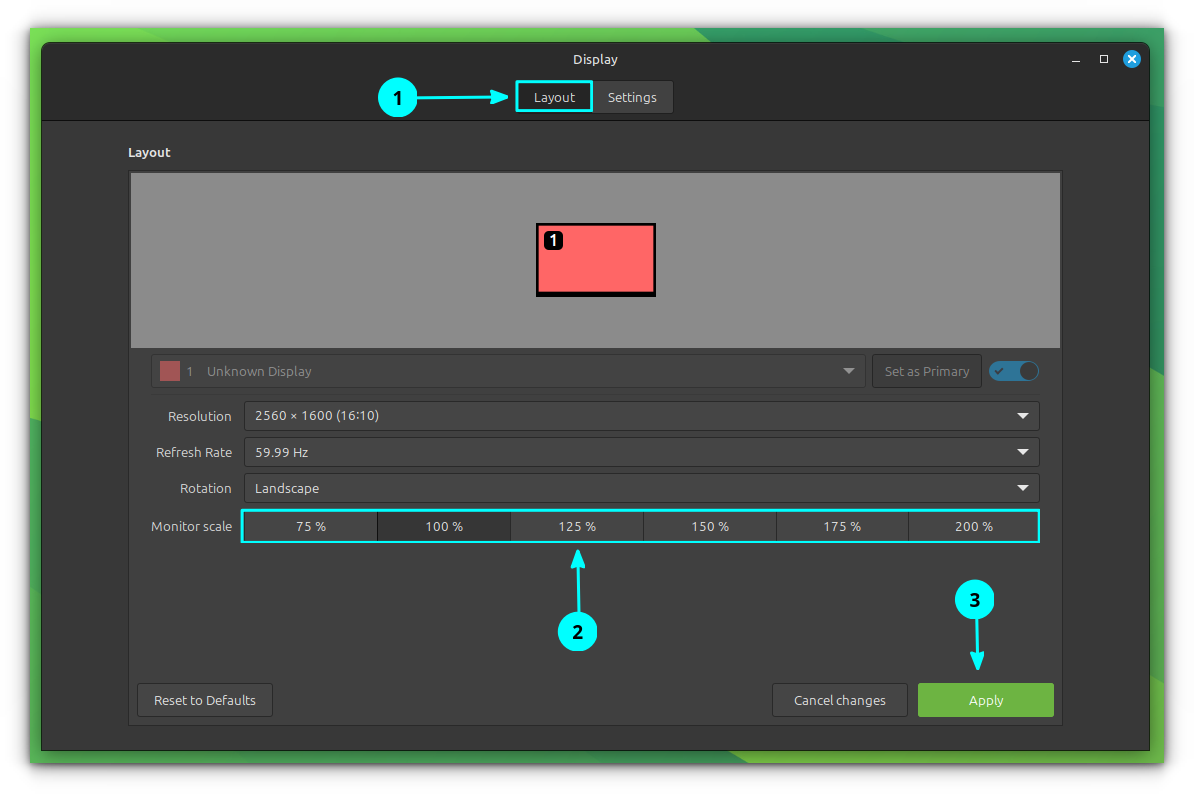
When you come back to the Layout tab, you can see that several Fractional Scaling options are available in the Monitor Scale section as shown in the screenshot below.
Fractional Scaling Options
You can select a particular Fractional Scaling value from this list that suits your needs.
⚠️
Fractional Scaling can result in increased power consumption in Laptops. This may lead to reduced battery backup.
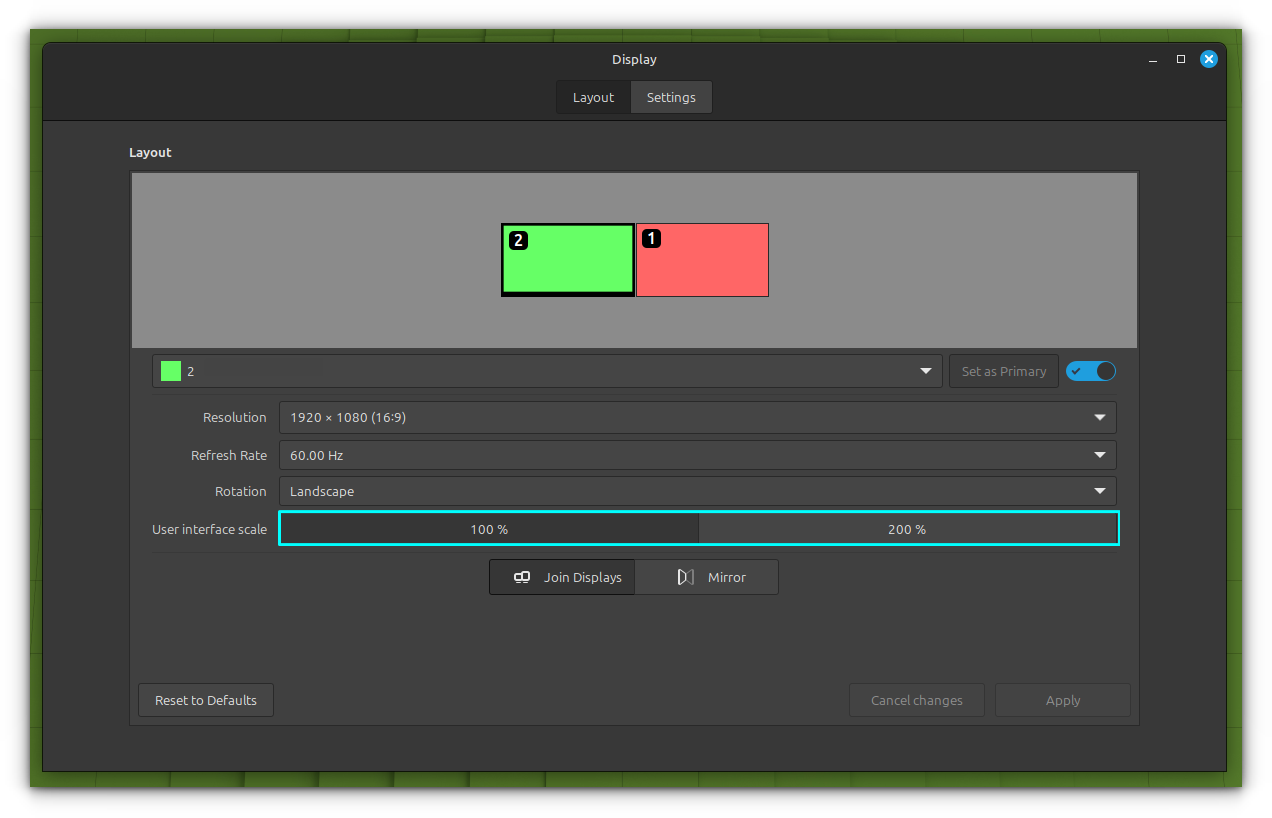
If you have more than one display, it will show an additional display in the settings. Select a particular display and set the scaling accordingly.
Scaling in multiple monitor
As the scaling value increases, the size of text and icons displayed on the screen also increases. So, Fractional Scaling is an experimental process for you to determine what is your convenience in viewing items.
📋
Some Snap or Flatpak applications may not adhere to fractional scaling.
Other manual solutions
There are some manual solutions you can use in cases when everything else fails.
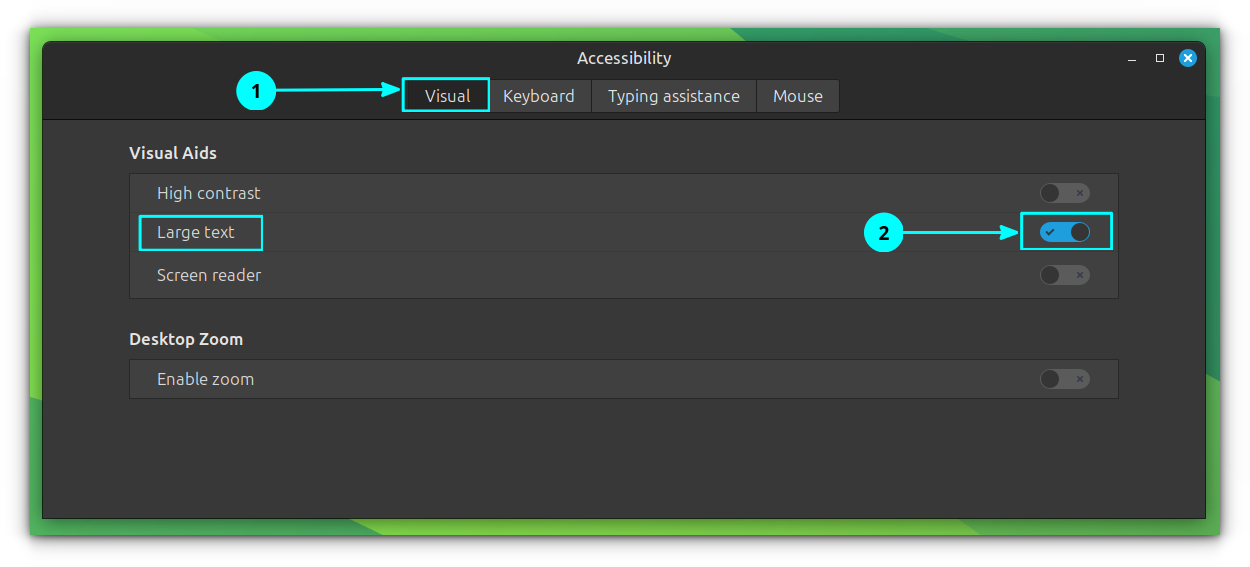
Larger fonts
Either set is through Menu → Accessibility → Visual → Large Text.
Set a larger text in Accessibility settings
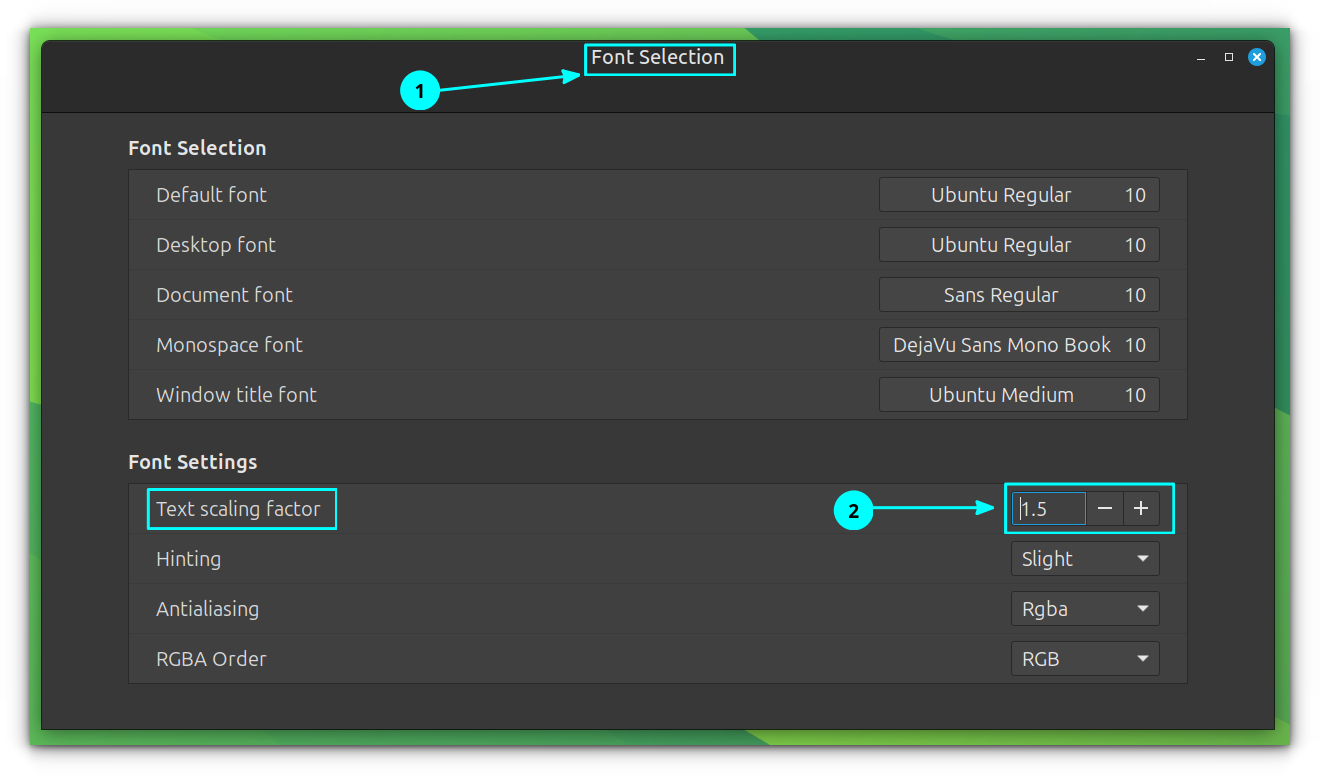
Or through Menu → Font Selection → Text Scaling.
Text Scaling Factor
Larger icons
Icons can be scaled in various ways.
The Menu provides a way to increase the size of the icons shown inside the menu. For this, right-click on the Menu and select Configure. In the configuration window, go to the Menu tab and increase the icon size for various parts:
Menu Icon Size
The desktop icon size can be increased my right-clicking on an empty space in desktop and selecting Customize.
Change Desktop icon size
Similarly, there are other settings you can check like:
Increasing the panel size/height. The Cinnamon panel supports section-wise size changes.
CTRL+Scroll to increase icon size in Nemo File Manager.
CTRL+Scroll in Firefox to scale Firefox view.
Setting a profile with customized text size in terminal.
Conclusion
Using fractional scaling lets you use your 2K or 4K screen without squinting your eyes. If everything works well, it's a set and forget thing.
If it doesn't work as per your expectations, you may try changing the size of fonts and icons, although it's more manual work, in my opinion.
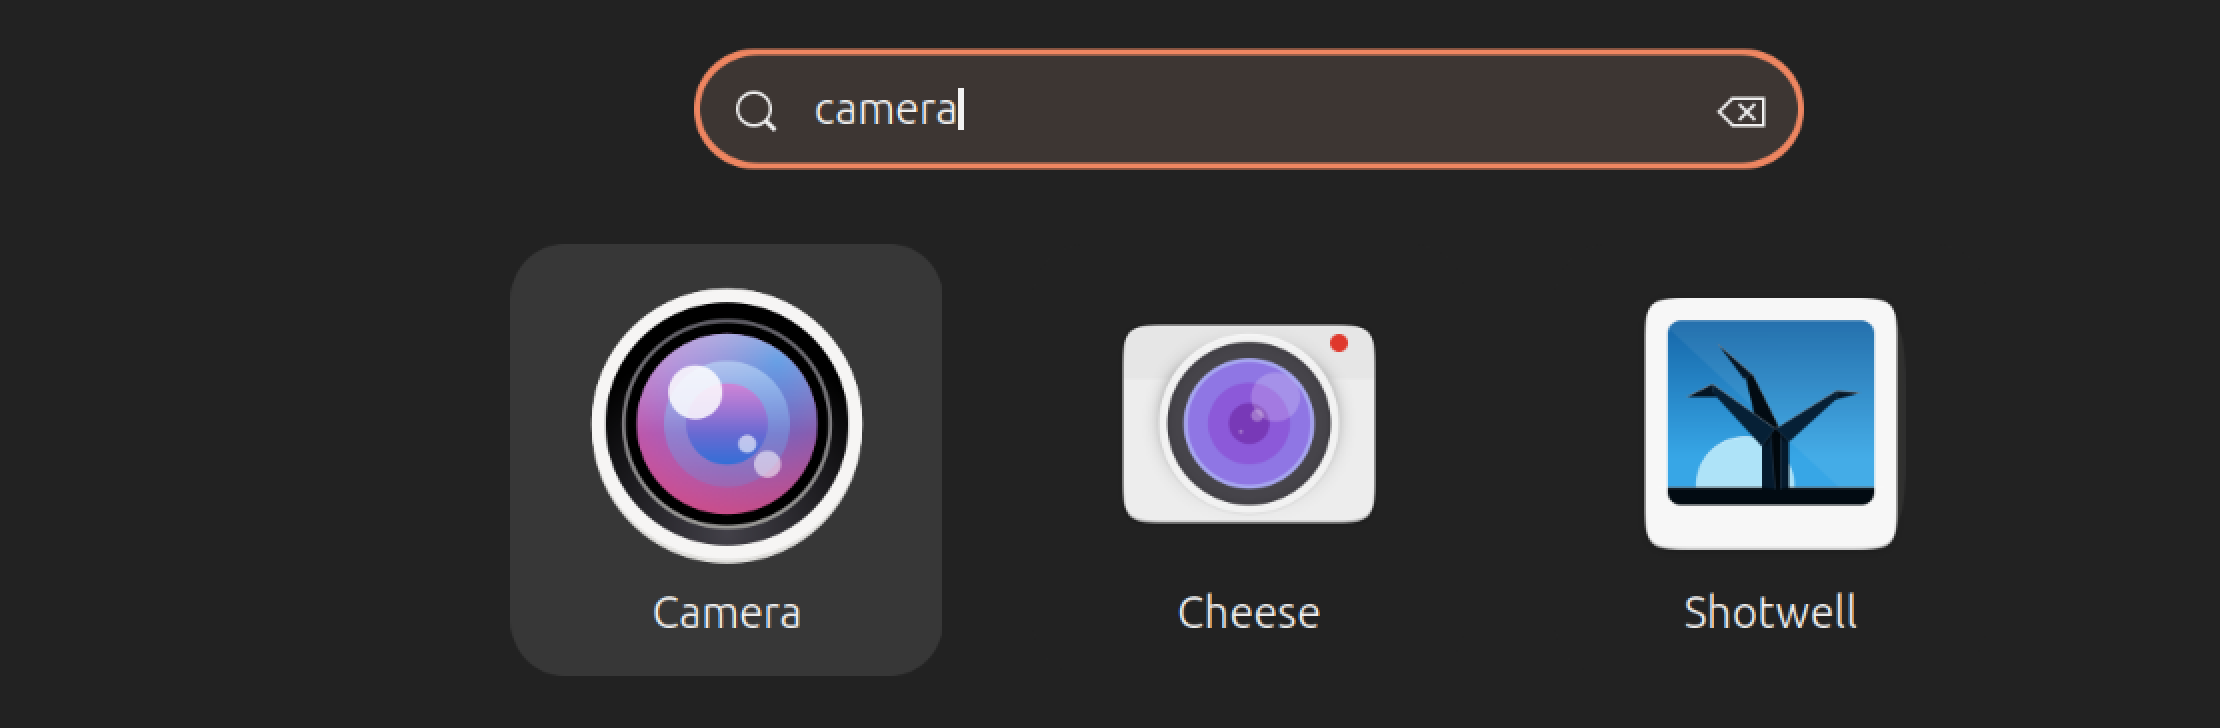
Ubuntu 24.04 ships with GNOME's new camera app and it doesn't work. It simply fails to recognize the in-built or external webcams.
When you open the Camera app, it shows "No Camera Found. Connect a camera device" message.
This may make you doubt your machine's hardware but it likely to be a software issue as the Camera app does not work by default in Ubuntu 24.04.
Several workarounds have been suggested for this problem on various Ubuntu forums. However, the one that worked for me was shared by an It's FOSS reader, Jack.
Here it is.
Fixing the issue
The trick here is to add yourself to the video group. You can use the usermod command for this purpose. Fortunately or unfortunately, this is a command line fix.
🚧
Type the commands as it is or copy-paste them in the terminal. The -a part is of utmost important.
If this is your first time with sudo, you should know that it asks to enter password. You have to enter your account's password through which you log into the system. While typing the password, nothing is reflected on the screen. That's normal in the UNIX/Linux world. Just blindly type the password and press enter.
There is no success message or output for the command.
💡 The usermod command modifies a user account. With G you are telling it to modify the groups the user belongs. The -a option is crucial because you are asking it to append a new group to existing groups of a user. If you don't use -a, then user will only belong to the group you specify (video here) and that will be catastrophic as you cannot use sudo and function as before.
You may have to log out or restart the system before the changes take effect.
When you start the Camera app again, it should work now.
That's me thinking why Ubuntu won't fix these widespread issues
Conclusion
I still prefer the good old Cheese camera app.
If you want, you can install it using this command:
sudo apt install cheese
It is also available from the app store but the Snap version gets priority and that also doesn't work very well.
Each Ubuntu release has bugs, 24.04 is just buggier. I don't understand how this prevalent bug made it to a long-term support release and why it has not been fixed even after the first point release of 24.04.1.
I know we are not going to get answers but at least these troubleshootings help us explore an otherwise uncharted territory.
Generative AI and Large Language Models (LLMs) are often used interchangeably, but while they share some similarities, they differ significantly in purpose, architecture, and capabilities.
In this article, I'll break down the difference between the two, explore the broader implications of generative AI, and critically examine the challenges and limitations of both technologies.
What is Generative AI?
Generative AI refers to a class of AI systems designed to create new content, whether it's text, images, music, or even video, based on patterns learned from existing data.
How Generative AI Works
At its core, Generative AI functions by learning patterns from vast amounts of data, such as images, text, or sounds.
The process involves feeding the AI huge datasets, allowing it to "understand" these patterns deeply enough to recreate something similar but entirely original.
The "generative" aspect means the AI doesn’t just recognize or classify information; it produces something new from scratch. Here’s how:
1. Neural Networks
Generative AI uses neural networks, which are algorithms inspired by how the human brain works.
These networks consist of layers of artificial neurons, each responsible for processing data.
Neural networks can be trained to recognize patterns in data and then generate new data that follows those patterns.
2. Recurrent Neural Networks (RNNs)
For tasks that involve sequences, like generating text or music, Recurrent Neural Networks (RNNs) are often used.
RNNs are a type of neural network designed to process sequential data by keeping a sort of "memory" of what came before.
For example, when generating a sentence, RNNs remember the words that were previously generated, allowing them to craft coherent sentences rather than random strings of words.
3. Generative Adversarial Networks (GANs)
GANs work by pitting two neural networks against each other.
One network, the Generator, creates content (like an image), while the other network, the Discriminator, judges whether that content looks real or fake.
The Generator learns from the feedback of the Discriminator, gradually improving until it can produce content that’s indistinguishable from real data.
This method is particularly effective in generating high-quality images and videos.
Examples of Generative AI
Image generators :
DALL-E: It can generate highly detailed images from textual descriptions, demonstrating its ability to understand and translate language into visual form.
Stable Diffusion: It allows users to generate a wide range of images, from realistic portraits to fantastical landscapes
Music generators:
Udio: This AI tool can create original music compositions in various styles, from classical to electronic.
Jukebox: Another notable music generator, Jukebox is capable of generating realistic-sounding music in different genres and even imitating specific artists.
Video tools:
Runway: This versatile platform offers a suite of tools for video editing, animation, and generation. It can be used to create everything from simple animations to complex visual effects.
Topaz Video AI: This software specializes in enhancing and restoring video footage, using AI to improve quality, reduce noise, and even increase resolution.
What Are Large Language Models (LLMs)?
Large Language Models (LLMs) are a specialized form of artificial intelligence designed to understand and generate human language with remarkable proficiency.
Unlike general generative AI, which can create a variety of content, LLMs focus specifically on processing and producing text, making them integral to tasks like translation, summarization, and conversational AI.
How LLMs Work
At their core, LLMs leverage Natural Language Processing (NLP), a branch of AI dedicated to understanding and interpreting human language. The process begins with tokenization:
Tokenization
This involves breaking down a sentence into smaller units, typically words or subwords. They are called tokens in LLM terms.
For instance, the sentence "I love AI" might be tokenized as ["I", "love", "AI"]. These tokens serve as the building blocks for the model's understanding.
LLMs typically use an architecture called transformers, a model that revolutionized natural language processing.
They work by analyzing relationships between words and their contexts in massive datasets.
In simple terms, think of them as supercharged auto-complete functions capable of writing essays, answering complex questions, or summarizing articles.
Examples of LLM's
Text Generation:
GPT 3: One of the most well-known LLMs. It is capable of generating human-like texts, from writing essays to creating poetry.
GPT-4: It is more advance successor and further improved like having memory which allows it to maintain and access information from previous conversations.
Gemini: A notable LLM by Google, which focuses on enhancing text generation and understanding.
Generative AI and LLMs: A unique Bond
Now that you’re familiar with the basics of generative AI and large language models (LLMs), Let's explore the transformative potential when these technologies are combined.
Here are some ideas:
Content Creation
To all the writer folks like me that might have met with a writers block, the combination of LLMs and generative AI enables the creation of unique and contextually relevant content across various media text, images, and even music.
Talk to your documents
A fascinating real-world use case is how businesses and individuals can now scan documents and interact with them.
You could ask specific questions about the content, generate summaries, or request further insights without compromising privacy.
This approach is particularly valuable in fields where data confidentiality is crucial, such as law, healthcare, or education.
We have covered one such project called PrivateGPT.
Enhanced Chatbots and Virtual Assistants
No one likes the generic response of customer service chatbots. The combination of LLMs and generative AI can power advanced chatbots that handle complex queries more naturally.
For instance, an LLM might help a virtual assistant understand a customer’s needs, while generative AI crafts detailed and engaging responses.
Open-source projects like Rasa, a customizable chatbot framework, have made this technology accessible for businesses looking for privacy and flexibility.
Improved Translation and Localization
When combined, LLMs and generative AI can significantly improve translation accuracy and cultural sensitivity.
For example, an LLM could handle the linguistic nuances of a language like Arabic, while generative AI produces culturally relevant images or content for the same audience.
Open-source projects like Marian NMT and Unlabel Tower, a translation toolkit and LLM, show promise in this area.
Still, challenges remain especially in dealing with idiomatic expressions or regional dialects, where AI can stumble.
Challenges and Limitations
Both Generative AI and LLMs face significant challenges, many of which raise concerns about their real-world applications:
Bias
Generative AI and LLMs learn from the data they are trained on. If the training data contains biases (e.g., discriminatory language or stereotypes), the AI will reflect those biases in its output.
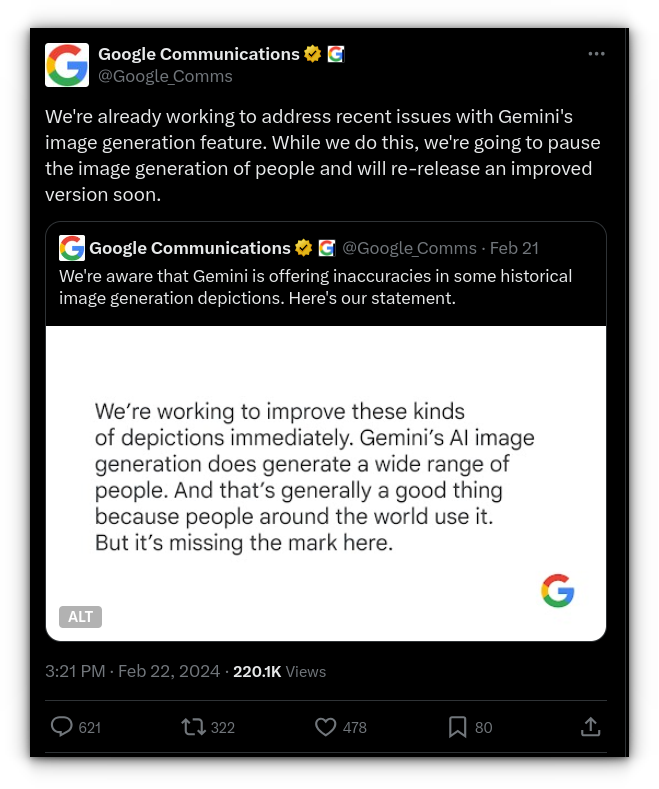
Google halts Gemini's image generation due to historical inaccuracies
This issue is especially problematic for LLMs, which generate text based on internet-sourced data, much of which contains inherent biases.
Hallucinations
A unique problem for LLMs is "hallucination," where the model generates false or nonsensical information with unwarranted confidence.
While generative AI might create something visually incoherent that’s easy to detect (like a distorted image).
But an LLM might subtly present incorrect information in a way that appears entirely plausible, making it harder to spot.
Resource Intensiveness
Training both generative AI and LLMs requires vast computational resources. It’s not just about processing power, but also storage and energy.
This raises concerns about the environmental impact of large-scale AI training.
Ethical Concerns
The ability of generative AI to produce near-perfect imitations of images, voices, and even personalities poses ethical questions.
How do we differentiate between AI-generated and human-made content? With LLMs, the question becomes: how do we prevent the spread of misinformation or misuse of AI for malicious purposes?
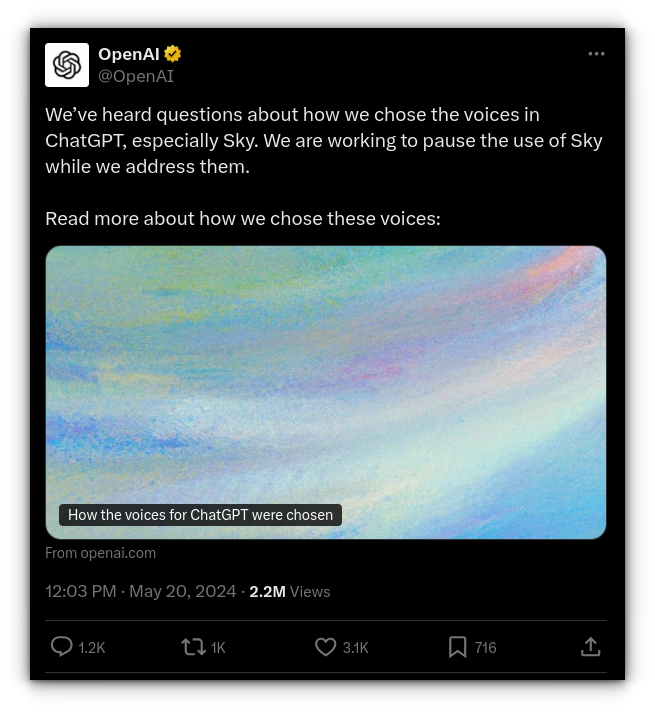
ChatGPT's reply after 'Sky' voice faces scrutiny over Scarlett Johansson comparison
Key Takeaways
The way generative AI and LLMs complement each other is mind-blowing whether it’s generating vivid imagery from simple text or creating human-like conversations, the possibilities seem endless.
However, one of my biggest concerns is that companies are training their models on user data without explicit permission.
This practice raises serious privacy issues, if everything we do online is being fed into AI, what’s left that’s truly personal or private? It feels like we’re inching closer to a world where data ownership becomes a relic of the past.