Selasa, 28 Februari 2023

Terminal Basics Series #3: Listing the Contents of Directory With ls Command

Terminal Basics Series #3: Listing the Contents of Directory With ls Command

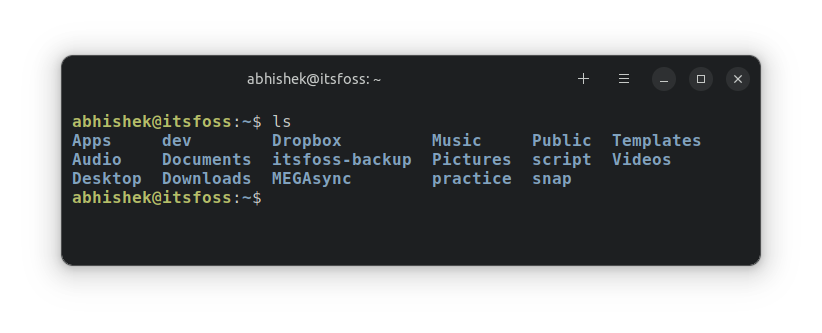
The ls command in Linux is used for listing the contents of directories. You can think of ls as a short form for list.
Terminal Basics Series #3: Listing the Contents of Directory With ls Command

There is more to just listing what a directory consists of. You can see the file size, the time it was created, whether it is a file or directory, and file permissions. You can even sort the output based on those criteria.

I won't go into a lot of detail. You should know just enough basics to get your way around it at this stage.

Prepare your test setup

This Terminal Basics tutorial series uses a hands-on approach where you learn things by doing them. It will be better to create a working scenario on your system so that you can try things and see similar results, as shown in this tutorial.

Open a terminal and switch to the home directory and create a ls-command directory under the practice directory and then enter this newly created directory.

cd ~
mkdir -p practice/ls-command
cd practice/ls-command

It's okay if you don't recognize some commands here. Just enter them as it is shown.

Create a couple of empty files:

touch empty_file_{1,2}

Copy a huge text file:

cp /etc/services .

Create a few directories:

mkdir dir_{1..3}

Create a hidden file:

echo "Now You See Me" > .john-cena

And let's end the setup with a soft link (like a shortcut to a file):

ln -s services link_services

Let's see how the ls-command directory looks now:

abhishek@itsfoss:~/practice/ls-command$ ls
dir_1  dir_2  dir_3  empty_file_1  empty_file_2  link_services  services

Long list: Listing with details

While the ls command shows the content, it doesn't give any details about the contents.

This is where you can use the long listing option -l.

ls -l

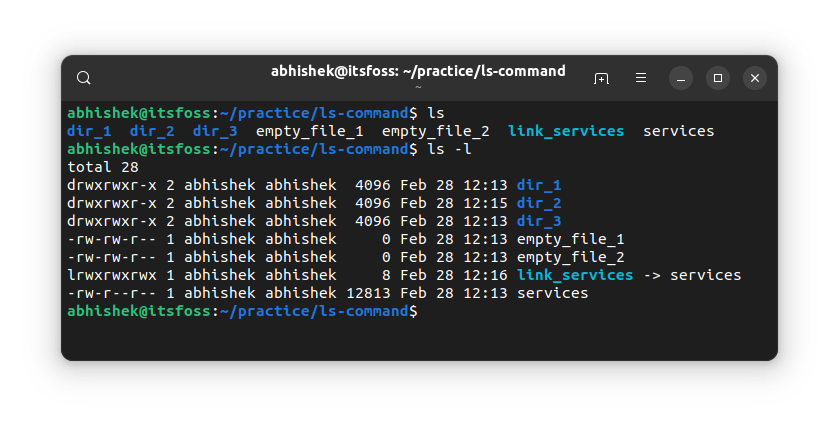
It will show the directory's contents in individual rows with additional information in alphabetical order:
Terminal Basics Series #3: Listing the Contents of Directory With ls Command
๐Ÿ“‹
Most Linux distros have preconfigured to show files, directories and links in different colors. The executable files are also shown in a different color.

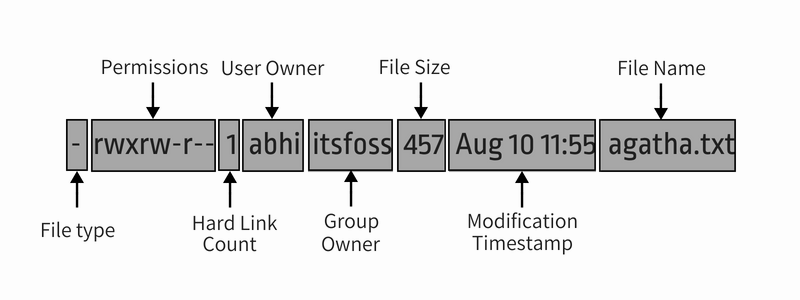
You'll see the following information in the long listing:

  • File type: - for file, d for directory, l for soft links.
  • Number of hard links: Usually 1 unless there is actually a hard link (don't worry too much about it).
  • Owner name: The user who owns the file.
  • Group name: The group that has access to the file.
  • File size: Size of the file in bytes. It is always 4K (or 4096) for the directories, irrespective of the directory size.
  • Date and time: Usually, the file's last modified time and date.
  • Filename: Name of the file, directory, or link .
Terminal Basics Series #3: Listing the Contents of Directory With ls Command
File details at a glance

It is a good idea to know about file permission and ownership. I highly recommend reading this tutorial.
Linux File Permissions and Ownership Explained with Examples
Linux file permissions explained in simpler terms. Also learn how to change the file permissions and ownership in Linux in this detailed beginner’s guide.
Terminal Basics Series #3: Listing the Contents of Directory With ls Command

Displaying the hidden files

Remember that you created a 'hidden file' named .john-cena? But you don't see it in the output of the ls command.

In Linux, if a filename starts with a dot (.), the file or directory is hidden from the normal view.

To see these 'hidden files', you have to use the option -a:

ls -a

Actually, you can combine more than one option together in most Linux commands. Let's combine it with the long listing option:

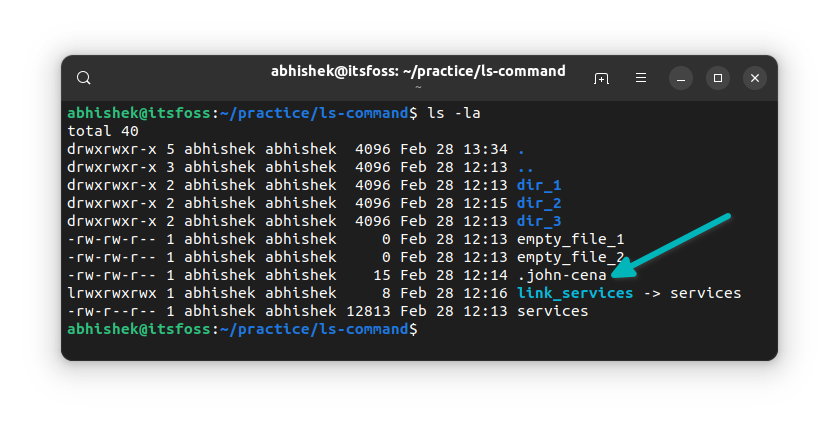
ls -la

Now, it will show the hidden .john-cena file:
Terminal Basics Series #3: Listing the Contents of Directory With ls Command
Including hidden files in the ls command output

Did you notice the special directories .(current directory) and ..(parent directory) are also displayed now?

You can make them go away and still show other hidden files using the option -A instead of -a. Go ahead and try it.

Display file size

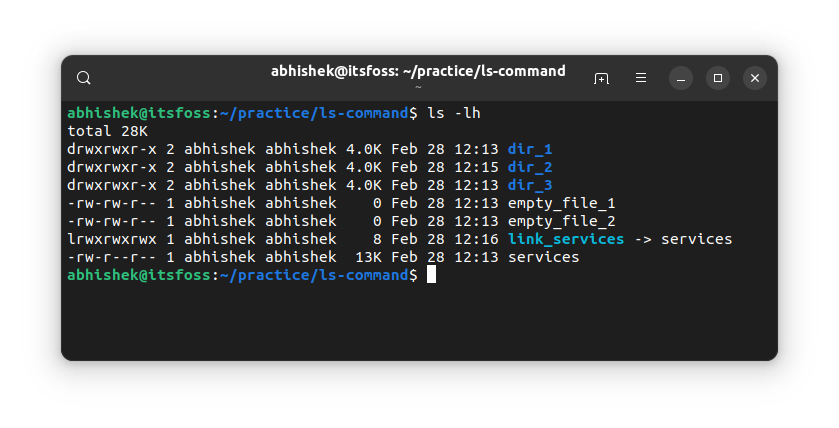
The long listing option -l shows the file size. However, it is not easy to understand. For example, in the examples above, the services file has size 12813 bytes.

As a normal computer user, it makes more sense to see the file size in KB, MB and GB.

The ls command has a human-readable option -h. Combine it with the long listing option and you can see the file size in recognizable formats.
Terminal Basics Series #3: Listing the Contents of Directory With ls Command
File size with ls command
๐Ÿ’ก
The ls command doesn't display the size of directories. For directory size, you have the du command.

Display the newest files first

You already saw that the long listing shows the modified time of a file/directory.

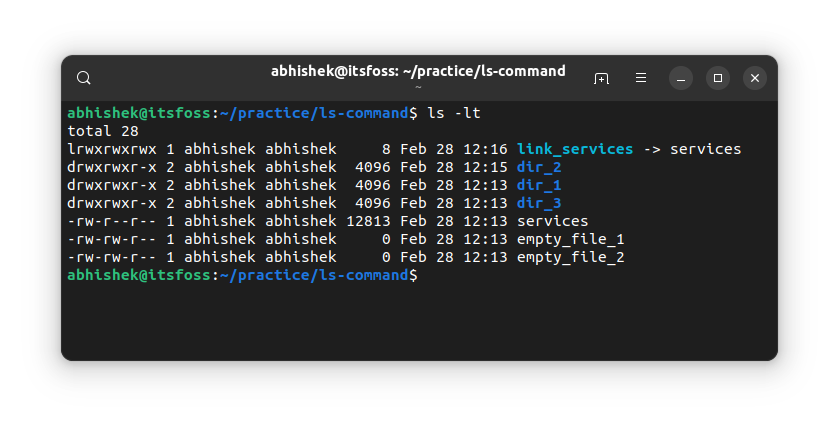
You can sort the output of the ls command based on this timestamp using the -t option:

ls -lt

As you can see, the link was the most recent of them all.
Terminal Basics Series #3: Listing the Contents of Directory With ls Command
๐Ÿ–ฅ️
Reverse the order and show older files first by combining the above option -t with the reverse option -r. What do you see?

Show details on individual files

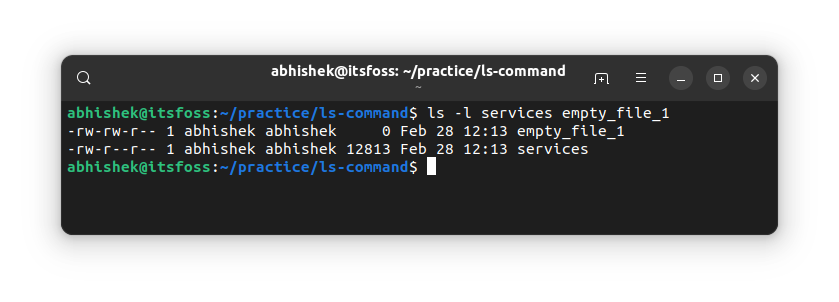
So far, you have used the ls command on the entire current directory. You can also use it on a single file or a bunch of files and directories. What's the point? Well, you can use the long listing option to get the details on selected files.

ls path_to_file1 path_to_file2

Here's an example:

Terminal Basics Series #3: Listing the Contents of Directory With ls Command
Use ls command to get stats on selected files
๐Ÿ‹️
If you use the ls command with a directory path, it will show its content. If you want to see the stats of a directory, use the option -d.

Test your knowledge

Most Linux commands have numerous options. It is impossible for anyone to know them all, even for the most frequently used commands like ls here.

For now, you have a decent idea about listing the contents of a directory and checking file stats. It's time to put your knowledge to some test.

Try the following:

  • Create a new directory called ls_exercise and enter this directory
  • Use the following command to copy a file: cp /etc/passwd .
  • Check the content of a directory. What's the filename?
  • What is the size of this file?
  • Copy some more files using this command: cp /etc/aliases /etc/os-release /etc/legal .
  • Sort the files in the reverse order of modified time.
  • What do you observe if you run the following command: ls -lS?

You can discuss this exercise in the community forum.

In the next chapter of the Terminal Basics series, you'll learn about creating files in Linux command line.

Do let me know if you have questions or suggestions.


from It's FOSS https://ift.tt/HL03olF
via IFTTT

Senin, 27 Februari 2023

NixOS Series #2: How to Install NixOS on a Virtual Machine?

NixOS Series #2: How to Install NixOS on a Virtual Machine?

If you can use the Nix package manager on any Linux distro, why should you install the NixOS?

I often wondered about the same before using NixOS for a few days.

Once I realized the benefits, I wrote about it to help you know why you might consider using NixOS. If you have read the first article of the series, you already know what you want.

So, how to get started with it? Considering it can be a new experience for many, should you replace your daily driver with it or install it as a virtual machine?

I recommend using NixOS on a VM before you want to replace it as your primary operating system. This holds for anything new that you want to try, but specifically for advanced Linux distributions like NixOS.

Install NixOS in the VM Using VirtualBox

In this tutorial, I will be using VirtualBox.

And if you are using Ubuntu and don't care about having the latest version, VirtualBox can be installed using a single command:

sudo apt install virtualbox

Want to install the latest version? You can refer to the given guide:

How to Install VirtualBox on Ubuntu [Beginner’s Tutorial]
This beginner’s tutorial explains various ways to install VirtualBox on Ubuntu and other Debian-based Linux distributions. Oracle’s free and open-source offering VirtualBox is an excellent virtualization tool, especially for desktop operating systems. I prefer using it over VMWare Workstation i…
NixOS Series #2: How to Install NixOS on a Virtual Machine?

And if you are using anything besides Ubuntu, you can follow the download instructions from its official downloads page.

Once you have successfully installed VirtualBox, let us start with the first step.

Step 1: Get the ISO image of NixOS

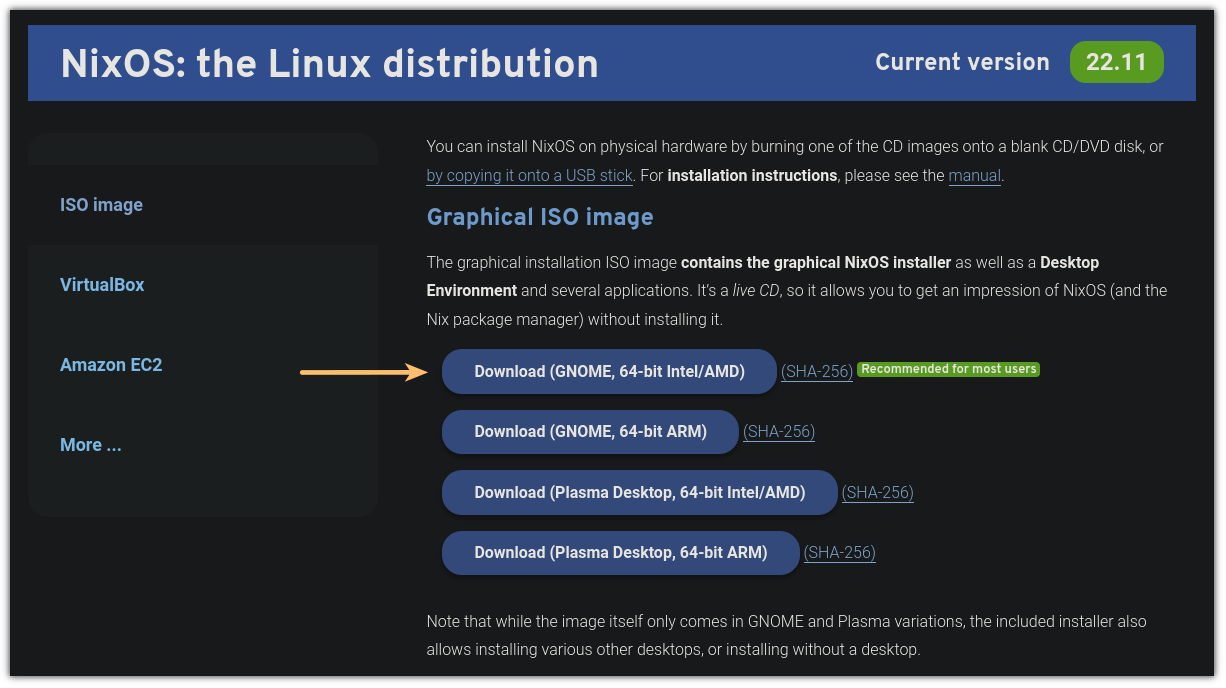
You need to head to NixOS official download page.

And under the NixOS: the Linux distribution section, you will find ISO with GNOME and KDE desktops.

Sure, there is a minimal ISO, too, but I would recommend going with either of the two (GNOME and KDE):

NixOS Series #2: How to Install NixOS on a Virtual Machine?

For the sake of this tutorial, I will be using GNOME.

Remember, you are given GNOME and KDE options for the live desktop!

And during installation, you get the option to choose your favorite desktop environment, including Xfce, Pantheon, Cinnamon, MATE, and more!

Step 2: Create a virtual in VirtualBox

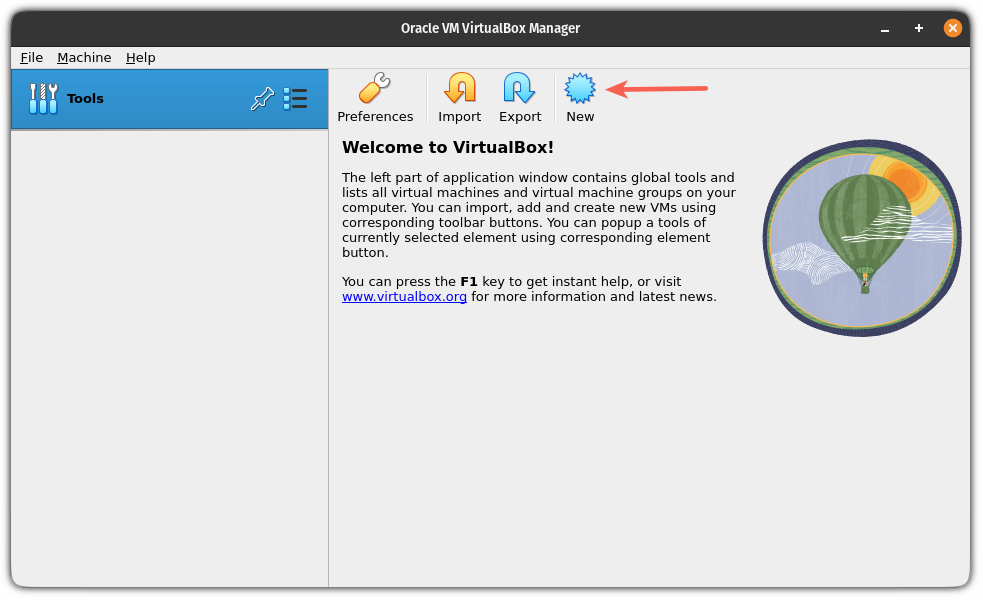
Open VirtualBox and click on the New button to add a new virtual machine:

NixOS Series #2: How to Install NixOS on a Virtual Machine?

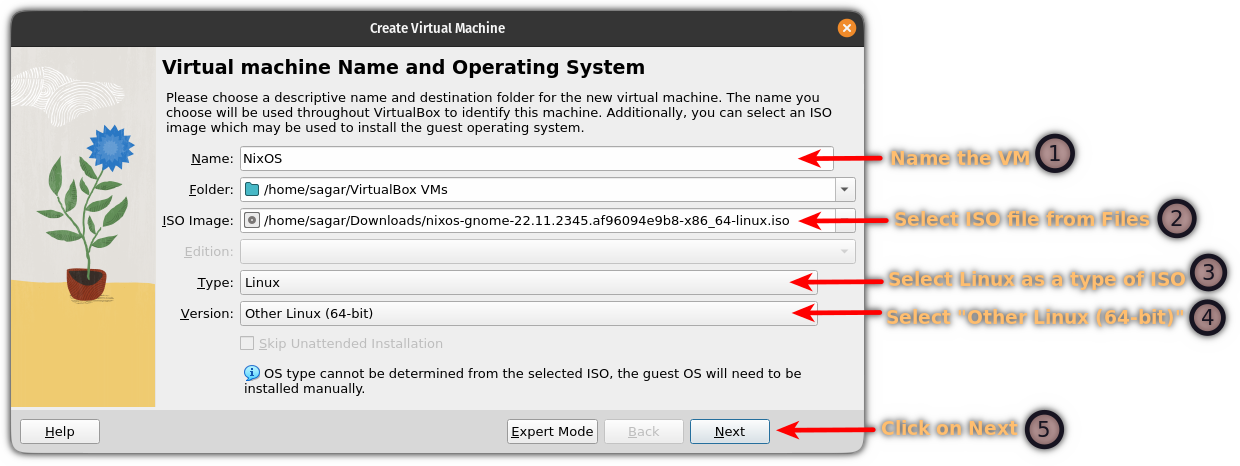
And it will open a prompt asking you to add information about the VM you want to add.

You can start by naming your VM:

  • Name your VM so that you can identify it is a NixOS install. So I named it NixOS.
  • Choose the ISO image that you've downloaded recently.
  • Select Linux as a type of ISO.
  • And choose Other Linux (64-bit) for version.
NixOS Series #2: How to Install NixOS on a Virtual Machine?

Once you select everything, click on the Next button.

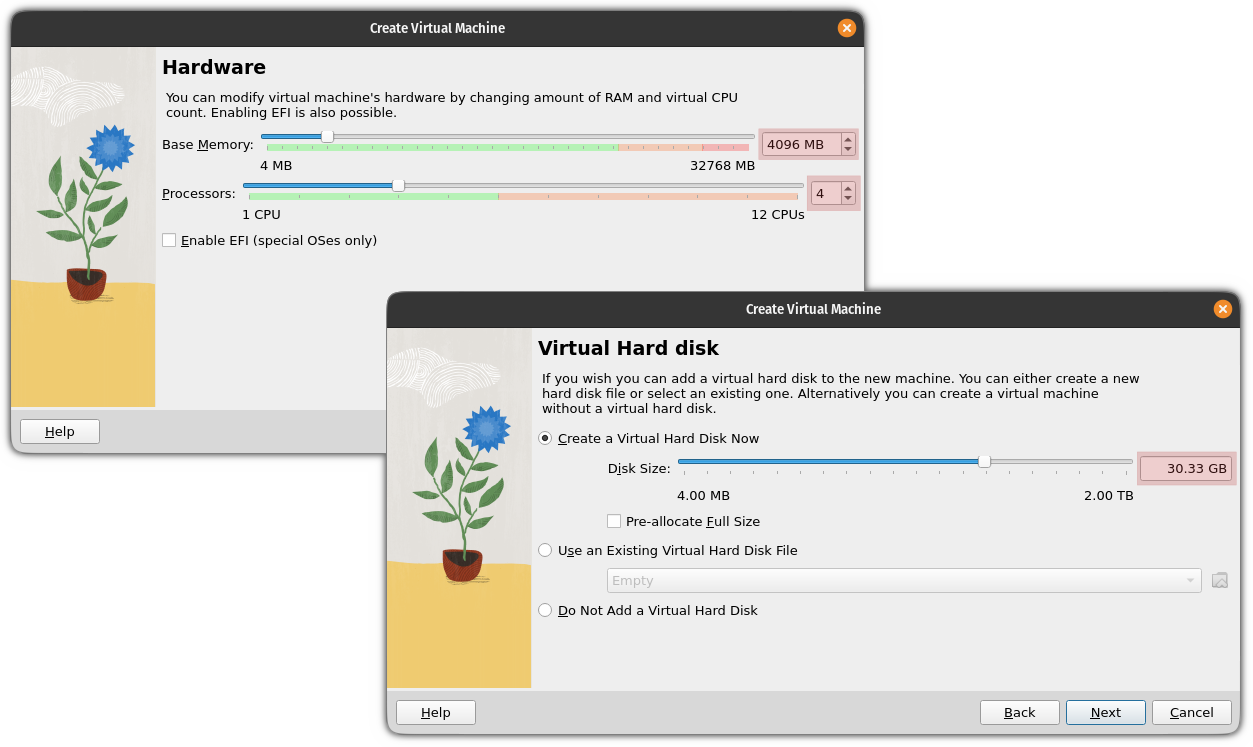
Next, you will be asked to choose the Base memory (RAM), processors you want to allocate to this VM, and storage space for this install.

While NixOS mentions no official requirements, I recommend you to have at least 4 gigs of RAM, 2-4 processor cores, and 30 GB of space for this install:

NixOS Series #2: How to Install NixOS on a Virtual Machine?

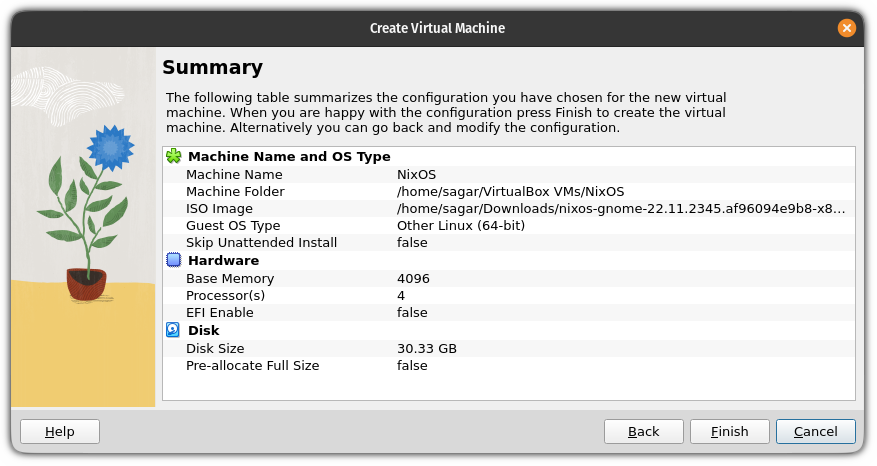
And in the end, it will show you the summary of the choices you made for this VM:

NixOS Series #2: How to Install NixOS on a Virtual Machine?

If everything seems fine, click on the Finish button and it will create a NixOS virtual machine for you.

Suggested Read ๐Ÿ“–

How to Install Linux Inside Windows Using VirtualBox
Using Linux in a virtual machine allows you to try Linux within Windows. This step-by-step guide shows you how to install Linux inside Windows using VirtualBox.
NixOS Series #2: How to Install NixOS on a Virtual Machine?

Step 3: Installing NixOS

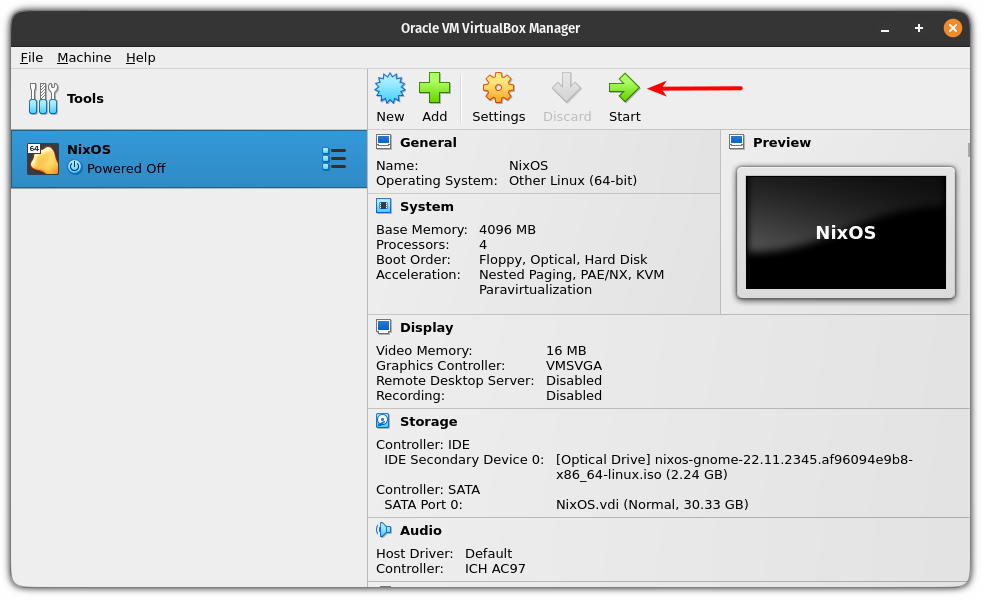
Once you are done creating the VM, the name you gave to your NixOS VM should start reflecting in the VirtualBox list of VMs.

Select the NixOS VM and click on the start button:

NixOS Series #2: How to Install NixOS on a Virtual Machine?

And it will start the NixOS live so you can try the Linux distro.

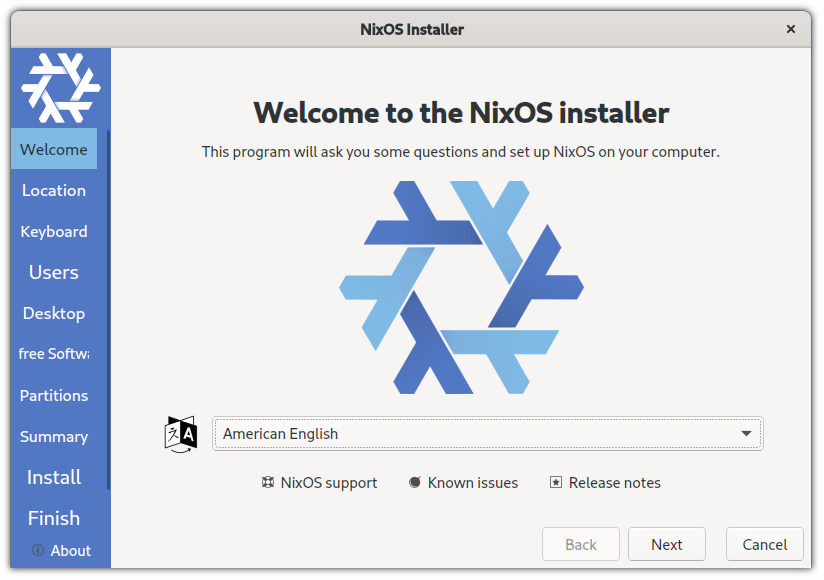
Select installer language

Once you boot into the NixOS, the installer will start and ask you to set the preferred language for the installer:

NixOS Series #2: How to Install NixOS on a Virtual Machine?

Choose region and timezone

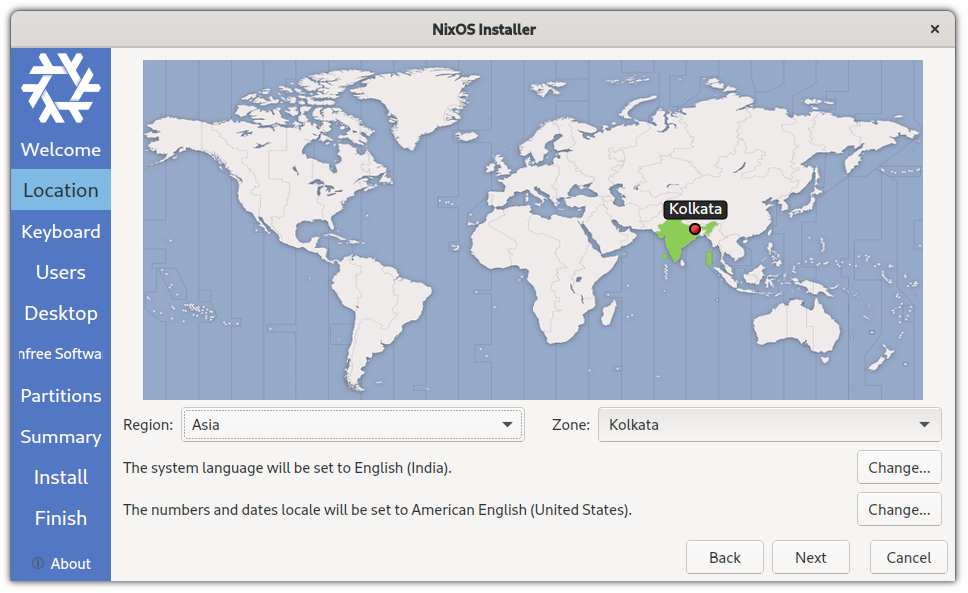
Next, choose your region and zone. If you don't know this, you can select your country from the map, which will set things for you.

Once you select the region and zone, it will also select the preferred language, numbers, and date locale.

Sure, you can change if you want to, but for most users, the selected options will work just fine:

NixOS Series #2: How to Install NixOS on a Virtual Machine?

Select Keyboard layout

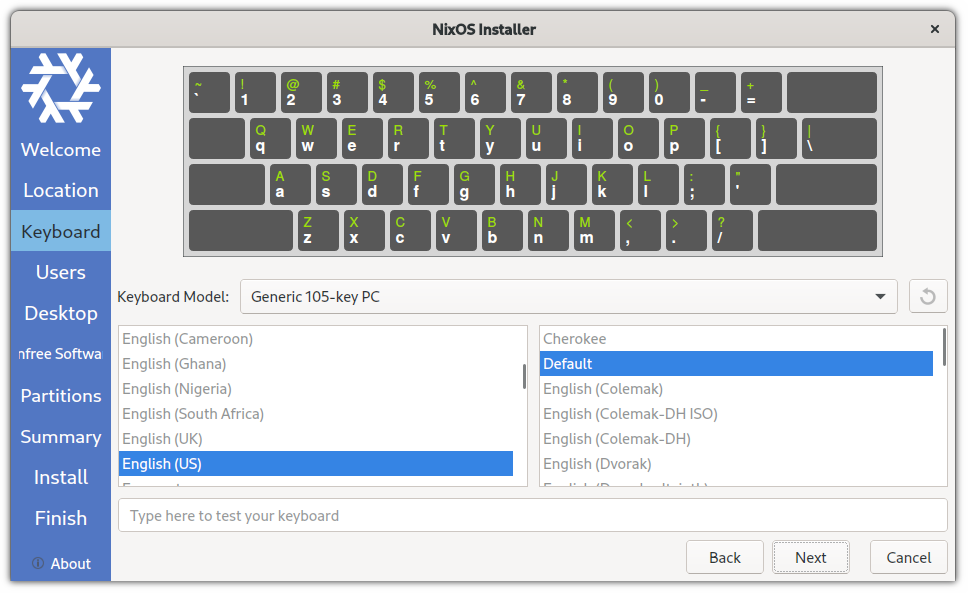
Next, you will have to set the keyboard layout. For most users, English (US) with default setting should work fine.

If you are going with something else, you can test your keyboard configuration before proceeding.

NixOS Series #2: How to Install NixOS on a Virtual Machine?

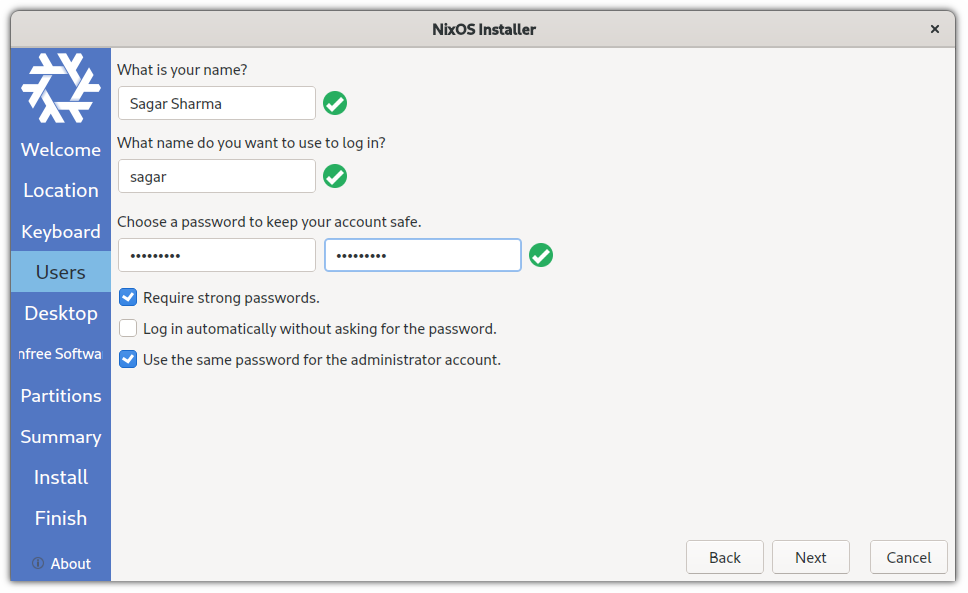
After that, you are asked to create a user and set a password for that user.

You can choose to keep a strong password or just anything random for the VM.

NixOS Series #2: How to Install NixOS on a Virtual Machine?
'

Select your favorite Desktop Environment

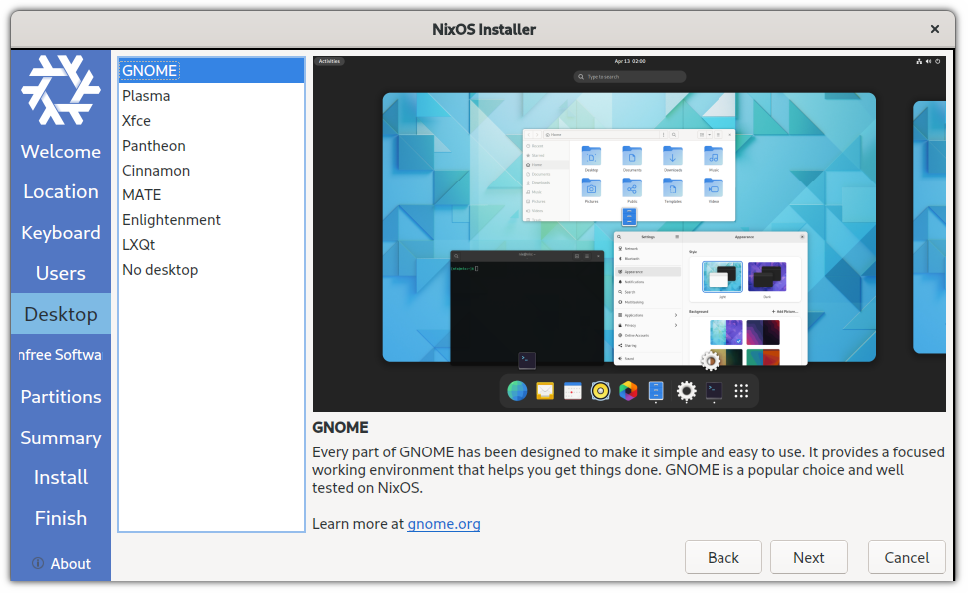
With NixOS, you are given the following choices for the desktop environment:

  • GNOME
  • KDE (best choice for customization)
  • Xfce
  • Pantheon (a desktop environment that ships with ElementaryOS)
  • Cinnamon
  • Enlightenment
  • LXQt
NixOS Series #2: How to Install NixOS on a Virtual Machine?

Suggested Read ๐Ÿ“–

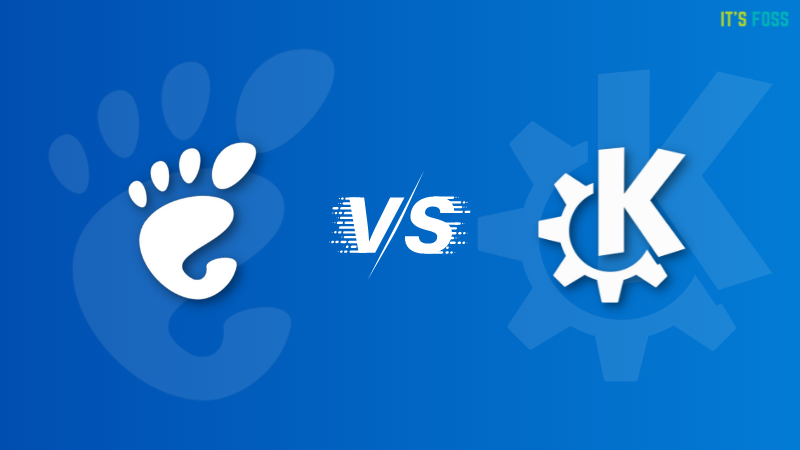
KDE vs GNOME: What’s the Ultimate Linux Desktop Choice?
Curious about the desktop environment to choose? We help you with KDE vs GNOME here.
NixOS Series #2: How to Install NixOS on a Virtual Machine?

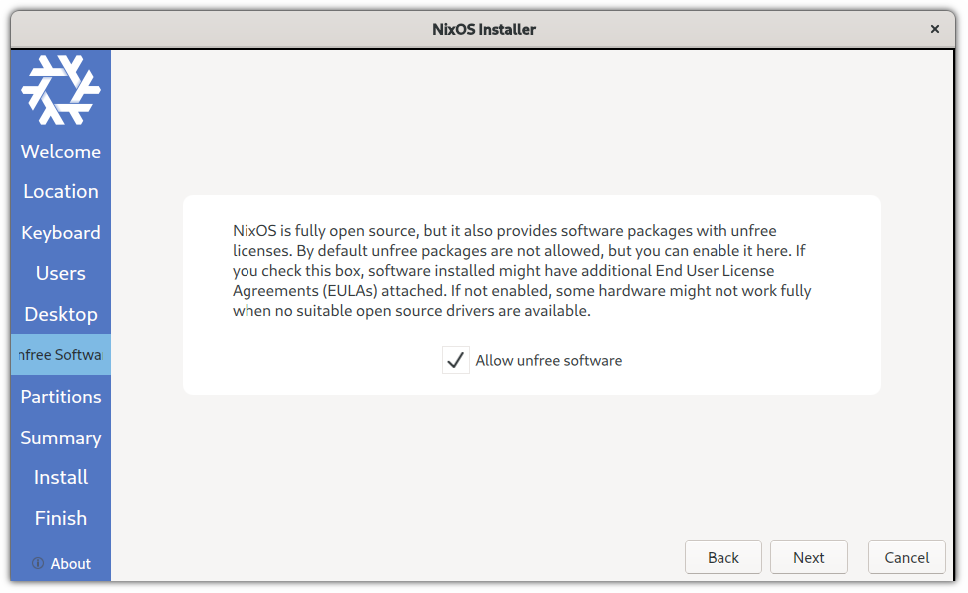
Use non-free software on NixOS

NixOS follows a similar approach to Fedora, where you have to choose whether you want the non-free software.

I would recommend you enable non-free packages:

NixOS Series #2: How to Install NixOS on a Virtual Machine?

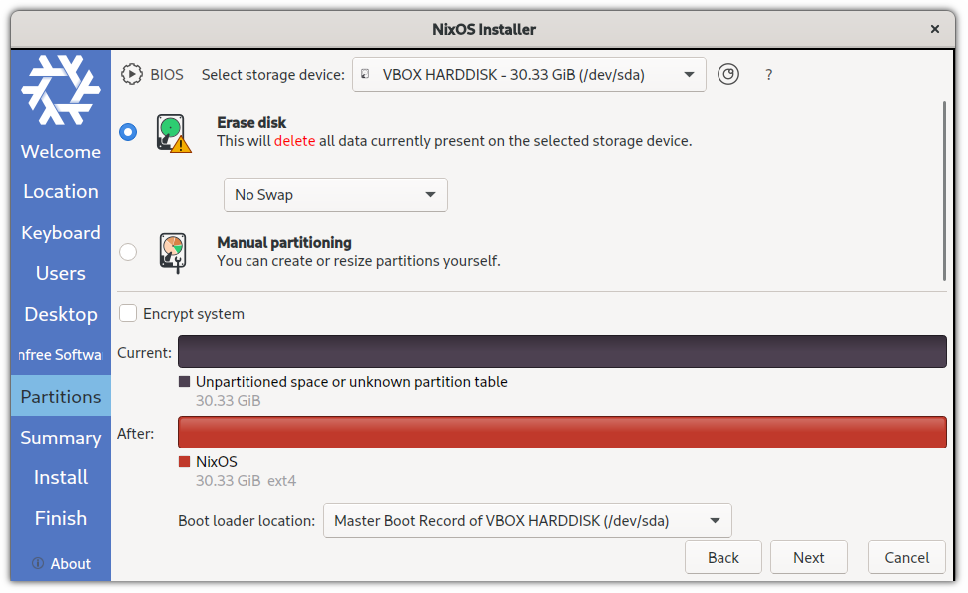
The partitions part

As this is a VM guide, I will recommend you go with the Erase disk option that should partition the disk automatically!

NixOS Series #2: How to Install NixOS on a Virtual Machine?

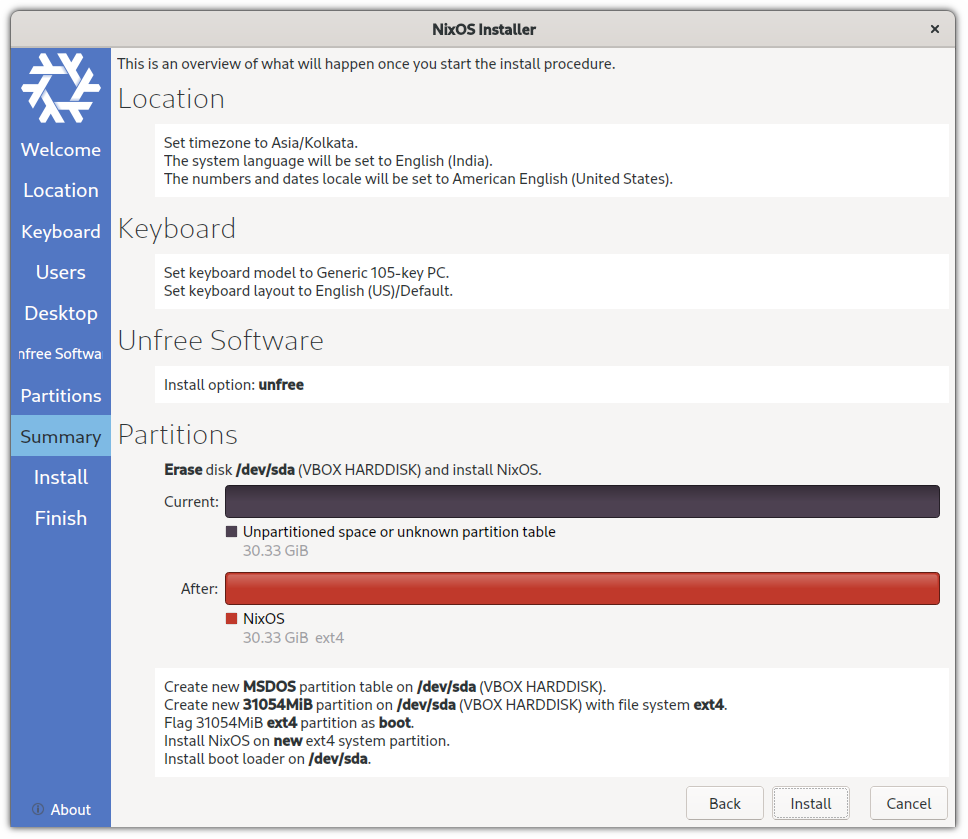
Once done, it will get you the summary of the choices you went with:

NixOS Series #2: How to Install NixOS on a Virtual Machine?

And if everything seems correct, click on the Install button, and it will start the installation button.

Don't Reboot but turn off the VM

Once the installation is finished, you will be given the option to restart the VM.

And if you do so, it will load the installer again!

To solve this issue, you must make changes in the boot sequence.

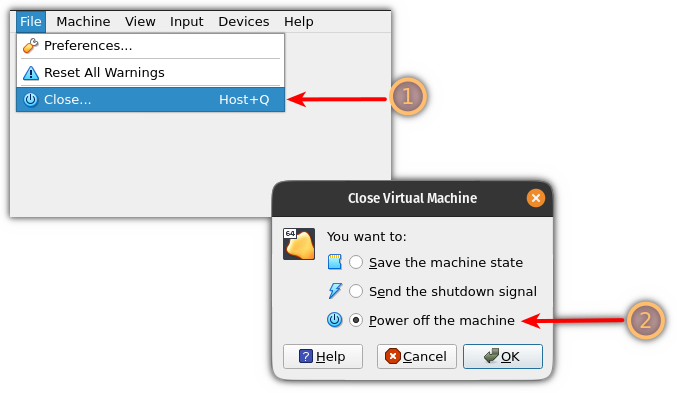
And to do that, power off your VM once the installation is complete.

To power off the VM, select the Close option from the File menu and select the Power off the machine option:

NixOS Series #2: How to Install NixOS on a Virtual Machine?

Change the boot order in VirtualBox

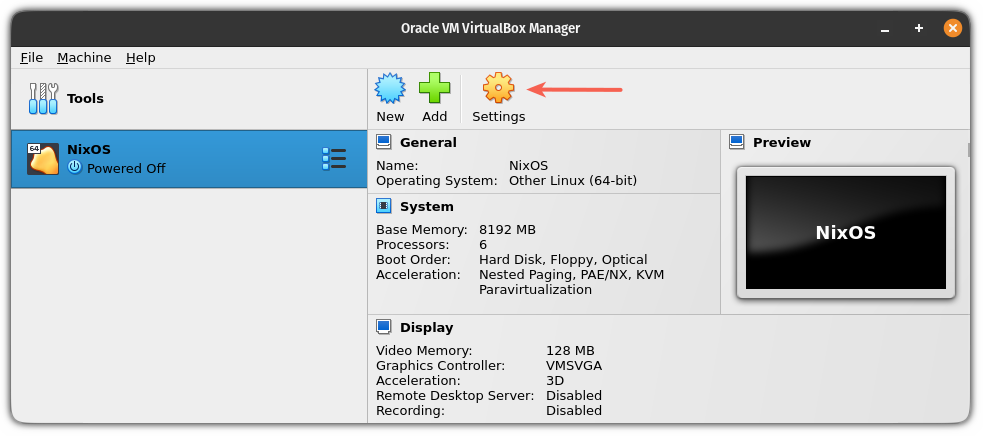
To change the boot order in the NixOS VM, open the settings for that VM:

NixOS Series #2: How to Install NixOS on a Virtual Machine?

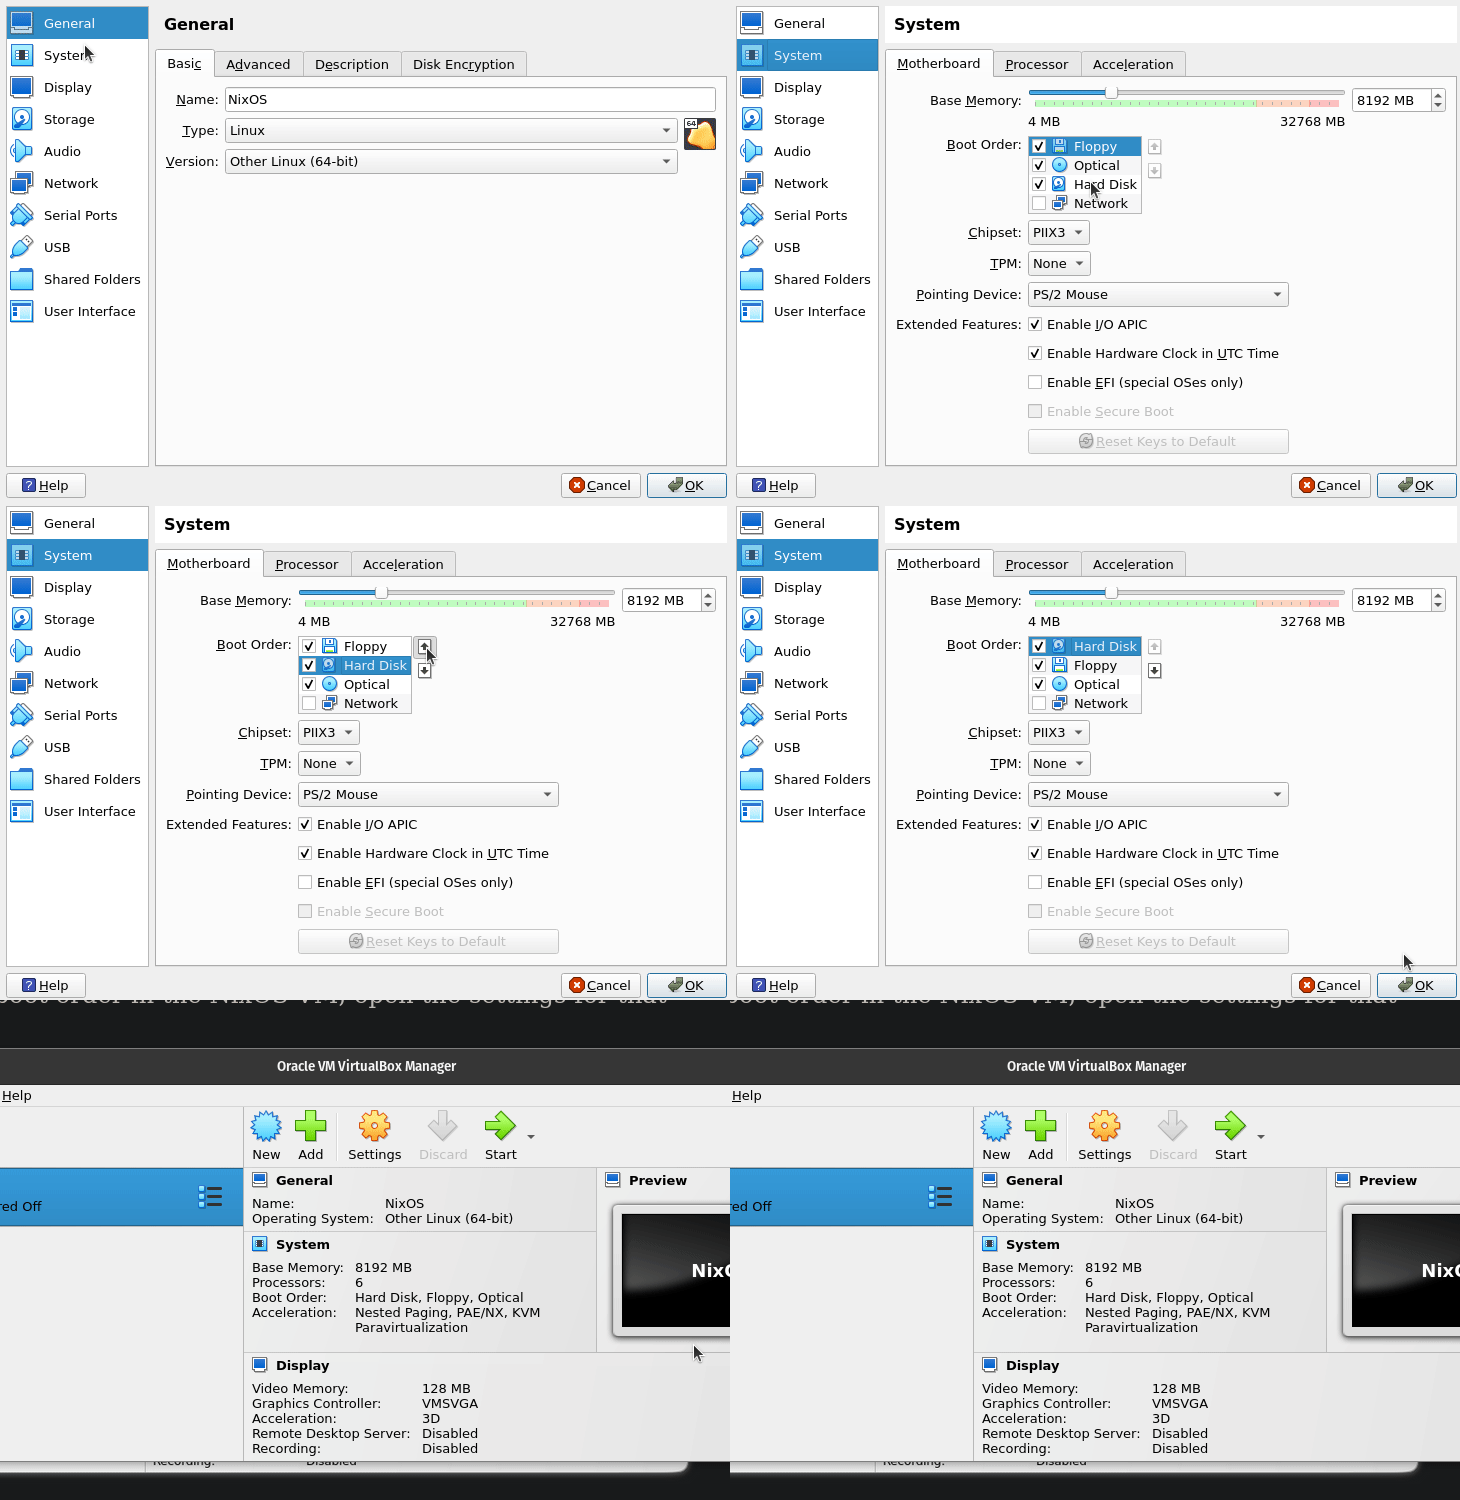
In settings, select System and you will find the boot order.

Here, select the Hard Disk and use the up arrow icon next to the options and make it the first option to boot:

NixOS Series #2: How to Install NixOS on a Virtual Machine?

Press OK and it will save the changes you made.

Alternatively, you can remove the optical disk (ISO image) that we added to start the installation.

Step 4: Boot from NixOS install

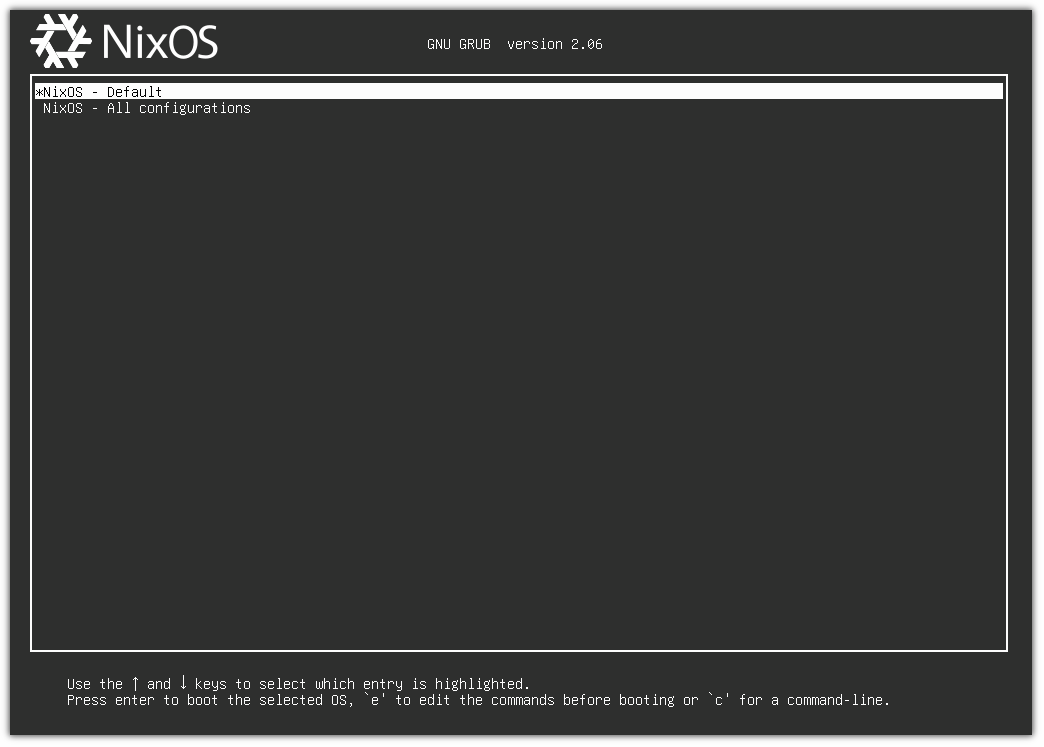
Now, start your NixOS VM, and you will see a GRUB screen:

NixOS Series #2: How to Install NixOS on a Virtual Machine?

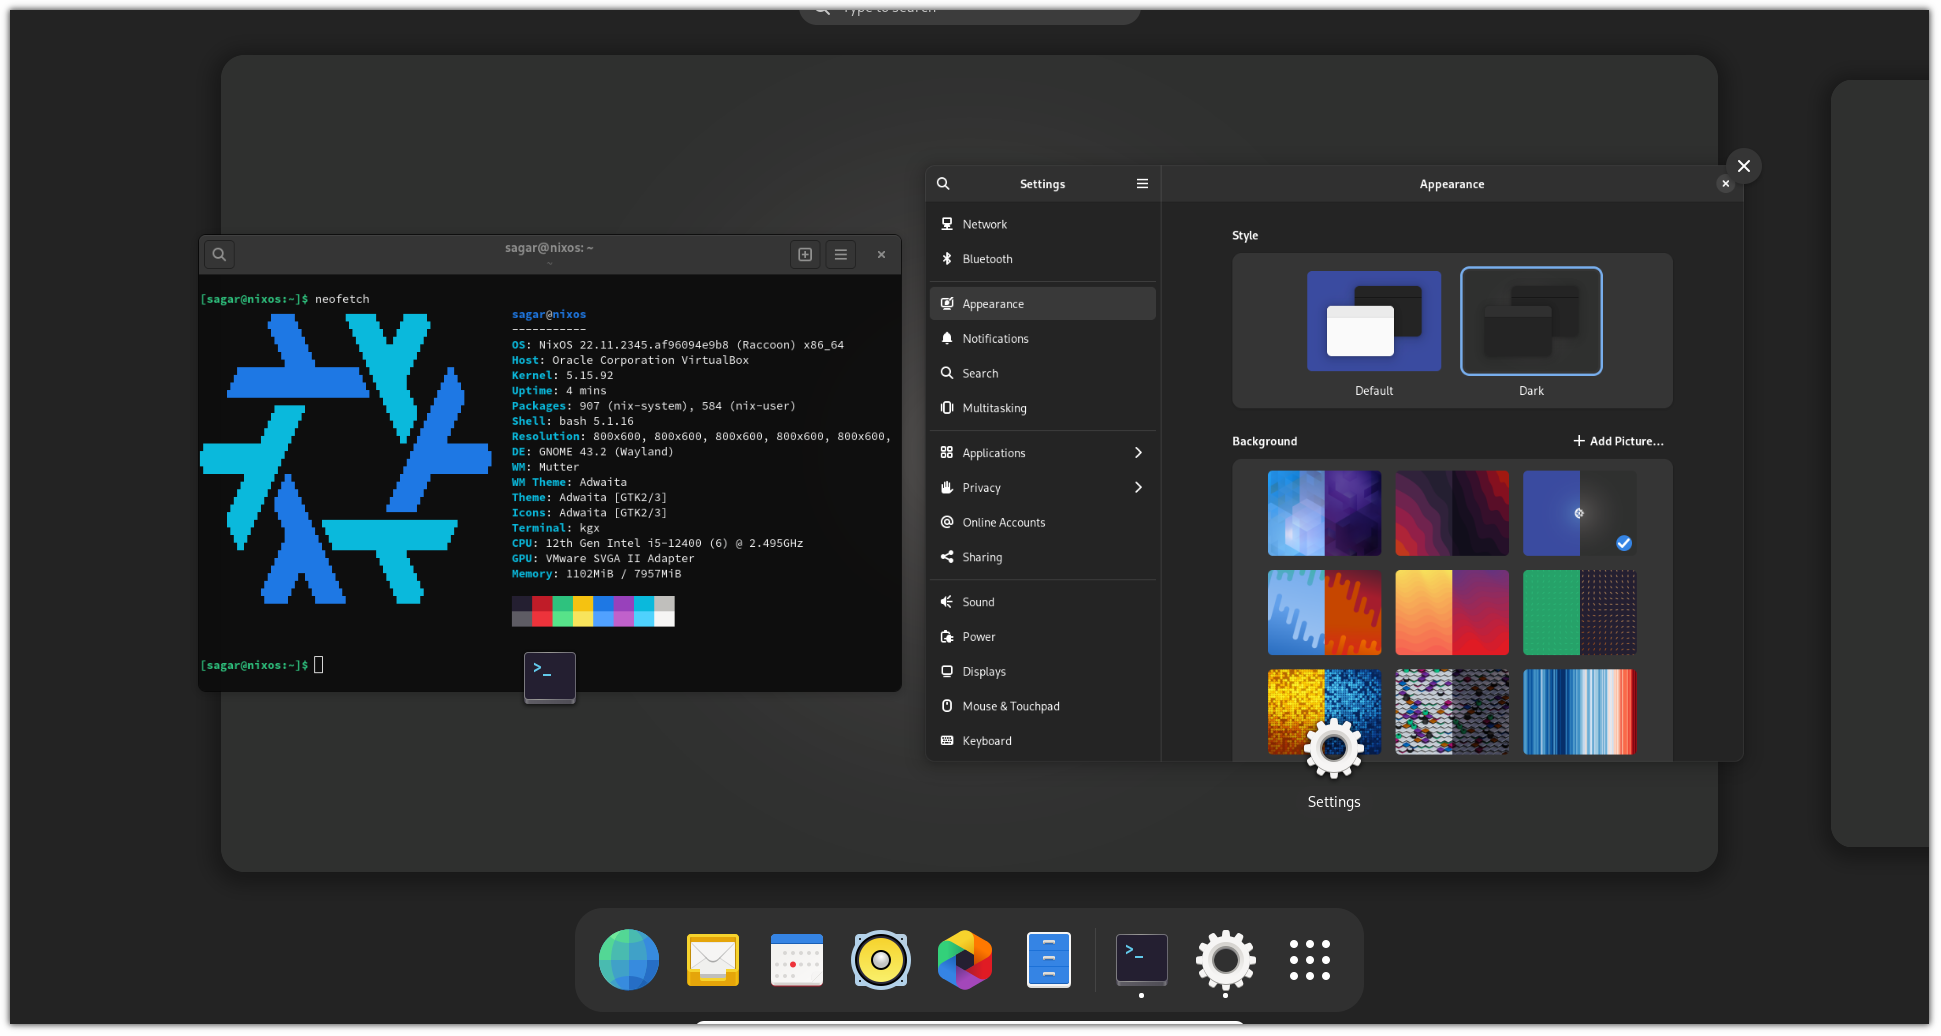
Select the default option, and it will get you into the fresh install of NixOS with the GNOME desktop.

NixOS Series #2: How to Install NixOS on a Virtual Machine?

That's it! Go on exploring NixOS!

Wrapping Up

This was a quick guide on how you can install NixOS on VirtualBox.

For the next part of the NixOS tutorial series, I shall share pointers on installing and removing packages.

๐Ÿ’ฌ Stay tuned for the next part of the series. Until then, feel free to share your thoughts on NixOS and if you face any issues following the guide!


from It's FOSS https://ift.tt/w1f9LZj
via IFTTT

Rabu, 22 Februari 2023

FOSS Weekly #23.08: Kernel 6.2 Raspberry Pi Debugger, 40 FOSS Android Apps and More

FOSS Weekly #23.08: Kernel 6.2 Raspberry Pi Debugger, 40 FOSS Android Apps and More

Linux may be tough, but you are tougher ๐Ÿ’ช

๐Ÿ’ฌ What you get in this week's issue:

  • Terminal Basics series continues with a new chapter on making directories
  • Beginning of a Nix OS starter series
  • Twitter and DreamWorks plan to open source some of their tech
  • And more Linux news, open source applications, videos and memes

๐Ÿ“ฐ Linux News Round-up

It’s Here! New Linux Kernel 6.2 Arrives With Full Intel Arc Graphics Support
Linux Kernel 6.2 release is here!
FOSS Weekly #23.08: Kernel 6.2 Raspberry Pi Debugger, 40 FOSS Android Apps and More

๐Ÿซถ Newsletter sponsor: pCloud

This edition of FOSS Weekly is supported by pCloud, a Swiss-based cloud storage service provider. They are one of the few services that provide native Linux applications. Apart from manually choosing essential files to store, you can even back up your entire desktop in the cloud. Their lifetime pricing is pocket friendly, as you don't have to pay monthly fee.

pCloud - File Security Made Simple | pCloud
pCloud is the most secure encrypted cloud storage, where you can store your personal files or backup your PC or share your business documents with your team!
FOSS Weekly #23.08: Kernel 6.2 Raspberry Pi Debugger, 40 FOSS Android Apps and More

๐Ÿง  What we’re thinking about

An interesting analogy to the recent AI sensation.

ChatGPT Is a Blurry JPEG of the Web
OpenAI’s chatbot offers paraphrases, whereas Google offers quotes. Which do we prefer?
FOSS Weekly #23.08: Kernel 6.2 Raspberry Pi Debugger, 40 FOSS Android Apps and More
๐Ÿ—“️
On 18th February 1911, Frenchman Henri Pequet made the first official air mail delivery in Allahabad, India, moving 6,500 letters to Naini, about 10 kilometers (6.2 miles for the US folks) away.

⛓️️Tutorial series

At present, there are two tutorial series being published each week.

You are already familiar with the Terminal Basics series helping new users get familiar with the Linux commands. Here's the latest chapter in the series.

Making Directories in Linux Terminal
Learn to make new folders in the Linux command line in this part of the Terminal Basics tutorial series.
FOSS Weekly #23.08: Kernel 6.2 Raspberry Pi Debugger, 40 FOSS Android Apps and More

We've started a new series focused on Nix OS. It's a lesser-known but pretty unique distro for experienced Linux users. Here's the first chapter of the six-part series.

6 Reasons Why Should You Consider Using NixOS Linux
NixOS is an exciting distribution. Let’s take a look why you might want to give it a try.
FOSS Weekly #23.08: Kernel 6.2 Raspberry Pi Debugger, 40 FOSS Android Apps and More

Stay tuned for more in these series.


๐Ÿ“ฒOpen source Android

Here are various kinds of open source apps for your Android smartphone and tablet.

40+ Best Open Source Android Apps
The best open source Android apps. Replace the proprietary options to enjoy a potentially better experience!
FOSS Weekly #23.08: Kernel 6.2 Raspberry Pi Debugger, 40 FOSS Android Apps and More

If you are experienced and experimental, you may explore these Google-less Android ROMs.

6 De-Googled Android-based Operating Systems
Concerned about your privacy or want to give another life to your smartphone? You could consider these Android distributions and custom ROMs.
FOSS Weekly #23.08: Kernel 6.2 Raspberry Pi Debugger, 40 FOSS Android Apps and More

๐Ÿ“น What we are watching

This is for fun only. Don't try this at home :)


๐Ÿ“ฑApplication highlights

Simple TUI frontend for paru or yay AUR helpers.

GitHub - Vonr/parui: Simple TUI frontend for paru or yay.
Simple TUI frontend for paru or yay. Contribute to Vonr/parui development by creating an account on GitHub.
FOSS Weekly #23.08: Kernel 6.2 Raspberry Pi Debugger, 40 FOSS Android Apps and More

A human-friendly and fast alternative to cut and (sometimes) awk.

GitHub - theryangeary/choose: A human-friendly and fast alternative to cut and (sometimes) awk
A human-friendly and fast alternative to cut and (sometimes) awk - GitHub - theryangeary/choose: A human-friendly and fast alternative to cut and (sometimes) awk
FOSS Weekly #23.08: Kernel 6.2 Raspberry Pi Debugger, 40 FOSS Android Apps and More

๐Ÿคฃ Linux Humor

That's what some hardcore Linux users do :)

FOSS Weekly #23.08: Kernel 6.2 Raspberry Pi Debugger, 40 FOSS Android Apps and More
No offense Windows

❤️ Enjoying FOSS Weekly?

Forward it to Linux-using friends and encourage them to subscribe (hint: it's here).

Become a Pro member and show your support ๐Ÿ™

Join our Telegram channel.

Something else? Share it with me by pressing the reply button.

Enjoy :)


from It's FOSS https://ift.tt/0jHQuem
via IFTTT