If a user is visually impaired or blind, they may rely on sound prompts or other interactions (like Braille) to read and communicate.
How can they use a Linux distribution?
Well, in general, accessibility software help make it possible.
Butwhat are the Linux distributions that focus on accessibility? What are the best distros tailored for visually impaired users?
I focus on listing some of the best options here. Before that, there are some essential pointers to note before you try/recommend Linux for visually challenged users.
Is Linux Ideal for Visually Challenged Users?
Unfortunately, not entirely.
Compared to Windows and macOS, the accessibility software/options available are limited on Linux.
I came across a year-old Reddit thread where a blind user shares his experience on the state of accessibility on Linux, and it may not sound good.
It is still usable depending on what you want to do and which distro you choose.
Some of the points worth noting include:
Not every desktop environment offers good accessibility options. You can explore and experiment, but GNOME and KDE are acceptable options.
The documentation for accessibility in Linux distributions may not be comprehensive. So, you might want to explore and research before getting started. Here are the links to GNOME and KDE documentation.
You can always install popular Linux distributions like Ubuntu and set it up with screen reader tools to get started.
However, some distributions might give you a good experience out of the box and may be worth trying.
Here are your best picks:
📋
The list is in no particular order of ranking.
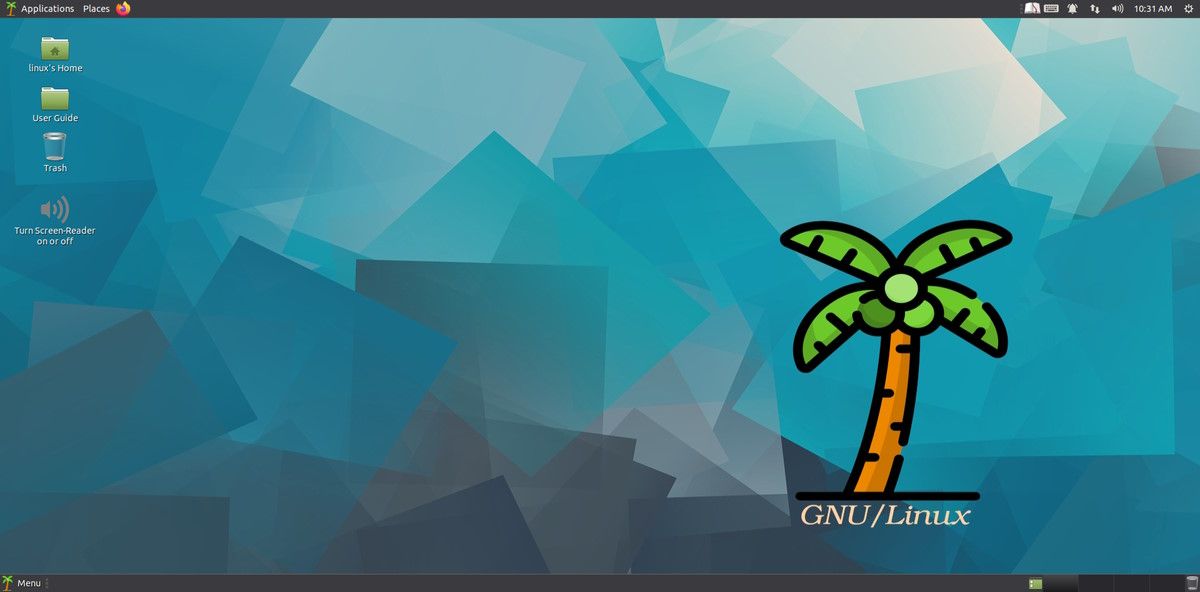
1. Accessible-Coconut (AC)
Accessible-Coconut is a community-driven Linux operating system based on Ubuntu MATE.
Out of the box, you will find all the essential tools or software needed to make the Linux experience accessible for people with visual impairment.
Some of those include a screen reader that supports speech synthesis and Braille, screen magnification, a screen reader for the console, an ebook speaker, a daisy player, and more.
The software that comes baked in is known for better accessibility. So, you may not need to search for alternatives after installing the operating system.
Vojtux is an unofficial Fedora-based distribution created by a blind software engineer.
It is an exciting option for most users because the creator knows what visually impaired users need. By default, you will have the Orca screen reader starting at login, with Qt accessibility enabled, a custom repository for extra voice synthesis and other software.
Also, interestingly, you will find a script that can turn your monitor on and off quickly.
However, you must build the live media ISO before installing it. So, if you do not have technical knowledge for that, you may ask around your friends who would be willing to set it up for you.
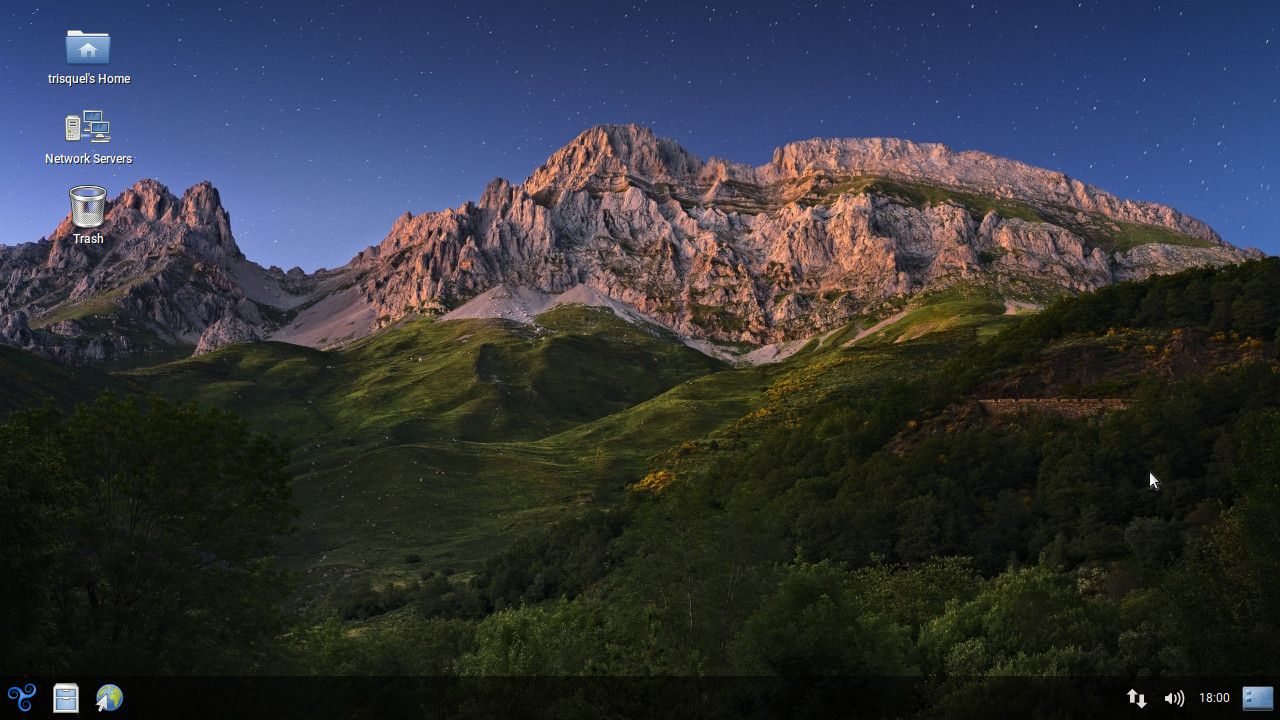
Trisquel is a Ubuntu-based Linux distribution with a Linux-libre kernel. It is tailored for home, office, and education institutions.
Unlike some other options, Trisquel focuses on accessibility features by default, like having the Orca screen reader enabled. You can find audio guides on their website and screen-reader-friendly manuals.
Head to its official website to explore more about it and download the ISO.
Fedora Workstation is the best bet for users who want to experience the best of the GNOME desktop environment.
You will find the latest GNOME desktop installed. So, it is likely that you will end up having an accessible experience on Fedora.
Not to forget, the community of Fedora users is known to be passionate about keeping accessibility at the forefront and fixing any issues reported as soon as possible.
Flatpak and Snap packages are more popular than ever among Linux users who no longer prefer native binary packages or AppImages.
Primarily because of its ease of use, integration with the software center, and the ability to get the latest app updates hassle-free.
You no longer need to worry about the dependencies when installing an app.
For some, the security advantages of sandboxing/isolation are a factor too. But we will not discuss the specifics for that here.
No matter the benefits of Flatpak and Snap, what are their differences? What should you consider using? In this article, we explore how they're distinct to help you decide what you want to use.
1. Origin
Snap was developed by Canonical to build applications for IoT platforms. The aim behind Snap has always been to encourage app updates, and make things easier for developers to maintain them when compared to deb packages.
Eventually, it made its way for applications meant for desktops (with GUI as well).
If you wanna explore more Snap's history, I recommend you to read the blog post by Alan Pope.
Flatpak was created by Alexander Larsson, Principal Software Engineer at Red Hat. It is an independent open-source project where many notable developers from GNOME, Fedora, and Red Hat are involved.
The aim behind it was to have a robust framework to distribute Linux desktop applications across various distributions.
Originally, it was known as xdg-app, and later renamed to "Flatpak" in 2016.
Every package format has its advantages. Some might say, "why do we need this"?
We need every package format available. So, you can choose to use whatever you need per your requirements. Hence, it is essential to learn where and why Flatpak and Snap packages can be helpful.
Flatpak is only tailored for Linux workstations and personal computers to run desktop applications. You can explore more about it in our resource on what Flatpak is.
However, Snaps work on your desktop and can also be used for server-focused terminal applications.
For instance, Ubuntu Core, the operating system for IoT, and Edge are built from snaps to keep things secure and ensure reliable updates.
As far as I know, Flatpak has not been used for anything similar because of its different approach and targeted use case.
3. Startup Time
Snap applications have been known to have a slow startup compared to Flatpak.
Canonical has been working on this for a while, but it was still a problem when publishing the article.
Of course, practically, not every user may notice or care about the difference. But, the overall consensus regarding the app startup time remains better for Flatpak compared to Snap.
For instance, I find launching the Spotify app as a Flatpak faster than its Snap. It can be subjective. So, take it with a pinch of salt.
4. Performance
The performance of an app not only refers to its responsiveness but its stability and feature offerings.
Some applications perform better as Snap, and some as Flatpak.
For instance, the Flatpak version of GNOME Boxes does not support device sharing compared to its Snap package. One can use this example to say that Snaps are better.
However, I always prefer to install Spotify as a Flatpak instead of Snap.
So, you need to test your favorite applications to realize what is better for you; no one gets a clear edge here.
5. Availability and Popularity
While you can install either of them on any Linux distribution, Flatpak gets an edge for its availability and out-of-the-box support on more distributions when compared to Snap.
For instance, Linux Mint comes with snap disabled but features Flatpak support built-in.
Distributions like Pop!_OS and Ubuntu MATE also offer Flatpak support by default. In other words, you will find plenty of different Linux distributions (other than Ubuntu flavours) that have Flatpak baked in by default.
However, Snaps are preferred mainly by Canonical's Ubuntu and its official flavors. If you are not using Ubuntu or its flavors, refer to our Snap guide to get it setup.
So, one can say that Flatpak's adoption for Linux desktops is much wider (if not necessarily with a more extensive user base).
💡
One may mention that the number of applications available as Snap is more. While that was a solid difference a couple of years back, Flatpak's recommended store Flathub now features most of the essential apps, which may not make it a deal breaker.
6. Open Source vs. Closed Source
Flatpak is entirely open source.
Unfortunately, when it comes to Snap packages, the answer is not as simple.
Snap is an open-source project at its core, including snapd, the background service that manages/installs snap apps.
However, the back-end of the snaps is proprietary and controlled by Canonical without any community involvement.
As an end-user, you should not have a problem with the closed-source parts of Snap as long as the app gets the job done.
Of course, Flatpak will be your choice if you prefer completely open-source technologies.
Flatpak is open-source and embraces a decentralized approach.
Even though we have a famous "Flathub" portal where most users get their apps from, Flatpak allows having multiple stores when/if needed.
With Snap, you are limited to Canonical's Snap store.
Some users prefer a centralized application store for convenience. So, you should not have any issues with either of them. However, Flatpak gives you an edge to add an extra repository if needed.
8. Updates
Snap applications get updated automatically by default. The user can modify when and how often the updates happen. Also, you can hold and postpone updates for selected snaps.
On the contrary, Flatpak packages do not get updated automatically. If you have Flatpak integration with the software center, you will be notified of available updates, but it will not be forcefully updated.
With Flatpak, you get more control by default. But, some users forget to update the packages missing out on new features or security/bug fixes.
So, whether you want automatic updates to the applications you use or want the control to update them manually, that will influence what you like better.
9. Working
Flatpak does not need admin privileges to install applications but Snap does.
Flatpak comes with sandboxing enabled by default. It uses Linux Kernel's namespaces feature for sandboxing whereas Snap utilizes AppArmour.
You can explore both the developer documentations to learn more. But, these two key points might influence picking one of them for your use-case.
10. Maintainer's Perspective
When going through forums and Reddit threads before writing this article, I found some interesting insights from app maintainers. Some of those include:
Snaps are easier to maintain/build compared to Flatpak packages.
Snap security is a tad bit advanced.
With Flathub as Flatpak's store, maintainers get help from various developers to test and improve the Flatpaks.
Of course, for further technical information and differences, the documentations will be a great place to start.
💬Which one do you prefer? Flatpak or Snap? And, why? Share your thoughts in the comments section below.
Rust programming language is constantly getting more famous for its performance-oriented and memory-safe approach.
You can find plenty of software rewritten in Rust just to make things faster and more robust. As an example relevant to Linux users, System76 chose to build its desktop environment from scratch powered by Rust. So, it is undoubtedly loved by many.
Let me highlight some of the best Rust-powered Linux terminal tools to save you some trouble.
📋
The list is in no particular order of ranking.
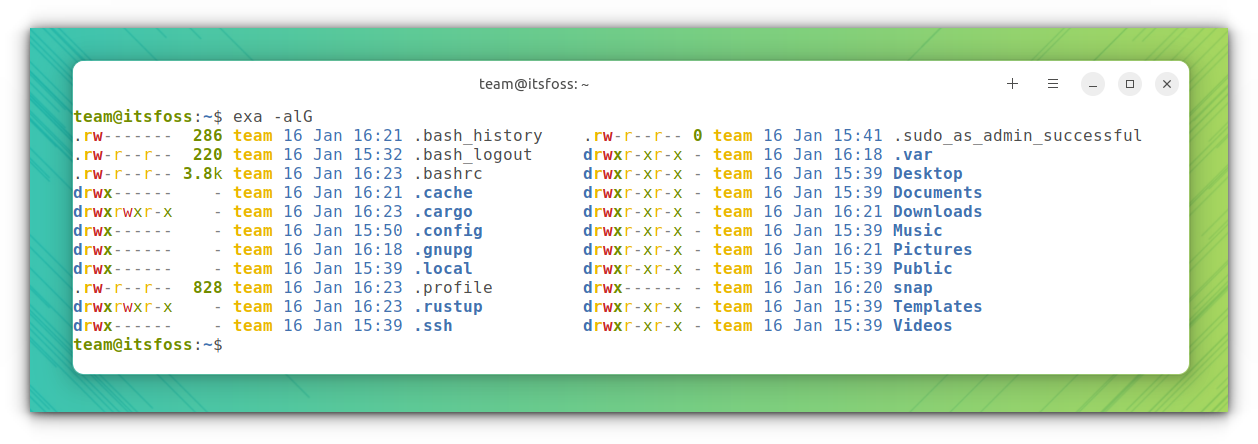
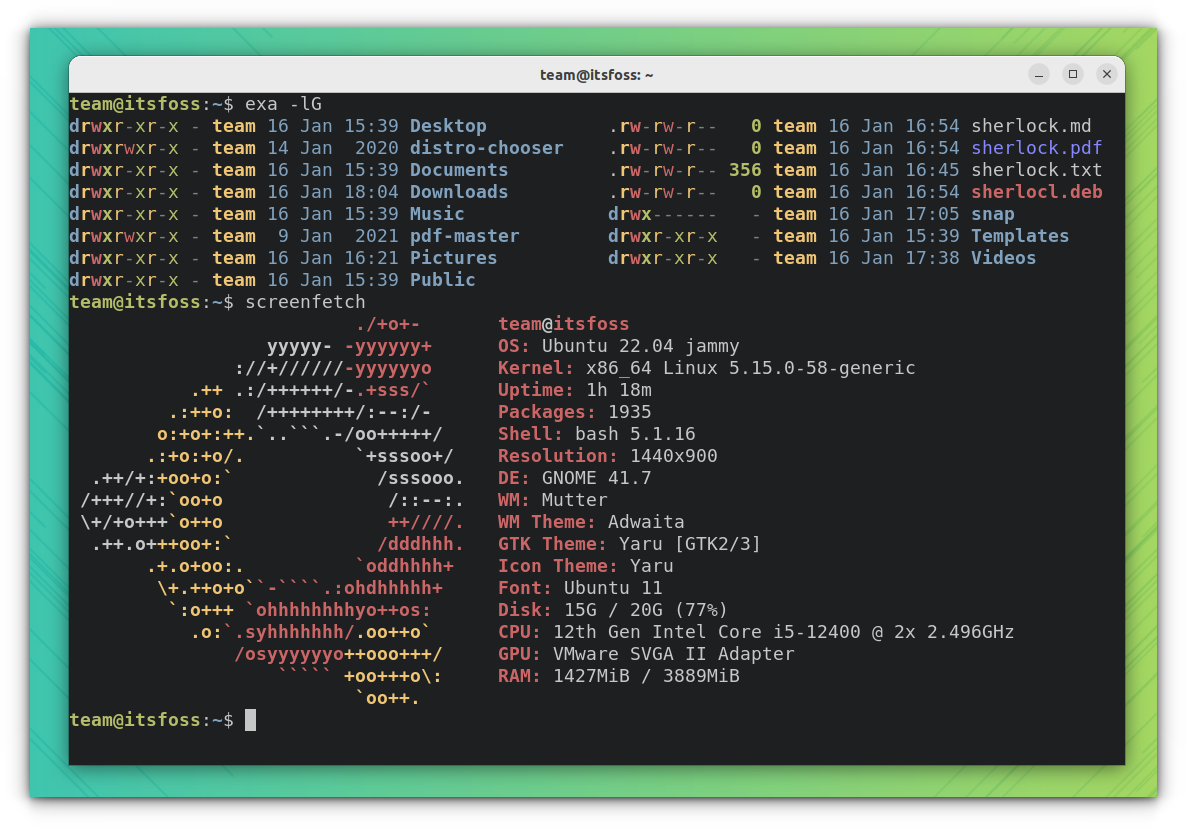
1. Exa
One of the first tools, that comes to my mind, when thinking about rust apps is exa, a great alternative to the most common ls command.
It offers features like colored output, icon support, etc that make it visually pleasing to use.
Exa: An alternative to ls command
Features of Exa
It uses colors to distinguish file types and metadata.
It knows about symlinks, extended attributes, and Git.
Exa queries files in parallel, giving you performance on par with ls
Built-in tree tool
Column view support
Install Exa
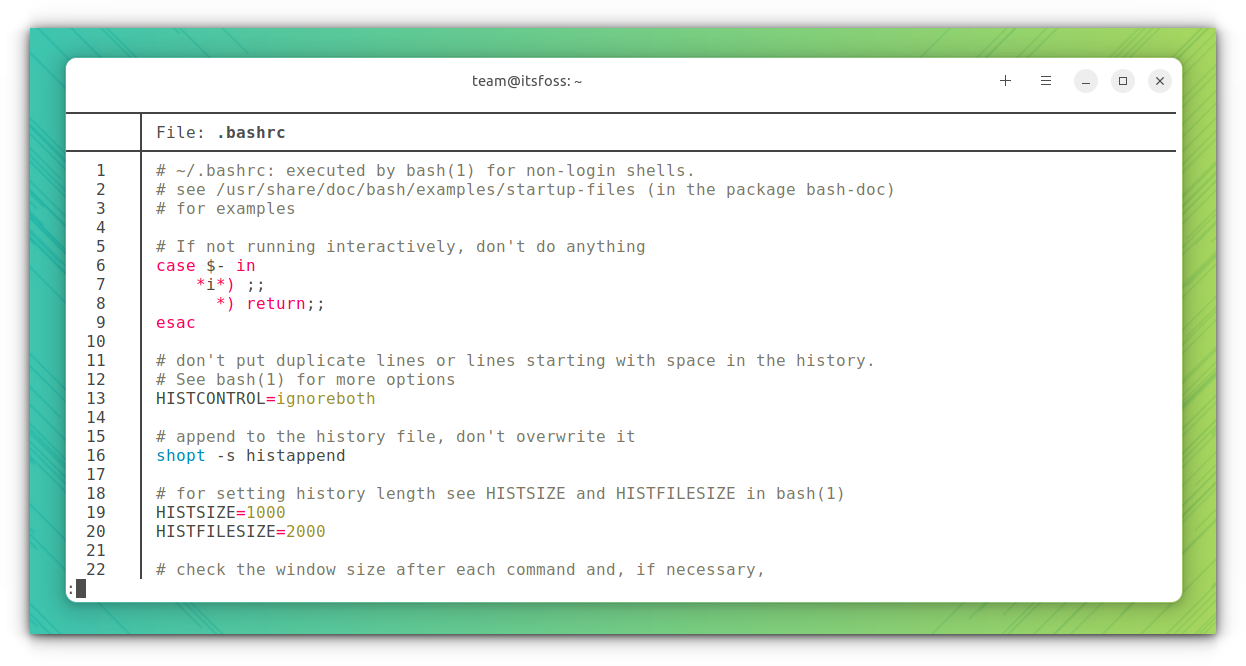
Exa is available in almost all the repositories of major distributions. In Ubuntu, you can install exa by the following command:
sudo apt install exa
Once installed, you can use exa in the terminal to use it. If you want it instead of ls all the time, create an alias for ls with exa.
There are many shells out there like bash, zsh, etc. You probably know the popular ones, and if you are curious, we have a list of lesser-known shells.
But all of those provide a shell prompt, which looks almost the same.
Starship prompt allows you to change the look of your shell prompt the way you want with a vast amount of configuration options. Starship prompt is simply an excellent customization tool.
Starship Prompt
Features of Starship Prompt
Minimal and fast
Works with almost all major shells
Intelligent: shows relevant information at a glance.
Feature-rich: support for all your favorite tools.
Customizable: configure every aspect of your prompt.
Install Starship Prompt
Starship prompt is not available in official repositories. In Ubuntu and other distributions, to install the latest version of Starship, first, ensure you have curl installed:
sudo apt install curl
Then, use this command to install the starship prompt:
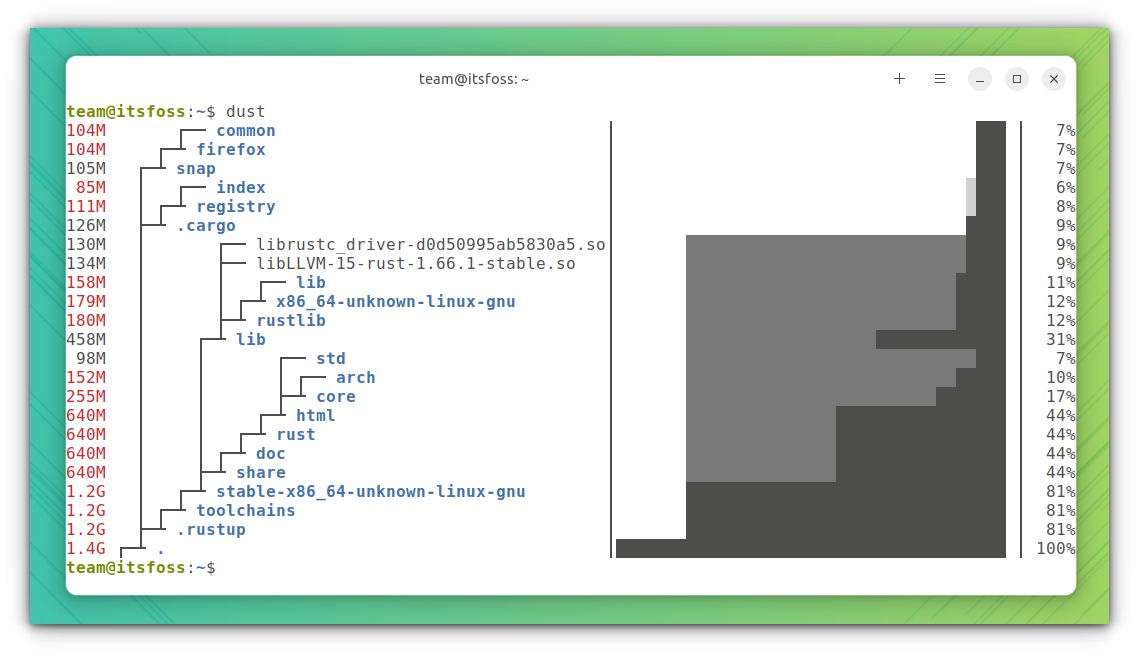
Dust is a more intuitive Rust version of the du command. It gives you an instant overview of which directories are using the disk space without requiring to sort.
Dust: A du command alternative
Features of Dust
The largest subdirectories will be colored.
Small, simple, and easy-to-understand
Returns a graphical overview of contents that shows its contents and what percentage each item holds.
Install Dust
Dust is available in the Arch Linux community repository, and you can install it directly from Arch-based distributions using Pacman commands.
On Ubuntu, you can install Dust using cargo. For that, you need to set up cargo in Ubuntu. Once set, install the tool using the following command:
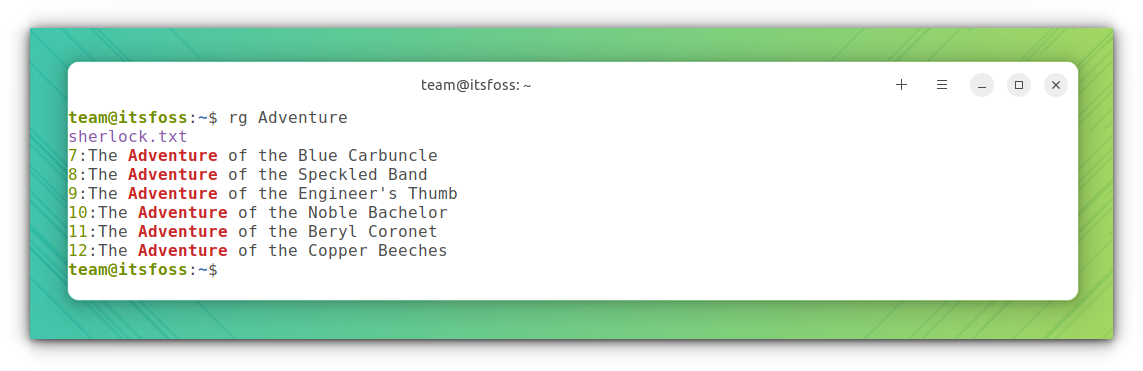
If you use the Linux terminal frequently, you may have used the grep command. It is such an important command with varied use cases.
ripgrep is the rust implementation of grep with more valuable features and tweaks. ripgrep is a line-oriented search tool that recursively searches the current directory for a regex pattern.
ripgrep: A modern grep command alternative
Features of ripgrep
ripgrep defaults to recursive search and does automatic filtering.
ripgrep can search specific types of files, like python files (rg -tpy foo). Also, it can be taught about new file types with custom matching rules.
Supports many features found in grep. It stays fast while supporting Unicode.
ripgrep has optional support for switching its regex engine to use PCRE2. This makes it possible to use look-around and backreferences in your patterns, which are not supported in ripgrep's default regex engine.
Install ripgrep
For Ubuntu 18.10+ users, ripgrep can be installed by using the following command:
sudo apt install ripgrep
Once installed, you can use ripgrep by using the name of the binary, that is, rg.
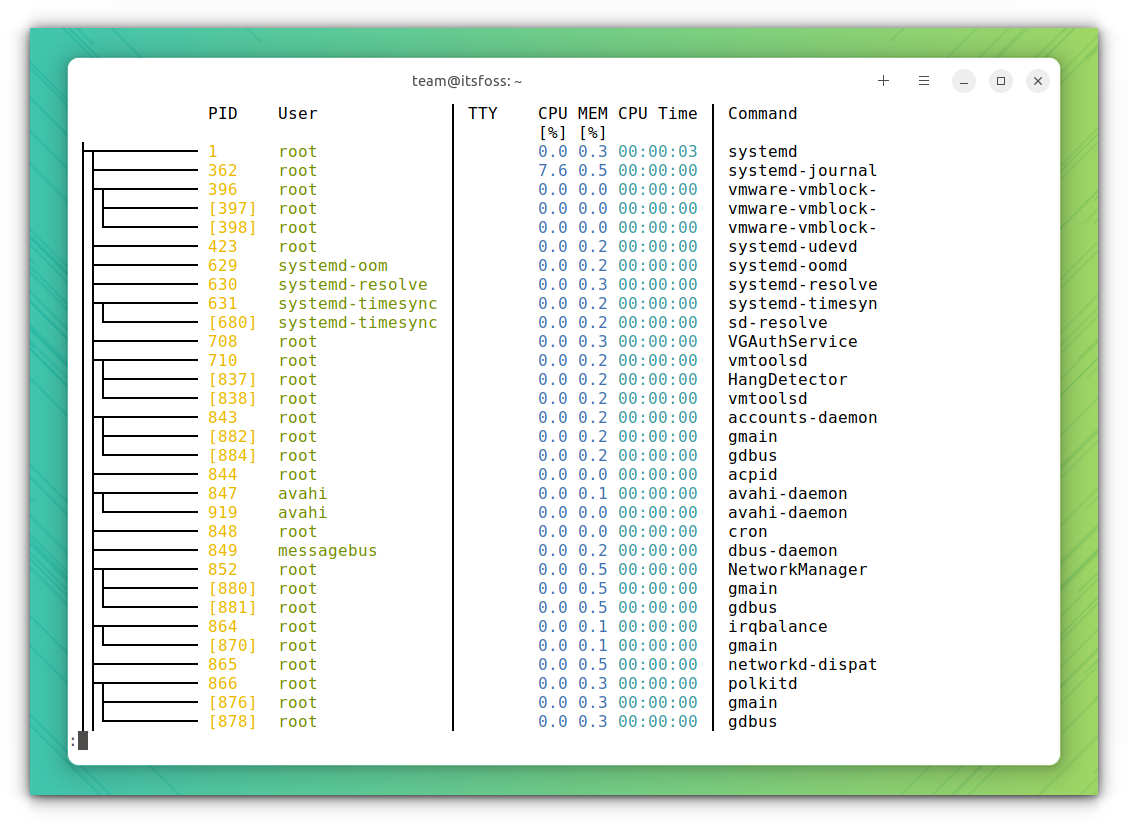
Procs is a modern replacement for the ps command, written in Rust.
It provides a colored, human-readable output with automatic theme detection based on the terminal background. It is also available for all major platforms, Linux, Mac, and Windows.
Procs Command
Features of Procs
Multi-column keyword search
Pager support
Watch mode (like top) and Tree view
Some additional information which are not supported by ps: TCP/UDP port, Read/Write throughput, Docker container name, and More memory information.
Install Procs
Procs is available as a snap. So if you are using Ubuntu, or you have snap app support enabled, run the following command to install procs:
sudo snap install procs
It is also available in the Arch Linux community repository and Fedora official repositories.
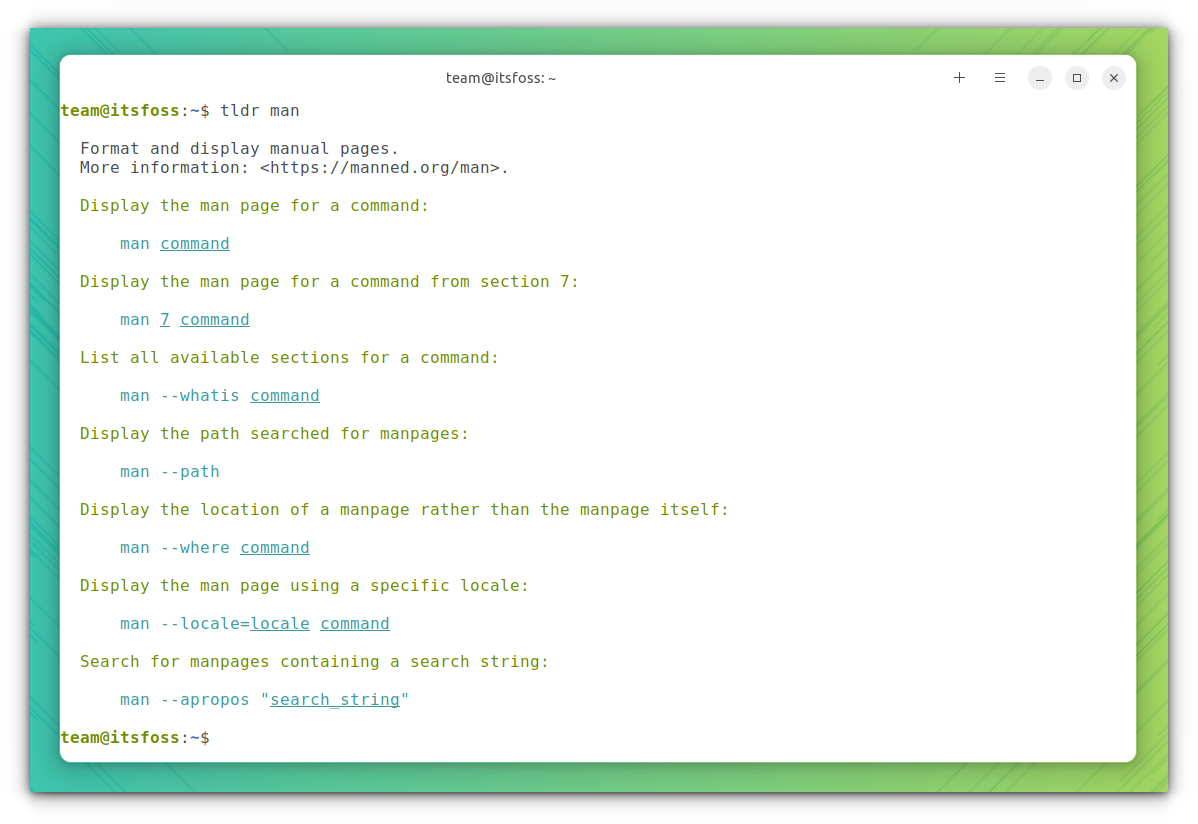
tldr is a simplified, community-driven collection of manpages, while Tealdeer is a speedy rust implementation of tldr.
Man pages are a treasure for those starting new in the Linux command line. But the traditional man page provides a huge amount of information, which may overwhelm many.
The simplified tldr is a great relief because Tealdeer adds fast retrieval of the data in a neat format.
Tealdeer
Features of Tealdeer
Downloads and cache pages, so you need internet only when updating the cache.
Advanced highlighting and configuration.
Output color support.
Comply with the tldr client specification
Install TealDeer
Tealdeer is available in Arch Linux and Fedora repositories. Users of these systems can install it from there. If you are using Ubuntu, install tealdeer with cargo:
cargo install tealdeer
Once installation is finished, run the following command to update the cache:
tldr --update
Another exciting thing is that a static binary available to download, which doesn't require any installation. You can check it on their GitHub releases page.
Bottom is a customizable cross-platform graphical process/system monitor inspired by tools like htop, gtop, etc.
One of the main highlights of this system monitor tool is the availability of graphical visualization widgets for CPU usage, RAM usage, etc.
Bottom: A System Monitor
Features of Bottom
Widgets for displaying info about battery usage, disk capacity, temperature sensors, etc.
A process widget for displaying, sorting, and searching info about processes, as well as support for kill signals and tree mode.
Customizable behavior that can be controlled with command-line flags or a config file.
An htop-inspired basic mode and expansion, which focuses on just one widget.
Install Bottom
Bottom is available in the Arch Linux Community repository and also available as a snap. If you use Ubuntu/Debian, there is a deb package for stable and nightly builds on its GitHub releases page.
You can also use the following commands to install it via the terminal:
You should be aware of the cd command used to move into various directories. While cd is plenty good, Zoxide is kind of a smarter cd. Zoxide can remember the directories you use most frequently, so you can "jump" to them in just a few keystrokes.
This helps to boost your productivity, and more importantly, it is available for all significant shells out there.
Zoxide: A modern cd command alternative
Features of Zoxide
Runs on most major platforms, Linux, mac, Windows, BSD and Android.
Third-party integrations for Vim, Emacs, Ranger file manager, ZSH-Autocomplete, etc.
Optional interactive selection using fzf command-line fuzzy finder
Works on all major shells.
Install Zoxide
For Ubuntu 21.04 and above, Zoxide is available on official repositories. Just run:
sudo apt install zoxide
Or if you want to install the latest version, use:
Broot is another rust tool, through which you can navigate directories.
You can get an overview of big directories, making it easier for you to explore. And, when searching for a file, it tries to select the most relevant file.
Broot: Navigate directories
Features of Broot
Get overview of big directories
You may also search with a regular expression
Manipulate your files: Move, copy, rm, mkdir, are built in and you can add your shortcuts.
Skim is a command-line fuzzy finder. It can be used as a general filter (like grep) or as an interactive interface for invoking commands.
You can explore its GitHub page for usage instructions.
Skim: Command-Line Fuzzy Finder
Features of Skim
It can invoke other commands dynamically.
It provides a regex mode, which you can switch dynamically by pressing Ctrl-R (Rotate Mode).
Supports customization of the color scheme.
Supports pre-selection
Install Skim
Skim is available in Fedora and Arch Linux repositories, from where you can install using dnf and pacman respectively. For other users, it can be installed using cargo or homebrew.
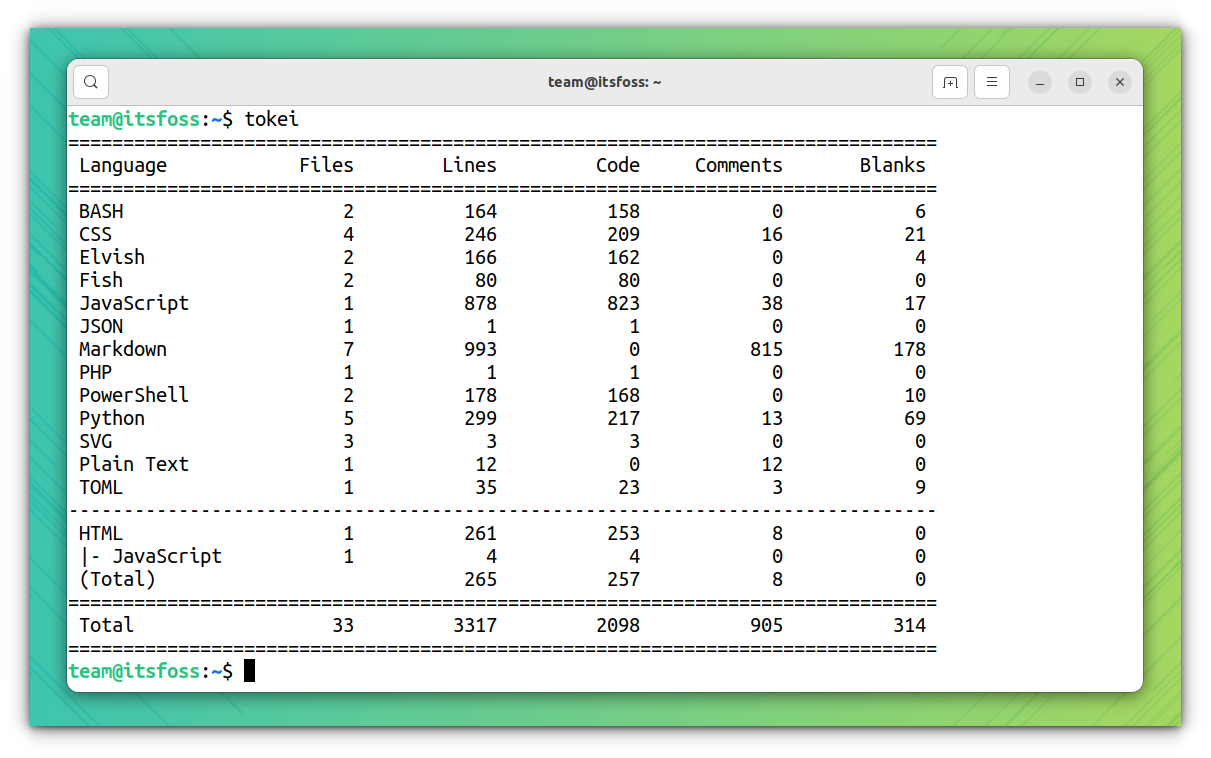
Tokei is a program that displays statistics about your code, like the number of files, total lines within those files and code, comments, etc. It is available for macOS, Linux, and Windows.
Tokei: Displays statistics about your code
Features of Tokei
Tokei is very fast and can count millions of lines of code in seconds.
Correctly handles multi-line and nested comments, and not counting comments in strings. Providing accurate code statistics.
Supports over 150 languages and their various extensions.
Tokei is also a library allowing you to easily integrate it with other projects.
Install Tokei
Many distributions like Arch Linux, Fedora, and OpenSUSE have Tokei in their repositories. In Ubuntu, you can install Tokei using Cargo.
Alacritty is a modern terminal emulator supported on all major platforms. It comes with extensive configuration capabilities and known for its fast performance.
Alacritty: A Modern Terminal Emulator
Features of Alacritty
The vi mode allows moving around Alacritty's viewport and scrollback using the keyboard.
You can open URLs with your mouse by clicking on them.\
Search allows you to find anything in Alacritty's scrollback buffer.
Alacritty supports running multiple terminal emulators from the same instance.
Install Alacritty
Precompiled binaries are available on their GitHub releases page. You can also install it using cargo. First, you need to install the required dependencies:
💬What is your favorite on the list? Did we miss listing your favorite rust tools for the Linux terminal? Share your thoughts in the comments section below.